Why do you need a lambda probe?
Many people believe that the lambda probe (also known as an oxygen sensor) is almost the most important sensor in the engine management system. But in fact, this is another tribute to the environment. And not in the sense that it directly does something useful for the environment.
A lambda probe is installed for the full operation of the catalytic converter! The fact is that the catalyst operates with maximum efficiency only when the mixture is close to stoichiometry, that is, the air-fuel mixture consists of air and fuel in a ratio of 14.7 kg of air per 1 kg of fuel.
As soon as this ratio changes in one direction or another, then the catalyst reduces its performance and does not fully fulfill its task, which has a detrimental effect on the environment.
Therefore, the lambda probe is primarily designed to monitor the stoichiometric composition of the mixture for the sake of proper operation of the catalyst.
By the way, the lambda probe readings are not always taken into account by the engine control unit (ECU). Let’s say that during acceleration the engine needs a richer mixture, so at this moment the ECU does not take into account the signal from the lambda probe. A similar picture occurs when engine braking.
It is also worth noting that although the ECU does not take the signal into account at this moment, the lambda probe still produces a signal that we can see in the diagnostic program. And from this signal you can tell a lot about the state of the fuel supply system and other components of the engine. We will clearly see this below in the screenshots.
How does a lambda probe work?
There are also many misconceptions here. Even Wikipedia gives not entirely correct information. Here is a quote: “ Lambda probe
(
λ-probe
) - residual oxygen sensor. Allows you to estimate the amount of remaining unburned fuel or oxygen in the exhaust gases.”
The result is two proposals that contradict each other and confuse novice motorists even more.
So what does he value? Residual oxygen? Or residual unburnt fuel?
In fact, the lambda probe has no idea how much unburnt fuel there is! Because that's not what it's designed for. And not even to determine the amount of residual oxygen in the exhaust gases.
It simply compares the amount of oxygen in the exhaust gases with the amount of oxygen in the environment where the car is located. After all, we know that the amount of oxygen in the environment is not the same everywhere.
In general, in simple language - the Lambda probe compares the amount of oxygen in the environment with the amount of oxygen in the exhaust gases! From this difference one can judge how much oxygen was burned in the combustion chamber of the engine. If there is a lot of oxygen in the exhaust gases, it means the mixture was lean and in the next cycle the ECU will add fuel to burn more oxygen.
This cycle is repeated constantly and due to this, the air-fuel mixture is in the region of stoichiometry. It is in the AREA of stoichiometry - a little higher, a little lower, a little higher, a little lower. On the graphs it looks like a saw
In the middle of this saw, there is precisely stoichiometry. It is based on this signal that fuel correction occurs and, naturally, it also looks like a saw.
As you can see, the engine control unit performs fuel corrections strictly according to the signal from the lambda probe. Everything is as if in a mirror image - the lambda probe signal is down (lean mixture), and the corrections are immediately up (add fuel). And this happens endlessly until a mixture close to stoichiometry is needed.
I think it should be clear.
But I’ll emphasize once again that the lambda probe does not see fuel, it only sees oxygen! That's why it's called an oxygen sensor! Naturally, he cannot detect unburned fuel in any way. No way! It's not designed for that.
Why is it so important to understand this?
Imagine the situation if the exhaust manifold gasket on a car burns out. Since exhaust gases are pulsating in nature, not only will exhaust gases escape through this gasket, but air will also be sucked in from the environment. The lambda probe will naturally see this oxygen and report it. The ECU will inevitably determine that the mixture is too lean and will push the corrections far into the positive range by adding fuel. But the lambda probe cannot detect fuel, it only sees oxygen! And it only reports a lot of oxygen! In this situation, the ECU will add fuel until the corrections reach their extreme value. At this moment, an error will appear about a lean mixture and the control unit’s inability to correct the situation on its own, and it asks for human help to sort out this problem.
First intermediate conclusions: A lambda probe is installed in the engine control system to maintain the air-fuel mixture in the stoichiometric region for full operation of the catalyst and compares the oxygen content in the exhaust gases with the oxygen content in the environment. Exclusively oxygen!
ANATOMY OF EVIL
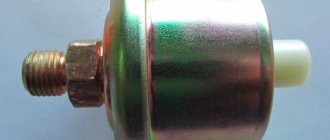
Oxygen sensors come in two types: trigger (jump signal) and broadband. The trigger sensitive element consists of a ceramic body (zirconium dioxide) coated on the outside and inside with electrodes. They are made by sputtering a layer of gas-permeable platinum and can conduct oxygen ions at temperatures from 300 ºC. To achieve it faster, a heater is built into the sensor. The outer part of the element is in the exhaust gas flow, and the inner part is in the ambient air.
A potential difference arises between the electrodes: depending on the proportion of oxygen in the exhaust gas, from 0.1 V (lean mixture) to 0.9 V (rich mixture). When moving from a rich mixture to a lean one and vice versa, the sensor transmits a signal jump. Based on this, the ECU adjusts the fuel injection. Due to this, it constantly adjusts the mixture for efficient operation of the neutralizer.
The wideband sensor converts the oxygen content in the exhaust gas into a current value. It can measure excess air ratio λ in the range of 0.7–4.0. At the same time, its signal is continuous and clearer. This allows it to be used in a diesel engine that runs on very lean mixtures. The sensor consists of a Nernst galvanic cell and an oxygen pump element. Both are made of zirconium dioxide coated with porous platinum. Between the elements there is a diffusion gap (measurement area), into which the exhaust gas enters. The Nernst element is designed and works as a trigger oxygen sensor, producing a voltage signal. Using it, the pump cell controls the supply of oxygen to the measurement area so that the excess air coefficient in it is always equal to unity. When the engine runs on lean mixtures (high oxygen content), the pump element pumps oxygen ions out of the measurement area. When the engine runs on rich mixtures (low oxygen content), the opposite is true. In this case, the element consumes current: positive when pumping and negative when pumping. Based on this value, the engine control unit determines the coefficient of excess air in the exhaust gas.
As a rule, a trigger sensor is placed in front of the neutralizer. But when very precise mixture control is needed, broadband is increasingly used. But after the neutralizer there is always a simpler trigger one, since it only monitors its operation and does not affect the engine.
Where is the lambda probe installed?
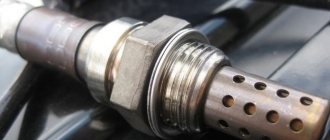
The lambda probe is installed in the exhaust system in front of the catalytic converter
Some manufacturers can install several catalysts, and, naturally, several lambda probes.
Lambda probes installed in front of the catalyst are called control probes, since their signal is used to control fuel corrections.
But the fight for the environment does not stand still, so automakers were obliged to teach engine control units to monitor and diagnose the operation of the lambda probe and catalyst. Therefore, on later cars additional lambda probes appeared, which are installed after the catalyst. They got the name, no matter how trivial it may sound, diagnostic.
But the lambda probe has one drawback - it only works when heated. Therefore, immediately after starting the engine, this sensor does not participate in the operation of the engine control system, and fuel is supplied according to the table stored in the ECU memory and according to the accumulated corrections recorded in the adaptive memory of the ECU
After the sensor warms up, it begins to generate a signal and the ECU turns it on, turning the fuel supply system into a closed loop. It is also called fuel supply with oxygen sensor feedback.
That is, while the sensor is cold, the stoichiometry is not adjusted.
This fact turned out to be unacceptable in the constant struggle for the environment. Therefore, manufacturers were forced to install autonomous electric heating in the lambda probe. It allows you to significantly reduce the time it takes for the sensor to warm up to operating temperature.
We can also see the warm-up operation in the diagnostic program
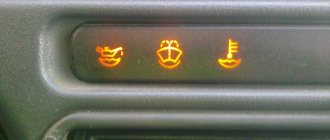
Lambda probe malfunctions: signs and causes
Failure of the lambda probe can lead to a malfunction of the fuel system, an increase in fuel consumption, a decrease in traction, etc. A failure in the fuel system will lead to a decrease in the performance of the car engine: loss of power, deterioration in dynamics, etc.
The main symptoms of a malfunctioning lambda probe:
Lambda probe malfunction, causes:
It is also worth noting that a breakdown of the oxygen sensor can lead to the operation of the EGR system (impaired functionality of the system’s vacuum valve).
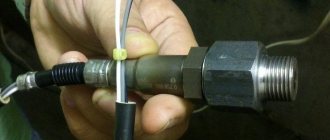
How to check a lambda probe
Checking a lambda probe is not as difficult as it seems, but it is important to understand the constant dilemma of a car diagnostician - is the incorrect operation of the sensor caused by its malfunction or does it react this way to some incorrect processes in the engine or in the engine control system?
In other words, if the lambda probe signal indicates a lean mixture, then it is necessary to figure out whether the mixture is really lean or whether the exhaust tract in front of the lambda probe has depressurized, which I wrote about above. That is, the sensor itself is to blame for such readings or it shows the real picture of what is happening. This is the most difficult and most crucial stage, because it is it that determines the path of further action.
And there are situations that are more complex, when there is more than one problem. Let's say the exhaust manifold is leaking and the fuel pump does not provide enough pressure. Both will affect the lambda probe readings.
Therefore, attention and some imagination will help you quickly solve the problem and find the culprit.
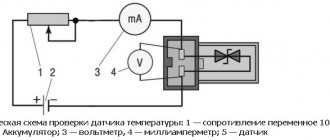
Many people try to check the lambda probe with a multimeter. Is it possible to check it like this? Of course you can, it is not prohibited by law
But the information obtained in this way will not give us much. Yes, we will see a changing voltage, by which we can judge that the sensor is working. But it’s difficult to guess how it works.
Therefore, the best and most budget-friendly testing option is to buy a diagnostic adapter for your car, which is not that expensive. And install some diagnostic program on your laptop.
My personal choice:
- diagnostic adapter for a few dollars
- free diagnostic program for Chevrolet cars. If you have another car, you can find a program for your car online
- if you have never encountered this, then you can look at the step-by-step instructions for starting diagnostics yourself
In this way we can say a lot not only about the state of the lambda probe, but also about many other things.
The ideal lambda probe signal has a sawtooth shape with a lower value of 0.1 V and an upper value of 0.9 V, as well as a switching frequency of no more than 2 seconds
What malfunctions can occur with a lambda probe:
- weak switching amplitude
- low switching frequency
- break or complete failure of the sensor
- no switching
- unimaginable amplitude values
If it’s not clear, then everything will become clear now.
How to determine the switching frequency? So I showed off my creativity and drew. The grid on the graph has a size of 2 seconds (green). The two adjacent upper values of the lambda probe readings fall within this interval (2 seconds). So the sensor is normal
I have selected several problematic graphs for you to illustrate.
Here is an example of a tired sensor whose switching time is almost 10 seconds
Solution to the problem: Replacing the lambda probe
The following graph shows a faulty lambda probe that does not switch at all. Just a straight line that goes up and down. I observed this a couple of times after treating the lambda probe connector with WD-40. Therefore, I always advise you to think carefully before carrying out similar procedures. By the way, in most cases, after a couple of weeks the sensor returns to normal and begins to work almost correctly.
Solution to the problem: Inspect the sensor connector for the presence of condensation and other undesirable things. If everything is normal, then change the lambda probe.
The following case shows how a tired lambda probe does not produce the required amplitude of 0.1-0.9 V. Instead, the upper signal of the sensor is approximately 660 mV
And the lower one does not fall below 330 mV
Solution to the problem: Disconnect the connector from the sensor. If we see a straight line of 415 mV, then we change the sensor. If we don’t see a straight line of 415 mV, then we turn our attention to the ECU
Here is another very interesting point that I have seen more than once. The lambda probe goes crazy and produces almost 5 V instead of the required 0.9 V!
The sensor itself cannot generate such a signal. What's going on? The answer is simple - the sensor signal circuit periodically closes to the heating circuit and draws voltage from there
As we see, this happens. Moreover, sometimes it is quite difficult to identify this, since the closure is short-term and intermittent. You have to travel with your laptop for several days to capture this moment.
Solution to the problem: Check for a short circuit in the wiring. If everything is fine, then change the lambda probe
These are the most common malfunctions of lambda probes. Therefore, if you observe something similar on your charts, then it is worth taking action.
But the diagnosis of the lambda probe does not end there. Or rather, not diagnostics of the lambda probe itself, but diagnostics using the lambda probe.