Training on a shooting range or at improvised shooting ranges turns a mediocre shooter into an accurate hunter!
Many people say that targets don’t fly like ducks and don’t quack. I will answer: it doesn’t matter that the targets don’t fly like living ducks, much less quack. It is important to learn how to wield a weapon, correctly determine the distance to the target and choose the right lead.
I note that the result of hunting game is influenced not only by the skill of the shooter, but also by the hunter’s knowledge of the habits of the game, the correctly chosen place at dawn, the ability to camouflage and conceal the game.
I will give a number of tips and introductory exercises for gaining the skill of shooting while hunting, through training on a bench or shooting from portable throwing machines (MM).
The recommendations are intended primarily for hunters and are slightly different from the requirements for training athletes. If there is a stand nearby, the training will take place without problems, and where there are no permanent stand sites, buy for yourself or in a pool a throwing machine and several boxes with skeet targets. As a result, it will not be so expensive, and in this case you can practice shooting with at least two people. A portable throwing machine, even of the simplest design, will be quite enough to obtain good flying shooting skills, and with a thoughtful approach to training and using the following recommendations - even without the help of an instructor.
Before you start shooting
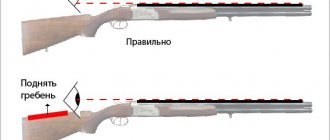
The first thing to do before you start shooting is to adjust the gun (there is a lot of literature and articles on this subject). Pay special attention to the length of the stock, the height of the comb and the pitch (using the pitch you can adjust the point of impact of the center of the shot scree; it is desirable that the center of the shot scree falls below the target). For hunting, the stock may be a little short, better than long, and the height of the comb (the butt is bent) should not leave the aiming bar open; when the cheek is “pressed” into the ridge of the stock, the front sight may even “sag” slightly.
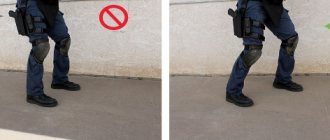
For “hunting shooting” the gun must be held 20-25 cm above the hip; the rules for the position of the gun when shooting on a round stand should only be kept relatively and slightly pushed forward to the level of the shoulder cavity, which will make it easier and faster to raise the gun, especially for beginners.
The hands serve only to lift and hold the gun; all turns, both in horizontal and vertical directions, are carried out only by the body. When throwing up, try to ensure that the ends of the barrels do not “nod” down and remain after raising the gun at the level of the initial position or the intended flight path of the target (game), the barrels follow the flight path and only the butt rises to the shoulder.
The general position of the gun is at an angle of about 45 degrees to the shoulder line
.
The finger on the trigger lies tightly, and the shot is fired without stopping the gun during the firing process.
How to study correctly
The course of study should be divided into several stages. Once you have mastered one technique, move on to the next.
If you encounter difficulties in performing any exercise, do not try to immediately obtain a positive result by repetition. It’s better to stop, take a break, try to analyze your actions and possible mistakes.
Typical shooter mistakes
Now let's talk about the most common mistakes beginners make when shooting. Unfortunately, there are a lot of them, so we have combined all the information into a list:
- The front sight deviates from the aiming point at the moment of the shot several centimeters down (under the black circle) - the hit ends up 5-6 centimeters from the aiming point. This type of error is called parallel weapon misalignment and can be corrected through training. Moreover, we can talk not only about shots. All you have to do is take the rifle, then aim it and pull the trigger. Only when a beginner learns to press the trigger smoothly can he begin training shooting.
- Initially, incorrect aiming can lead to all the bullets landing at one point. Most often, this reason occurs due to incorrect zeroing of the weapon. If you are using an open sight (with the exception of a diopter), it is strongly recommended that you zero in under the target, and not in its center. In addition, if you have the opportunity to use a laser cartridge and a locking machine, then be sure to take advantage of this, as this will allow for more accurate zeroing.
- The bullets land in different places and have poor accuracy. Most likely, the cause is improper breathing. The shooter usually tries to catch the moment when the target is in the middle and pulls the trigger as quickly as possible. You can cope with the problem if you learn to breathe correctly, take the correct posture, and also smoothly press the trigger. Remember that there is no place for haste in shooting. A sniper can wait for hours for the right moment to make an accurate shot.
We hope that now you have a better idea of what GTO air rifle shooting is. If you have a desire to take part in such competitions, then do not hesitate to go to the official website “Ready for Labor and Defense” and find out in which places the events are held. However, remember that no one succeeds the first time. All professional shooters went through long and hard training before making their name famous. So don't be discouraged if something doesn't work out for you. Shooting loves not only theory, but also practice.
The first stage is shooting at a stolen target
Practicing shooting at a stolen target on the 7th number of a round stand or from a throwing machine (MM) located next to the shooter (to avoid injury, install a protective shield between the MM and the hunter) to gain general shooting skills at flying targets.
Initially, shoot from the shoulder at a hijacked (flying away) target, with the barrels aligned along the target's flight path. The aiming point is along the bottom edge of the plate. Don't fuss, but fire immediately after aligning the front sight with the aiming point, and the hits will follow one after another.
Make the exercise more difficult by deflecting the gun from the target's trajectory over long distances in different directions during preparation and bringing the barrels (with the body) to the desired point; you need to bring the barrels from below to the target. Five, at most ten shots, and now the plate is confidently hit. The target throwing range is 50-60 m, and the flight height 20 m from the machine is 4-5 meters. Having mastered these movements, proceed to shooting with the gun positioned before the target takes off near the waist.
If you practice jumping (home training) before shooting, the results will be no worse, and the perception of the target’s flight will be much simpler. Look initially at the plate with both eyes and only after throwing up, slightly squint your left eye (right-handed), if in the open state it interferes with aiming (if you can clearly see the target with two open eyes, then there is no need to squint your left eye).
Hierarchy of achievements
For receiving a prize in GTO competitions, a gold, silver or bronze badge is awarded. However, in order to achieve such a result, you will have to score a certain number of points in competitions held in a certain hierarchical group:
- 1st stage – schoolchildren from 6 to 8 years old;
- 2nd stage – schoolchildren from 9 to 10 years old;
- 3rd stage – schoolchildren from 11 to 12 years old;
- 4th stage – schoolchildren from 13 to 15 years old;
- 5th stage – schoolchildren from 16 to 17 years old;
- 6th stage – adults from 18 to 29 years old;
- 7th stage – adults from 30 to 39 years old;
- 8th stage – adults from 40 to 49 years old;
- 9th stage – adults from 50 to 59 years old;
- 10th stage – adults from 60 to 69 years old;
- 11th stage – adults over 70 years of age.
Of course, men and women (girls and boys) compete in different categories. As for the standards required to obtain each badge for a member of a particular group, this information will be found in the next section.
The second stage - a target flying past
Main for hunting waterfowl. Let's start by shooting at the second shooting station of the round stand at an oncoming target or at a MM target flying to the left of the shooter approximately 15 meters away.
The MM is installed 30-35 meters from the hunter. When installing the MM and marking the shooting positions, if possible, be guided by the dimensions of the round stand area; To simulate shooting from a tower, if the terrain allows, install the MM on a hillock.
Manufactured, the gun is 20-25 cm above the hip, the barrels are slightly to the left of the target's departure. After the target takes off, perform a rearing (without jerking) and leash (smoothly and working only with the body) behind the target, go forward 30-40 cm (a little more is possible) and, without stopping the gun, fire a shot when the target has approached the optimal distance. This simple exercise is easy to master.
Then move to number 6, and when using the MM, position yourself so that the target passes to the right of the shooter. The movements on an oncoming target are similar, only turning the body to the right is somewhat more difficult (for a right-handed person) than moving to the left, so “twist” the body a little, positioning yourself in the shooting zone (the left leg points with the toe in the direction of the shot), and then turning the body towards the departure targets without stepping on your feet.
To avoid “sagging” of the plate and shooting from above, the leash passes slightly below the target’s trajectory and exits at the point of the shot. Then master counter targets on numbers 3 and 5 on the stand or increase the distance from the flight path of the target from the MM to 20-30 meters; leads will accordingly increase to 100-120 cm. Shoot at an oncoming saucer in the 1st and 7th places, or one fired from a MM at 30-40 m and flying from the shooter at 5-10 m.
The difficulty here is caused by the fact that the distance with the plate is rapidly decreasing, and the movement (rotation) of the body will be accelerated; The only difficulty is this, but the lead is minimal - 10-20 cm. In most cases, it is more rational to shoot at an oncoming target (game) at the shortest distance, when the direction of the shot is perpendicular to the target trajectory, so the visible leads coincide with the true ones, which makes it easy to control, even by yourself the shooter, both his mistakes in the amount of advance, making the necessary corrections, and the correct actions.
Let me note that on the most massive hunt, such as duck hunting, if you don’t yawn, then 90 percent of the shots will be at flying ducks. If oncoming targets are practiced, then success at duck dawns is guaranteed.
Load your own cartridges
Most shooting ranges prohibit the shooting of self-loading ammunition. Today there is a very wide range (by brand, shot weight, technical characteristics) of cartridges sold in stores and at stands. You can choose according to all parameters what will satisfy you. The criterion of saving when equipping yourself also works conditionally. The cost of charging today is no less than ten rubles per cartridge, and if you get creative, you can buy them for 11-12 rubles. With a training volume of 100 shots (and shooters with experience no longer shoot loading cartridges), saving 200 rubles is hardly an adequate payment for the inconvenience caused to oneself and others.
Paying tribute to your experience in loading ammunition, realizing that in general they are safe, like branded ones, we note: the unusual sound of a shot, non-standard wads and containers flying out of the barrels, fire, unexpected smoke - all this distracts both you and your neighbors from regular, quiet and therefore safe shooting. In short, you better accept it, don’t!
The third stage - hijacked targets on a trench stand
It is better to start practicing hijacked targets on a trench stand with a reduced distance of 5 meters and a short target throwing range - about 50 meters.
Shooting is carried out from the shoulder, the barrels are aimed at the target's departure or slightly higher, the gaze is focused approximately 5 m beyond the departure and slightly above the place where the plate appears.
After the target appears, determine the target’s flight path, calmly make a movement with your body, as if drawing under the target and taking a lead depending on the angle of departure of the target. Fire the shot without stopping the gun; if you miss the first time, try to quickly make the necessary correction and fire the second shot. Naturally, on straight (hijacked) targets or with small deviations, the leads are small and mostly only vertically.
Under no circumstances should you “aim” the stolen targets, as well as the left and right targets; the shot should sound as soon as all the movements to practice the target have been completed. Don’t fuss, don’t rush right after the target, when you are too ahead of the target (game) and have to slow down, and this is usually a shot from behind when the gun involuntarily stops.
The movements of the gun on the left or right stolen targets on the trench stand (from under the cop's stance) are, as a rule, accelerated. When practicing shooting hijacked targets from MM, shoot from a distance of 5 to 15 meters from the departure, changing shooting positions so that the angle of the skeet’s flight path with the continuation of the “shooter - MM” line to the left and right is from 0 to 45 degrees; also change the target's flight altitude.
At a shooting distance of 15 m from the MM, depending on the angle and casting distance, the visible leads range up to 100-120 cm, this is not so far from the target. Having achieved 50-60 percent of hits on a trench stand, practice shooting at stolen targets on a round stand, at the beginning on 6 and 5 then on 2,3 and 4 places, and with MM - first on stolen targets going to the left and then to the right.
When aiming at a target, use the skills learned from handling skeet when shooting in the trench.
The position of the gun on the circle when shooting at hijacked targets is slightly further from the departure than when shooting oncoming targets, but the gaze is directed at the place where the target appears. Since you are preparing for a hunt, distribute the weight of the hunter-shooter on both legs, and at the moment of throwing up, leading and shooting, try not to strain and work only with the body.
I want to try it from afar
Often (especially among experienced shooters) there is a need to shoot from non-standard numbers. In general this is prohibited. But such stories arise often. When you get into a freelance position, don’t rush. Study the direction of fire as carefully as possible. On regular numbers they thought about your safety for you. There is no. Check not only the distant background, but also the near one: you can catch the frames of shooting numbers, the operator’s booth, wires, etc. Neighboring sites (shot flies 250 meters) - remember this too. Check everything before shooting, otherwise it will be too late later! Any doubts are not in favor of shooting. No one should shoot on the site during your experiments. Call the instructor to be sure. Do not hurry.
Workout at home
The ability to control your body is not always as simple as it seems. In front of the mirror, try raising the gun to your shoulder with your hands, so that your shoulder remains in place. It may not work out right away. Quickly move the barrels by turning the body to various designated points; at first it will definitely be difficult to do this.
Conclusion, before you start shooting, do some home training.
Home training is very important when shooting offhand.
This shooting technique is often used when hunting snipe, grouse in the forest, and autumn woodcock.
To gain more complete skeet shooting skill, vary your training, including approach shooting, shooting from awkward positions, different MM settings, and double shooting. If the stand is equipped with sports grounds nearby, then this is not difficult at all.
Tired of theory
Don't like moralizing? It seems that everything written is a boring theory? This can't happen to you? Wasn't this at your stand? Have fun reading the following stories on this site:
“Semi-automatic transmission”; "Crow"; "Minus five"; "Silver Switch"; "Rats in sour cream."
There is not a drop of fiction in them. All this happened. And so live in peace. Shoot calmly. And let others shoot.
← Equipment of a clay pigeon shooterAbout behavior at sports competitions… →
Articles on the topic “Skeet shooting”
Shotgun for clay pigeon shooting, sporting weapon
Shooting club Nizhny Novgorod
Skeet target for skeet shooting
Compact sporting
Skeet Shooting Basics - Shooting Training
Shotgun shooting in Russia
Safety precautions during training
When practicing on your own, do not forget about safety precautions: after firing and when reloading the MM, unload the gun and always keep it open, and a semi-automatic with an open bolt, and do not point the barrels of even an open gun towards people.
Install the MM so that the unaffected plates fall onto the tall grass and are reused without breaking.
When practicing shooting, it is advisable to use sports cartridges (less fatigue from recoil), headphones or earplugs to eliminate the negative impact of a strong shot on the training process.
When the time comes for hunting, at dawn, having calmed down after a possible couple of misses, using the acquired skills of skeet shooting, without difficulty and with great pleasure from correct shooting, you will shoot the amount of game allowed for hunting.