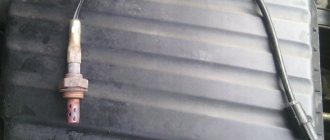
As you know, a lambda probe (oxygen sensor) determines the amount of oxygen in the exhaust gases. Based on the data obtained, the engine ECU flexibly adjusts the composition of the fuel-air mixture, as a result of which it is possible to achieve the necessary environmental friendliness and efficiency of the engine.
In this case, the lambda probe can fail for various reasons, and the catalyst often also turns out to be problematic. One way or another, in this case the engine will work unstably, there will be a loss of power, increased fuel consumption, etc.
To make the engine work normally, the solution is to trick the lambda. Next, we will look at what a catalytic converter is, how it works, and what are the pros and cons of installing an oxygen sensor blende.
Reasons for installing a lambda probe blende
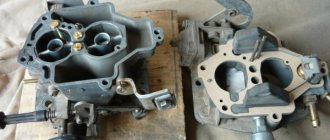
All passenger cars built according to standards starting with Euro-2 have catalysts installed. Without touching on the designs of catalysts (magnetic-strictive, ceramic, chemical), it should be noted that the device intended for cleaning exhaust gases is an expensive vehicle component.
The lambda probe monitors the content of exhaust gases after passing through the catalyst
Natural wear and tear (“catalyst burnout”) is most affected by low-quality gasoline. Lead tetraethyl, which gets into gasoline at domestic gas stations, very quickly burns the catalytic layer of the gas converter. The electronic control unit (ECU) of the engine reacts to a malfunction of the catalyst by switching the engine to emergency mode. The “check” sign, familiar to drivers, lights up on the dashboard and a re-enriched fuel mixture is supplied to the cylinders. Engine power decreases, spark plug soot increases, engine oil becomes contaminated, and friction of parts increases.
Installing a new catalyst, recommended by automakers as the only troubleshooting measure, can cost the car owner from 10,000 rubles to 30,000 - 60,000 (depending on the model). You can install a new catalyst on various VAZ models for 5,000 - 10,000 rubles (including the cost of work).
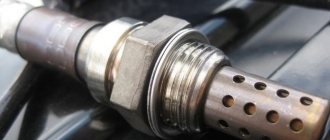
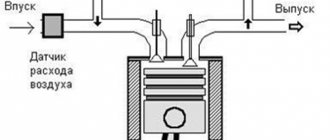
The photo shows part of the car exhaust system diagram
The essence of the device is simple. Without reacting to a catalyst malfunction, the device changes the readings of the monitoring oxygen sensors (lambda probes) installed at the inlet and outlet of the catalyst. In this case, the catalyst can be cut out and replaced with a flame arrester. For the first lambda probe, decoys are not used. Its indicators serve as a standard by which the ECU determines the efficiency of the catalyst. The coincidence of indicators (when the catalyst is removed) is perceived by the electronics as a malfunction of the gas converter.
Alternative options
If you do not take into account the possibility of repairing the catalyst or oxygen sensor, then problems in the operation of the lambda probe can be eliminated by reprogramming the electronic control unit (ECU).
This method is used, as a rule, only on cars of the Euro-2 environmental class. The main disadvantage of flashing is the fact that it is practically impossible to perform such an operation yourself, and the work of a specialist will be quite expensive. The qualifications of the service station employee who carries out the work of changing the ECU settings are very important, because if serious errors are made, the system firmware may crash during operation of the machine.
Such manipulation of settings is economically justified only in the case when, in addition to disabling the lambda probe, the system is reflashed in order to increase engine power.
Mechanical options for decoys
Mazda tribute
The problem can be solved using two types of deceptions.
When choosing a mechanical type of emulator, a spacer made of bronze or other metal that is not afraid of elevated temperatures is installed in place of the catalyst. The size of the emulator must match all sizes of the standard catalyst. In the place where the blende is fixed, you need to drill holes through which exhaust gases will be supplied into the cavity of the emulator.
The emulator must contain ceramic chips coated with a catalytic layer, which will cause the oxidation of CO and CH by the oxygen flow. At the output, the level of components harmful to the environment will be significantly reduced.
In addition, the signals from both sensors will be different, so there will be no malfunctions in the operation of the power unit. The presented emulator of a standard catalyst can be positioned as the most budget-friendly. It is noteworthy that mechanical blende is ideal for use with any car.
Is blende needed after removing the catalyst?
Some people mistakenly think that after removing the catalyst, there is no need for a lambda probe snag. But this is only possible if the ECU is completely reflashed. If you do not take any of the measures, problems will occur in the first minutes of operation.
About mechanical snag
It is a bronze spacer containing a ceramic filler with a catalytic layer inside. Gases passing through this blende are oxidized by oxygen. The electronics analyzes the signal and concludes that the catalyst is operating normally (although in fact it is cut out). The mechanical blende is installed in front of the catalyst, in the area of the exhaust manifold. The cost of the part is no more than a kilogram of sausage, excluding installation.
Lambda probe emulator
UAZ on tracks
To control the normal quality of the gas mixture, copy and emulate the lambda probe signal, you can install a lambda probe emulator on your car (installed only on cars with a distributed injection system). This additional function (lambda probe emulator) is only suitable for owners of cars with second-generation gas equipment installed on them.
The lambda probe emulator is installed in the engine compartment of the car; it is advisable to avoid places where it can get wet. It can also fail when exposed to high temperatures. It is necessary to ensure free access to the warning lights of the lambda probe emulator. For quick setup and repair, the emulator should be mounted in a visible, easily accessible place.
Lambda probe emulator connection diagram:
- The blue wire is connected to the petrol/gas switch button,
- The black wire is connected to the ground of the car,
- The white wire must be connected to the controller (injector control unit),
- The white-blue wire is connected to the standard lambda probe.
An incorrect connection can cause the lambda probe emulator to quickly fail.
When switching the system from gasoline to a gas mixture, the standard lambda probe is disconnected from the vehicle's electronic control unit. The ECU receives a signal from the lambda probe emulator, which ensures that errors in the electronic control unit are avoided during engine operation. In other words, prevent the check engine light from coming on.
Indication of light bulbs on the lambda probe emulator:
- Green color indicates that the mixture entering the engine is “poor”
- Yellow color indicates an intermediate value between a “lean” and a “rich” mixture,
- Red color means the mixture is “rich.”
When your car is running on gasoline, the lambda probe emulator does not affect the overall operation of the standard lambda probe.
To configure the optimal operation of the lambda probe emulator, you must first check the signal of the standard lambda probe when the car is running on gasoline. Then these values are adjusted using an oscilloscope or car tester on a lambda probe emulator. For correct operation of the car on a gas mixture.
In the practice of installing gas equipment, the percentage of cars with installed lambda probe emulators is 40% of the total number of cars with distributed injection running on second-generation gas equipment.
How does a lambda probe work?
An oxygen sensor or oxygen sensor, as well as a lambda probe, is a sensor that monitors exhaust toxicity. How does this happen? When a fuel-air mixture (FA) consisting of oxygen and gasoline (solar or gas) is burned, harmful elements are formed in the exhaust, which pollute the atmosphere. So, in order to prevent pollution, smart people came up with the idea of monitoring the toxicity of the exhaust using sensors like these. Lambda monitors what percentage of oxygen is contained in the exhaust and sends data about this to the ECU (in other words, the brain), which in turn concludes whether the mixture is “rich” or “lean” and then decides whether to increase or decrease the fuel supply. The ideal air to fuel ratio is considered to be: 14.7:1. This proportion is called stoichiometric, and it is used as a starting point when setting up fuel equipment and all engine systems as a whole. In addition, it has been proven that this ratio causes minimal harm to the environment. So, when the engine is in good working order and running on its familiar native fuel assembly, everything is fine and there is no “Check”. But as soon as you install HBO, the composition of the mixture will change significantly, and the lambda, which “stands guard and sees everything,” will notice this one way or another and report it to the “brains,” which will notify you about this with a corresponding inscription on the panel. Learn more about why the “Check” light comes on on a car with HBO. So, we seem to have sorted this out, let's move on.
Tips and tricks
Pajero mini
As you can see, a catalytic converter error can be a real problem for the owner, and a large amount of money is required to replace the catalytic converter on the car.
Of course, you can install a lambda trick, but you should remember that this solution is not always possible to integrate well, especially on “fresh” cars. For this reason, it is advisable to follow certain rules to increase the service life of the catalyst.
First of all, it is important to understand that bad fuel can damage the catalyst. You should only refuel at proven gas stations, and also fill in gasoline of the brand recommended by the car manufacturer itself (for example, you cannot pour cheaper AI-92 gasoline into a car where the use of AI-95 or AI-98 fuel is allowed.). Secondly, you should not actively pour various fuel additives into the tank, especially from little-known manufacturers
The effect may be questionable, and the damage to the catalyst may be great.
Secondly, you should not actively pour various fuel additives into the tank, especially from little-known manufacturers. The effect may be questionable, and the damage to the catalyst may be great.
Third, any mechanical impact on the catalyst should be avoided (during car repairs and when operating the car). The fact is that the ceramic honeycomb of the catalyst is very fragile and can crumble even during aggressive off-road driving.
You also need to drive through puddles and snow piles carefully, since in this case the highly heated catalyst quickly cools. Such temperature changes can quickly destroy the fragile honeycomb of the catalyst.
There are two ways to fix the problem
1. Installation of a “fake” device on the sensor that will correct the readings from the probe.
2. Making changes, adjusting the software to eliminate the option of adjusting the fuel condition coefficient based on tabular data for the car model.
Lambda probe decoy as a way to troubleshoot an oxygen sensor (OK)
A decoy installed on the oxygen sensor will solve the problem of failure or incorrect operation of the system. The mounted device will adjust the magnitude of the pulses from the probes, and the Check Engine indicator signal on the dashboard will no longer bother the driver when the vehicle is moving.
There are two types of decoys that can be installed to correct the status signal of the car's exhaust system. These are mechanical and electronic converters.
Do-it-yourself mechanical snag
The mechanical blende of the lambda probe is structurally a spacer made of bronze or heat-resistant steel. The internal volume, as well as the cavities of the part, are filled with ceramic chips with catalytic spraying, which significantly speeds up the process of afterburning exhaust gases and thereby ensures a difference in the pulses of the first and second sensors.
It is quite easy to make a mechanical blende for a lambda probe. Anyone with the slightest idea about turning can do this. For production, you will need a blank of the appropriate size from a suitable metal. Using a machine, it is given the desired shape.
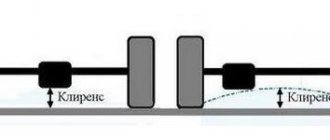
The principle of operation is quite simple - the bushing has a hole with an internal diameter of 2 mm, thereby moving the oxygen sensor further away from the exhaust gas flow. You can install the snag yourself in the garage by placing the car in an inspection hole. The installation sequence is the same for all cars: VAZ, GAZ or foreign car. Before removing the sensor, you must remove the negative terminal from the battery. Next, select a convenient, suitable key and unscrew the part.
The metal spacer is screwed onto the probe and installed back into the socket. Next, you need to connect the battery and start the car engine. The situation with the appearance of an error may repeat again - you should remove the terminal again and put it back on, rebooting the system.
A solution to the problem using a mechanical lambda probe is a budget method available to every car owner. It is worth noting that mechanical decoys are compatible with exhaust systems of almost all cars. These are vehicles of domestic and foreign production on which oxygen sensors are screwed into sockets.
Electronic lambda probe decoy
– the second way to regulate the state of exhaust gases on a car
Another option for eliminating problems with oxygen sensors on a car is to install electronic lambda probe spoofs. This option not only eliminates the problem (“hardens” the system) when the manifold is not fixed (or missing), the device takes part in adjusting the quality of the fuel, ensuring the correct operation of the power unit.
Structurally, the blende is a single-chip microprocessor capable of analyzing the processes occurring in the catalyst: it receives the signal from the first sensor, converts it and issues an auto signal to the processor, similar to that supplied by the second DC, provided that the catalyst is operating normally.
How to make an electronic lambda probe with your own hands
This method of adjusting the operation of oxygen sensors is suitable for those car enthusiasts who love and know how to work with a soldering iron and small parts. How to make, drawings, reviews on the operation of cars with similar systems, as well as how to correctly install the equipment on various types of vehicles can be emphasized on car enthusiast forums.
Mechanical way to deceive lambda sensors
The lambda probe (oxygen sensor) records the concentration of oxygen levels in the exhaust gases. The principle of monitoring the efficiency of the catalyst system is based on measuring the parameters of the output signals of lambda probes. When the catalyst is removed, exhaust gases with the same composition of impurities will enter the first and second oxygen sensors. The engine control unit will receive a signal indicating that the catalyst is not working efficiently, or rather, not working at all. In order to comply with EURO standards, the engine management system will “choke” the engine, display an error message, and go into emergency mode.
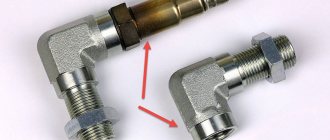
The mechanical trick of the lambda probe consists of installing a second lambda sensor in the exhaust gas exhaust system through an adapter fitting. Drawings of fittings for various car brands can be found on the Internet. The principle of operation of mechanical decoys is that exhaust gases will not be supplied to the second oxygen sensor in full. The design of the fitting adapter, in some cases, provides an additional small ceramic filter, which further reduces the concentration of harmful impurities. The adapter can be made using conventional turning equipment or purchased at a store specializing in tuning or exhaust systems. It is better to take beryllium bronze as a material. It is resistant to high temperatures and is not subject to severe corrosion.
The process of installing a mechanical lambda sensor is simple:
- with the ignition off, the negative terminal of the battery is removed;
- the second oxygen sensor is removed, the sensor is cleaned, and, if necessary, replaced with a new one;
- a decoy adapter is installed;
- an oxygen sensor is installed;
- The negative terminal of the battery is connected.
After mechanical work, diagnostic equipment is connected, errors are read and deleted. Then a check run is performed and errors are diagnosed again. If the adapter corresponds to the optimal mode, the control unit will not generate engine errors. Otherwise, you can adjust the seating depth of the adapter fitting and an additional small filter.
It is worth noting that the efficiency of mechanical decoys on modern engines is at a very low level. Those. If you are the owner of a relatively new foreign car, most likely mechanical snag will not help you.
Do-it-yourself lambda probe decoy
Most often, mechanical blendes are made of metal from bronze or heat-resistant steel. The idea of the method is that it is necessary to force the oxygen sensor to breathe not “through the nose”. To do this, it is moved a little away from the exhaust pipe and from the flow of exhaust gases; it will “breathe” through a small hole. In this way, fewer gases will flow to the sensor, and it will believe in the existence of a working catalyst.
To make the spacer itself, you need to take a drawing and take it to a turner. When you receive a new part, the matter remains small. It is necessary to remove the terminals from the battery and from the pit or on the lift, first remove the electronic connector, and then unscrew the lambda probe. The most important thing is to unscrew it carefully; you should always remember that the sensor cannot be restored and if it breaks, you will have to buy a new one.
Don't know how to properly putty a car? Find out in our article.
How to replace the ignition switch on a VAZ 2110: detailed instructions. If it does not unscrew, under no circumstances should you knock it out with a hammer, or tear it off the thread, or heat it. When the CD is in your hands, instead of it, first screw in the snag, and then screw the previously removed sensor into it.
The cost of this issue directly depends on the turner and the cost of his materials.
Of course, you can make electronic decoy yourself. The main skill on which the result will depend is the ability to solder electrical parts or the presence of a person with the necessary skills nearby.
If you have these skills, you will need:
- Soldering iron with fine tip
- Rosin
- Resistor 1 MΩ
- Capacitor 1uF
In this case, all data from the sensor is sent to the electronic control unit. To implement a homemade decoy, first of all we disconnect the terminals from the battery, then we need to dissect the wire running from the sensor itself to the connector. We have 4 wires in front of us, 2 of them are black, one is white and one is blue. It is necessary to cut the blue wire and connect it back through soldering to the resistor. Then you need to solder a capacitor between the white and blue wires. At the end, everything must be carefully insulated with heat shrink or insulating tape. Before doing such a custom, think, maybe it’s still worth buying an electronic decoy or a catalyst emulator before getting into the wiring yourself.
Another option for solving this issue is to reflash the control unit. It is not recommended to do it yourself without the availability of equipment and the necessary skills and knowledge. If you try to use this method to solve the problem without experience, then there is a huge risk of spoiling the original engine firmware, which is very difficult to obtain. Therefore, it is worth contacting a good professional who will do this job efficiently for you.
Do-it-yourself electronic “cheating” circuit
The oxygen sensor electronic blende is a circuit included in the electrical circuit of the ECM. By installing additional components, the signal supplied to the control unit is corrected, and the ECU receives data from the sensor as if a catalyst were installed on the car and there were no changes in the exhaust system.
Usually, four-pin lambda probes with an electric heater are upgraded with your own hands; the heating element is necessary to warm up the oxygen sensor on a cold engine - the thing is that the catalyst is activated only after the exhaust system is heated to a temperature of at least 360 degrees Celsius. The heating of the oxygen sensor is powered by the ECU (control unit), and the polarity of the wires does not matter (usually white wires are connected to the heater).
In electronic blende, the electric heater is not subject to modernization; all changes concern only the signal contact. The simplest circuit contains two main components - a high-resistance resistor and a capacitor with a capacity of approximately 1 Microfarad, and it usually looks like this:
- the resistor is connected to the signal wire break;
- The capacitor is installed between the ground connector and the signal.
The capacitance of the capacitor and the resistance of the resistor can be different; their value largely depends on the car model and the type of engine installed.
Methods for changing the readings of the second lambda probe
There are several known ways to influence the performance of the second lambda probe. Domestic inventors use:
- Mechanical spacers (metal bushings).
- Electronic circuits that convert the sensor signal.
- Chip (reflashing the ECU program).
- Installation of a mini-catalyst that simulates the operation of a working gas converter.
The simplest mechanical spacer can be made by any turner. A metal sleeve moves the lambda probe away from the exhaust tract. A small hole for exhaust gases weakens the sine wave of the readings, the electronic brain of the engine considers this to be the result of a working catalyst.
Mechanical blende drawing
A typical spacer drawing may vary in size depending on the model, make of the car, and lambda probe thread. The important point is the size of the inlet opening. Experiments by car owners and “traditional craftsmen” have shown that the optimal diameter is 1.5 - 2 mm.
Reviews from car enthusiasts who have installed decoys made of various metals (plain steel, stainless steel, bronze) do not see much difference in the efficiency of the device, which is hinted at by the manufacturers of the part. The bronze mechanical bushing does not create a catalytic effect, as is described in advertising materials. You can install the metal spacer yourself. To do this, just unscrew the oxygen sensor and screw in its place the bushing into which the lambda probe is installed.
A more complex option for simulating the normal operation of a gas neutralizer would be to install a mini-catalyst. Three layers of catalytic elements are mounted in the body of the device installed in front of the lambda probe, filtering exhaust gases specifically for the sensor. Replicating the design of the main catalyst, the expensive device also reacts painfully to low-quality fuel.
Electronic snag is based on changing the electrical signal from the sensor. The wiring diagram using a single resistor or capacitor is quite simple. You can do it yourself using one soldering iron, if you have the skills of radio engineering and electrical installation. The difficult part of the installation will be the search for the necessary resistors, the experimental selection of their parameters (depending on the car model, sensor design).
Electronic decoy circuit
The more difficult issue is with flashing (chipping) the control program. Service specialists claim that this is an unusually complex procedure. Machine owners who are proficient in programming talk about changing one value in the program. In this case, the second sensor can be removed. In any case, independent experiments by amateurs with flashing the program are not recommended.
avtoexperts.ru
In the previous article, we already talked about why lambda probe decoys are needed, what they are and how they work. Outside the scope of that article, the question remained of how to make these decoys with your own hands. It is simple and accessible to many car owners. What's the point of making decoys yourself if ready-made ones are sold? There are at least two reasons.
Mechanical snag of the lambda probe
1. Finished products will be more expensive in any case. If in the case of mechanical decoys the difference in cost may not be very large, then with electronic decoys it is significant.
2. It is not always possible to quickly find the desired decoy on sale. When a working car is urgently needed, sometimes it’s faster to make a fake one yourself.
As we already know, there are two types of decoys, so we will analyze an independent option for making both.
Manufacturing of mechanical blende
As you remember from the last article, the basis of this type of deception is a metal sleeve. The optimal material for manufacturing is bronze, because it is the one that best withstands temperature influences. To make a bushing yourself, you need a lathe and experience working with it, but you can always find a turner who will make the required workpiece according to the drawing for a minimal fee. This is the drawing.
Drawing of a trompe l'oeil
Actually, in the simplest cases this will be enough, but it would be optimal to fill the hollow part of the bushing with ceramic chips, which are not a problem to find. A homemade deception is installed in the same way as a purchased one - we unscrew the oxygen sensor, install a bushing in its place, and screw the sensor itself into it.
Installed snag
The need to look for a turner and contact him somewhat reduces the attractiveness of making a mechanical blende yourself, and the difference in cost will not be that big, but this option also has a right to exist if for some reason you are not satisfied with the electronic blende.
Self-made lambda decoy
Making electronic decoy
It would seem that an electronic “device” that simulates the operation of a lambda should be very complex, but in fact it is a very simple and primitive circuit that, nevertheless, works. To make it, you will need a car wiring diagram, a soldering iron, a knife, rosin, a 1 µF non-polar capacitor and a 1 mOhm or 150-200 kOhm resistor. It is usually recommended to use a 1 mOhm resistor, but on some cars the signal simulation is not very accurate, the “check” is extinguished, but the fuel mixture is not very correct, and the consumption is high. Then you will need to experiment a little with resistors.
Electronic decoy circuit
Next, let's look at the process point by point.
1. You need to figure out in the wiring diagram of your car how many and what wires go to the lambda probe. There are from two to four wires, depending on the presence of additional heating. Most often, four-contact sensors are found; of these four contacts, two are responsible for heating; we do not need them, but we need a signal contact and ground. Almost all diagrams on the Internet indicate the color of the wires, but on your car it may not match, so to find the signal wire and ground according to the diagram.
Electronic snag
2. Next, we arm ourselves with a knife and a soldering iron. You need to solder a resistor into the signal wire, and a capacitor between the signal wire and ground on the ECU side . Naturally, all connections must be insulated. In principle, after these manipulations everything should work.
Electric lambda decoy. Photo — drive2
3. The third step is optional, but highly desirable, because it can extend the life of the circuit. Additional elements and wires can be placed in a small plastic box or container and filled with epoxy .
Another option for deception
Even such a primitive scheme works great, and the cost of its production is meager. Buying an electronic emulator will be much more expensive. Yes, they usually use more advanced circuits, sometimes with microprocessors, but the difference in cost can be tenfold. There is an incentive to take up the soldering iron yourself.
In general, it is the electronic version that seems to us the most reasonable for self-production, the nuances can only be in the selection of the resistor, but they are inexpensive, soldering one to another in the circuit is also not a great difficulty, so you can experiment. The result will be a fully working “gadget” for pennies.
Electronic deception.
Electronic blende is a microprocessor that allows for the productive operation of the engine control system. Unlike a mechanical device, this type of deception allows you to normalize the operation of the most important vehicle system as a whole, and not just eliminate the error of the electronic control unit. This way, the vehicle's engine system maintains its performance under conditions of catalytic converter damage or removal. The microprocessor analyzes the level of pollution in the exhaust gases and, when passing through the first analyzer, similarly to the catalyst, it corrects the readings transmitted to the electronic engine control unit. Electronic blende takes into account the principle of operation of the catalyst and allows you to accurately repeat the signal to normalize the operation of the engine, even in the absence of one of the integral elements of the exhaust system.
The microprocessor has small dimensions and is installed directly in the lambda probe circuit. In order to understand the role of the blende during the operation of the vehicle, it is also worth considering the option of flashing the electronic unit.
Analyzer
This troubleshooting option involves changing the controller program by removing the rear lambda probe adjustments. In this case, in order to eliminate the error of the electronic unit, it is necessary to install a program in which changes are calculated only based on the signal readings of the sensor installed in front of the catalytic converter. It is quite difficult to find such a program from a vehicle manufacturer; therefore, pirated firmware is installed on most cars. As you know, this type of program can adversely affect the operation of the vehicle’s most important system.
Considering the threat to the motor system that unofficial firmware creates, the preferred method of restoring vehicle function remains the lambda probe snag. Despite the effectiveness of this method, installing a blende is a very economical way to solve the problem. In most cases, car enthusiasts successfully install this device into the exhaust gas exhaust system with their own hands.
A simple mechanical blende device allows you to reduce the wear of the element in question to a minimum. In most cases, the blende lasts quite a long time and its function can be disrupted only through serious mechanical influences. Therefore, oxygen sensors remain the most vulnerable elements of the circuit. As you know, a damaged analyzer cannot be repaired and if a malfunction occurs, it is necessary to replace the lambda probe. Fortunately, the process of replacing an oxygen analyzer is simple and accessible to every car enthusiast, and the price of this spare part is relatively low.
To summarize, we can say that by correctly installing the lambda probe, the vehicle owner can once and for all forget about the catalytic converter and its characteristic malfunctions.
https://youtube.com/watch?v=5OLhnQZp5lo%3F
Successful installation!
What is a lambda zone decoy?
In general, a lambda probe is a really useful device that can significantly reduce exhaust emissions (in accordance with stringent Euro 4/5 standards), while simultaneously reducing fuel consumption.
Structurally, such a device consists of two oxygen sensors, between which a catalytic converter is installed. The latter is responsible for converting harmful components of exhaust gases into harmless ones. The task of O2 sensors is to monitor the level of oxygen in the exhaust and report this to the on-board computer, which, based on the data received, increases or decreases the fuel supply to the cylinders.
Two sensors are needed to compare the analysis results, and if they do not match, the ECU will perceive this as a malfunction of the lambda probe. The consequences of such a situation are not very optimistic:
- the on-board computer immediately switches the operation of the power unit to emergency mode, which involves the use of rigid presets for fuel maps, while the readings of the O2 sensors are completely ignored;
- the “Check Engine” indicator is constantly on, which significantly impairs the ability to diagnose other vehicle systems, that is, if other malfunctions occur, you simply will not notice them;
- an enriched mixture begins to be supplied to the combustion chambers, which will increase fuel consumption by a noticeable amount;
- Due to the air mixture being too rich in fuel, the formation of soot on the spark plugs increases, engine power decreases, and the engine oil becomes contaminated at an accelerated rate.
“Check Engine” indicator
Preventing such a situation from occurring is what the lambda probe is needed for.
Of course, there is a standard way to solve the problem - replacing the neutralizer with a working one. It is recommended by all automakers without exception. However, the cost of the complete set (catalyst along with two sensors) is very high. Let's say, for some VAZ models it can be 50-60 thousand rubles, the situation with foreign cars is even more pessimistic. Plus, you need to add the cost of the work, and the amount may be unaffordable for many. That is why a significant part of drivers, when such a problem arises, decide to resort to an alternative option.
Let's look at how the lambda probe decoy works. The principle of operation of the emulator is to change the readings of oxygen sensors in such a way that the ECU would perceive them as normal. In this case, the power unit will continue to operate as normal, and all the consequences described above will be avoided. Of course, the neutralizer will not work in this case, which means that your car’s exhaust will probably no longer comply with Euro environmental standards. Well, for many this is a perfectly acceptable sacrifice. For the sake of what the lambda probe trick provides, if not the majority of car owners, then a fairly significant part of them decide to take such a step. Especially when you consider that the cost of this method of solving the problem is an order of magnitude less, and installing an oxygen sensor emulator is quite simple and can be done independently, without the need to use the services of external specialists.
Bottom line
Before doing something on your own, you should always sensibly assess your strengths; if you are confident, then go ahead, if you still are not, then you should turn to the experts. Yes, at the service station you will most likely not be given guarantees about continued performance after unscrewing the lambda, but it’s still worth contacting a service center where professionals will install either mechanical or electronic decoys, or in extreme cases, firmware and configuration specialists will download a new one program code for your ECU.
- Next Contract engine: what is it and how to choose
- Back Brake pedal beating: what to do if it happens
- Engine/Ratings
Aug 23, 2019
- Hyundai crossovers / News
Aug 23, 2019
- Aug 22, 2019
- Volkswagen crossovers / News
Aug 21, 2019
- Crossovers Ford / News
Aug 20, 2019
- Audi crossovers / News
Aug 20, 2019
- April 13, 2019
- March 12, 2019
- Feb 17, 2019
- April 11, 2019
- July 27, 2017