A lambda probe is an O2 concentration sensor (or, more simply, an oxygen sensor) that allows you to estimate the volume of unburned oxygen contained in the exhaust gases. These indicators are extremely important, since by maintaining certain proportions of fuel and air, the most efficient combustion of the air-fuel mixture occurs. The best ratio is 14.7 parts oxygen to 1 part gasoline. If this ratio is violated, the mixture will be lean or, conversely, enriched, which, in turn, will affect fuel consumption and engine power.
Although outwardly the oxygen sensor does not look like a “vital” part, it performs a very important function, therefore any malfunction of the lambda probe, the “symptoms” of which we will consider, must be corrected immediately.
What is an oxygen concentration sensor used for?
In practice, many vehicle owners are not even aware of the existence of this element. Its purpose is to determine the oxygen concentration in the exhaust gases and subsequently transmit this information to the ECU. Based on this, according to the algorithms embedded in the system’s memory, the fuel-air mixture is corrected for its complete combustion in the cylinders of the power unit.
The location of the oxygen sensor is the exhaust manifold. On most models, the lambda is mounted directly in the area of the catalytic converter. Regardless of where the sensor is installed, the correctness of its readings and system performance will not be affected. There are two types of lambda probe:
- Broadband
- Dual channel
Note that the second type is included in the design of older vehicle models that were produced before the 90s. All modern models have a broadband lambda, which accurately records all deviations to ensure the most correct mixture formation. At the same time, a properly functioning sensor of such a system can actually reduce fuel consumption and ensure optimal crankshaft speed of the power unit.
Methods for checking a lambda probe
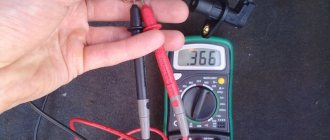
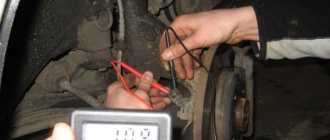
Checking the lambda probe with a multimeter
To independently check the λ-probe, you need a digital voltmeter and a vehicle manual. The sequence of actions is as follows:
- The wires are disconnected from the probe block and a voltmeter is connected.
- The car engine is started, the rotation speed is set to 2500 rpm, and then reduced to 2000 rpm.
- Remove the vacuum tube from the fuel pressure regulator and record the voltmeter readings.
- At a value of 0.9 V, the sensor is operational. If the voltmeter does not respond at all, or the reading is below 0.8 V, the λ probe is faulty.
- To check in dynamics, the probe is connected to the connector, connecting a voltmeter in parallel and maintaining the rotation of the engine crankshaft at 1500 rpm.
- If the sensor is working properly, the voltmeter will show 0.5 V. Deviation from this value indicates a breakdown.
We recommend: What to do if the engine oil foams?
Methods for diagnosing an oxygen sensor
Experts advise checking the correct operation of the lambda probe every 10,000 km, even if there are no problems with the operation of the device.
Diagnostics begins with checking the reliability of the connection between the terminal and the sensor and for the presence of mechanical damage. Next, unscrew the lambda probe from the manifold and inspect the protective casing. Small deposits are cleaned.
If, during a visual inspection, traces of soot, strong white, gray or shiny deposits were detected on the protective tube of the oxygen sensor, the lambda probe should be replaced
How to check a lambda probe with a multimeter (tester)
The sensor is checked for functionality using the following parameters:
- Heating circuit voltage;
- "Reference" voltage;
- Heater condition;
- Sensor signal.
Connection diagram to the lambda probe depending on its type
The presence of voltage in the heating circuit is determined with a multimeter or voltmeter in the following sequence:
- Without removing the connector from the sensor, turn on the ignition.
- The probes are connected to the heating circuit.
- The readings on the device must match the voltage on the battery - 12V.
“+” goes to the sensor from the battery through the fuse. In its absence, this circuit is called.
“—” comes from the control unit. If it is not detected, check the terminals of the lambda probe - ECU circuit.
The reference voltage measurements are carried out using the same devices. Sequencing:
- Turn on the ignition.
- Measure the voltage between the signal wire and ground.
- The device should show 0.45 V.
To check the heater, set the multimeter to ohmmeter mode. Diagnostic stages:
- Remove the connector from the device.
- Measure the resistance between the heater contacts.
- The readings on different oxygen pumps are different, but should not go beyond 2-10 ohms.
Important! The absence of resistance indicates a break in the heater circuit.
A voltmeter or multimeter is used to check the sensor signal. For this:
- They start the engine.
- Warm it up to operating temperature.
- The probes of the device are connected to the signal wire and the ground wire.
- Engine speed is increased to 3000 rpm.
- Monitor voltage measurements. Jumps should be observed in the range from 0.1 V to 0.9 V.
If during at least one of the checks the indicators differ from the norm, the sensor is faulty and needs to be replaced.
Video: checking the lambda probe with a tester
Checking with an oscilloscope
The main advantage of this lambda probe diagnostic over checking with a voltmeter and multimeter is the recording of the time between similar changes in the output voltage. It should not exceed 120 ms.
- The probe of the device is connected to the signal wire.
- The engine is warmed up to operating temperature.
- Engine speed is increased to 2000-2600 rpm.
- Based on the oscilloscope readings, the performance of the oxygen sensor is determined.
Diagnostics with an oscilloscope gives the most complete picture of the operation of the lambda probe
Exceeding the time indicator or crossing the voltage limits of the lower 0.1 V and upper 0.9 V indicates a faulty oxygen sensor.
Video: diagnosing an oxygen sensor with an oscilloscope
Other verification methods
If the car has an on-board system, then the “CHECK ENGINE” signal, which generates a certain error, can be used to diagnose the condition of the lambda probe.
List of lambda probe errors
In order for the lambda probe to work for a long time and efficiently, it is necessary to fill the car only with high-quality fuel. Scheduled and timely diagnostics of the oxygen sensor will help to detect its malfunction in time. This measure can extend the life of not only the sensor itself, but also the catalyst.
Replacing the lambda probe
Replacing the lambda probe
The lambda probe is not repairable, so if it completely fails, it is replaced with a new one.
If cleaning does not help, then the lambda probe must be replaced. Lambda probe repair is not carried out, either in a car service center or with your own hands. There are two sensitive threads made of rare earth or precious metals that burn out and cannot be replaced. As a rule, the price of a lambda probe is about 3-4 thousand rubles, but it can fluctuate depending on the model and class of the car. You can also install a universal Bosch lambda probe, which is attached using a special adapter and is suitable for any car. It can replace even a more modern broadband lambda probe, which costs several times more. The old lambda probe is unscrewed and simply replaced with a new one. If it is replaced with a similar, original one, then no adjustments are needed. If a different lambda probe is installed, you may have to change the connection plug. When installing a new sensor, the threads must be lubricated with sealing paste to avoid depressurization of the manifold. In addition, such a sensor can then be easily unscrewed and cleaned, since it will not stick.
How much does an oxygen sensor cost?
The cost of the sensor depends on the type of product and the prevalence of the model. Below are reference prices for devices used on some car models.
| Name | Price, rub |
| Lambda probe for VAZ-2114 | 1500-2000 |
| Lambda probe for Hyundai Solaris | 4500 |
| Lambda probe for Volkswagen Polo Sedan | 3500-5000 |
| Lambda probe for Gazelle, Volga | 1600-2600 |
| Prices are relevant for three regions: Moscow, Chelyabinsk, Krasnodar |
How to repair a lambda probe
Repairing a lambda probe with your own hands is quite simple; to do this, you need to determine in which particular unit the failure occurred.
If the problem is related to the circuit contacts, then first of all you need to find the break point and check whether the contacts have oxidized. The signal may simply not come from the control unit. Therefore, check the lambda power supply. If the element contacts have oxidized, they must be treated with WD40.
We recommend: Polishing the windshield with your own hands: maintaining visibility for a long time
If a lot of carbon deposits have formed on the probe body, it may be necessary to clean all parts of the system. And here a natural question arises: how to rinse the lambda probe. The fact is that it is strictly prohibited to process platinum electrodes and ceramic rods with sandpaper. Therefore, it is necessary to use specialized products designed to dissolve rust.
To clean the sensor, follow these steps:
- Remove the lambda probe after heating its housing to 50 degrees.
- Remove the protective cap.
- Soak the sensor in phosphoric acid for 30 minutes (it will cope with even the most difficult deposits).
- Rinse the lambda in water, dry it and install the element back. Don't forget to lubricate the sensor threads with a special agent to create a complete seal (but don't use silicone sealant).
Since the cost of sensors ranges from 1000 - 3000 rubles per element, it is quite reasonable to try to repair the lambda probe yourself (see video below), and only then proceed to install a new element.
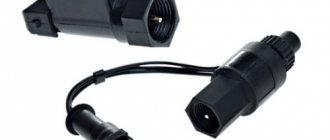
Installation instructions for a universal oxygen sensor
Installation instructions for a universal oxygen sensor
Installation must only be carried out by a qualified technician in a specialized repair shop! The instructions are provided for informational purposes only.
Please read these instructions carefully before removing the oxygen sensor from your vehicle.
INSTALLATION INSTRUCTIONS: (see illustrations)
Installation must only be carried out by a qualified technician in a specialized repair shop! The instructions are provided for informational purposes only.
| STEP 1 . Remember how the installed sensor's wiring is routed. In the same way, you will need to route the wiring of the universal sensor later. Disconnect the old sensor plug from the vehicle electronics (do not open or cut the wiring of the sensor itself). Remove the old sensor with a suitable tool. | |
| STEP 2. Compare the old sensor with the universal sensor. The universal sensor wiring must be min. 40mm shorter than the wiring of the old sensor. If necessary Shorten the universal sensor wiring accordingly. | |
| STEP 3 . Now shorten the universal sensor wiring so that each individual wire is 40mm shorter than the previous one, starting from any wire. | |
| STEP 4 . Now shorten the wiring from the old sensor connector. | |
| STEP 5 . After this, put a special wire on each individual wire. the insulating tube included with the universal sensor kit. | |
| STEP 6 . Apply waterproof insulation to each individual wire. Note that the wide end of the waterproof insulation points to the end of the wire (connection). | |
| STEP 7 . Using a suitable tool (insulation cutters), remove 8mm of insulation from each end of the wire. Now place the contact connection on the wires of the universal sensor and, using the appropriate tool, compress the structure. Make sure that there are no bare wires sticking out and that the connection is perfect. | |
| STEP 8 . Once again, pay attention to the wiring correspondence table and make sure that the wires are selected correctly. Now connect the wires of the old sensor to the wiring of the universal sensor by putting a contact joint on the wires. Here again, make sure that there are no exposed parts of the wiring sticking out, and compress the connection accordingly. To simplify the process, we recommend starting with the shortest universal sensor wire. | |
| STEP 9 . Slide the waterproof insulation over the fastening joint at the two ends of the wiring. After this, place a special insulating tube over the contact connection so that the tube completely covers the connection and the waterproof insulation. | |
| STEP 10 . Use a hot air gun to secure the insulating tube in the middle above the contact connection. In order to ensure proper waterproofing of the wiring, the waterproof insulation must be located inside the insulating tube. | |
| STEP 11 . Remove the protective cap of the universal sensor and mount the sensor. Use force: M18 = 35-58 Nm | |
| The sensor wiring should be routed in the same way as the old wiring was routed. The original fasteners must be secured. Avoid contact of wiring with hot parts of the car (Manifold, converter). If necessary, use fasteners to secure the wires to each other. | |
| Wiring Compliance Table | |||
| Sensor manufacturer | Heating wire (x2) (only on 3-4 contact sensors) | Signal wire | Ground wire (only on 2.4 contact sensors) |
| UNIVERSAL | White | Black | Grey |
| Mark I | Black | White | Green |
| Mark II | Black | Blue | White |
| Mark III | Dark brown | Violet | Light brown |
| Mark IV | White | Black | Grey |
What are the consequences of untimely replacement of the oxygen sensor?
The oxygen sensor assesses the level of free oxygen remaining in the exhaust gases. Based on this, the car's ECU makes a decision to regulate the fuel supply to create the optimal mixture for the operation of the internal combustion engine. If the lambda fails, the electronic control unit begins to operate according to the average parameters recorded in the memory. This means that the mixture entering the cylinders is not optimal.
Video instruction
Buy universal lambda probes in the Lambda probes section of our store
Back
How to replace it yourself?
As you can see, in most cases of lambda probe failure, repairing it makes no sense, so the best solution to the problem would be to replace the faulty element, especially since this process is not complicated.
Before replacement, it is necessary to turn off the power to the vehicle's on-board network, and then remove the block from the sensor (on some models it can be additionally secured with clamps). Since lambda is included in the design of the exhaust system, the element therefore constantly operates under high loads. It is not always possible to unscrew it the first time. This should be done carefully so as not to damage the threads in the exhaust manifold pipe.
After the failed element is removed from its seat, we clean the threads from dirt, install a new lambda probe and screw it in, being careful not to overtighten.
The importance of the oxygen concentration sensor in the exhaust system of a car cannot be overestimated, since its failure will provoke incorrect operation of the power unit, which is extremely detrimental to its elements. For this reason, you need to learn to identify its breakdowns in a timely and correct manner.
Main symptoms and causes of lambda probe malfunction
The main symptoms of a malfunctioning lambda probe:
- interruptions in operation and floating speed at idle or low shaft speed;
- reduction of vehicle acceleration parameters;
- a noticeable (sometimes by several liters) increase in fuel consumption;
- The Check Engine indicator turns on and errors appear in the memory of the control unit.
The causes of malfunction of the oxygen sensor may be:
- damaged sensor element;
- clogging of the working area of the probe with soot or lead;
- destruction of wiring;
- failure of the heating element.
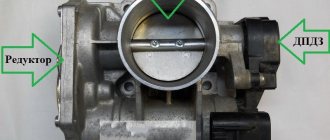
Purpose and principle of operation of the lambda probe
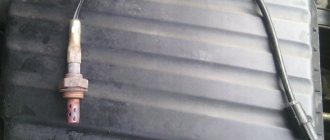
Lambda probe mounted on the exhaust pipe
Strict environmental requirements for cars force manufacturers to use catalytic converters that reduce exhaust toxicity. But its efficient operation cannot be achieved without controlling the composition of the air-fuel mixture. Such control is carried out by an oxygen sensor, also known as a λ-probe, the operation of which is based on the use of feedback from the device and the fuel system with a discrete or electronic injection system.
We recommend: How to fix poor heating of the Daewoo Nexia stove
The amount of excess air is measured by determining the residual oxygen in the exhaust gas. To do this, the lambda probe is placed in front of the exhaust manifold catalyst. The sensor signal is processed by the control unit and optimizes the air-fuel mixture, more accurately dosing the fuel supply to the injectors. On some car models, a second device is installed after the catalyst, which makes the preparation of the mixture even more accurate.
The lambda probe works as a galvanic cell with a solid electrode made in the form of ceramics made of zirconium dioxide doped with yttria, on which platinum is deposited, which acts as electrodes. One of them records readings of atmospheric air, and the second - exhaust gas. Effective operation of the device is possible when temperatures exceed 300°C, when the zirconium electrolyte becomes conductive. The output voltage appears from the difference in the amount of oxygen in the atmosphere and exhaust gas.
Oxygen sensor device (lambda probe)
There are two types of λ-probe - broadband and two-point. The first type has higher information content, which allows you to more accurately tune the operation of the engine. The device is made of materials that can withstand elevated temperatures. The operating principle of all types of sensor is the same, and is as follows:
- Two-point measures the oxygen level in the engine exhaust and atmosphere using electrodes on which the potential difference changes depending on the oxygen level. The signal is received by the engine control unit, after which the fuel supply to the cylinders by the injectors is automatically adjusted.
- The broadband consists of an injection element and a point-to-point element. A constant voltage of 450 mV is maintained at its electrodes by adjusting the pumping current. A decrease in oxygen content in the exhaust leads to an increase in voltage at the electrodes. After receiving the signal, the control unit creates the necessary current on the injection element to pump or pump out air to bring it to the standard voltage. So, when the fuel-air mixture is excessively rich, the control unit sends a command to pump in an additional portion of air, and when the mixture is lean, it affects the injection system.
Why can an oxygen sensor fail?
Dismantled burnt lambda probe
Before you begin diagnosing signs and symptoms, as well as repairing a particular malfunction yourself, we suggest that you familiarize yourself with the reasons for the failure of the regulator.
So, why the regulator does not work:
- Use of low quality fuel. If the fuel contains iron, water, petroleum breakdown elements, lead and other harmful substances, this will cause the regulator to break down. Such components clog platinum electrodes quickly enough to clog them, it will take two or three refuelings with low-quality fuel.
- Heating fault. The oxygen sensor is equipped with a special heating. If the heating fails, the regulator may display an operation error. Heating is an important element, since it is thanks to heating that the driver receives accurate information from the lambda probe. If the regulator operates without heating, it will produce the wrong amount of oxygen in the exhaust. Accordingly, heating comes into operation immediately after starting the engine. Failure of the heating means repairing and replacing the sensor as a whole, since if there is no heating, the regulator will make no sense.
- Overheating of the lambda probe housing as a result of the ignition timing being incorrectly set. Also, a symptom of overheating may appear as a result of a too rich combustible mixture.
- If the condition of the oil scraper rings is poor, this can lead to engine fluid entering the exhaust pipe. Accordingly, its effect on the sensor can be detrimental and there will be a need to repair or replace the device.
- Malfunctions in the ignition system are another reason why the lambda does not work. We are talking about spark plugs, coils, all kinds of modules and wiring. The reason may be popping noises in the exhaust pipe - they can destroy the fragile ceramics of the device.
- Shocks appear in the engine intake manifold.
- Improper starting of the car engine. The need to repair a malfunction arises as a result of repeated and unsuccessful attempts to start the car engine, and also because these attempts are carried out in short periods of time. As a result, unburned fuel accumulates in the engine exhaust manifold. When a shock wave occurs, the fuel may ignite.
- Contact of various consumables - solvents, coolants, detergents, etc. - on the ceramic element may require repair of the regulator.
- The use of sealants when installing the regulator can lead to serious problems. Especially if they can vulcanize at room temperature or if they contain silicone.
- As a result of a break or poor contact of the device, as well as a short to ground of the output wiring, repairs become necessary.
- If the engine operates with incorrectly adjusted valves, which may be preloaded or pinched, or with valves that have not been adjusted for a long time.
- The compression level in the engine cylinders is incorrect. If the compression is uneven, this can lead to unbalanced combustion of the combustible mixture.
- When installing the timing belt, the device marks were set incorrectly, or they could have been damaged during operation of the vehicle.
- Clogged petrol injectors of the engine. Also, the need to repair a malfunction arises as a result of clogging of the engine’s gasoline injectors or due to the fact that an imbalance has arisen in their operation.
Coked oxygen sensor
Main symptoms of malfunctions
Next, we will consider the signs that will allow us to diagnose and check whether the lambda probe corrector and the sensor as a whole are working or not. As practice shows, the device fails gradually, and not immediately. Therefore, if you do not know where the lambda probe is installed and how to check it, then most likely you will not immediately identify signs of failure. But if you familiarize yourself with the signs described below, then you will not have any problems during the test.
So, the failure of the regulator can be divided into several stages.
- The first sign is that the device stops working normally. In particular, during certain engine operating moments, the controller refuses to generate a signal. As a result, the idle speed begins to destabilize, that is, the speed floats. This symptom may indicate that the device needs to be restored. It should be noted that revolutions can fluctuate over a very wide range, and accordingly, over time this can lead to a decrease and loss of quality of the combustible mixture.
- Another sign that indicates the need to restore the device is that the machine begins to twitch. As a result of starting and checking the engine, you may hear popping noises that are uncharacteristic of its operation. In addition, if during the check you notice that a new indicator lights up on the dashboard, this indicates that the device needs to be checked in more detail using a multimeter. If you do not have a multimeter, then contact an electrician for help.
- The next step by which you can check the malfunction is the complete failure of the regulator when operating on a cold engine. In this case, the control unit will warn the driver about a malfunction and the need for repairs - the engine power will decrease, and when you press the gas pedal, a slow response of the car will be felt. The same popping noises will be heard from under the hood, the car will jerk while driving - these signs of a malfunction indicate that repairs need to be made and the device restored.
- One of the most dangerous signs of a malfunction is overheating of the motor.
- Also, increased fuel consumption may indicate the need for repairs and restoration, and an unpleasant odor with a sign of toxicity may appear from the car muffler.
- If you have a modern car, then as a result of a device failure, the emergency locking system may be activated. Accordingly, further movement of the vehicle will be impossible; the only way out is to call a tow truck and take the car for repairs.
- One of the worst options for further developments could be depressurization of the device, since if depressurized, driving the car will be impossible. There is a high probability of engine failure. When this process occurs, the exhaust gases do not exit through the muffler, but enter the intake duct. When the driver presses the brake, the sensor sees an excess of oxygen in the system, as a result of which it produces a huge number of negative impulses. Thus, the injection control system may completely fail. If the regulator is depressurized, this can be recognized as a result of a loss of power, which is especially noticeable when driving quickly. Jerking and popping noises, as well as an unpleasant odor, are the same symptoms of failure. You can also check the exhaust valve housing and spark plug mounting locations - soot deposits may form on them (video author - HondaDiagnostic Sistem).