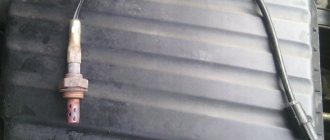
A lambda probe is an O2 concentration sensor (or, more simply, an oxygen sensor) that allows you to estimate the volume of unburned oxygen contained in the exhaust gases. These indicators are extremely important, since by maintaining certain proportions of fuel and air, the most efficient combustion of the air-fuel mixture occurs. The best ratio is 14.7 parts oxygen to 1 part gasoline. If this ratio is violated, the mixture will be lean or, conversely, enriched, which, in turn, will affect fuel consumption and engine power.
Although outwardly the oxygen sensor does not look like a “vital” part, it performs a very important function, therefore any malfunction of the lambda probe, the “symptoms” of which we will consider, must be corrected immediately.
Signs and causes of lambda probe malfunction
Lambda probe malfunctions manifest themselves in the same way as problems with fuel equipment or catalytic converter. Therefore, it is possible to determine exactly which element is broken only through diagnostics at a car service center. There are a number of symptoms that indirectly indicate that the lambda is failing:
- Floating speed when idling the internal combustion engine. If the lambda probe breaks down, they constantly change, dropping to 400-600. This happens due to a lean fuel mixture. It is not enough for stable operation of the engine in idling mode. The lambda probe is responsible for dosing fuel into the mixture.
- Decrease in engine power. A lean mixture reduces the power of the internal combustion engine. Its speed will begin to slowly increase when the accelerator pedal is pressed, the car will drive worse uphill, acceleration will become slower.
- Increased fuel consumption. Fuel consumption may increase by 25-30%!
- Change in color and odor of exhaust gases. The exhaust will turn black. It will clearly smell of gasoline that does not burn out in the catalyst.
- Candle color. If the mixture is over-enriched, they will develop a black coating.
- Uneven acceleration with jerks. The car will not be able to accelerate quickly and evenly.
- "Check Engine" indicator on the dashboard. If you consider the error as a scanner and decipher it, it will be clearly indicated that the lambda probe is broken. If the error is simply erased, it will constantly appear until the problem is eliminated.
Popular brands:
Ford Focus, Toyota Corolla
Typical causes of failure are:
- Use of low quality fuel. This is perhaps the most common reason. Excess harmful impurities, when burned, settle on the working surface of the heating element, which leads to its clogging.
- Natural wear and tear over time. The lambda needs to be changed closer to 150 thousand kilometers. The period can be increased if high-quality fuel is used. A non-original or cheap sensor will last less.
- Wiring problems. To connect the lambda to the ECU, ordinary copper wire is used, which will later begin to oxidize or break.
Types of lambda probes on different cars
Now let's look at the malfunctions of this sensor on different brands of cars.
VAZ family.
The first will be VAZ cars from 2110-212. Until 2004, these cars with injection engines were equipped with Bosch lambda probes with identification number 0 258 005 133.
On newer models of this family, as well as on VAZ 2114-2115, Priora, Kalina, Bosch sensors also began to be used, but with the number 0 258 006 537.
The elements installed before 2004 did not have heaters, so they only started working after the engine had warmed up.
Now these cars are equipped with heated lambda probes, which allow the sensor to reach operating temperature much faster.
In addition to the main signs of a malfunctioning lambda probe on these cars, there are two more:
- after stopping the engine, crackling sounds may be heard from under the car;
- Car exhaust gases change in smell due to the large amount of unburned fuel.
Ford Focus 2.
On a model such as the Ford Focus 2, the marking and number of lambda probes depends on the power plant.
For example, on engines with 1.8 and 2.0 liters of volume, two sensors are used.
The installed sensor before the catalyst has the original marking 3М519F472FF, and the lambda probe behind the catalyst is 3М519G444FF.
The 1.4 and 1.6 liter engines also had two sensors: the first was 3M519F472VA, and the second was 3M519G444VA.
Some 1.6-liter engines have two catalysts installed, so they have 4 sensors.
Two lambda probes located before the catalysts are marked 3M519F472DA and 3M519F472BC, and the sensors after the catalysts are marked 3M519G444DA and 3M519G444CA.
And these are just some of the sensor markings used on Focus 2.
It is worth noting that these sensors differ from the same VAZ sensors produced by Bosch with the marking 0 258 006 537 only in the connector for connecting the wiring, and the devices themselves are identical.
This is interesting: Power steering hums when cold or constantly: causes and repair of power steering
Therefore, special signs of malfunction, in addition to the generally accepted ones, are indicated above.
Skoda Octavia.
On the Skoda Octavia, the VAG concern installs its oxygen sensors with catalog numbers 06A906262BR, 06A906262AJ, etc.
It all depends on the power plant and year of production of the car.
But structurally, their differences from the same Bosch boil down again only to the wiring connector. The rest of the design is identical and there are also signs of malfunction.
Honda CR-V.
The Honda CR-V also comes with original lambda probes with catalog number 36531RNAJ01 installed from the factory, but Bosch ones are also suitable instead, which indicates that all devices are almost identical in design, and the only difference is in the connectors.
Renault Logan.
On Renault Logan, the factory lambda probe has catalog numbers 8200052063, 7700109844 and 8200495791. They differ from each other in the color of the wire braid.
It is noteworthy that these sensors are also used on the VAZ Lada Largus.
But the design, as well as the signs of malfunction of these sensors, do not differ from those described above.
What is the lambda probe responsible for?
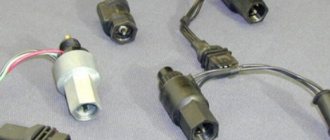
What does a lambda probe look like?
Simply put, a lambda probe, also known as an O2 sensor, is a sensor that estimates the amount of unburned fuel and oxygen in a car’s exhaust system. Although lambda probes are also used in other areas, in this article we will talk specifically about automotive oxygen sensors.
We recommend: How to test a car battery for performance
What is this oxygen sensor for? So-called catalysts, which reduce the share of harmful substances in exhaust emissions, are currently available in every more or less modern car. The lambda probe controls the amount of oxygen in the catalysts, thus extending their life. It also significantly affects the amount of fuel consumed by your car and improves engine performance.
If we mention specific facts, it is known that fuel burns efficiently only with the correct ratio of fuel and air in the fuel mixture. Otherwise (if there is less or more air), the catalysts will wear out and become unusable. Therefore, the lambda probe directly affects the vehicle's exhaust system.
Description of the device and where it is located
With the advent of electronic gasoline injection systems, designers were faced with the task of adjusting the composition of the fuel mixture.
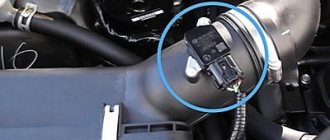
For this, oxygen sensors or lambda probes began to be used. The devices maintain the composition of the fuel mixture within certain limits, which allows for maximum efficiency of the catalytic converter. With other mixture compositions, the neutralizer begins to work incorrectly and fails. Depending on the design of the exhaust system, one or two sensors are used:
- The first is installed directly in the exhaust manifold and measures the composition of the exhaust gases before the catalytic converter. On early systems this device was the only one.
- With the introduction of Euro-3 standards, a second probe began to be used, located after the neutralizer. The electronic control unit analyzes data from two probes and indirectly evaluates the efficiency of the catalyst, and also adjusts the composition of the mixture.
Lambda probe options
Manufacturers have established a service life for products:
- probe without heating coil - no more than 80 thousand km;
- heated unit - up to 100 thousand km;
- planar (broadband) probes - up to 160 thousand km.
The declared service life of the probes is not accurate. The operating life of devices depends on many factors and may be less or more than the specified values.
What is the lambda probe responsible for?
Simply put, a lambda probe, also known as an O2 sensor, is a sensor that estimates the amount of unburned fuel and oxygen in a car’s exhaust system. Although lambda probes are also used in other areas, in this article we will talk specifically about automotive oxygen sensors.
What is this oxygen sensor for? So-called catalysts, which reduce the share of harmful substances in exhaust emissions, are currently available in every more or less modern car. The lambda probe controls the amount of oxygen in the catalysts, thus extending their life. It also significantly affects the amount of fuel consumed by your car and improves engine performance.
If we mention specific facts, it is known that fuel burns efficiently only with the correct ratio of fuel and air in the fuel mixture. Otherwise (if there is less or more air), the catalysts will wear out and become unusable. Therefore, the lambda probe directly affects the vehicle's exhaust system.
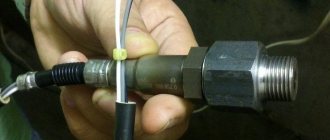
Device diagram
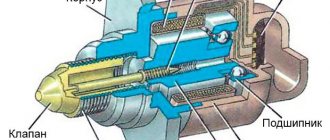
Let's look at the probe diagram, which gives an idea of the placement of nodes. Knowledge of the design allows you to understand the locations of parts that are prone to failure.
Probe design example
The design includes:
- 1 - metal fitting intended for installing a probe, there are turnkey edges on the outer surface, a thread is located below;
- 2 - ceramic insulator;
- 3 — sealing element for inserting the wiring harness;
- 4 - signal wires;
- 5 - metal protective cap, equipped with ventilation vents, designed to protect the measuring element from damage;
- 6 — spring contact part;
- 7 - sensitive element made of ceramic;
- 8 - heating rod;
- 9 - ventilation duct;
- 10 - outer metal casing.
Lambda probe service life
The average lifespan of oxygen sensors using Russian gasoline is 40,000–100,000 km. To increase service life, it is recommended to fill with high-quality fuel with a low content of impurities and heavy metals. It is quite difficult to determine a malfunction by self-diagnosis, and it is almost impossible to establish the cause. This may be wear and tear, low quality gasoline, mechanical damage and other factors.
If you suspect a faulty oxygen sensor, contact a professional diagnostician. Using an oscillogram, a specialist will determine the causes of the malfunction and suggest solutions.
Causes of lambda probe malfunction
Symptoms of sensor failure can vary. Initially, its malfunction affects the quality of the fuel mixture. For example, its incorrect operation may be caused by the presence of various deposits. And the most common cause of lambda failure is a violation of its tightness, caused by natural wear and tear of the material of its manufacture. Mechanical damage to the oxygen concentration sensor is less common because the element is well protected.
The sensor may also work intermittently or not function at all due to a power failure. The contact groups of the lambda probe are subject to oxidation, as a result of which the device begins to work incorrectly, transmitting incorrect readings to the computer. This leads to disruption of the mixture formation process.
Incorrect ignition timing is one of the possible causes of an interruption in the operation of the oxygen sensor. Often, a similar problem occurs on vehicles whose ignition system has a distributor. In addition, damage to the electrical wiring and problems with the spark plugs also leave their mark on the functioning of the lambda probe. This can be recognized by the engine shaking and its incorrect operation when the crankshaft speed increases.
Video “How to properly change a lambda probe”
You can learn how to properly replace the regulator with your own hands from the video below (the author of the video is oasex).
The service life of lambda probes under normal operating conditions ranges from 50 to 250 thousand km, depending on the type of sensor.
The most common reasons for their premature failure are listed below.
If an error is detected in the operation of the lambda probe, then it is necessary to carry out a full external inspection and check its operation:
1. Check the integrity of the electrical connector and sensor wires. 2. Carefully inspect the sensor itself for dents, cracks and other mechanical damage. 3. Check the cleanliness of the contact group of the electrical connector, as well as the absence of traces of corrosion on it.
Typical malfunctions of lambda probes, their causes and solutions
←
If the engine is operating normally and the fuel is burned completely, then there is no plaque on the working tip of the sensor, and its surface has a dull matte dark gray color.
Poisoning of the sensor sensing element.
If you observe the following changes on the sensor tip, then you should pay attention to the need for additional repair work.
← Antifreeze poisoning.
If contaminated with antifreeze, granular gray or greenish deposits with white streaks appear on the tip:
→
Check the engine cooling system and especially the cylinder head gasket for leaks and carry out repairs. Replace lambda probe.
← Oil poisoning.
If the engine consumes excessive oil, gray or black deposits appear on the tip: → Check the engine for wear or oil leakage and make repairs. Replace the sensor.
← Soot poisoning.
If the ignition and/or fuel system does not operate properly, dark brown or black soot appears on the sensor. → Check the fuel system, measure the toxicity of exhaust gases. The sensor will have to be replaced.
← Leaded gasoline poisoning. One or two refills with leaded gasoline will result in shiny, dark gray deposits appearing on the sensor. → Replace leaded gasoline with unleaded gasoline and replace the sensor.
← Poisoning by fuel additives.
Frequent use of various fuel additives or recent engine repairs using silicone sealants leads to the formation of red or white deposits on the sensor. → Clean the fuel system and engine. Replace sensor.
Burnt out heating element.
If the sensor tip looks completely healthy, its wires and electrical connector are in order, then the sensor failure occurred as a result of the heating element burning out. The heating element could burn out for the following reasons:
1. Temperature shock as a result of water entering the sensor due to forcing deep puddles or washing the engine compartment. 2. Faulty electrical wiring. 3. Problems with the catalyst.
→Attention! If the heating element burns out, the catalyst should be checked, since if problems with the catalyst persist, the new lambda probe will fail again within a short time.
Corrosion of the contact group of the electrical connector.
Water getting inside the electrical connector (on the contact group) due to forcing deep puddles or washing the engine compartment. →Try to drive through puddles calmly, without splashing, especially if the car has normal ground clearance.
Mechanical damage to the sensor, sensor cable, electrical connector.
. “Crooked” hands of auto mechanics dismantling/installing the sensor while carrying out other work or parts located near the sensor. Damage occurs as a result of the sensor falling onto a hard surface, or something hard and heavy (key, head, part, bolt, etc.) falling onto the sensor or electrical connector. → There’s hardly anything you can do to help here, but be careful!
Incorrect laying of the lambda probe cable after reinstallation. As a result, the cable insulation melts due to its contact with hot parts of the engine, or, in the case of the second sensor, it breaks during movement. → Check that the wires are laid correctly after installing the sensor.
Lambda - what is it? In this case, we are not talking about a letter of the Latin alphabet. When signs of increased fuel consumption, black exhaust gases and unstable engine operation appear, one of the most common causes is a broken lambda probe. What is a lambda probe in a car and why is a lambda probe needed, you will learn from this article.
This is a special oxygen sensor that is responsible for the correct proportions of air volumes in the fuel system. In other words, a lambda probe is a regulator that collects and transmits information to prepare the optimal fuel mixture.
But when this part performs its duties stably and smoothly, the car saves fuel, and catalysts that reduce emissions of harmful substances into the atmosphere last longer. Therefore, every car enthusiast should know and remember the principles of its operation and diagnostics.
WATCH THE VIDEO
Methods for checking a lambda probe
Checking the lambda probe with a multimeter
To independently check the λ-probe, you need a digital voltmeter and a vehicle manual. The sequence of actions is as follows:
- The wires are disconnected from the probe block and a voltmeter is connected.
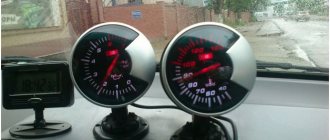
- The car engine is started, the rotation speed is set to 2500 rpm, and then reduced to 2000 rpm.
- Remove the vacuum tube from the fuel pressure regulator and record the voltmeter readings.
- At a value of 0.9 V, the sensor is operational. If the voltmeter does not respond at all, or the reading is below 0.8 V, the λ probe is faulty.
- To check in dynamics, the probe is connected to the connector, connecting a voltmeter in parallel and maintaining the rotation of the engine crankshaft at 1500 rpm.
- If the sensor is working properly, the voltmeter will show 0.5 V. Deviation from this value indicates a breakdown.
Regulator check
If there is a suspicion of a regulator malfunction, it is recommended to start by assessing its external condition. In most cases, if the sensor is faulty, it will become covered with a layer of dirt or grime. The normal appearance of the sensor, as a rule, indicates its normal operation, but the check should be continued.
- The regulator should be disconnected from the block.
- Then connect it to a voltmeter that has a fairly high accuracy class.
Note. The connection diagram of the regulator to the voltmeter should be based on its pinout: the black wire of the sensor is responsible for the signal (goes to the controller), the white wires are responsible for heating, the gray wire is for grounding.
Checking the voltmeter readings is a diagnostic test based on the dynamics of the vehicle’s power plant. For example, if cruise mode is engaged (2500 rpm), with the vacuum tube removed, a normally operating regulator should output 0.9 V (slightly more or less). If the sensor readings are below 0.3 V, then the device is definitely faulty.
Checking the sensor may have another mode. You can simulate forced air leaks, thereby depleting the air-fuel mixture. In this case, the regulator readings should be less than 0.2 V.
Another check mode is associated with the intermediate position of the motor. In other words, if the engine speed is within 1500 rpm, the regulator should show a value of 0.5 V.
If the sensor is completely proven to be faulty, it should be removed and replaced. And here you need to adhere to certain rules.
- It is better to change the regulator on a working car, so to speak, “hot”. This gives you a better chance of not stripping the thread.
- It is also recommended to slightly raise the connector of the new regulator, thereby protecting the device from dirt and moisture.
- And finally, experts recommend treating the sensor body with graphite, even with factory lubricant.
Almost all modern cars have an oxygen sensor. The device can be positioned in different ways. On some cars it is located near the catalyst, on others it is in the exhaust manifold.
What to do if you find a faulty sensor on the road
If a sensor malfunction occurs on the road or you need to go somewhere urgently, but the problems with the probe are not resolved, what can you do? The solution is ingenious to the point of simplicity - you just need to turn off the probe. Of course, the blinking “check” will not disappear until the engine stops, and the dynamics, in principle, will not be normal. But you can easily get to a car service center, albeit without amenities.
You need to install a probe that is recommended by a specific car manufacturer. By installing some kind of “left” device, even for the sake of economy, you can subject the engine to unbearable loads and problems. Undoubtedly, engine repair will cost much more than purchasing a high-quality oxygen sensor.
Device diagram
Let's look at the probe diagram, which gives an idea of the placement of nodes. Knowledge of the design allows you to understand the locations of parts that are prone to failure.
Probe design example
The design includes:
- 1 - metal fitting intended for installing a probe, there are turnkey edges on the outer surface, a thread is located below;
- 2 - ceramic insulator;
- 3 — sealing element for inserting the wiring harness;
- 4 - signal wires;
- 5 - metal protective cap, equipped with ventilation vents, designed to protect the measuring element from damage;
- 6 — spring contact part;
- 7 - sensitive element made of ceramic;
- 8 - heating rod;
- 9 - ventilation duct;
- 10 - outer metal casing.
We recommend: How to remove and unscrew the crankshaft pulley?
Operating principle of the oxygen sensor
The principle of operation of the oxygen sensor is quite simple. The lambda probe must compare the readings with some ideal results in order to understand how the percentage of oxygen in the mixture changes, so measurements are taken in two places - atmospheric air and combustion products .
This approach allows the sensor to feel the difference if the fuel mixture ratio changes.
The ECU must receive an electrical impulse from the lambda probe. To do this, the sensor must be able to convert measurements into electrical signals. For measurements, special electrodes are used that can react with oxygen.
Lambda uses the principle of galvanic cells - changing the conditions of chemical reactions leads to a change in the voltage between the two electrodes. When the mixture is rich and the oxygen content is below the lower threshold, then the voltage rises. If the mixture is lean, the voltage will drop.
Next, the impulse that occurs at the stage of chemical reactions is sent to the ECU, where the parameters are compared with the fuel maps stored in the memory. As a result, the operation of the power system is adjusted.
Related article: How to make a foam generator for a car wash with your own hands
The oxygen sensor operates on chemical reactions, but its design is relatively simple. The main element is a special tip made of ceramic materials. Zirconium dioxide and, less commonly, titanium dioxide are used as raw materials.
The tip is coated with platinum - it is this layer that reacts with oxygen. One side of this tip is in contact with the exhaust gases, the other side with the air in the atmosphere.
The lambda probe electrodes have one feature. So that the reaction is more efficient and the indicators are accurate, measurements of the oxygen content in the exhaust are carried out under certain temperatures.
In order for the tip to reach the performance characteristics and the required electrical conductivity, the temperature of the environment should be 300-400 degrees.
To ensure the required temperature regime, the lambda probe was initially installed in close proximity to the exhaust manifold. This ensured the desired temperature after warming up the internal combustion engine. The sensor did not start working immediately. Before the lambda warmed up enough and began to produce accurate parameters, the ECU used signals from other sensors. The optimal mixture was not prepared during the heating process.
Some oxygen sensor models are equipped with electric heaters. Thanks to them, the lambda can quickly reach operating temperature conditions. Heating uses energy from the vehicle's on-board network.
Signs and causes of lambda probe malfunction
According to statistics, oxygen sensors fail gradually, so you can identify its malfunction if you pay attention to the following “symptoms” in time:
- The idle speed began to drop or “float”.
- The car jerks, and after starting the engine, popping noises uncharacteristic of the engine are heard.
- The engine power has decreased and when you press the gas pedal there is a slow response.
- The engine overheats greatly and fuel consumption has increased.
- The smell in the exhaust pipe has changed (exhaust gases have become more toxic).
As a result of a failed sensor, the quality of the fuel mixture entering the combustion chamber deteriorates, which disrupts the smooth operation of the engine. There can be many reasons for this:
- Incorrect operation of the filament circuit or reduced sensitivity of the sensor tip.
- Low-quality fuel with a high content of iron, lead, oil decay particles and other harmful inclusions. All these substances stick to the platinum electrodes, causing the sensor to malfunction.
- Problems with the lambda probe heating system. If the heating stops functioning as it should, the oxygen sensor will produce inaccurate data.
- Overheating of the regulator housing. This happens if the ignition timing is incorrectly set.
- Worn oil scraper rings. In this case, engine fluid enters the exhaust pipe, which affects the lambda probe.
- If the engine is started repeatedly.
- Using sealants (especially silicone) to install lambda probes.
- The compression level in the engine cylinders is impaired. In this case, the combustible mixture burns unevenly.
- Clogged engine petrol injectors.
If you notice that the lambda probe is not working, you should not ignore the symptoms, as otherwise you will cause yourself a lot of problems with your car. The fact is that most modern cars are equipped with an emergency locking unit, which can work at the most unfortunate moment. However, the impossibility of further movement is not the worst thing. If the sensor becomes depressurized, the injection system will fail and you will have to pay for expensive repairs to a more serious unit.
Therefore, it is recommended to periodically check the condition of the lambda probe. You can do this yourself.
Purpose and principle of operation of the lambda probe
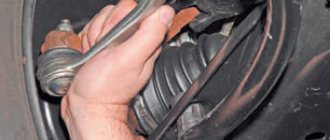
Lambda probe mounted on the exhaust pipe
Strict environmental requirements for cars force manufacturers to use catalytic converters that reduce exhaust toxicity. But its efficient operation cannot be achieved without controlling the composition of the air-fuel mixture. Such control is carried out by an oxygen sensor, also known as a λ-probe, the operation of which is based on the use of feedback from the device and the fuel system with a discrete or electronic injection system.
We recommend: How to fix poor heating of the Daewoo Nexia stove
The amount of excess air is measured by determining the residual oxygen in the exhaust gas. To do this, the lambda probe is placed in front of the exhaust manifold catalyst. The sensor signal is processed by the control unit and optimizes the air-fuel mixture, more accurately dosing the fuel supply to the injectors. On some car models, a second device is installed after the catalyst, which makes the preparation of the mixture even more accurate.
The lambda probe works as a galvanic cell with a solid electrode made in the form of ceramics made of zirconium dioxide doped with yttria, on which platinum is deposited, which acts as electrodes. One of them records readings of atmospheric air, and the second - exhaust gas. Effective operation of the device is possible when temperatures exceed 300°C, when the zirconium electrolyte becomes conductive. The output voltage appears from the difference in the amount of oxygen in the atmosphere and exhaust gas.
Oxygen sensor device (lambda probe)
There are two types of λ-probe - broadband and two-point. The first type has higher information content, which allows you to more accurately tune the operation of the engine. The device is made of materials that can withstand elevated temperatures. The operating principle of all types of sensor is the same, and is as follows:
- Two-point measures the oxygen level in the engine exhaust and atmosphere using electrodes on which the potential difference changes depending on the oxygen level. The signal is received by the engine control unit, after which the fuel supply to the cylinders by the injectors is automatically adjusted.
- The broadband consists of an injection element and a point-to-point element. A constant voltage of 450 mV is maintained at its electrodes by adjusting the pumping current. A decrease in oxygen content in the exhaust leads to an increase in voltage at the electrodes. After receiving the signal, the control unit creates the necessary current on the injection element to pump or pump out air to bring it to the standard voltage. So, when the fuel-air mixture is excessively rich, the control unit sends a command to pump in an additional portion of air, and when the mixture is lean, it affects the injection system.
Methods for checking an oxygen sensor
The check is carried out with the engine running. There are several ways to check the oxygen sensor:
- Using a multimeter (tester). You need to measure voltage and resistance. The probes are connected to the contacts in the plug, and measurements are taken in different operating modes of the internal combustion engine. If the lambda is fully operational, at XX speed the voltage will fluctuate between 0.1-0.9 volts. The disadvantage of this method is the inability to measure the rate at which the voltage changes.
- An oscilloscope. The test allows you to see the rate at which the voltage changes. It should not be more than 0.2-0.3 seconds. If at least one of the two described parameters is significantly outside the permissible limits, then the component must be cleaned or replaced.
- Reading errors from the on-board system. If the “Check Engine” icon appears on the dashboard, this may indicate a failure of the lambda probe. To determine exactly what is faulty, you need to conduct computer diagnostics (read the error from the ECU). Certain codes indicate exactly this problem; they are listed in the table.
Instructions for repairing and replacing the sensor
You can replace or restore the controller yourself.
How to remove the sensor
Removing the device, regardless of the machine model, is done as follows:
- Warm up the surface of the part to approximately 60 degrees. To do this, you can use a regular lighter or torch. Warming up will make it easier to remove the device from the seat.
- Disconnect the wires connected to the part.
- Carefully unscrew the oxygen sensor. It is not recommended to use special tools for dismantling.
- Remove the protective cap.
Diman Stepanenko spoke about dismantling the lambda probe on his own.
Cleaning and Soaking
There are two options for restoring the oxygen sensor:
- the first - using orthophosphoric acid;
- the second - with phosphoric acid and a burner.
It must be taken into account that phosphoric acid or another similar product belongs to the category of hazardous substances. When working with a substance, it is important to remember safety rules. Acid should not be allowed to enter the mucous membranes or inside the body.
First way
This method cannot be called accelerated, since the consumer needs to gain full or at least partial access to the ceramic surface of the device. This component is hidden behind a protective cap made of metal; it is not easy to dismantle. Do not use a hacksaw for removal as it will damage the work surface. Dismantling is carried out using a lathe - at the base of the oxygen sensor, you need to cut off the protective cap using a cutter. The cutting is done close to the thread.
If it is not possible to use the machine, you can use a file. It is not possible to completely remove the cap with this tool, but you can make small windows about 5 mm in size on it. Approximately 100 ml of orthophosphoric acid is used for cleaning. If it is not available, you can use a rust converter.
Device recovery:
- Pour the liquid into a glass container. You can use jars, glasses, etc.
- Place the oxygen sensor core into the container. The controller cannot be completely immersed in liquid. Wait about twenty minutes.
- Remove the sensor from the container and rinse its base with tap water. Wait until the device is completely dry.
- If you are unable to remove the dark deposits on the core the first time, repeat the procedure. It is necessary to ensure that the element again becomes a metallic color.
- If, after several attempts, high-quality cleaning fails, you can use a brush to enhance the effect of the product. The base of the device is wetted and treated with it. As a result, the plaque should be removed. If the protective cap has been removed, then the brush will not be needed. It is better to use a toothbrush instead.
- After cleaning has been completely completed, the sensor is washed. If the cap has been removed, then after restoration it must be put back in place. For this, argon welding is used.
This is interesting: How to check the ignition coil with a multimeter
When using this method, please note:
- If the device is heavily soiled, then twenty minutes will not be enough to restore it. For critical blockages, the soaking procedure can be extended to three hours. In some situations, cleaning may take a full night, at least eight hours.
- After cleaning, you need to check how effectively the procedure was performed. Diagnostics will require some time for the car owner to understand how the car behaves and how much fuel it “eats.” If the malfunction indicator on the device remains lit, then the controller could not be repaired.
- If the machine is equipped with a sensor whose protective cap is equipped with a double shell, then it will not be possible to make a hole in it with a file. To solve the problem, you need to soak the device in acid or another product with the cap itself.
Second way
To restore the controller you will need the same acid, as well as a gas burner or stove. When using a household stove, give preference to a small burner.
Cleaning procedure:
- The lid is removed from the burner. Then it is turned over and installed back, with a slight offset to the side. It is necessary to install the lid so that it covers the pipe itself from liquid getting inside.
- The fire on the burner is lit.
- The lambda probe core must be dipped in a container of acid, then taken with pliers and heated over a fire. This will cause the acid to boil and the substance will begin to splash. A greenish tint of salt will appear on the working surface of the device.
- Wait until the substance has completely boiled away. Rinse the controller with clean water and then repeat the cleaning procedure. These steps must be continued until the controller is completely shiny. This may take ten minutes or more. Before further installation, the thread of the lambda probe must be treated with graphite lubricant, which will prevent the oxygen sensor from sticking to the threaded hole.
Installing a lambda probe
Installation of the device is carried out in the reverse order:
- A protective cap is installed on the sensor.
- Wires are connected to the device.
- The controller is installed in the seat and screwed in.
How to check a lambda probe
If you notice the signs of a malfunctioning lambda probe described above, then you need to check it immediately. It is best to check the lambda probe using professional equipment. Often the test is carried out using an electronic oscilloscope. The process itself occurs while the engine is running, since otherwise the data cannot be obtained. Many service stations will be able to provide you with such a relatively inexpensive service.
We recommend: How to determine what is knocking in the engine
Although you can check the sensor with a voltmeter at home, if the sensor is not warmed up, you may get incorrect data.
Replacing the lambda probe
Replacing the lambda probe
The lambda probe is not repairable, so if it completely fails, it is replaced with a new one.
If cleaning does not help, then the lambda probe must be replaced. Lambda probe repair is not carried out, either in a car service center or with your own hands. There are two sensitive threads made of rare earth or precious metals that burn out and cannot be replaced. As a rule, the price of a lambda probe is about 3-4 thousand rubles, but it can fluctuate depending on the model and class of the car. You can also install a universal Bosch lambda probe, which is attached using a special adapter and is suitable for any car. It can replace even a more modern broadband lambda probe, which costs several times more. The old lambda probe is unscrewed and simply replaced with a new one. If it is replaced with a similar, original one, then no adjustments are needed. If a different lambda probe is installed, you may have to change the connection plug. When installing a new sensor, the threads must be lubricated with sealing paste to avoid depressurization of the manifold. In addition, such a sensor can then be easily unscrewed and cleaned, since it will not stick.
Detailed problem definition
Common signs of a malfunctioning lambda probe include the following:
- increased fuel consumption;
- the occurrence of jerking while driving;
- a sharp decrease in the power of the power unit;
- unstable idle;
- the appearance of a sharp, toxic odor in the exhaust gases of a car.
It must be emphasized that the symptoms listed above are not always the result of a malfunction of the oxygen concentration sensor. If these symptoms are detected, the lambda probe must be thoroughly checked. Let's take a closer look at this process.
Reasons for failure of the lambda probe
- Poor quality fuel. The main reason for lambda probe failure is the use of low-quality fuel. Because of this, a large amount of harmful impurities is deposited on the surface of the sensor and it becomes clogged. Therefore, it is necessary to use only high-quality fuel in order for all engine components to operate for a long time and correctly.
- Lifetime. On average, a lambda probe works normally until the mileage is 100-150 thousand. When using high-quality fuel and an original sensor, this figure may be higher. Low-quality non-original sensors have a much shorter service life.
- Wiring problems. The lambda probe is connected to the ECU using conventional copper wiring, which can break due to the high operating temperature of the manifold.