Now you need to buy:
- Main and connecting rod bearings;
- Pistons with a set of rings.
Having bored it, wash the parts with kerosene and unscrew the four plugs. Oil, antifreeze, and debris are not allowed in blind threaded holes - because the liquid does not compress and the threads are damaged. We check the cylinder head, i.e. plane of contact with the block, valves, valve guides, change oil seals.
It would be a good idea to take the cylinder head to the factory for grinding, since it is too tedious and inconvenient to grind 16 valves. When everything is ready, you can start assembling the engine.
When assembling, it is important to work with clean hands and tools. Bolts, nuts, etc. with bad threads we replace them with new ones, it’s better not to save money. It is necessary to tighten without effort - the thread can easily break, and the restoration process is very difficult. It would be a good idea to coat all the gaskets with sealant, and wipe the areas that touch them and degrease them with a solvent.
As a result, the engine will be clean during operation and nothing will leak.
Place the cylinder head and insert the CV thrust half-rings with the antifriction layer facing outward.
Disassembly
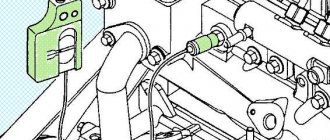
Unscrew nuts 1 and remove screen 5 of the phase sensor, bracket 2 for lifting the engine and exhaust manifold 6.
Remove the exhaust manifold gaskets.
Unscrew bolt 3 and remove the 4th phase sensor.
Unscrew the emergency oil pressure sensors 7 and the oil pressure indicator 8.
Loosen clamp 1 and remove the hose from the idle air regulator pipe.
Unscrew nuts 2 and remove receiver 3 from the inlet pipe.
Remove the receiver gasket.
Unscrew nuts 1 and remove intake pipe 2 along with injectors and fuel line (not shown in the photo).
Remove the intake pipe gasket.
Unscrew bolts 1 and remove rear cover 2 of the block head.
Remove the cover gasket
Remove valve lifters 1. It is more convenient to remove hydraulic pushers using a magnet or suction cup
Hydraulic pushers cannot be swapped, so before removal they must be marked so that they can be installed in their place during assembly.
Hydraulic lifters should be stored in the same position as they are on the valves, so that oil does not leak out of them.
If the design of the puller does not provide a valve stop, place a suitable stop under it.
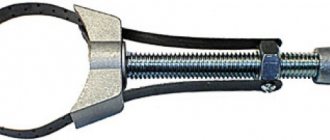
We compress the springs with a desiccant. To make the plate of springs come off the crackers more easily, you can apply a light blow with a hammer to the persistent bipod of the desiccant.
We take out two crackers with tweezers and smoothly release the springs.
Remove the top plate and two valve springs.
Use a puller to remove the oil seal
Using a screwdriver, use a screwdriver and remove the support washer 1 of the valve springs.
We turn the cylinder head over and remove the valve, marking its installation location so that during subsequent assembly the valve will return to its original place.
Similarly, remove and mark the remaining valves.
Press out worn valve guides using a mandrel
Using an “8” hex wrench, unscrew the oil channel plugs.
2_5.jpg
We turn the HF by the counterweights; it should rotate easily, by hand, and not with the help of a crowbar.
Next, install the rear oil seal in the holder and screw it to the cylinder head, not forgetting about the gasket. We lubricate the outer part of the oil seal with sealant, and fill the space between the working edge and the boot with lithol.
We twist the flywheel. The flywheel on the HF is placed in only one position. A special washer is installed under the bolts. To lock the crankshaft, you need to insert the handle of a hammer between the block wall and the counterweight.
We install a spacer washer and a new bearing for the gearbox input shaft.
Further repairs of the 406 engine can be carried out conveniently by placing the block on the flywheel.
We assemble the connecting rod and piston group. The new pistons come with pins and retaining rings.
Before assembly, the piston must be heated and the pin lubricated with oil. We immediately install one retaining ring into the piston, making sure that they fit into their grooves in the piston so as not to install the pin further than necessary. The inscription on the front of the piston and the protrusion on the lower head of the connecting rod should be in the same direction.
We install the retaining rings, making sure that they fit into their grooves in the piston. On the packages of the rings there is a diagram of their installation.
Gazelle 406 engine repair: price
| Engine repair Gazelle ZMZ 406; 405 and their modifications | Price |
| engine removal/installation | from 21600 |
| engine repair | from 36000 |
| replacing the engine cylinder head gasket | from 9180 |
| replacing the crankshaft oil seal (front or rear) of the engine | from 7200 |
| Engine repair Gazelle UMZ-4216 | Price |
| engine removal/installation | from 13680 |
| engine repair | from 33660 |
| replacing the engine cylinder head gasket | from 9900 |
| replacing the crankshaft oil seal (front or rear) of the engine | from 15336 |
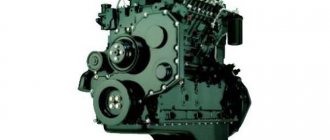
| Engine repair Gazelle Cummins (Cummins) | Price |
| engine removal/installation | from 18900 |
| engine repair | from 27000 |
| replacing the engine cylinder head gasket | from 15660 |
| replacing the crankshaft oil seal (front or rear) of the engine | from 5220 |
Engine repair 406 Gazelle
The ZMZ 406 engines on the Gazelle are carburetor engines with an electronic ignition system. Compared to the ZMZ 402, these engines have taken root in commercial vehicles better, but the problem with the cooling system has not been solved here either. Gazelle drivers try to take all measures to avoid overheating; one of such solutions is installing a larger three-row cooling radiator.
The ZMZ 4063.10 engine has a long service life; before major repairs during normal operation (without overheating), the engine can easily cover 250-300 thousand km. Routine maintenance of the internal combustion engine is also required, mainly it is necessary to change:
If the motor overheats, the head of the block not only warps, it completely fails. Buying a new cylinder head is expensive, so overheating must be carefully avoided. There is one more disease of these engines, but it cannot be called serious - oil almost constantly leaks from under the valve cover. When you replace the gasket, the oil stops leaking for a while, but not for long.
Engine repairs on a Gazelle with a 406 power unit are often done in car repair shops; not all drivers can do the work themselves - the internal combustion engine has a more complex design.
Gazelle engine repair: price
| Engine repair Gazelle ZMZ 406; 405 and their modifications | Price |
| engine removal/installation | from 21600 |
| engine repair | from 36000 |
| replacing the engine cylinder head gasket | from 9180 |
| replacing the crankshaft oil seal (front or rear) of the engine | from 7200 |
| Engine repair Gazelle UMZ-4216 | Price |
| engine removal/installation | from 13680 |
| engine repair | from 33660 |
| replacing the engine cylinder head gasket | from 9900 |
| replacing the crankshaft oil seal (front or rear) of the engine | from 15336 |
| Engine repair Gazelle Cummins (Cummins) | Price |
| engine removal/installation | from 18900 |
| engine repair | from 27000 |
| replacing the engine cylinder head gasket | from 15660 |
| replacing the crankshaft oil seal (front or rear) of the engine | from 5220 |
Inspection, troubleshooting and repair of the block head
1. After disassembling the cylinder head, wash all parts in gasoline, wipe and dry. Clean combustion chambers and valves from carbon deposits.
2. Inspect the block head. If there are cracks on the bridges between the valve seats, burn marks and cracks on the walls of the combustion chamber, replace the block head.
3. Using a metal ruler and feeler gauges, check whether the flatness of the surface of the head adjacent to the block is broken.
To do this, place the ruler with its edge on the surface of the block head, in the middle, along and then across, and use a feeler gauge to measure the gap between the surface of the head and the ruler. If the gap exceeds 0.1 mm, replace the head.
4. Check the clearances in the camshaft bearings.
5. Check the gaps between the hydraulic valve lifters and the channels for the hydraulic lifters in the cylinder head. The gap is calculated as the difference between the diameter of the channel and the diameter of the hydraulic pusher.
The nominal diameter of the channel for the hydraulic pusher is 35.0 +0.025 mm, the maximum permissible is 35.1 mm. The nominal diameter of the hydraulic pusher is 35.0 -0.025 and 35.0 -0.041 mm, the maximum permissible diameter is 34.95 mm.
The maximum permissible gap is 0.15 mm. If the gap exceeds the specified value, replace the hydraulic tappet. If this does not give a positive result, replace the block head.
6. Inspect the valves. If cracks, warping of the valve head, burnout, or deformation of the stem are detected on the working face of the valve, the valve must be replaced.
Minor marks and scratches on the working face of the valve can be removed by lapping.
The valve is ground into the seat as follows:
— insert the valve into the block head;
— put a valve grinding device on the valve stem;
— apply a thin layer of lapping paste, which is a mixture of fine abrasive powder with engine oil, to the working chamfer of the valve;
— use the tool to turn the valve in both directions, periodically pressing it against the seat.
An external sign of satisfactory lapping is the uniform matte gray color of the working chamfer of the seat and valve.
After lapping, wipe the seat and valve with a clean cloth and rinse thoroughly to remove any remaining lapping paste. To check the tightness of the valve, install it in the block head along with springs and cotters.
After this, place the block head on its side and pour kerosene into the channel closed by the valve. If within 3 min. kerosene will not leak into the combustion chamber, the valve is considered sealed.
7. Check the condition of the valve springs. Springs that are bent, cracked or broken must be replaced.
8. Check the condition of the valve seats. There should be no signs of wear, holes, corrosion, etc. on the working chamfers of the seats.
Minor damage (small marks, scratches, etc.) can be removed by grinding the valves. More significant defects can be removed by sanding.
After grinding, check the runout of the seat chamfer relative to the hole in the valve guide; the maximum permissible runout is 0.05 mm.
After grinding, grind the valves. Then thoroughly clean the block head and blow it with compressed air so that there are no abrasive particles left in the channels closed by the valves and in the combustion chambers.
Please note that after grinding the seat, the valve fits deeper into the seat. Therefore, after grinding, you need to measure the distance between the end of the valve stem pressed against the seat and the camshaft axis.
If this distance is less than 35.5 mm, replace the cylinder head, since in this case the normal operation of the valve lifters is disrupted.
9. Check the gaps between the guide bushings and valves. The clearance is calculated as the difference between the diameter of the hole in the bushing and the diameter of the valve stem.
The maximum permissible gap is 0.2 mm.
If the gap exceeds the specified value, replace the valve and guide sleeve. The old bushing is pressed out using a mandrel from the side of the combustion chamber.
Install new bushings with retaining rings put on them until the retaining ring stops in the plane of the block head on the side of the hole for the hydraulic pushers.
Before installation, the bushings must be cooled to –40…45°C, and the block head must be heated to a temperature of +160…175°C.
The bushing should be inserted into the block head freely or with little force.
Valve guides are supplied as spare parts in three repair sizes. The first repair size with the outer diameter of the bushing increased by 0.02 mm.
The second is the outer diameter of the sleeve 14.2 +0.053 and 14.2 +0.040 mm, the third is with a diameter increased by 0.02 mm from the second size. When installing bushings of the first repair size, do not bore the hole for the bushing in the block head.
When installing bushings of the second and third repair sizes, you need to bore the hole to a diameter of 14.2 -0.023 and 14.2 -0.050 mm.
After installing the new bushings, drill out the hole for the valves in them. Then grind the valve seats as indicated above.
10. In order to check the block head for cracks, you need to connect a hose for supplying compressed air to one of the holes in the cooling jacket. Plug all holes in the head with wooden plugs.
Lower the head into a bath of water and apply compressed air at a pressure of 1.5 atm. In places where there are cracks, air bubbles will come out.
Repair of ZMZ 405, 406 engines on Gazelle cars
The ZMZ 405, 406 engines in Gazelle cars are among the most common and reliable, having proven themselves even in difficult conditions of intensive use on Russian roads.
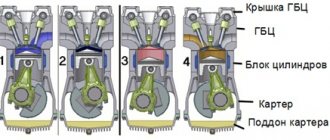
The engines have a simple and reliable design, including 4 cylinders and 16 valves. If operating conditions are observed (for example, with regular engine oil changes every 10,000 kilometers), many cars last not 300,000 kilometers, as the manufacturer promises, but much more - up to 500,000 kilometers.
At the same time, even such a reliable unit requires regular maintenance, and often partial repairs, which makes it possible to postpone major intervention for a long time.
The main types of malfunctions of ZMZ 405, 406 engines on Gazelle cars
Malfunctions of Gazelle engines can be divided into three categories:
When should you contact a specialist?
Signs of engine problems are:
How are Gazelle engines repaired?
Repair of ZMZ 405, 406 engines on Gazelle cars is carried out according to the following scheme:
Why should you entrust the repair of ZMZ 405, 406 engines on Gazelle cars to our masters?
By entrusting your Gazelle car to us, you can be sure that it will be serviced professionally. We offer:
All types of work are provided with a guarantee - its period is calculated individually and does not depend on the mileage of the car during this period. Contact us! Let us help your Gazelle's engine last as long as possible!