All modern cars are equipped with a honeycomb exhaust gas emission neutralizer - a catalyst. It is named after the principle of chemical reactions occurring there, where the noble elements of the filling accelerate and make possible the processing of harmful substances into neutral ones at high speed. But sometimes this useful device itself becomes a source of big problems.
Do you need an oxygen sensor emulator?
- The ECU puts the engine into emergency mode when the engine operates according to the specified fuel maps without taking into account the readings of the oxygen sensors.
- The “Check Engine” indicator lights up on the dashboard and an enriched fuel mixture enters the cylinders.
- Soot on the spark plugs increases, the power of the internal combustion engine decreases and the oil becomes contaminated.
- Increased fuel consumption entails extra financial costs.
Almost all automakers recommend replacing a faulty converter. But not every car owner will do this, because the price of some copies, for example, for VAZ, reaches 60,000 rubles. It is also worth adding the cost of installing the device. Therefore, many car enthusiasts are interested in what a do-it-yourself catalyst blende is and the scheme for its implementation.
The essence of the emulator's operation is to change the real sensor readings, after which the ECU switches to normal operation. In this case, the neutralizer itself can be cut out or replaced with a flame arrester. The procedure for installing a simulator is no more complicated than increasing the ground clearance of a Renault Duster.
How to make a mechanical corrector for the exhaust system?
To implement a mechanical blende for the catalyst with your own hands, it is recommended to use blanks made of heat-resistant steel or bronze. This way the parts will not be deformed due to high temperature. There are two designs, but both options require a lathe or the help of an experienced turner.
First option
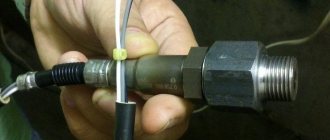
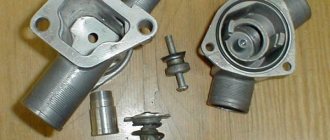
It is a sleeve 40-100 mm long. On one side, a standard sensor is screwed in, and on the other, the circulation of gases is limited by a small diameter hole. The essence of the “device” is that the composition of the exhaust mixture is averaged, because the lambda probe is removed from the gas stream itself and, accordingly, catches fewer toxic substances. Due to this, it is possible to deceive the ECU.
A typical drawing with spacer dimensions can be changed in terms of dimensions, it depends on the model and brand of the car. The optimal inlet diameter remains unchanged - 1.5-2 mm. In some cases, the length of the bushing may not allow it to be installed in its original place. As a result, you have to weld the mount elsewhere in the exhaust pipe.
Second option
- Exhaust gases enter the bushing body through a small diameter hole.
- In the volume of the spacer, excess CH and CO are subject to oxidation by oxygen, as a result of which the concentration of harmful substances decreases.
- The ongoing processes change the shape of the sinusoid, and the electronic system believes that the catalytic converter is operating normally.
A do-it-yourself catalyst blende made according to the above diagram has advantages similar to the previous option. Here the standard probe will be raised by 32 mm, although this is less than 40-100 mm.
Features of spacer installation
The installation procedure is not difficult, and begins with placing the car on an overpass or lift. Further actions occur according to the following scheme:
- Disconnect the negative terminal of the battery.
- Unscrew the controller.
- Screw the bushing onto the probe.
- Screw the upgraded unit into place.
- Connect the battery.
After the first start, the Check Engine light should go off. The motor will now operate normally.
There are two ways to fix the problem
1. Installation of a “fake” device on the sensor that will correct the readings from the probe.
2. Making changes, adjusting the software to eliminate the option of adjusting the fuel condition coefficient based on tabular data for the car model.
Lambda probe decoy as a way to troubleshoot an oxygen sensor (OK)
A decoy installed on the oxygen sensor will solve the problem of failure or incorrect operation of the system. The mounted device will adjust the magnitude of the pulses from the probes, and the Check Engine indicator signal on the dashboard will no longer bother the driver when the vehicle is moving.
There are two types of decoys that can be installed to correct the status signal of the car's exhaust system. These are mechanical and electronic converters.
Do-it-yourself mechanical snag
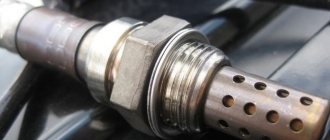
The mechanical blende of the lambda probe is structurally a spacer made of bronze or heat-resistant steel. The internal volume, as well as the cavities of the part, are filled with ceramic chips with catalytic spraying, which significantly speeds up the process of afterburning exhaust gases and thereby ensures a difference in the pulses of the first and second sensors.
It is quite easy to make a mechanical blende for a lambda probe. Anyone with the slightest idea about turning can do this. For production, you will need a blank of the appropriate size from a suitable metal. Using a machine, it is given the desired shape.
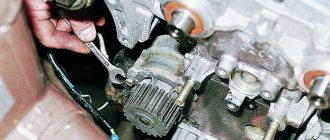
The principle of operation is quite simple - the bushing has a hole with an internal diameter of 2 mm, thereby moving the oxygen sensor further away from the exhaust gas flow. You can install the snag yourself in the garage by placing the car in an inspection hole. The installation sequence is the same for all cars: VAZ, GAZ or foreign car. Before removing the sensor, you must remove the negative terminal from the battery. Next, select a convenient, suitable key and unscrew the part.
The metal spacer is screwed onto the probe and installed back into the socket. Next, you need to connect the battery and start the car engine. The situation with the appearance of an error may repeat again - you should remove the terminal again and put it back on, rebooting the system.
A solution to the problem using a mechanical lambda probe is a budget method available to every car owner. It is worth noting that mechanical decoys are compatible with exhaust systems of almost all cars. These are vehicles of domestic and foreign production on which oxygen sensors are screwed into sockets.
Electronic lambda probe decoy
– the second way to regulate the state of exhaust gases on a car
Another option for eliminating problems with oxygen sensors on a car is to install electronic lambda probe spoofs. This option not only eliminates the problem (“hardens” the system) when the manifold is not fixed (or missing), the device takes part in adjusting the quality of the fuel, ensuring the correct operation of the power unit.
Structurally, the blende is a single-chip microprocessor capable of analyzing the processes occurring in the catalyst: it receives the signal from the first sensor, converts it and issues an auto signal to the processor, similar to that supplied by the second DC, provided that the catalyst is operating normally.
How to make an electronic lambda probe with your own hands
This method of adjusting the operation of oxygen sensors is suitable for those car enthusiasts who love and know how to work with a soldering iron and small parts. How to make, drawings, reviews on the operation of cars with similar systems, as well as how to correctly install the equipment on various types of vehicles can be emphasized on car enthusiast forums.
Do-it-yourself electronic catalyst blende and emulator circuit
A real electronic emulator is a microprocessor device consisting of a single-chip microcircuit. The principle of its operation is based on the formation of an output signal, which in shape corresponds to the information in the working neutralizer. This option is difficult to do on your own, so you should immediately consider a simpler method. To implement it you need to prepare:
- Electric soldering iron.
- Solder and rosin.
- Knife and side cutters.
- Resistance 200 Kom, power 0.25 W.
- The capacitor is non-polar with a capacity of 4.7 microfarads.
The principle of operation of the system is to average the readings of the oxygen sensor, which is installed after the converter. The method of connecting emulator components is simple and universal. All elements are connected directly to the vehicle’s on-board network conductors. Before connecting the electronic decoy to the catalyst with your own hands, you should disconnect the battery to eliminate the possibility of a short circuit.
After the implementation of the project, the car demonstrates good dynamics. However, the effect of over-enrichment of the combustible mixture may occur, which causes the deposition of a layer of soot in the exhaust manifold. In addition, on some models error P0133 appears, indicating a low response rate of the lambda probe.
What do spare parts manufacturers offer?
On the shelves of auto stores you can find all kinds of parts for tuning the exhaust system. The production of mechanical simulators of the normal operation of the catalytic converter is made of bronze or chrome-plated steel. The price of such devices ranges from 400 to 800 rubles, and a standard installation at a service station will cost about 500 rubles.
A spacer with a minicatalyst is offered much more expensive than its elementary counterpart, its cost is 1,500-4,000 rubles. Simple electronic emulators of industrial production are sold for 1,500-3,000 rubles. The range of prices for flashing ECU software is quite wide - from 1,000 to 30,000 rubles.
DIY lambda probe emulator circuit
Publication date: January 16, 2021. Category: Automotive equipment.
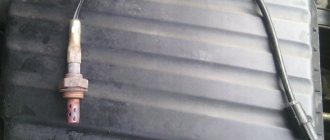
Lambda probe (also called oxygen controller, O2 sensor, DC) is an integral part of the exhaust system of vehicles that meet EURO-4 environmental standards and higher. This miniature device (usually 2 or more lambda probes are installed) monitors the O2 content in vehicle exhaust mixtures, thereby significantly reducing the emission of toxic waste into the atmosphere.
If the DC is not operating correctly or if the lambda probe is disconnected, the functioning of the power unit may be disrupted, causing the engine to go into emergency mode (the Check Engine light will light up on the panel). To prevent this from happening, the car system can be outsmarted by installing a decoy.
Varieties of hand-made trompe l'oeil
A decoy, also known as an emulator, is a device that does not determine the oxygen content in gases. It only serves to fool the car's electronic control unit.
Changed controller firmware
You can reflash it yourself by downloading the software and instructions on how to do it. It's better to give it to a specialist. In electronic mode, the oxygen sensor is turned off through a certain program. In fact, it should turn out that the ECU will receive only the most correct value from the catalyst and there will be no errors on the instrument panel.
Without a lambda probe, the engine operates in standard mode.
Mechanical dummy
This method is much simpler. There is no need to reflash the device program. The point is simple. You just need to insert a suitable sleeve between the probe and the sensor mounting location (the surface of the manifold pipe).
The bushing material must be bronze or steel, resistant to high temperatures. The bushing is a hollow cylinder.
To make your own blende, you will need a lathe and the ability to sharpen. Therefore, it is better to give it to some friend who works at the plant. This is usually how it is done.
Ready-made options are sold. The price of ready-made blende in the store is up to 1000 rubles for 2021. We find the location of the oxygen sensor, unscrew it, screw on a new one and that’s it.
Electronic snag
There is another option to deceive the ECU - an electronic version, a dummy lambda probe. It always conveys a good value of the oxygen content in the exhaust gases.
This trick is based on a programmable processor. This method of deceiving the on-board computer due to a breakdown of the oxygen sensor is used when the second lambda sensor, that is, the one located in the catalyst, has broken down.
The following materials and tools will be required:
- Resistor with a resistance of 1 Ohm.
- Soldering iron, tin, rosin.
- Non-polar capacitor with a capacity of 1 µF (micro Farad).
Typically, the second lambda probe of the electronic type has 2 black wires, white and blue.
How to install the oxygen sensor decoy:
- First of all, disconnect the ground from the battery.
- Disconnect the blue wire and install a resistor. No black wires are required.
- We connect a capacitor to the white and blue wires.
- You can install it anywhere. It can be between the seats, it can be under the hood, it can be in the place for the connector.
Mechanical snag of the lambda probe (“screw-in”)
“Vvertysh” is a bushing made of bronze or heat-resistant steel. The inside of such a “spacer” and its cavities are filled with ceramic chips with a special catalytic coating. Due to this, the exhaust gases are burned faster, which, in turn, leads to different indicators of pulses 1 and 2 DC.
Important! Any snag is installed only on a working lambda probe.
A homemade lambda probe decoy, the diagram of which is presented below, is easy to manufacture. To do this you will need to prepare:
The blende is made on a processing lathe. If there is none, then you can contact a specialist by providing him with a drawing.
The resulting part is compatible with most exhaust systems of both domestic and foreign cars.
Installation of the lambda probe blende is carried out as follows:
- Lift the car onto the overpass.
- Disconnect the negative terminal on the battery.
- Unscrew the first (upper) probe (if there are two of them, then remove the one located between the catalyst and the exhaust manifold).
- Screw the lambda probe into the spacer.
- Reinstall the "advanced" sensor.
- Connect the terminal to the battery.
Healthy! Typically, mechanical blending of the second lambda probe is not performed, since this DC is protected by a catalyst and only controls its condition. The most sensitive is the first sensor, which is installed closest to the collector.
After this, the “Check Engine” system error should disappear. If this method does not work, you can use a more expensive deception.
Which Lambda Probe Should I Install?
lambda probe : picture
From the article you will learn how to make a lambda probe with your own hands and how to install it on your car. How well the air-fuel mixture burns in an engine depends on its efficiency. It is very important to choose the best proportion of gasoline and air, depending on the load on the engine.
While in older cars all ownership options and fuel quantities depended on the rules of the carburetor, the situation is somewhat different in modern cars. Everything was transferred to the reliable hands of microprocessor technology and a large number of sensors.
Content
How does the injection system work?
There are several important components available in the injection system:
- Fuel tank.
- Fuel level sensor in one housing with pump and filter.
- Fuel rail (installed in the engine compartment on the intake manifold).
- Injectors that provide the consistency of gasoline in the combustion chambers.
- Control device. It is usually installed in the cabin, which allows you to control the flow of the air-fuel mixture.
- An exhaust system that ensures complete removal of harmful substances.
In particular, the latter is a lambda probe mixture. With your own hands (Lancer 9 or Lada with you, it doesn't matter) you can do this quite easily. How to make a lambda jerk on a lambda probe | Nevertheless. But you must consider all the consequences of installing the plugin. The DIY lambda trick of the Priora can also be performed in a conventional design, in any case it will have a significant impact on the operation of the engine.
How many sensors are there in the car?
Oxygen sensors (lambda probes) are installed in the exhaust system of modern cars with a fuel injection system. The system may have one or two oxygen sensors. If installed, it is located after the catalytic converter. If two, before and after.
In this case, a person determines the percentage of oxygen directly at the outlet of the cylinders and transmits his own signal to the electrical control unit. The second one, which is installed after the catalyst, is necessary to adjust the readings of the first one.
How does a lambda probe work?
All auto electronics, which are responsible for the correct formation of consistency, are involved in the distribution of fuel through the injectors. Using an oxygen sensor, the required amount of air is determined to form a high-quality mixture. Narrow settings of the lambda probe allow you to achieve the maximum degree of environmental friendliness and economy.
The fuel burns completely, and the almost clean air coming out of the pipe is a plus for the environment. The correct dose of air and gas increases fuel economy. Naturally, the catalytic converter, along with oxygen sensors, provides measured engine performance. But since it is made of precious metals, its price is very high. And when it doesn't work, a replacement will cost quite a penny. So the idea comes: “But there is a mixture of lambda probes with your own hands (the VAZ-2107 even needs to replace the oxygen sensor), this will not be difficult to do.”
Design features of the oxygen sensor
The appearance of this device is ordinary. a long electrode body from which wires extend. The case has a platinum coating (in particular, this precious metal was discussed above). But the internal structure is more “rich”:
- An iron pin that connects wires to connect to the active electronic element of the sensor.
- Dielectric seal for safety. It has a small hole through which air enters the housing.
- Coated zirconium electrode inside clay tip. When current flows through this electrode, it heats up to a temperature of 300.1000 degrees.
- Protective screen with hood.
READ Which side to install the cabin filter Polo sedan
Sensor types
There are two main types of oxygen sensors currently used in automatic technology:
Regardless of the type, they actually have similar internal arrangements. You acknowledge that there are superficial similarities. There we find the 2nd lambda probe. Honda's combination is reliable, which is why it's our choice. But the mechanism of operation is significantly different. The wideband oxygen sensor is an updated two-point sensor.
It has an injection component which, thanks to voltage fluctuations, sends a signal to the electrical control unit. The current supply of this item may increase or decrease. In this case, a small amount of air enters the gap and is analyzed. In particular, at this stage the concentration of CO in the exhaust gases solidifies. But from time to time, a fake lambda probe is made and installed with your own hands. For example, Chevrolet Lanos works with it in size and does not create errors after refueling with bad gasoline.
Fixing oxygen sensor problems
Of course, this element does not last forever, despite its highest price and platinum in its composition. Of course, the lambda probe is no exception and may one day enjoy a long life. And some symptoms will appear:
- COA levels increase sharply in exhaust gases. Do you need an electronic lambda sensor for Mitsubishi Lancer 9 or a second lambda sensor for Lancer 9? If an oxygen sensor and the CO level is very high, this indicates a failure of the control unit. The content of harmful substances can only be determined using gas analyzers. But it is not profitable to receive it for personal purposes.
- steeply increased fuel consumption. Pay attention to the on-board computer. See what your current gas mileage is. This is the easiest way. You can also judge the frequency of refills.
- And the last sign of tanning on the dashboard is the engine warning light.
Lambda probe decoy. where to cheat for Chevrolet Lanos.
Got it here: If someone is interested but they are cheating on the price, then discuss the price first. Also.
Deception of the second lambda probe (How to apply the mixture to the lambda probe) Mechanical mixture of the lambda probe)
This video shows you how to install a lambda
mechanical
mixture
Who has problems with catalysis.
If it is not possible to analyze the exhaust gases using a special device, this can be done visually. Lambda probe and we put the mixture in its place and screwed it in. Which is acc. Light smoke is a sign that there is too much air in the fuel mixture. Black says a lot of gasoline. Therefore, you can judge the system failure. But the picture is different if there is a trick with the lambda probe. With your own hands (Volkswagen, VAZ, Toyota. For any car) such a device is quite simple.
Causes of breakdowns
It is worth noting that the oxygen sensor is located at the epicenter of fuel combustion. Consequently, the composition of gasoline has a significant impact on the operation of the lambda probe. If gasoline contains many impurities, does not comply with GOST, or is of poor quality, then the oxygen sensor will give an error or an incorrect signal to the electronic control unit. In the worst case scenario, the device will fail. And this is due to the high content of lead, which settles on the sensor and disrupts its operation. But there may be other reasons for breakdowns:
- Mechanical impact. vibrations and too active operation of the car lead to damage or burnout of the body. It's not a good idea to repair or restore it, it's a good idea to buy a new one and install it.
- Incorrect fuel system. If the air-fuel mixture does not burn out completely, soot begins to settle on the lambda probe housing and also gets inside through the air intakes. Of course, cleaning the device first helps. But if you need this procedure more often, you will need to install a new device.
READ VAZ 2114 Error 15 14
Try to diagnose your car from time to time. In this case, it won't surprise you that any element will fail.
Problem solving
Of course, only diagnostics using specialized equipment will give the most accurate answer about breakdowns. But you can detect a sensor failure yourself, just read carefully about the features of the sensor and its characteristics. But installing a lambda probe is extremely rare. With your own hands (VAZ-2114 or any other car, if you have one), you can literally make a blank from available tools. Troubleshooting algorithm:
- Open the hood and locate the exhaust manifold. Work must be carried out with the engine cool, as this may result in serious injury. Find a lambda catalyst. probe .
- Conduct an external inspection. Contamination, soot, and light deposits are signs of a faulty fuel system. Moreover, the last sign indicates that there is too much lead in the gases.
- Replace the oxygen sensor and retest the entire fuel system. If no contamination is observed, continue troubleshooting.
- Disconnect the sensor plug and connect a voltmeter with a scale of up to 2 Volts. On the original lambda probe in the photo, as you can see, it has the number 96394003, just like the Aveo. Start the engine and increase the speed to 2500 rpm, then reduce it to idle. The voltage change should be small. within 0.80.9 volts. If there are no changes or the voltage is zero, we can talk about a breakdown of the sensor.
You can also judge the distribution by other characteristics. Create a vacuum in the vacuum tube artificially. In this case the voltage should be very low. less than 0.2 volts.
Oxygen sensor life
To ensure smooth and stable operation of the vehicle, it is necessary to carry out regular inspections. For example, the lambda probe should be checked every 30 thousand kilometers. Moreover, it has a resource of no more than one hundred thousand. You should not drive a car with an old sensor. this will only lead to the fact that the engine will have to be repaired much earlier. And a question. Is the lambda probe mixture suitable for your car? You can make such a device with your own hands on Kalina in a matter of minutes.
But there is one caveat. An essential element of the catalyst is a mixture of lambda probes with lambda any. The motorist cannot guarantee that the fuel used to refuel the car is of good quality. Of course, everyone is accustomed to filling up with gasoline, which is sold at their favorite gas station. But who knows what kind of gasoline is poured there? Therefore, try to trust branded gas stations that value their name. But if there are no good gas stations nearby, you'll have to settle for what's on hand. And an illuminated combustion engine failure light is a common occurrence, and installing a plug will help get rid of it.
READ Does Lambda Probe Affect Fuel Consumption?
Homemade mixture
It all depends on what money you have. It is worth noting that the mixture of a lambda probe with hands on a VAZ may be the most democratic, it still works without any complaints. The cheapest option. home. Which emulator should be installed on the entire electronic mix of the lambda probe "lambda-um". The body is made of bronze. This metal is better to choose because it has very high heat resistance. In addition, the size of this disk must be exactly the same as that of the sensor itself, so that the exhaust gases do not leak. It's actually a spacer with a small hole. no more than three mm. This spacer is screwed into place of the sensor. And the lambda probe is installed in the gap.
Between the sensor and the hole in the disk there is a layer of ceramic chips, on which a layer of catalyst is applied. Thanks to this, the exhaust gas passes through a thin hole and is oxidized into crumbs. The result is a significant reduction in CO levels. Therefore, a standard oxygen sensor is difficult. But such devices can be installed on budget cars. Expensive cars should not be recycled.
Electronic snag
But if you have the skills to install electrical circuits, you can make a homemade device. You only need one of these two elements. resistor or capacitor. But this lambda probe trick isn't for everyone. With your own hands (Subaru Forester or VAZ, it doesn’t matter) you can do this in accordance with one of the proposed options. But be careful because misunderstanding the mixture will affect the operation of the entire control unit. And if you are not sure, it is better to buy a ready-made microcontroller. The good thing is that he can independently perform the following actions:
- Estimate the gas concentration at the first sensor.
- A pulse corresponding to the previously received signal is then generated.
- Provides an average value for the electronic control unit, which allows the engine to operate normally.
Firmware for electronic control unit
The most effective way. completely change the program built into the control unit. The essence of the entire procedure is to completely or partially get rid of any reaction to changes in readings coming from the oxygen sensor. But please note that the car's warranty will disappear. Therefore, this method, like any other, is not suitable for new cars.
Conclusion
And the most important thing. think, is the game worth the candle? Do you need to do things like mix the lambda probe yourself? For example, Lancer 9, a car, is not a budget car, but a high-end one, so does it make sense to break its design with various household goods? It is reasonable? If you have money for an expensive car, then you should have money to keep it in working condition. If not, why buy such a car?
Source
Electronic snag
Another way to eliminate problems with the DC is to use an electronic decoy of the lambda probe, the diagram of which is presented below. Since the oxygen sensor transmits a signal to the controller, a decoy circuit connected to the wiring from the sensor to the connector will “crude” the system. Thanks to this, in a situation where the lambda probe is faulty, the power unit will continue to operate correctly.
Healthy! The installation locations for such deception may differ depending on the PBX model. For example, it can be mounted in the central tunnel between the seats, in the dashboard or in the engine compartment.
The decoy circuit is a single-chip microprocessor that analyzes the processes in the catalyst, receives data from the first DC, processes it, converts it to the indicators of the second sensor and issues a corresponding signal to the car processor.
To install this type of snag, you will need a lambda probe connection diagram, which looks like this.
As you can see, there are different pinouts of the lambda probe (4 wires, three and two). The colors of the wires may also vary, most often there are products with 4 pins (2 black, white and blue).
To make a deception device, you will need:
- soldering iron with a fine tip and solder;
- rosin;
- non-polar capacitor with a capacity of 1 µF Y5V, +/- 20%;
- resistor (resistance) 1 mOhm, C1-4 imp, 0.25 W;
- knife and insulating tape.
Healthy! Before installation, it is best to place the circuit in a plastic case and fill it with epoxy.
Next, the electronic snag is mounted on the lambda probe with your own hands as follows:
- Disconnect the negative terminal of the battery.
- “Dissect” the wire that goes from the DC itself to the connector.
- Cut the blue wire and connect it back through the resistor.
- Solder a non-polar capacitor between the white and blue wires.
- Insulate connections.
Below is a do-it-yourself diagram of a lambda probe for pinout into 4 wires.
At the final stage, the following should happen.
Such manipulations should not be performed if you do not have the proper experience. Today, stores offer ready-made decoy circuits that even a novice driver can easily install.
Car ECU firmware
When flashing (reflashing) the electronic control unit (ECU), you can completely disable the lower lambda probe, so there is no need to install any decoys at all. But this method of solving the problem has two significant disadvantages. Firstly, the cost of such a service varies in the range of 5,000-10,000 rubles. for budget and common models, but can reach up to 50,000 rubles. if you have a luxury car or just a fairly rare model. Secondly, there is always a risk of losing the ECU if something goes wrong during the firmware process and the unit “burns out” or the new firmware periodically “flies”.
Therefore, although this method solves the problem of a catalyst error, it only makes sense if, along with disabling the oxygen sensor, you will perform some other manipulations with the firmware settings, say, to increase engine power. Otherwise, the game is not worth the candle.
Reflashing the controller
Some particularly sophisticated car owners decide to reflash the control unit, which blocks the processing of signals from the second oxygen sensor. However, it must be taken into account that any changes to the system operation algorithm can lead to irreversible consequences, since returning the factory settings will be almost impossible and costly. Therefore, it is not recommended to perform such manipulations yourself. The same applies to ready-made firmware that is sold on the Internet.
Healthy! When flashing the lambda probes, they are removed.
If you still want to flash the system, then contact a competent specialist who can disable receiving DC data using specialized equipment.
What are the consequences after installing decoys?
You need to understand that any deception is installed at the risk of the car owner. If the installation was carried out incorrectly, you may encounter the following problems:
- Due to the fact that the on-board computer cannot regulate fluid injection, engine malfunction may occur.
- If the circuit is not properly soldered, it may damage the wiring.
- In the process of installing the decoy, you can damage the oxygen sensors, after which you will not even know about their malfunction (since you will already have the decoy installed).
- After such interventions (not only during flashing), the on-board computer may fail.
Any inaccuracy will lead to disastrous consequences, so it is better to install a safer ready-made emulator. Unlike deception, it does not “deceive” the control unit, but only ensures its correct operation by converting the DC signal. A microprocessor is also installed inside the emulator (as in a homemade electronic decoy), which is capable of assessing exhaust gases and analyzing the situation.
Do we remove the catalyst or restore it?
The catalyst is a consumable item and cannot be restored. The only way out of the situation is to remove it. Or replacing it with a ready-made flame arrester.
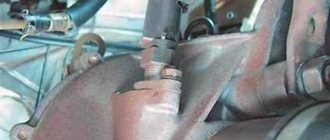
How is the catalyst removed?
Let's consider this procedure in the conditions of a service station. The operation includes several stages. First, the car is driven onto a lift. Next, the specialist finds the location of the catalyst (located immediately behind the exhaust pipe) and begins dismantling it. Depending on the design, the element is secured with three or four bolts. The main problem is that they can stick. In advanced cases, the removal procedure cannot be completed without the use of an angle grinder. So, they cut out part of the pipe along with the fasteners and begin to gut the insides of the catalyst. Then the hole made is welded with argon welding and a part of the pipe with fasteners is cut off. A new one is welded in their place. The car is lowered from the lift and the specialist performs firmware for the electronic control unit, connecting with a laptop through the diagnostic connector. On older models it is possible to install a mechanical blende. This allows you to stabilize the operation of the motor and return its performance characteristics to factory parameters.
Emulator of the 2nd lambda probe. Electronic catalyst blende in Vladivostok
Ad note
Fits
- Lexus GX460
- Lexus GX470
- Lexus LS500
- Lexus LX570
- Nissan Juke
- Nissan Patrol
- Subaru Forester
- Toyota Camry
- Toyota Land Cruiser
- Toyota Land Cruiser Prado
- Toyota Prius
- Toyota RAV4
Available, various models for any car.
Wholesale 1500 rub. per piece
The catalyst emulator is an electronic device based on the PIC12F629 microcontroller, which works according to a specific algorithm, simulating the correct signal for the ECU. Mechanical “falsehoods”, which are offered in most workshops, have a slightly lower cost, but they only work on machines from the past and the beginning of this century. This “whistle” will not work on more modern ones! And even if the Check Engine malfunction lamp does not light up, this does not mean at all that the engine management system is working correctly. Most likely, it will work in emergency mode, heating the missing converter with exhaust gases due to more fuel and reducing the driving performance of the car. This threatens increased gas mileage and other problems. This emulator works correctly on all modern cars (including the latest ones). It is installed in the gap of the oxygen sensor, or connected to the corresponding wires in the car wiring.
Connection diagram included. Support from me.
Solving problems with error 0420; 0430 And other errors about the operation of the catalyst and mixture formation.
Can be installed on a car for RUB 2,000.
Why you shouldn’t install mechanical tricks
As a manufacturer of electronic emulators, we responsibly declare that we would not develop a device if mechanical dupes provided what they wanted and why they should not be installed.
Because what actually happens is this:
The operating temperature of the oxygen sensor is about 350 degrees and it is heated mainly by exhaust gases. When a mechanical blende is installed, the sensor itself is removed from the exhaust gases. And immediately the temperature regime hardly reaches 200 degrees, it is obvious that the output values will be far from the truth. The result is increased fuel consumption (progressing over time, more on this in the next paragraph). The design of the oxygen sensor is made in such a way that it is ventilated by exhaust gases. After installing the fur. Accordingly, it becomes clogged with combustion products and after some time stops working completely (and what, after all, the Check is not lit, and the grass does not grow any further). It seems that many people are not interested in this arrangement. Almost always fur. the blende is made of the worst steel (Steel-3). After installation, about a month later, it cannot be turned out or it turns out with part of the pipe. Accordingly, the threads on the pipe and lambda probe suffer.
Do-it-yourself electronic and mechanical catalyst blende: drawings, diagrams, recommendations
The catalytic converter is a purely environmentally friendly part. Platinum and palladium deposited on the surface of its honeycomb accelerate the oxidation of exhaust gases to harmless water vapor and carbon dioxide, which are absorbed by trees. And rhodium activates the reduction of pure nitrogen. All harmful substances interact with oxygen, which means that its share at the outlet of the catalyst should decrease. EURO 3 and higher standards strictly regulate exactly how much less it should be. Therefore, on any car that meets these standards, a second oxygen sensor is always installed behind the “can”. He is being deceived.
Why do you need to fool the oxygen sensor?
If you cut out the catalyst and leave everything as it is in the electronic engine management system, you will instantly get a lambda error. This will be indicated by the Check Engine icon, a “stifled” gas pedal and increased fuel consumption.
Why is only the second lambda cheated? Firstly, it controls the condition of the catalyst. But in some models, it increases the accuracy of dosing the components of the air-fuel mixture (often, when using the wrong blende, gasoline consumption increases sharply). Secondly, the first sensor performs an important function - it adjusts the content of gasoline and air in the cylinders, doing this for reasons of fuel economy and environmental concerns.
For your information. A lambda probe, located immediately behind the exhaust manifold, is found on all injection engines. The second sensor appeared on cars with EURO 3 class and higher.
Quick check of oxygen sensor functionality
Many car owners have repeatedly confirmed that electronic deception works normally only if the lambda probes on the car are working properly. It’s quite easy to quickly check the functionality of the sensors; for diagnostics you only need a multimeter. We perform the check in the following order:
- move the multimeter switch to the DC voltage measurement position with an upper limit of 20 Volts;
- we connect the probes of the device: with the red wire - to the signal connector of the oxygen sensor, with the black wire - to ground;
- we start the engine, on a cold engine the voltmeter should show a voltage of approximately 0.45-0.5 V;
- on a warm engine, the voltage should constantly change from 0.1 to 0.9 Volts, and all this data indicates that the sensor is generally working.
But it is worth noting that such a check does not give an idea of 100% serviceability of the sensor; it only confirms that the lambda probe is in working condition.
Related articles:
- A car in Russia for 300 thousand rubles Recently, taking into account the change in the ruble exchange rate, prices for all goods in Russia have increased noticeably, and cars have also become more expensive. For little money you can buy a new car [...]
- Homemade “anti-rain”: composition, pros and cons, user reviews The process in the production of automotive chemicals does not stand still; manufacturers are constantly inventing new compounds that help to effectively care for the car, operate the car […]
- The importance of KBM when taking out an MTPL insurance policy The concept of KBM was introduced by the Russian Union of Auto Insurers (abbreviated RSA) in 2013, the bonus-malus coefficient (this is how the abbreviation stands for) is intended to […]
What is a lambda probe emulator
To deceive the oxygen sensor means to force it to produce standard values. That is, show the electronic engine control system that there is a catalytic converter and it properly cleans exhaust gases.
What does it look like
There are two types of decoys: mechanical and electronic. A table with a photo gives a general idea of what they are like.
- Any of the mechanical decoys is a bushing that is screwed in instead of the original lambda, and the sensor is already placed directly into this screw.
- The resistor and capacitor are soldered into the contact gap of the original sensor.
- An autonomous unit with a microcontroller is placed between the block and the lambda probe.
Causes of lambda probe failure.
2.Use of leaded gasoline. Sulfur, lead, silicone and other fuel additives gradually destroy the oxygen sensor.
3. Overheating of the sensor by exhaust gases, which is associated with malfunctions of the ignition system.
4. Break in the supply wire and short circuit in the on-board electrical circuit.
5. Mechanical damage to the lambda probe.
6. Exceeding the service life of the oxygen sensor (untimely replacement).
Important! It is recommended to diagnose the condition of the lambda probe every 30 km of the vehicle.
It is not difficult to cut out the catalyst, but instead you will need an alternative device, that is, a flame arrester.
Advantages of a flame arrester compared to a catalyst:
3. Reliability in operation.
The flame arrester has one drawback - deterioration of environmental properties due to increased toxicity of exhaust gases, which threatens with a fine when traveling to EU countries. The video will tell you how a faulty catalyst “kills” the engine.
Do-it-yourself mechanical blende of an exhaust system catalyst
The table presented two types of “mechanics”. The scope of their application is different, the design and principle of operation are different.
Attention! When choosing/making a mechanical lambda probe with your own hands, evaluate the amount of space above the second oxygen sensor. If there is a deficiency, it is necessary to use a rotary sleeve.
Option No. 1: screwdriver with a small diameter hole
So-called “empty” mechanical emulators are suitable for a narrow series of cars with EURO 3. Tentatively, these are foreign cars produced before 2004 and domestic cars produced before 2011.
Principle of operation
The function of the bushing is to isolate the lambda from the direct flow of gases, which contains a lot of oxygen. Through the small hole, only a small part of it reaches the sensor, but enough for the sensor to respond to the ECU with a qualified signal.
How to do
The bushing is turned on a lathe according to the presented drawing. Take into account only the configuration and diameter of the hole connecting the sensor to the exhaust tract (1.5-2 mm). The remaining dimensions must be adjusted by removing the actual lengths of the lambda mounting on a particular car. For example, only the overall length can vary between 40-100 mm.
The temperature at the place where the readings are recorded is about 300...400°C, so steel or brass will work as a material. The workpiece is a rod.
Where is it placed?
The part is screwed into the exhaust tract instead of the second lambda probe. The oxygen sensor is not thrown away, but is screwed into an already screwed-in bushing and connected to the block.
Option No. 2: bushing with minicatalyst
Suitable for cars of any EURO environmental class.
How does it work
The idea behind the solution is to clean the exhaust only for the oxygen sensor. Technically, it looks like this: a compact catalytic converter with platinum, palladium and rhodium is pressed into a bushing.
When the structure is assembled, gases entering the threaded insert first pass through the honeycomb and then enter the oxygen sensor. It detects a decrease in oxygen content, and the ECU perceives the situation in the exhaust as normal.
Manufacturing technology
It is difficult to make on your own due to the inaccessibility of small-sized copies of catalysts. Otherwise, the technology is not much different from that specified in option No. 1. The work is carried out on a lathe; the dimensions are entered in the drawing after preliminary measurement of the sensor thread and the seat for it.
How to install
The installation technology is identical to the method described in option No. 1: unscrew the oxygen sensor and screw it into the adapter sleeve. Screw the assembly unit into the exhaust pipe.
Important! When using bushing spacers of any type, the lambda must be in good working order.
Methods for changing the readings of the second lambda probe
There are several known ways to influence the performance of the second lambda probe. Domestic inventors use:
- Mechanical spacers (metal bushings).
- Electronic circuits that convert the sensor signal.
- Chip (reflashing the ECU program).
- Installation of a mini-catalyst that simulates the operation of a working gas converter.
The simplest mechanical spacer can be made by any turner. A metal sleeve moves the lambda probe away from the exhaust tract. A small hole for exhaust gases weakens the sine wave of the readings, the electronic brain of the engine considers this to be the result of a working catalyst.
Mechanical blende drawing
A typical spacer drawing may vary in size depending on the model, make of the car, and lambda probe thread. The important point is the size of the inlet opening. Experiments by car owners and “traditional craftsmen” have shown that the optimal diameter is 1.5 - 2 mm.
Reviews from car enthusiasts who have installed decoys made of various metals (plain steel, stainless steel, bronze) do not see much difference in the efficiency of the device, which is hinted at by the manufacturers of the part. The bronze mechanical bushing does not create a catalytic effect, as is described in advertising materials. You can install the metal spacer yourself. To do this, just unscrew the oxygen sensor and screw in its place the bushing into which the lambda probe is installed.
A more complex option for simulating the normal operation of a gas neutralizer would be to install a mini-catalyst. Three layers of catalytic elements are mounted in the body of the device installed in front of the lambda probe, filtering exhaust gases specifically for the sensor. Replicating the design of the main catalyst, the expensive device also reacts painfully to low-quality fuel.
Electronic snag is based on changing the electrical signal from the sensor. The wiring diagram using a single resistor or capacitor is quite simple. You can do it yourself using one soldering iron, if you have the skills of radio engineering and electrical installation. The difficult part of the installation will be the search for the necessary resistors, the experimental selection of their parameters (depending on the car model, sensor design).
Electronic decoy circuit
The more difficult issue is with flashing (chipping) the control program. Service specialists claim that this is an unusually complex procedure. Machine owners who are proficient in programming talk about changing one value in the program. In this case, the second sensor can be removed. In any case, independent experiments by amateurs with flashing the program are not recommended.
Do-it-yourself electronic snag of the second lambda probe: diagram and recommendations
The table shows two types of electronic designs. If we evaluate it strictly, then only a circuit made of a resistor and a capacitor falls under the definition of a handmade blende, since it can be made by yourself. The autonomous unit operates on the basis of a microcircuit, which is difficult to solder at home.
Option #1: Integrating a resistor and capacitor into the wiring
A universal circuit suitable for many machines is shown in the photo. When designing with your own hands, you should only take into account the configuration of the electronic blende of the second lambda probe:
- The resistor is soldered into the break in the signal wire.
- A non-polar capacitor is connected to the ground gap and the signal contact.
The characteristics of the components are selected individually for each vehicle.
Let’s say for Mitsubishi Lancer X you need a pulse resistor of 1 MOhm, 0.5 W, 5% and a non-polar “condenser” of 2.2 μF, 50 V. And for Nissan Primera - a resistance of 150 kOhm, 1 W + a capacitor of the same class, only at 1 µF. There are plenty of examples of unsuccessful lambda deception. Let's say on the Audi A4 this kind of intervention is pointless. After soldering the components, the system records the fact that incorrect readings are being given or there is no signal at all from the sensor.
For your information. Thematic forums for specific cars or blogs of users of the automotive social network DRIVE2.RU will help you find out the characteristics of the resistor and capacitor that are suitable for your car, and generally make sure that this method will give results.
Option No. 2: microprocessor board in the lambda probe wiring break
Intelligent emulators based on medium-complexity chips are often purchased ready-made. The device has a presentable appearance: the connection is made without any twisting/soldering - only connector blocks.
For your information. When purchasing, it is important to discuss with the seller the compatibility of the electronic catalytic converter with the firmware version of the central computer of your car.
Types of homemade decoys
To understand the principle of operation of the emulator, it is worth considering each type separately, since the lambda probe trick works differently in each case. The key goal of the emulator is to “fuss the brains” of the car’s ECU if the catalytic converter is broken. The decoy gives a signal about the optimal operation of the catalyst and the permissible oxygen content in the exhaust. So, let's look at three ways to deceive the electronics of a modern car.
Reflashing the controller
The only requirement in this case is to use the services of a specialist if you are not strong in electronics. It is advisable to use the method in case of failure of both the sensor and the catalyst. It is necessary to electronically disable the oxygen sensor by entering the appropriate program. Next, the appropriate changes are made and, if everything is done correctly, a message about critical faults will no longer be displayed on the dashboard. The engine will operate as usual without a lambda probe. The main problem with this method is that if done incorrectly, the computer will no longer operate at its optimal level. This can only be corrected by factory firmware, which is expensive and generally not so easy to obtain.