How to clean a drain hose by disassembling the drainage system
- Citric acid will again help get rid of scale on the electric heater. The amount of powder depends on the degree of soiling, but on average, a machine with a 5 kg load requires 250 g. Pour 200 g into the powder compartment, and 50 into the drum and run the wash at maximum temperature.
- More aggressive acetic acid can also deal with scale. Just add 50 ml of vinegar to the conditioner container and turn on the machine. Be careful: vinegar can damage the rubber elements.
If you do find a malfunction that arose due to a clog in the drain hose of the washing machine, then first of all you need to ensure full access to the drain system.
Cleaning the filter
Clean the filter in the following sequence:
- Unscrew the screw and carefully remove the filter.
- We tilt our structure, drain all the available liquid, having previously placed a container with low sides for this purpose.
- After there is no water left in the machine, we remove all foreign objects that are stuck. If structural elements are completely covered with scale, they must be completely replaced.
- Next, when you have already removed the dirt by washing with water and wiping with a damp sponge, inspect the place where the filtration system is located and remove the remaining dirt from the walls.
- Clean the pump and the adjacent system, and then connect your device to power and enable the drain mode. If you did everything correctly, the blades and impeller of the pumping system will rotate without interruption.
We suggest you find out why water leaks from the bottom of the washing machine door during the spin cycle. Video on how to repair a washing machine with your own hands. – Service
All the details can be found in the video review, which describes the process in detail.
Attention: there are exceptional situations when the system is so dirty that it simply cannot be removed. In this case, it is recommended to remove one wall of the washing machine and carefully clean the filter from the side of the pumping system
Everything is carried out in several stages:
- Unplug the washing machine.
- Close the water supply valve.
- Using a flathead screwdriver, remove the side or front bottom panel.
- Pour the remaining used water through the drain filter.
- Using pliers, disconnect the end of the hose from the sewer pipe or trap.
In devices from brands such as VEKO, Ariston, Candy, Samsung and Indesit, you can only get to the drainage hose through the bottom. In such cases, to make it easier to clean the washing machine from blockages, place your unit on its side, placing some cloth under it in advance. After you open the clamp with pliers, you can safely disconnect the hose from the pump.
In Electrolux or Zanussi washing machines, the hose runs along the back wall. To get to it, remove the back cover of the case. Next, we open the latches, unfasten the drainage hose, and then unscrew it from the water supply hose. To completely remove the drain hose, you should completely remove the top cover by unscrewing all the bolts and loosening the clamp to secure it.
In machines such as Bosch and Siemens, you can get the hose by removing the front panel of the case. Everything is done in the following order:
- Remove the sealing rubber from the front panel and unclench the clamp.
- We take out the bottom panel and the retractable tray for detergents.
- Unscrew the bolts to secure it and remove the hatch door lock.
- Remove the front panel of the case.
- Unclench the clamp and pull out our hose.
Clean the drain hose by washing and treating the walls from the inside using special brushes. Masters in this business are accustomed to using not metal brushes, but those made of synthetics.
Helpful advice: in order for you to achieve the best effect when washing, use warm water with citric acid added to it.
The hose, washed from all sides, just needs to be fixed in its old place, performing all the described steps in reverse order.
Functionality check
There are three ways to check that the valve is properly lapping.
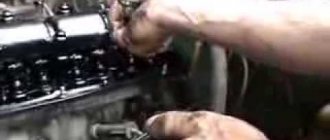
➤ Using a vacuum tester. The most reliable and simple option. Connect a tool to each hole on the intake and exhaust sides of the manifolds. Now use it. If the valves are poorly lapped, the vacuum level on the pressure gauge will be insufficient. ➤ Using kerosene. Reinstall the valves, place the combustion chamber head up and pour kerosene on top. Leave them like this for several hours. If the kerosene does not leak out, everything is in order. Experts do not recommend using this method as it is not very reliable. ➤ Using a pencil. We draw radial lines along the entire circumference of the working edge of the valve seat. We install the valve in place, press it firmly and rotate it in a circle. We take out the product and look at the pattern. If the lines are erased and evenly paint the surface, everything is in order. If there are irregularities, the grinding was performed incorrectly. Grinding in the valves ensures normal engine operation. Be sure to regularly resort to the procedure - this way you can avoid problems with the power unit.
Where does valve adjustment begin?
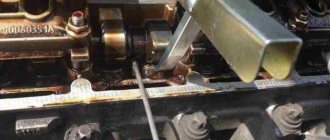
The thermal gap is adjusted after measuring it, and if it does not correspond to what is required, by selecting a washer of a certain thickness.
According to the regulations, the thermal clearance on the VAZ 2114 must be checked and adjusted every 60 thousand kilometers, as well as when valve knocking occurs.
Next, we will consider the procedure for adjusting the thermal gap on a VAZ 2114. All work is not very complicated, but requires certain equipment. To complete the work you will need:
- set of open-end wrenches;
- spark plug key;
- set of probes;
- special device for squeezing valves;
- set of adjusting washers;
- rags;
The set includes a set of washers with thicknesses from 3.0 mm to 4.5 mm. The thickness size interval is 0.05 mm, which allows you to select a washer of the required thickness when performing work. This set is not cheap, but purchasing it will allow you to carry out all the work yourself for a long time, without going to a service station.
Also, to complete the work, you will need a valve cover gasket, since it is disposable and must be replaced when the cover is removed.
Products for cleaning carbon deposits on valves
Many car owners are interested in the question of how to wash off carbon deposits on valves? Currently, there are a number of chemical products designed directly to remove such deposits. Typically these are additives added to fuel. They are mixed with gasoline, and during the combustion process, together with the air-fuel mixture, they soften this composition, facilitating its combustion along with the fuel. Among these additives, the following are especially popular among car owners:
- Valve cleaner from Liqui Moly Ventil Sauber. The additive is designed to be added to gasoline during the next refueling. Can be used with any type of gasoline. The function of the additive is to remove deposits formed on valves, injectors, carburetor and other elements of the intake tract. It also protects the listed elements from corrosion. Can be used with engines with catalytic converters and turbocharging. Sold in a 250 ml can, which is designed to be dissolved in 75 liters of fuel. The article number for this package is 1989. Its price as of winter 2018/2019 is about 470 rubles.
- Valve and power system cleaner HI-GEAR FUEL SYSTEM & VALVES CLEANER. Another popular product among car enthusiasts. It cleans not only valves very well, but also other elements of the power system. Can be used with any gasoline engines, including those equipped with catalysts and turbochargers. The product is intended for engines up to 2.5 liters. It is recommended to use it as a preventive measure every 3,000 thousand kilometers. Sold in two different jars - 295 ml and 325 ml. The volume of the second can (325 ml) is enough to dilute 40 liters of gasoline. The article numbers for these packages are HG3235 and HG3236. The prices are respectively 440 rubles and 530 rubles.
- Cleaning the engine without disassembling MITSUBISHI SHUMMA ENGINE CONDITIONER. This product was specially created by specialists from the famous Japanese automaker Mitsubishi for cars of this brand equipped with engines with direct fuel injection (GDI). It is recommended to use this product as a preventative every 100 thousand kilometers. However, given that these recommendations are given for Japanese conditions, for domestic roads and gasoline this interval must be significantly reduced. The product is a foam cleaner that is used to treat the internal working surfaces of fuel system elements. Detailed instructions are given on the packaging (in particular, you need to work with a cold engine!). Reviews about the product are very positive. Sold in a 250 ml can. The article number for this package is MZ100139EX. Its price for the above period is about 1300 rubles.
Wurth valve carbon cleaner. Like the previous one, this product is a foamy detergent composition that is used to wash the contaminated surfaces of the elements of the car’s fuel system. Allows cleaning without disassembling the engine. So, to do this you just need to disconnect a few hoses. Detailed instructions are indicated in the description of the drug
Please note that this product can only be used in combination with a spray wand. One cylinder is enough to treat a four-cylinder engine, and two cylinders are enough to treat six- and eight-cylinder engines
Also, in addition to factory products, carbon deposits from valves can be removed using phosphoric acid. You can use not its pure composition, but a diluted one. It perfectly removes various deposits, so it will also cope well with carbon deposits. Tested by car enthusiasts in practice! Interestingly, the popular drink Coca-Cola also contains phosphoric acid in small quantities, so it can also be used to remove stains.
VKG valve
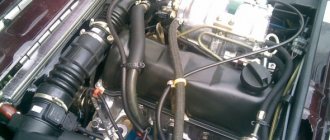
The crankcase ventilation system valve is an integral part of the plastic pipe at the inlet to the throttle valve. The valve has a membrane with a diameter of about 26 mm. With age, it naturally bursts. Because of this, the engine begins to suck in oil vapors, which settle in a rather thick film in the intake tract and on the throttle valve.
The original tube with valve costs about $150, so few owners shell out the cash to purchase it.
The problem is solved in two ways. Or they saw off the valve body to get out of the membrane and replace it with a homemade liner made of a suitable silicone material or oil-resistant rubber. Or they add another 2.0 ALT engine valve in front of this valve (its number is 06B 103 235 G), which costs $15.
Lapping Tools
Lapping devices are divided into 2 groups.1.
Clamping the valve from above, fixed on the rod.
There is a handle on one side. To achieve the result, you need to pull and rotate it. 2.
"Suckers". They are fixed on the valve plate and are also equipped with a handle. To use, you need to press the valve against the plate and rotate the device in different directions.
Valve lapping tool: top clamping model
If you don't have a tool, a screwdriver or drill will do. Regardless of the tool you choose, you will need the following equipment: abrasive or diamond paste; spring - such that you can easily squeeze it with your hands and put it on the valve; kerosene. Can't get hold of abrasive paste? Prepare it! To do this, you will need fine-grain sandpaper or sandstone shavings. Remove the stones from it and mix them with grease or a similar substance in a ratio of 2 to 1. The consistency of the mixture should resemble shampoo. In extreme cases, standard motor oil will work as a base.
Applying abrasive paste
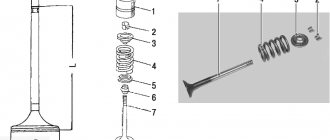
Engine valve design
The valve drive mechanism is part of a larger gas distribution mechanism (GRM). According to the design, the timing belt can be with upper or lower valves. In modern engines, the first scheme is more often used.
Through the valve, the air-fuel mixture is directly supplied to the cylinder in precise dosage. Simply air can also be supplied. Exhaust gases are released from the cylinder in a similar way using a valve. Therefore, a four-stroke internal combustion engine must have at least two valves per cylinder in order for its operating principle to be realized.
According to their intended purpose, valves can be divided into two types:
- inlet valve;
- Exhaust valve.
Part of the valve is its plate. The design of modern engines is such that the valves are located in the cylinder head (abbreviated cylinder head). The contact point between the valve and the cylinder head is called the valve seat. The seat is made of steel or cast iron and pressed into the cylinder head.
In order for the cylinder to be filled with the fuel-air mixture or air as efficiently as possible, the intake valve plate must exceed the exhaust valve plate in diameter. This is the main difference between intake and exhaust valves. Due to the larger diameter of the plate, the intake valve fills the cylinder with air or fuel mixture more efficiently.
However, there are reasons for increasing the diameter of the poppet and exhaust valve. For example, this improves the cleaning of cylinders from combustion products. However, the diameters of the plates of both valves cannot be increased indefinitely - they must fit into the geometric dimensions of the combustion chamber located in the cylinder head.
During operation, the motor valves are subject to heavy loads both in terms of mechanical parameters and temperature. For this reason, they are made from special alloys that can withstand high temperatures and mechanical destruction. The edge of the plate is especially strengthened, and it itself is given additional mechanical strength by spraying ceramic. The intake valve usually has a stem made of a single piece of metal, but the exhaust valve stem contains a cavity with sodium inside. This provides it with increased thermal conductivity to quickly remove heat from the valve disc.
The surface where the valve disc touches the cylinder block is called a chamfer. The formation of soot in this place is very undesirable. To prevent this phenomenon, as well as to distribute heat more evenly, a certain engineering solution is used in the design of the valve mechanism. Namely, the valve rotates while the engine is running.
Currently, internal combustion engines with a four-valve circuit are most often used. That is, each cylinder of such an engine has two intake and two exhaust valves. When the intake valve is lowered, an annular passage between the seat and the poppet opens. Through this passage the cylinder is filled with a fuel-air mixture or simply air. The cross-sectional area of the passage directly affects the filling speed of the cylinder and, as a result, the performance of the motor.
In addition to the above-described scheme, there are two-, three- and five-valve ones. A two-valve system has one intake and one exhaust valve in each cylinder. The three-valve contains two inlet and one outlet. If there are five valves, three serve for injection and two for exhaust gases. The number of valves is determined by the size of the combustion chamber in a particular engine and the type of valve drive. Also, the number of valves depends on the engine speed and other indicators.
The valve opens by pressing its stem. This pressing is carried out by the drive. Thus, through the valve drive, force is transmitted from the camshaft. Modern engines implement two main drive schemes: transmission of motion from hydraulic pushers or a drive based on roller levers.
The valve closes using a spring selected for its stiffness. Thanks to spring pressure, the valve disc seals the inlet and outlet channels hermetically. To hold the valve on the rod, crackers and a valve spring plate are used. However, when the engine is running, especially under load, it can cause resonant vibrations in the valves. To combat this effect, two springs are installed, the turns of which have different directions.
Engine valve
The wide variety of materials from which internal combustion engine valves are made can present a difficult choice. This article will talk about valve production technologies, in what cases to use certain valves, their advantages and disadvantages, lightening and tulip grooves, and we will also talk about protective coatings and methods of applying them. This information is provided to help you make an informed decision when upgrading your valvetrain.
1.Valve production technologies.
When manufacturing exhaust valves, special attention is paid to manufacturing methods and materials that can withstand high temperatures for a long time and at the same time maintain strength. The requirements for the intake ones are not so stringent since they have additional cooling with a fresh air-fuel mixture. Many alloys meet the required properties if certain technologies are followed, but something always has to be sacrificed, and the weight of the part turns out to be large. A lot of research is being carried out and the identification of new materials does not stand still. Many patented technologies have not yet found their application in practice.
I won’t describe all the many technologies and their shortcomings in detail; let’s briefly go through the main ones. How to make a valve disc:
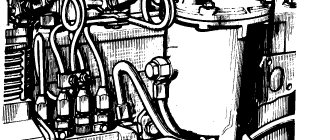
End rolling - a hot valve rod protrudes from the matrix and a pausson rotating at an angle to the axis of the matrix rolls out the rod in a circle, which is gradually fed into the matrix until it is given the required shape. A directional microstructure of the metal is created, parallel to the profile of the valve disc, which increases strength.
1-end of the workpiece. 2-matrix. 3-pause. 4-ready valve disc. 5-rod.
In the next method, the workpiece is fed into the matrix and the valve plate is rolled out in a similar way, while the stem is also squeezed into the hole, which also gives a directional microstructure similar to wood fibers. There are several other methods similar to those described.
The valve is made of steel grades: 40Kh9S2, 40XH, 40Kh10S2M, 20KhN4FA, 55Kh20G9AN4, 45Kh14N-14V2M, titanium alloys PT-3V, VT3, VT-14, VT6, with much lower temperature resistance (inlet valves only) VT18U and VT25U and other alloys ov . Valves made of alloys based on the TiAl intermetallic compound have a comparatively low metal density and, accordingly, lower weight with greater hardness and heat resistance, even in comparison with conventional titanium-based alloys. But difficulties arise in manufacturing using conventional technologies that allow adding strength due to low ductility. In this case, they are made by casting, but in this case, porosity is formed in the metal structure, which is removed only by high-temperature gas isostatication, a very expensive procedure that accounts for the cost of the valve.
A combined system is widely used, when the rod is made of low-alloy alloys with greater hardness, and the plate is made of heat-resistant ones. The finished parts are subsequently welded using various methods or pressed on; the design is considered not very reliable.
Another manufacturing option, the valve stem and end are made of the same alloy; as a result of deformation and heat treatment, different metal microstructures are created, high hardness and creep resistance are ensured in the head; high heat resistance is provided in the plate. Again, manufacturing technologies are very expensive. I will not describe the other methods, which each have 3-4 transition zones in microstructure and annealing technology; they are all fundamentally similar to those described above.
Hot stamping into the end - a hot rod is simply pressed into a matrix in which the metal is distributed haphazardly, disrupting the microstructure, the simplest and most cost-effective method, which does not have the necessary strength.
Types of valves
There are only two widely used types of poppet valves: “Tulip” and “T-shaped”.
It is worth understanding the disadvantages and advantages to make your choice. And so the most common is the tulip, it has a large margin of safety, a streamlined shape, and often a lot of weight.
The T-shaped one is designed to a greater extent for a tuned engine that operates mainly at high speeds. It has a minimum radius of transition from the stem to the plate, light weight, which reduces the load on the gas distribution mechanism, extending service life, shifts the threshold of valve hanging, which allows the use of standard valve springs without resorting to reinforced ones, which take their share of the power, less wear on guide bushings, better purging. We'll talk about reliability a little lower.
Tulip valve relief
For economic reasons, many people strive to lighten the valves themselves; the purchase of new T-shaped valves costs a tidy sum, usually these are titanium-based valves that have low weight, minimal metal consumption and better strength and heat resistance characteristics, however, due to the labor-intensive production of such parts, the cost is very high.
I already said above that Tulip initially has a large margin of safety and there is an opportunity to lighten it at the cost of reliability and the unjustified risk of getting into yet another capital investment. Few people are stopped by this fact and the search begins for those who have already tried and do exactly the same, respecting the size of the opponent. You can find a lot of positive experience on this topic on the Internet; less often you come across a sad outcome of revision.
Now let's figure out why this happens. At the beginning, I described valve production technologies and materials. If you read carefully, you already realized that production technology and the microstructure created in the metal are of great importance, even as a result of heat treatment or the stamping method. When lightening the valve, part of the metal in the surface layers of which contained the main strength of the entire part is mechanically removed. The thermal stress of the plate increases as a result of which the valve material is not able to withstand the load and is susceptible to deformation. Some manufacturers apply special coatings with expanding properties; I will describe them in more detail at the end of the topic. From this we can conclude that the probability of the plate breaking is 50/50, because you do not know the technology and materials and you will act based on the experience of others or by eye. Add the possibility of a manufacturing defect and possible detonation, and you get this result.
However, this does not always happen and judging by the experience of a few, lightweight valves last 100 thousand and continue to work properly. If you still decide to get relief, think about cooling the plate; replacing the valve seats with bronze ones will help with this. It is through the seats that most of the temperature is removed. I already wrote about this in the topic Valve seat. Avoid sharp edges and thin edges on the plate, these places will be extremely overheated, increasing the likelihood of detonation and leading to burnout and destruction of the valve. There is absolutely no need for chamfers; make a smooth transition and round the edge of the plate. Do not forget to lap the valve to the seat, preferably not with diamond pastes. Consider options for lightening the remaining moving parts - spring plates, rocker arms or pushers.
Of course, preference should be given to factory T-shaped valves, without ignoring the brand; their reliability will not make you doubt. Don't even think about trying something made in China, even if it's titanium.
Protective coatings, application methods.
Three methods of coating metals have become widespread: plasma-powder surfacing, laser alloying, and surfacing with high-frequency currents. The coating of a completely different metal on the exhaust valve expands the protective properties of the part and the ability to withstand an aggressive environment. This allows the valve to be made from more suitable materials in terms of heat resistance and strength, without resorting to searching for a middle ground. This results in a durable and lightweight valve that is not able to withstand oxidation and wear, but the use of a thin layer of special coating will solve this problem.
High-temperature exhaust gases cause great damage to the valve, causing gas corrosion by water vapor, oxidation by oxygen, carbon monoxide, and sulfur oxide, which are formed as a result of combustion. The mechanical impact unravels the working chamfer, its size increases, the tightness is broken, which leads to the breakthrough of hot gases into the gap and greater burnout.
Next, I’ll tell you about the coating application methods, and we’ll get to know each of them in more detail.
Plasma-powder surfacing -
the most universal method, granulated metal powder is fed along with gas into the plasmatron. This method allows you to apply a high-quality coating with a thickness of 0.5-5.0 mm, the solubility of the metal of the part in the deposited layer is only 5%, a possible deviation from the nominal thickness is 0.5 mm, minimal oxidation of the deposited layer due to the gas supplied to the plasmatron, minimal heat-affected zone.
Laser alloying-
The part is exposed to a laser beam, heating the surface slightly above the melting point of the base. The temperature is controlled by laser power and beam diameter. As a result, active mixing of the alloying metal placed on the surface of the base with the metal of the part occurs to a depth of approximately 1-2 mm. This method makes it possible to apply coatings of stellite, a tungsten-chromium-cobalt alloy. The solubility of the base metal in the coating is 5-10%.
Surfacing with high frequency currents -
A ring made of deposited metal is installed on the valve plate, between the valve and the ring there is a powder flux or a gaseous medium (argon, nitrogen), under the action of a high frequency current the ring is heated and the valve plate is heated to the temperature of metal diffusion, the coating area is cooled with water on the other side of the valve, In this way, the deposited layer is frozen, while the valve rotates to ensure uniform heating. In this way, self-fluxing alloys EP616, EP616A, EP616B, EP616V are applied much cheaper than cobalt stellites and have sufficient hardness and corrosion resistance. The solubility of the base metal in the coating layer is 20-30%.
Titanium valve plate with chromium nitride (CrN) coating
An example with titanium nitride coating provides high hardness.
Resists carbon deposits and oxidation.