Frequency of regulatory activities
According to the manufacturer's recommendations, the gaps between the levers and valve stems should be adjusted every 80 thousand mileage of the car. As practice shows, you have to do engine maintenance much earlier - as soon as the numbers on the speedometer pass the 60 thousand km mark. If you operate Renault Logan with gas-cylinder equipment, then the frequency of adjustment is halved. Every 30 thousand km you will have to call in for service and waste time and money. Or do it yourself - the adjustment procedure is simple and even novice car enthusiasts can do it.
Valve adjustment Renault Logan
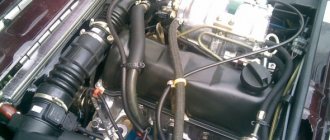
Renault Logan cars are equipped with two types of power units:
- 16-valve 1.6 l K4M;
- 8-valve 1.4 l K7J and 1.6 l. K7M.
The first belongs to the DOHC 16V series and does not require adjustment, since its gas distribution mechanism uses hydraulic compensators. As for the 8-valve 1.4 liter engines, they are built according to the SOHC-8V scheme, which means that from time to time you will have to monitor the clearances in the valve drive and adjust them.
According to the manufacturer's recommendations, the gaps between the levers and valve stems should be adjusted every 80 thousand mileage of the car. As practice shows, you have to do engine maintenance much earlier - as soon as the numbers on the speedometer pass the 60 thousand km mark. If you operate Renault Logan with gas-cylinder equipment, then the frequency of adjustment is halved. Every 30 thousand km you will have to call in for service and waste time and money. Or do it yourself - the adjustment procedure is simple and even novice car enthusiasts can do it.
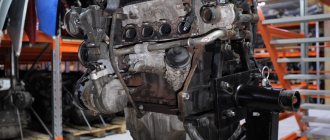
About the history of development and design features of the units
The 1.6 and 16-valve engine differs from the newest modifications; they are the absence of a mechanism for regulating valve timing; this engine design has significantly reduced the dynamic capabilities of the car. But the advantages remain excellent maintainability and durability, that is, increased engine life, thanks to simple design solutions from the manufacturer.
- the cylinder volume increased (1.6 liter engine), which made it possible to increase power in tandem with torque and improve the dynamic characteristics of the model;
- The output of the unit increased by 11% (up to 82 “horses” for the 8-valve version), this engine design led to an increase in torque to 132 Nm;
- the cooling system has undergone adjustments (the need for this modification is caused by an increase in engine power);
- the cooling circuit did not receive any fundamental design changes, and its elements were modified in order to achieve greater performance, for which some new components were integrated, which led to an increase in the service life and efficiency of the system, especially in critical operating modes;
- power increase up to 102 hp. With. achieved thanks to the use of new components in the cylinder-piston group units and valve mechanism:
- the number of valves has doubled (from 8 to 16), which ensured better filling of the combustion chambers with the mixture and led to an increase in power and dynamic capabilities;
- The service life of the motor has increased significantly due to the use of parts made of new, more durable alloys;
- After applying the previously mentioned design solutions in the updated engines, Renault Logan developers managed to achieve significant fuel efficiency:
- 1.5 liters at a distance of 100 km for a 1.6 engine with 16 valves;
- 1.0 liter in the case of 8-valve engine versions.
All these innovations made it possible to essentially make the 1.6 liter engine. more modern (especially the 16-valve version), the engine life has become longer. Although the developers did not apply progressive and innovative design solutions, this modernization of engines for Renault Logan still made it possible to attract a large army of new potential customers to the updated model. In addition to design innovations, these units began to meet the requirements of Euro-5 environmental standards. In the future, the manufacturer of Renault Logan models planned to bring the engine design to the level of compliance with Euro 6/7 standards.
The update of the 1.6-liter unit was not limited to the use of a 16-valve cylinder head mechanism. The increase in traction and power characteristics was achieved thanks to significant transformations, including:
- increasing the performance level of the intake and exhaust systems, which was a necessary measure to bring engines to the advanced level of environmental standards;
- the use of new elements in the cooling circuit, which significantly improved the efficiency of its operation;
- replacement of the generator with a version of increased performance for the Renault Logan model, which made it possible to cope with increased loads on this unit (now the power varies depending on the model’s configuration)
What are the gaps for?
In order to compensate for the thermal expansion of the metal in the gas distribution mechanism system, technological tolerances are set between the drive rod and the adjusting bolt.
Any deviations from the norms lead to increased wear of parts.
A distinct knocking sound in the engine compartment at idle loudly informs the owner of the need to adjust the clearances.
An increasing mismatch in size will not allow the valve to open completely, and, as a result, the cylinder will not be filled well with the dose of the combustible mixture and the engine power will drop.
With a reduced gap, efficiency is also lost due to incomplete compression, the seats burn and carbon deposits appear, which may lead to unplanned timing repairs.
The adjustment must be carried out on a cold engine.
Metal expands under the influence of heat, which is taken into account when developing any complex components. Compensation for such expansion is also necessary in the timing mechanism of the 1.4 liter Renault Logan engine, which can be achieved due to special tolerances between the adjustment bolt and the drive rod. Deviation of the gap from the specified parameter leads to accelerated wear of parts.
The first evidence of problems with Logan valves is the appearance of engine knocking at idle. In such a situation, it is recommended to adjust the gaps and adjust them according to the manufacturer's recommendations. The consequences of deviation can be fatal for the power unit:
- Exceeding the parameter leads to the impossibility of normal operation of the valve - it fails to open normally, which is why an insufficient volume of the fuel-air mixture enters the combustion chamber. The result is a decrease in the efficiency of the 8-valve engine.
- A decrease in the indicator also leads to a drop in power due to insufficient compression. In addition, under such circumstances, the valve burns, carbon deposits appear on its seat, which requires restoration of the timing belt. Timely adjustment of the valve mechanism on Logan allows you to avoid such problems.
To properly adjust the clearances, it is recommended to perform all activities on a cold engine.
Measurements are made using special probes.
This is interesting: Adjusting doors on a Lada Granta - what to do if the front door does not open from the outside: do-it-yourself repairs
As a result, the result of a regulation violation may be:
- Rapid failure of the Renault Logan engine mechanism.
- Reducing the power of the power unit.
- Loss of engine efficiency due to incomplete combustion of the fuel mixture in the combustion chamber.
- The appearance of soot and other problems.
Ignoring a malfunction inevitably leads to increased costs associated with the need for expensive repairs.
Purpose and functions
Intake and exhaust valves are one of the most important parts of an internal combustion engine. Due to them, fuel enters the combustion chambers and burnt products go into the exhaust system. The valve is in the closed state for most of the operating cycle. The opening occurs for a fairly short period of time. These elements are now subject to certain requirements.
The valves must not interfere with the exit of combustion products. When they are open, they carry out their tasks with minimal friction force, clearly perform their function, and operate at a certain moment. Also, the valve must have a strictly defined clearance. This prevents gases from escaping from the chamber when the mixture ignites.
When is Renault Logan valve adjustment required?
The manual for the car says that valve adjustment on a Logan with a 1.4 liter engine should be done once every 80-100,000 km. But this is only in theory. Traveling in difficult operating conditions and using low-quality gasoline forces car owners to make adjustments more often - once every 50-60,000 km. If LPG is installed on Logan, it is advisable to do all manipulations every 30,000 km.
But you shouldn’t focus only on mileage. As noted above, adjustment should be started when suspicious noise appears in the engine at idle. You can do all the manipulations yourself - just knowing the operating procedure or having a video on hand with a detailed description of the sequence of actions is enough.
When to adjust valves
The manufacturer recommends adjusting the Renault Logan valves after 80–100 thousand kilometers. In practice, adjustment is required after 60,000 km.
On Renault Logan with gas fuel instead of gasoline, the saddle fails faster.
The frequency of adjustment of Logan valves with LPG is reduced to 30,000 km.
You should think about adjusting the valves if you experience a distinct knocking sound at idle. The knock should come from the engine compartment.
Valve adjustment gauges.
Why adjust the valves and what should the clearance be?
A car engine operates in a difficult thermal regime, so its parts are subject to thermal expansion. The presence of a gap between the valve stem and the lever ( rocker arm) allows you to compensate for changes in linear dimensions. However, it should not be too large, otherwise the valve will not open completely. The cylinders will be less well filled with the combustible mixture, and the exhaust gases will not be able to leave the combustion chamber in time. As a result, the engine does not develop full power, and fuel consumption increases.
If the clearance is insufficient, the valve will not close, which again entails a loss of power, unstable operation of the power unit and increased gasoline consumption. And if such a nuisance does not entail unpleasant consequences for the intake valves, then the exhaust valves and their seats operating in more difficult conditions are subject to catastrophically rapid wear.
According to the manufacturer's recommendations, the gap for the intake valves (they are located on the side of the air manifold) is 0.1-0.15 mm, and for the exhaust valves - 0.25 - 0.3 mm . If the procedure is carried out after replacing parts of the gas distribution mechanism, then a gap of 0.2-0.25 mm is left for the new exhaust valves. After their plates are worn in to the saddles, the parameters will return to normal.
What does valve adjustment do?
Valve clearances are the distance between the adjusting bolt and the drive rod.
Renault specialists leave gaps to compensate for thermal expansion of the metal parts of the gas distribution mechanism. Incorrectly adjusted valves accelerate wear of parts. With increased valve clearance, engine power decreases - the cylinder is not filled with fuel sufficiently.
Reduced valve clearance leads to a loss of combustion efficiency of the fuel mixture due to incomplete compression. The saddles may burn and carbon deposits may appear. Subsequently, timing belt repair will be required.
A car engine operates in a difficult thermal regime, so its parts are subject to thermal expansion. The presence of a gap between the valve stem and the lever ( rocker arm) allows you to compensate for changes in linear dimensions. However, it should not be too large, otherwise the valve will not open completely. The cylinders will be less well filled with the combustible mixture, and the exhaust gases will not be able to leave the combustion chamber in time. As a result, the engine does not develop full power, and fuel consumption increases.
If the clearance is insufficient, the valve will not close, which again entails a loss of power, unstable operation of the power unit and increased gasoline consumption. And if such a nuisance does not entail unpleasant consequences for the intake valves, then the exhaust valves and their seats operating in more difficult conditions are subject to catastrophically rapid wear.
According to the manufacturer's recommendations, the gap for the intake valves (they are located on the side of the air manifold) is 0.1-0.15 mm, and for the exhaust valves - 0.25 - 0.3 mm . If the procedure is carried out after replacing parts of the gas distribution mechanism, then a gap of 0.2-0.25 mm is left for the new exhaust valves. After their plates are worn in to the saddles, the parameters will return to normal.
Necessary tools and knowledge
- pliers;
- set of probes;
- open-end wrench set to “13”;
- wheel wrench set to “10”;
- screwdriver.
The frequency of adjustment, as recommended by the manufacturer, is every 100,000 km. But practice shows that these figures should be reduced to 60 thousand km. It is worth noting: using gas as fuel makes the saddle seat faster, so in this case experts advise adjusting the dimensions every 30 thousand kilometers.
The clearance standards are within:
- inlet – 0.10-0.15 mm;
- graduation – 0.25-30 mm.
When completely replacing the exhaust valves with new ones, you need to set 0.2-0.25 mm for grinding.
How to adjust valves
Valve adjustment is carried out only on a cold engine! Before adjusting, it is necessary to tighten the timing belt if it is loose.
What standards should we follow?
It was previously noted that it is advisable to make adjustments (including the 1.4 liter Logan engine) “cold”. Before starting work, it is advisable to adjust the timing belt if its tension is insufficient.
To correctly adjust the mechanism, you should look in advance at the car manual and look at the clearance standards recommended by the manufacturer:
- Intake valve - 0.1-0.15 mm.
- Release valve - 0.25-0.3 mm.
If parts are completely replaced, a gap of 0.2-0.25 mm is set for grinding purposes.
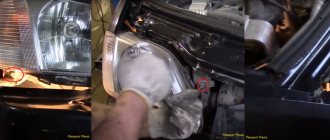
Instructions (photo report) for adjusting valves on Renault Logan
The self-adjustment procedure requires removing the cylinder head cover. Before you start, you need to prepare the tool.
- Unscrew the 4 bolts securing the air filter.
- Remove the L-shaped pipe that goes from the filter element to the valve cover.
- Remove the air filter housing.
- Disconnect spark plug wires.
- Unscrew the 8 bolts securing the valve cover.
- Raise the front of the vehicle on the driver's side.
- Engage 4th gear.
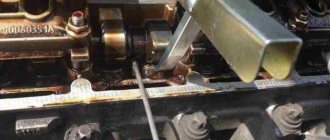
- Rotate the raised wheel until the letter F appears on the camshaft gear. Watch the valve of the first cylinder - the letter appears almost immediately after the valve begins to move when the wheel rotates. One wheel revolution is equal to one camshaft revolution.
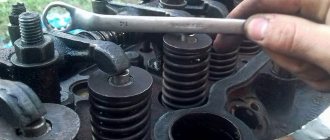
- Measure the valve clearances of the first cylinder. You need to loosen the locking nut and tighten the bolt with pliers. The gap is checked using a feeler gauge.
- Tighten the lock nut after setting the required gap and check again with a feeler gauge.
- Adjust the clearance of the second valve of the first cylinder.
- Rotate the crankshaft half a turn and adjust the valve clearances of the third cylinder.
- Rotate the crankshaft half a turn and adjust the valve clearances of the fourth cylinder.
- Rotate the crankshaft half a turn and adjust the clearances of the second cylinder.
This is interesting: Replacing the ball joint on a Peugeot 308 yourself
When starting engine maintenance, be sure to check and adjust the timing belt tension. We remind you that checking and setting clearances is carried out only on a cold engine. Otherwise, the parameters are overestimated, which is why you will get an unpleasant knock and will be forced to redo everything. For work you will need:
- a set of flat probes;
- open-end wrench “13”;
- tubular wrench or socket to “10”;
- screwdriver;
- pliers;
- jack.
- Remove the air filter housing. To do this, disconnect the corrugated air duct pipe and remove the 4 fastening screws.
- Rocking the filter element assembly left and right, remove it from its place and lift it from the side of the right wheel (hereinafter, the standard orientation in the direction of travel of the car is used). By sticking your hand into the resulting opening, release the plastic adsorber tube from the holders. There, remove the breather hose from the fitting located on the valve cover. After this, set the air filter housing aside.
- Remove the ends of the high-voltage wires from the spark plugs, disconnect the ignition module connector and the thin crankcase ventilation hose. Next, move aside the adsorber hose and the wiring harness, which is located at the right end of the valve cover.
- Having gained access to the upper part of the power unit, you should thoroughly blow all places with compressed air. In the future, this will prevent dust and debris from reaching the open gas distribution mechanism.
- Using a tubular wrench, unscrew the valve cover and remove it from the engine. If necessary, the parts installed on it are dismantled, and the part is washed.
- With the car on the parking brake, engage fifth gear. After this, use a jack to hang the right front wheel. This technique will allow you to rotate the camshaft during adjustments.
- The clearances of the engine intake and exhaust valves are adjusted according to the same scheme, so let’s look at the features of this process using the example of the 4th cylinder. The first thing is to ensure maximum clearance between the adjusting bolt and the valve stem. Slowly turning the suspended wheel, control the moment when the camshaft cam moves away from the working part of the lever (rocker) to the maximum distance.
- Check the clearance between the timing lever adjusting bolt and the end of the valve. To do this, insert a probe of the required thickness into the place of their contact. We remind you that the manufacturer recommends a gap of 0.1-0.15 mm for intake valves, and 0.25-0.30 mm for exhaust valves. A tool entering without effort is evidence of an increased gap - because of it, an unpleasant knock is heard when the engine is running. If the probe enters with difficulty or does not enter, then this indicates that the gap is too small - the valve is “clamped”. And finally, a slight tightness at the point of contact of the feeler gauge with the rocker plane on one side and the end of the valve stem on the other is normal - the clearance is adjusted correctly.
- Having found out with the help of a probe that the parameters recommended by the manufacturer are violated, proceed with the adjustment. To do this, use a spanner or open-end wrench “13” to completely loosen the lock nut of the adjusting bolt.
- If the car's mileage is 150-200 thousand km, inspect the mating parts. To do this, unscrew the bolt and inspect the end part. If there is wear, replace it, since the gap cannot be adjusted in this case. In addition, inspect the threads on the parts of the adjusting unit and draw conclusions about their suitability for further use.
- While holding the locknut from turning, rotate the bolt in the desired direction. It is most convenient to do this with a special tool, but if you don’t have one, use pliers. The rocker arm has a right-hand thread, so to increase the gap, turn the screw to the left, and to decrease it, turn it clockwise.
- Having achieved a position of the valve mechanism parts in which the dipstick can be moved with little effort, tighten the locknut. This must be done carefully, holding the adjusting screw itself from turning. Be sure to take into account that during final tightening the bolt rises upward by hundredths of a millimeter, so it is better to make a small adjustment.
- After removing the dipstick, press the rocker arm several times. After this, check the accuracy of the adjustment again.
- Periodically turning the camshaft by rotating the suspended wheel, check and, if necessary, adjust other valves.
- When starting assembly, inspect the valve cover gasket. Replace the heavily compressed part with a new one. In this case, it is better to use metal sealing elements - paper gaskets have not proven themselves to be the best.
- Return the valve cover to its place. After installing the bolts and screwing them in by hand to the maximum depth, proceed to fixing. As with other similar parts, tightening is carried out in several approaches, in a cross-shaped pattern from the center to the periphery. It is better to control the force using a torque wrench - this will ensure reliable fastening and safety of the thread.
- Replace the previously removed wiring harness and adsorber tube. After this, connect the hose from the intake manifold (thin breather) to the valve cover and install the ignition module if it was removed to clean it.
- Replace the air filter housing and attach the crankcase ventilation pipe and corrugated air duct hose to it. After this, proceed with the test run. After starting the engine, there should be no extraneous noise or knocking in its operation. Smooth operation in various operating modes and the absence of vibration at idle speed indicate that the adjustment has been made correctly.
This is interesting: Diagnostics of Passat b3 (Passat b3): how to find faults for a beginner?
And now the easiest way
We set the camshaft mark simply up. We specially adjusted the old mark on the timing belt for clarity. The mark on the belt may not match due to the fact that the belt arms between the marks are different and with each revolution it will shift by two teeth. If it suffers, then after a certain number of revolutions all the marks will fall into place, but we don’t need this.
The circled icon will be needed if we are going the long way; more about it at the end of the article.
If the old mark on the belt and camshaft match, then the second one on the belt and crankshaft too.
If you have a newer Logan, the camshaft sprocket will look like this.
We mark the marks on the belt with a marker; if they are not preserved, we remember which camshaft. Loosen the tension roller nut and remove the belt along with the roller.
New timing kit.
The new timing belt has marks and direction of movement.
We apply the old belt to the new one and are amazed at how clearly all the marks match.
We put the new timing belt in place, aligning the marks on the belt with the marks on the camshaft and crankshaft. We tighten it with a roller using the usual VAZ device. We check the tension of the belt, turn the long branch with two fingers and if it can be turned more than ninety degrees, then tighten it again. That's all. You can put back everything that was removed earlier.
Instructions (photo report) for adjusting valves on Renault Logan
When starting engine maintenance, be sure to check and adjust the timing belt tension. We remind you that checking and setting clearances is carried out only on a cold engine. Otherwise, the parameters are overestimated, which is why you will get an unpleasant knock and will be forced to redo everything. For work you will need:
- a set of flat probes;
- open-end wrench “13”;
- tubular wrench or socket to “10”;
- screwdriver;
- pliers;
- jack.
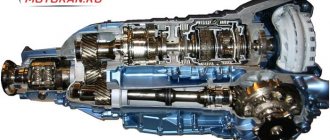
Valve adjustment procedure
- Remove the air filter housing. To do this, disconnect the corrugated air duct pipe and remove the 4 fastening screws.
- Rocking the filter element assembly left and right, remove it from its place and lift it from the side of the right wheel (hereinafter, the standard orientation in the direction of travel of the car is used). By sticking your hand into the resulting opening, release the plastic adsorber tube from the holders. There, remove the breather hose from the fitting located on the valve cover. After this, set the air filter housing aside.
- Remove the ends of the high-voltage wires from the spark plugs, disconnect the ignition module connector and the thin crankcase ventilation hose. Next, move aside the adsorber hose and the wiring harness, which is located at the right end of the valve cover.
- Having gained access to the upper part of the power unit, you should thoroughly blow all places with compressed air. In the future, this will prevent dust and debris from reaching the open gas distribution mechanism.
- Using a tubular wrench, unscrew the valve cover and remove it from the engine. If necessary, the parts installed on it are dismantled, and the part is washed.
- With the car on the parking brake, engage fifth gear. After this, use a jack to hang the right front wheel. This technique will allow you to rotate the camshaft during adjustments.
- The clearances of the engine intake and exhaust valves are adjusted according to the same scheme, so let’s look at the features of this process using the example of the 4th cylinder. The first thing is to ensure maximum clearance between the adjusting bolt and the valve stem. Slowly turning the suspended wheel, control the moment when the camshaft cam moves away from the working part of the lever (rocker) to the maximum distance.
- Check the clearance between the timing lever adjusting bolt and the end of the valve. To do this, insert a probe of the required thickness into the place of their contact. We remind you that the manufacturer recommends a gap of 0.1-0.15 mm for intake valves, and 0.25-0.30 mm for exhaust valves. A tool entering without effort is evidence of an increased gap - because of it, an unpleasant knock is heard when the engine is running. If the probe enters with difficulty or does not enter, then this indicates that the gap is too small - the valve is “clamped”. And finally, a slight tightness at the point of contact of the feeler gauge with the rocker plane on one side and the end of the valve stem on the other is normal - the clearance is adjusted correctly.
- Having found out with the help of a probe that the parameters recommended by the manufacturer are violated, proceed with the adjustment. To do this, use a spanner or open-end wrench “13” to completely loosen the lock nut of the adjusting bolt.
- If the car's mileage is 150-200 thousand km, inspect the mating parts. To do this, unscrew the bolt and inspect the end part. If there is wear, replace it, since the gap cannot be adjusted in this case. In addition, inspect the threads on the parts of the adjusting unit and draw conclusions about their suitability for further use.
- While holding the locknut from turning, rotate the bolt in the desired direction. It is most convenient to do this with a special tool, but if you don’t have one, use pliers. The rocker arm has a right-hand thread, so to increase the gap, turn the screw to the left, and to decrease it, turn it clockwise.
- Having achieved a position of the valve mechanism parts in which the dipstick can be moved with little effort, tighten the locknut. This must be done carefully, holding the adjusting screw itself from turning. Be sure to take into account that during final tightening the bolt rises upward by hundredths of a millimeter, so it is better to make a small adjustment.
- After removing the dipstick, press the rocker arm several times. After this, check the accuracy of the adjustment again.
- Periodically turning the camshaft by rotating the suspended wheel, check and, if necessary, adjust other valves.
- When starting assembly, inspect the valve cover gasket. Replace the heavily compressed part with a new one. In this case, it is better to use metal sealing elements - paper gaskets have not proven themselves to be the best.
- Return the valve cover to its place. After installing the bolts and screwing them in by hand to the maximum depth, proceed to fixing. As with other similar parts, tightening is carried out in several approaches, in a cross-shaped pattern from the center to the periphery. It is better to control the force using a torque wrench - this will ensure reliable fastening and safety of the thread.
- Replace the previously removed wiring harness and adsorber tube. After this, connect the hose from the intake manifold (thin breather) to the valve cover and install the ignition module if it was removed to clean it.
- Replace the air filter housing and attach the crankcase ventilation pipe and corrugated air duct hose to it. After this, proceed with the test run. After starting the engine, there should be no extraneous noise or knocking in its operation. Smooth operation in various operating modes and the absence of vibration at idle speed indicate that the adjustment has been made correctly.
Video: Adjusting valves on Renault Logan, Logan2, Simbol, Kangu, 8V
Valve adjustment Renault Logan (1.6, 8 valves)
The prepared video will show you how to adjust the valves on a Renault Logan car with a 1.6 or 1.4 engine (eight valves).
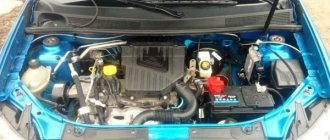
A little about the history of the creation of the car. This is interesting:
Renault Logan is a budget subcompact car developed by Renault specifically for emerging markets. The main production is located in Romania at the plant of the Dacia industrial group, owned by Renault since 1999. In Russia, the first generation of the car was produced from 2005 to December 2015, at the Avtoframos plant (later Renault Russia) in Moscow, and since 2014, the second generation has been produced at the AvtoVAZ plant in Tolyatti.
Depending on the specifics of the market, it is sold under the Dacia, Renault and Nissan brands. In European countries (except Russia) and Morocco, Dacia Logan is sold, assembled in Romania and Morocco. In Russia, the car is sold under the Renault brand. It is also sold under the Renault brand in Latin America, India and, since September 2009, in Ukraine. In Iran it is known as Renault Tondar. In the Mexican market, Logan is sold under the name Nissan Aprio. In the Indian market it is sold under the Mahindra Verito brand. The 2006 Dacia Logan MCV station wagon is produced in Russia under the name LADA Largus.
When do you need to adjust the valves on a Renault Logan?
Their adjustment is required if in the area of the cylinder head you clearly hear a characteristic clattering sound with a frequency two times less than the crankshaft rotation speed. These typical sounds appear due to wear and tear and can be clearly heard when the engine is idling.
The user manual advises checking the valves after one hundred thousand kilometers.
How to adjust valves on Renault Logan
Actions are performed on a cold engine, usually no higher than twenty degrees.
First, you need to remove the air filter housing by removing the air duct and unscrewing the four mounting bolts. After this, disconnect the high-voltage wires and connector from the ignition module, and do not forget about the wiring harness. That's right! Now you have access to all the valve cover bolts.
However, before removing the cover, everything must be blown out with compressed air. So you've removed the valve cover. Then, for your own comfort, you need to jack up the front right side of your “iron horse”. Thanks to this, you will be able to turn the crankshaft.
Now remove the cylinder head cover and the upper timing belt cover. Set the piston of the first cylinder to TDC at the end of the compression stroke, paying attention to the camshaft pulley marks.
Cylinders are counted from the flywheel.
Now carefully inspect the clearances in the drive of the intake and exhaust valves of the first cylinder and if they need adjustment, then do so. The heels of the rocker arms, when checking the crankshaft and camshaft in this position, must be directed towards the cylindrical parts of the camshaft cams, which are called the “backs”.
The rocker arms can swing on the axle within the clearance in the drive.
The thermal gap is controlled with the support of flat feeler gauges between the adjusting screw and the ends of the valve stem; the feeler gauge should move in the gap with little force. For intake valves, the gap should be 0.2 mm and 0.4 for exhaust valves.
The gap has completely different dimensions, so we can say right away that adjustment is necessary. Using a ten key, slightly loosen the locknut of the adjusting screw. At the same time, hold the screw by the flats with an adjustable wrench. Rotate the adjusting screw to set the required gap. While tightening the locknut into place, hold the adjusting screw with a wrench.
Now, turning the crankshaft by the bolt on the pulley clockwise one hundred and eighty degrees, carefully inspect and adjust the valves in cylinders 3, 4 and 2. Now you can safely put everything in place. Remember that this must be done in reverse order.
Thank you for your attention!
Useful tips
When setting the distance on a 1.4 liter Renault Logan engine, follow a number of simple tips:
- After removing the timing cover, pay attention to the mark made with enamel paint. In the TDC position it should “look” up. This spot can be moved to the desired position by lifting and scrolling the wheel, as noted above.
- To ensure the correct position of the piston, it is worth unscrewing the spark plug and checking with an aluminum wire.
- Check several times to make sure the settings are correct.