Next we look at how to replace the intake or exhaust valve on the 21120 engine. The engine was installed on cars of the “tenth” family, including the VAZ-2112. Our method involves removing the cylinder head. In general, on VAZ-2112 engines, replacing valves does not have the features characteristic of some foreign cars. The only thing is that it is recommended to grind the valves. The advice applies to all VAZ engines, but decide for yourself whether to use it or not.
The method of using lapping paste is shown in the video. Let's see.
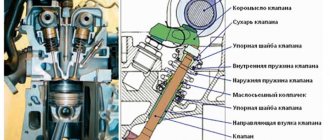
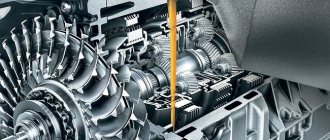
Sectional view of the valve mechanism
Replacing valves on a VAZ-2112 includes all the actions carried out when replacing hydraulic compensators. Having removed the compensator, you can see the valve stem and the upper plane of the disc. Plate 3 is held by two crackers 2 (see diagram).
Valve mechanism design
Dismantling includes the following steps:
- A “soft stop” (braided rope, etc.) is placed under the valve from below;
- Press down on the plate from above;
- The crackers are removed with tweezers or a magnetized screwdriver;
- Carefully move the plate upward, preventing the spring from rebounding.
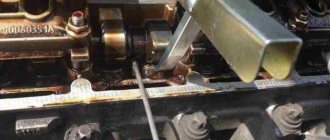
Sometimes in “step 2” you have to hit the plate with a hammer, and here you need to be extremely careful. In general, there is special equipment, such as shown in the photo.
Spring compression equipment
The puller works on the principle of a vice. But the force when screwing should be small, otherwise they conclude that the crackers “stick” to the plate. And in this case, take a hammer.
Articles
- 21120-1007010 – inlet valve;
- 21120-1007012 – exhaust valve;
- 21120-1007028 – cracker;
- 21120-1007025 – upper plate;
- 21120-1007300 – hydraulic compensator (about checking them here).
Preparing to remove valves
We will make a replacement on this engine (21120)
However, on a VAZ-2112 engine it is easier to replace valves by dismantling the cylinder head: to press in new guides, the cylinder head plate would have to be heated. It's best to leave the valve guides in place. But then you will have to remove different equipment:
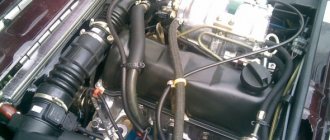
- There is a connector under the fuel pump hatch (photos 1 and 2). Turn it off so that the fuel pump stops pumping;
- Start the engine and let it stall;
- Remove the air filter: loosen clamps 1 and 2 and disconnect connector 3 (photo 3). Then use a 10mm wrench to unscrew the screw (photo 4).
All actions are illustrated by one photo.
Lowered the pressure, almost removed the filter
Remove the plastic filter housing along with the supply hose.
Disassembling the timing mechanism
Our goal is to remove both camshafts. On the VAZ-2112 engine, valve replacement can be performed even without removing the cylinder head. But the shafts will interfere in any case. Procedure:
- The negative terminal is disconnected from the battery;
- Remove the wires from the spark plugs, then disconnect them from the coils;
- The ignition module must also be removed (photo 2), and the crankcase ventilation hose must also be removed (photo 3);
- The bracket securing the injector wiring is screwed to the cylinder head cover (photo 3). Remove it! The same is done with the bracket of the second harness (DPZ and IAC);
- You will need to remove the receiver (photo 4). And the intake manifold holes are covered with fabric.
Study what the list says.
Preparing to dismantle the cylinder head cover
Like this
The cover itself is held in place by 14 bolts. A socket wrench is needed here. But first, let’s remove the plastic protection by unscrewing the six bolts with a 10mm wrench (photo 1).
We remove everything unnecessary in the timing drive
The timing mechanism has been removed!
Disconnect and remove the phase sensor under the right timing pulley. It is also necessary to disconnect the pressure sensor - it is located near the bracket that was removed. Using a 17mm wrench, without turning the pulleys, loosen the two mounting screws. A screwdriver is installed in the round holes - it is used as a stop. It remains to loosen the belt tension by partially unscrewing one nut (photo 3).
At the final step, after removing the belt, unscrew the screws on the pulleys. Each pulley is removed from the shaft. Then tighten three screws located flush with the pulleys (screws on plastic).
To remove the shaft, follow these steps:
- Remove the cylinder head cover;
- Unscrew 20 bolts (photo 1);
- Using two 15mm wrenches, unscrew the nut on the upper rod (photo 2). Do the same with the three nuts on the rod bracket (key “13”). The bracket is removed from the studs;
- Dismantle the bearing housing (photo 4);
- Now both camshafts can be removed (photo 5).
The meaning of what has been said is clear from the photo.
Timing drive disassembled
Hydraulics, that is, compensators, can be easily pulled out with a magnet.
Removing the cylinder head on a VAZ-21120 engine
We need to get rid of the fuel rail: use the “17” keys to unscrew pipes 2 and 3 (photo 1), and also remove clamp 1.
The ramp needs to be temporarily removed
The screws on the bar with the fuel line are unscrewed with a screwdriver. Then the rubber rings are removed from the pipes. You will also need to remove the tube with the oil dipstick - here you unscrew one “10” screw (photo 2). Finally, the two ramp mounting bolts are removed.
The main thing is to partially drain the coolant. Then top it up! Now unscrew the two nuts on the thermostat (photo 1) to move it to the side.
The thermostat should not interfere
The thermostat gasket is also removed. Using a “13” wrench, unscrew the nut with the “zero” wire. You can also disconnect the connector of the DTOZH sensor.
The VAZ-2112 engine is ready to replace the valves: use a “10” wrench to unscrew the bolts on the cylinder head and remove the plate along with the valves. Follow the turning sequence. Similarly, observe the sequence and tightening torque when assembling the cylinder head.
Recommended sequence (turn away)
Next, the actions specified in “Chapter 1” are carried out. We wish you success!
How to change valves on VAZ 2110/2112 (instructions)
- Replacement must be done in a garage or closed box, where there is no wind and dust.
- Turn off the power to the car and disconnect the battery.
- Drain the engine lubricant and cooling fluid.
- We dismantle all the attachments: hoses, fuel supply, vacuum system, we get wide access to the parts that need to be worked with.
- Remove the cover from the main cylinder block (cylinder head).
- Remove the casing and belt.
- We unscrew the bolts that secure the cylinder head.
- After removing the cylinder head, we arm ourselves with a special puller (if it’s not available, ask your neighbors in the garage - it’s really more convenient to do the work with it). We remove the camshaft and disassemble the pushers from the cylinder head. We attach the removal device to the studs. And put a stand under the plate and take out the fastener crackers. We remove the plate along with the springs, as well as the stop plates located under the springs (before that, we also remove the valve seal).
- We remove worn out or damaged valves.
- The next step is to replace the guide bushings. It is better to use a special device (screw version) because when struck there is a chance of damaging not only the head, but also the landing site. We press out the guides and treat the new ones with lubricant.
- We press each bushing into its proper place. They have special locking rings installed on them, so we press them in until there is a characteristic click, which means that the part has found its place. Everything should happen without strong tension, which could damage the bushing. If things get tough, don't rush. When the guide is pressed in, it is adjusted to the required fit dimensions (we use a reamer 8 mm in diameter, install it in the guide and scroll).
- We blow air through the holes, removing any foreign debris. We take measurements of the guide holes. We insert new valves.
- If you notice that the valve does not fully adhere to the seat, you need to grind the valves. It is produced on special machines. However, it should be remembered that you should not grind the valve too much, and after grinding it must be thoroughly washed. An ideal grind is considered to be one in which the working visible strip is 1 millimeter.
- We assemble the cylinder head in the reverse order and connect the fuel and air supply and cooling systems. We connect the battery.
Installation Tips
Before installing the shafts, the piston of the first cylinder must be at the “top dead center”. To achieve this, rotate the crankshaft, grabbing it by the screw securing the generator pulley. Here you need a key “17”.
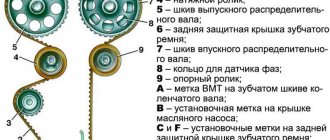
Alternator pulley and two timing shaft pulleys
The camshafts have spikes and the pulleys have grooves. Each pulley is equipped with a mark that should face up. The diagram shown in the photo corresponds to the upper position of piston 1. This is how the shafts are installed during installation.
You can set the crankshaft according to the mark located on the gearbox assembly (photo 1). This is done before installing the belt.
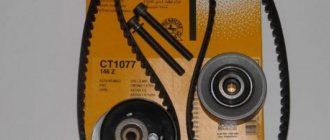
Various auxiliary elements
To set the tension correctly, use basic tips. Or you can do it simpler: when dismantling, note at what angle the tension roller was fixed. The key plate (photo 2) is set at the desired angle and the fixing nut is tightened (force 40 N*m).
How to screw the cylinder head
The threaded part of the screws is lubricated with engine oil. Then, maintaining a force of 20 N*m, the screws are tightened in the required order (see photo).
Recommended sequence (montage)
Second pass - each screw is turned at an angle of 90 degrees. On the third pass, the screws are turned another 90 degrees.
Chemistry
The bearing housing will be connected to the cylinder head cover. The connection itself must be airtight. A sealant is applied to the edge of the body around the perimeter: KLT-75M, Loctite-574, etc. During installation, the cylinder head gasket is not lubricated in principle - graphite or grease will only cause harm. Someone smears valve stems with graphite lubricant, which is also not correct. You need to use motor oil.
Before installation, the new valve is cleaned of factory grease. It is necessary!
Breakdown and signs
There are several characteristic signs based on which you can recognize the failure of the coolant pump:
- A hum or a rustling sound appears near the timing drive;
- There are traces of coolant leakage from the pump seat;
- Mechanical damage occurred to the belt - cracked, delaminated, teeth broke;
- The engine began to overheat excessively;
- The coolant level drops below normal, even when topping up;
- Liquid does not circulate well through the system.
Most often the pump fails due to bearing failure. It, in turn, breaks due to wear or incorrect installation of the timing belt tension. If such problems are found, the pump must be completely replaced.
Consequences of ignoring
If you ignore a pump breakdown and do not take any action to repair or replace it, this can lead to dire consequences. Namely:
- The timing belt is damaged or broken. It will then have to be repaired, the cylinder head, gas distribution mechanism, and piston group must be replaced;
- The motor is overheating. Because of this, all rubber connection elements of the engine cooling system, cylinder head gasket, valve cover, and rubber components of the piston group can be destroyed.
The current cost of a new pump is up to 1000 rubles. And the price for replacement services at a service station is another 1,000 rubles. If you don’t want to spend that kind of money on a car service, then you can easily do the replacement yourself.
Purchase rules
If you are going to change the pump, then first you have to purchase a new part. To choose it, follow a few simple rules.