How should low beam headlights shine?
There are requirements for luminous intensity for lighting devices, but there is no point in studying the indicators, since they cannot be measured without special equipment. Therefore, it is worth understanding the features of the low beam in order to understand what it should be like under normal conditions. The features are shown in the diagram, from which you can understand that the light flux is distributed unevenly, this occurs due to the different shapes of the diffusers.
This is what the ideal low beam distribution scheme looks like in headlights with halogen lamps.
Based on the graphic image, several conclusions can be drawn:
- The main part of the light should be distributed along the traffic lane over a distance of at least 60 meters.
- The side of the road should also be illuminated; for this purpose, the luminous flux is slightly shifted to the right (and in countries with left-hand traffic, to the left).
- Part of the light is distributed to the oncoming lane. But here it is very important to adjust the light so that it does not blind oncoming drivers; this is why adjustments are most often made.
In modern cars, automatic headlight leveling is often installed, which lowers or raises the light, depending on how the car is loaded. In models with a manual corrector, this must be done independently.
Ways to adjust headlights
There are several basic ways to adjust your car's headlights:
- contacting a special service;
- self-adjustment using tuning equipment;
- manual adjustment.
Of course, the most logical and reasonable way is to contact the service. However, you will be asked for a certain amount for the work of specialists. If you don’t have the opportunity to pay yet, and the headlights need to be adjusted urgently, then it’s quite possible to carry out this process yourself.
When contacting the service, check if they have tuning devices. Most of those that offer inexpensive services use the bench method. It is almost the same as something you can do yourself without much effort or expense.
The second option is to purchase special equipment for adjusting headlights, which is used in high-quality car services. However, it is quite expensive, requires special skills and, most likely, will not pay for itself over the course of using the car. It is much easier and cheaper to resort to the third, manual, method of adjusting the headlights.
A special device will help to correctly adjust the direction of lighting, but its price is quite high
In order to adjust the headlights with your own hands and without special devices, you just need to make certain markings and then adjust the headlights according to the diagram. Unfortunately, the accuracy of this method is inferior to that of specialists. The safest thing to do is to carry out the initial setup yourself and contact a workshop at the first opportunity.
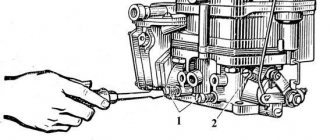
Where are the headlight adjustment screws located?
Even before starting work, you need to clearly know where the adjusting screws are located. They are found on all types of headlights, but the location may vary, as will the design. It is important to remember the following:
- The easiest way is to study the information in the car’s operating instructions or find data on thematic forums dedicated to a specific car model. You can often find videos where everything is shown clearly, which greatly simplifies the process.
- There are two screws on each headlight. The first regulates the luminous flux in the vertical plane, the second - in the horizontal . Therefore, you can adjust not only the height of the light, but also, if necessary, shift it relative to the road surface.
- The adjustment system may also differ. You can rotate the screws manually, using a flat-head or Phillips screwdriver, a hex or even an asterisk. It is worth clarifying this point in advance so that the necessary tool is at hand. Do not rotate plastic parts with an inappropriate tool; they are very easily damaged.
In some models, auto adjustment is carried out through special holes in the front trim. In this case, the main thing is to choose a screwdriver or other wrench of suitable length.
Sometimes headlights are adjusted through a special hole above the headlight.
Preparing to make adjustments
To achieve the correct position of the headlights, the adjustment procedure must be performed under certain conditions. Carry out the following preparatory work:
- Find a flat area without a slope adjacent to a vertical wall. One of the suitable options is a concreted entrance to the garage; the role of the setting template will be played by the gate.
- Remove unnecessary items from the trunk and interior of the car, leaving only the factory tool kit, first aid kit and spare tire. The goal is to ensure the curb weight of the vehicle specified in the operating instructions.
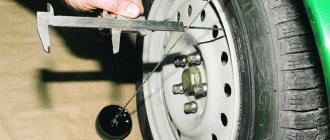
- Check the pressure in all tires and adjust them to normal if necessary.
- Clean the optical glass from dust and other contaminants that block the path of light flow. Do not use solvents, only ethyl alcohol-based glass cleaners.
- It is advisable to fill the fuel tank full, fill the washer tanks to the top and, if necessary, add antifreeze to the expansion tank.
A headlight adjustment diagram is drawn on the garage door or wall adjacent to the site. You will need a tape measure, a long straight bar and a marker. The color depends on the chosen background - for a white wall it is better to take a black felt-tip pen, for a dark gate - chalk. The diagram is drawn as follows:
- Drive the machine close to the wall. Using body parts or the car brand emblem as a guide, mark a point on the surface that coincides with the central (longitudinal) axis of the vehicle.
- Measure 7 m from the gate and drive the car to the specified distance. Draw a vertical line through the marked point.
- Take 4 measurements on the car: from both headlight bulbs to the ground and to the center of the car. On models equipped with separate high and low beam optics, the listed measurements are made for all four bulbs separately.
- Subtract 50 mm from the number indicating the distance to the ground. Set this size aside on the wall and draw a horizontal line.
- From the vertical axis, plot the distances to the centers of the lamps along the drawn line. Place marks in the form of segments. The scheme is ready.
Note. For separate optics, you need to draw 2 horizontal lines, and the second one must clearly correspond to the measurement from the high beam bulbs to the ground. Segments corresponding to the location of the outer lamps are laid out on it.
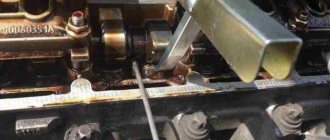
Before adjusting the position of the optics, it is also recommended to treat the adjustment screws with a penetrating aerosol lubricant such as WD-40, since the connection threads could become soured due to extremely rare rotation. As a rule, the adjusting screws are located on the rear plane of the headlight housing, facing into the engine compartment. The shape of the head is for a Phillips screwdriver, hexagon or special key.
We recommend: Repair of power windows on VAZ 2110
Why is adjustment needed?
This work should be done not when problems arise, but at least once a year or immediately after a light disturbance is noticed. You need to periodically adjust your headlights for several reasons:
- Ensuring normal visibility at night. A large number of accidents occur because the driver did not see an obstacle or a pedestrian in time.
The low beam must provide visibility at a distance of at least 60 meters. - Avoiding glare of oncoming traffic . This also often leads to emergency situations.
- Maintaining the performance of the regulation system . Over the course of several years, plastic elements can simply stick to each other and will not move.
Without properly adjusted headlights, you will also not be able to pass the inspection. It is better to make sure in advance that everything is in order with the light.
In what cases may it be necessary to adjust the headlights?
Factory adjustments of lighting equipment in a car can be disrupted by long driving on uneven roads. Numerous holes, potholes and cracks in the road surface lead to a gradual failure of the settings. As a result, the optics begin to direct light beams in the wrong direction.
Adjusting the headlights may also be necessary if:
- there was an accident, as a result of which the front part of the car was damaged;
- the motorist replaced the headlights or headlights on the vehicle;
- fog lights (FTL) were installed on the car;
- tires or wheels were replaced with analogues that differ in size;
- repairs have been made or the vehicle's suspension rigidity has been changed.
If oncoming motorists regularly flash high beam headlights at you, it means that the optics of your car are blinding them and require adjustment.
It is also worth adjusting the luminous flux if you yourself notice a deterioration in visibility while traveling in the dark. Finally, car owners are recommended to adjust the headlights before going for a technical inspection or traveling long distances.
Not only high beams, but also improperly adjusted low beam headlights can blind the driver.
Settings
If it is not possible to set up the system at a car service center, you can do it yourself. To do this, you will need a flat area with a wall or a solid fence opposite it. This is a prerequisite for any adjustment option.
Low beam
In this case, it is easier to use a universal method, which is almost the same for all cars. Only the distance from the wall to the car can differ; most often it is 7.5 meters , but some models are placed 5 meters away; it is better to clarify this point separately in order to correctly adjust the light. Next you need to prepare the markup.
- The car is driven close to a wall or fence, then marks are made on the surface clearly in the middle of the low beam headlights and opposite them. These will be the main guidelines.
- Then you can drive the car away and start drawing. Two more marks are placed 5 cm below the center of the headlights and connected by a horizontal line. Vertical lines are also drawn through the points to provide a clear reference point.
- The central axis of the machine is determined and also marked on the wall. The end result should look something like the diagram below.
All parameters are determined individually, since the size of the cars and the location of the headlights are always different.
Then you can start setting up. It is important that at least half a tank of gasoline is filled in the car, and that a person is sitting in the driver’s seat or there is a load approximately equal in weight to the driver. The easiest way to adjust headlights near a wall is this:
- The car is located at a distance of 5 or 7.5 meters, and the center line should coincide with the middle of the hood. It is important to position the car correctly.
- The hood is opened and a screwdriver or other tool is prepared for adjustment. The light is turned on and one headlight is covered with cardboard or any other opaque element.
- The upper edge of the light flux (it is clearly visible) should be located along the line. If it is displaced, adjustment is made with the corresponding screw that regulates the light in the vertical plane.
- Adjustment in the horizontal plane must be done so that the place where the luminous flux begins to rise is at the vertical mark opposite the headlight.
This is what the adjusted light output looks like.
The second method is in many ways similar to the first, but in this case you will need to place the machine at a distance of 10 meters from the wall. In this case, the horizontal line is drawn 12 cm below the center. Some argue that increasing the distance allows for greater tuning accuracy, so if you have the space, you can try this option.
Before adjusting the light, do not forget to set the headlight range control to zero.
Video: A visual example of setting up the headlight.
High beam
The high beam headlights do not have clear lines, they distribute the light evenly, so the adjustment will be much easier. The preparation process is almost the same as with low beam, the main guideline will be a horizontal line 5 cm below the center of the headlights and vertical lines opposite the bulbs.
In this case, you need to adjust the light so that the center of the beam falls at the intersection of the vertical and horizontal lines of the corresponding headlight. Here accuracy is not so important, since long-range lighting is used only when there is no oncoming traffic. If the low and high beam are combined in one bulb, then adjusting one option is enough for the headlight to work as it should.
High beam is distributed differently than low beam.
If the adjusting screws do not provide normal adjustment, it is worth loosening the headlight and adjusting its position. Often problems with light are caused by improper installation.
In the video they set the high beams on a Hyundai Tucson.
Fog lights
In this case, there are no screws for adjustment and the position of the light flux can only be changed in the vertical plane. Before you begin, you should loosen the fog lights. They often oxidize, so it is advisable to treat them with a penetrating lubricant in advance.
A line is drawn on the wall; its height should be 10 cm below the location of the fog lights. After this, the car needs to be driven 7.6 meters, positioned opposite the markings and the headlights turned on. In this case, the upper limit of the light flux should coincide with the line; only this position will ensure normal visibility in fog.
Fog lights also require adjustment to function properly.
How to adjust fog lights on a VAZ 2110 car
Fog lights (FTL) help to move quite comfortably on dark roads, in conditions of thick fog or heavy rain. In order for fog lights to effectively illuminate the road, they must be adjusted correctly. On a VAZ 2110 car, we make adjustments as follows:
- set the headlight range control to the zero position;
- place the machine on a flat area, at a distance of 5 meters from the wall;
- on the wall we mark a horizontal line that is on the same level as the fog lights on the car;
- using a laser on the wall we mark the center of each headlight;
- since the lifting angle of the PTF should be 2 times less than that of the low beam, the second horizontal stripe is drawn 2-3 cm lower (the tilt angle of the VAZ 2110 headlights is 1.3%!), and not 5 or 6 cm ;
- We carry out the adjustment for each PTF, at this moment closing the second headlight so that its light does not interfere with the adjustment;
- We adjust each headlight first in the center, and then in height.
Just like when setting the low beam, it is important to set the same pressure in the tires; ideally, you can put a person behind the wheel to create the same load as would be when driving a car.
In the instructions that come with the headlights of the VAZ 2110, it is recommended to install the PTF at a distance of 30 centimeters from the ground; when adjusting the height of the light 5 meters from the wall, the strip for adjusting the fog lights runs at 29 cm.
The industry produces fog lights that are installed not only on BA3 2110-2112, but also on Lada Priora. The fog lights of Lada Granta, Kalina-2, Lada Largus, Datsun Mi-Do and On-Do have the same design; the main manufacturers of VAZ optics are AvtoSvet (Kirzhach), Bosch.
Security measures
In order not to cause harm to health or break the headlights during work, you need to remember a few simple tips:
- Wear gloves when working and do not touch the wiring.
- Only use suitable tools for the adjusting screws, they break very easily.
- Put the car on the handbrake.
- When adjusting, do not apply excessive force.
Finally, one more adjustment method.
It is not difficult to adjust the headlights if there is a flat area with a wall opposite it. The main thing is to apply the markings correctly; the accuracy of the adjustment depends on this. If after carrying out the work oncoming drivers blink, it means the light is too high and needs to be lowered.
Rules for adjusting car headlights
Changing the direction of the axis of the light beam when adjusting the headlights is ensured by rotating the parabolic reflector, the focus of which is the light bulb, by moving it relative to the vertical and horizontal planes.
The correct position of the reflector is established by two vertical and horizontal adjustment screws, which are located on the rear surface of the headlight unit.
To correctly adjust the headlights, it is necessary to combine the light spot formed by the optics with the reference adjustment diagram, which is usually provided by the car manufacturer (in our case, the headlight adjustment diagram for Tavria and Slavuta cars).
Car headlight adjustment diagram
The headlights are adjusted in the following order:
- An unloaded car is placed on a flat horizontal platform at a distance of 5 meters from the screen. Any wall or low fence (up to one meter) is quite suitable as a screen.
- A vertical line “0” is applied to the screen, lying in the plane of symmetry of the machine (look at the adjustment diagram). To the left and right of it, two more symmetrical lines “L” and “R” are drawn, which should coincide with the centers of the left and right headlights.
- At a height corresponding to the distance of the centers of the headlights from the ground, a horizontal line “1” is applied, and a line “2” is applied 50 mm below it.
- When the preparation is complete, turn on the low beam headlights and begin adjusting.
- Closing each headlight in turn, check the location of the light border relative to the adjustment diagram printed on the screen. It should run along line “2”, with the inclined segments starting at points “E”.
- If this does not happen, then you should adjust the headlights using the horizontal and vertical adjustment screws.
Adjustment of PTF blocks
The task of fog lights is to ensure maximum visibility of the car for oncoming traffic and to illuminate the section of the road in front of the car when the powerful light of standard devices is reflected by a thick veil of fog. Accordingly, the beams should be directed below and parallel to the road surface.
To configure headlights of this type, follow this algorithm:
- Determine the distance from the centers of the PTF blocks to the ground level and draw a corresponding horizontal line on the wall.
- Draw the second line at the same distance above the first. Mark the center axis of the car and both fog lights with vertical lines.
- Place the machine opposite the wall, measuring 10 m. Turn on the PTF and, using the adjusting screws, ensure that the centers of the light spots are at the intersection points of horizontal lines with vertical segments.
- Lower the beams until the distance from the top borders of the beams to the horizontal line is 10 cm.
During the setup process, it is not necessary to cover the fog lights one by one with shields. This measure simplifies adjustment - excess light does not interfere with accurately determining the outline on the wall.