Each owner of a VAZ Six, as a rule, should master certain types of repairs, including adjusting VAZ valves. Considering the level of popularity of cars of the “classic” series, there is absolutely no hope of quickly ousting them from the roads with new products from the automobile industry. We can agree that “old ladies” are not as comfortable and economical, but they have many advantages. The owners of such cars are people with not very large incomes, and they require a minimum of money to repair.
Firstly, Zhiguli spare parts are quite cheap and are presented in a huge assortment in stores. Secondly, the machines have a very simple design and allow the owner to carry out any types of repairs and adjustments himself without visiting a car service center.
Technology requires VAZ valve adjustment
Owners of foreign cars and new domestic cars are completely unfamiliar with many of the procedures that should be carried out with cars designed during the Soviet period. Technology has come a long way. While on classic cars many adjustments have to be made manually, in new cars everything happens automatically.
Adjusting the 2106 valves is required for a very simple reason. During operation, the engine gets extremely hot. As is known from physics, any solid body changes its linear dimensions when heated - they increase. Actually, constant temperature changes lead to changes in the parameters of parts, and some of them require systematic adjustment to factory standards.
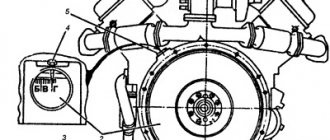
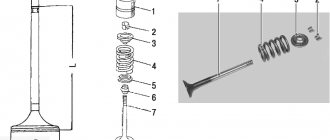
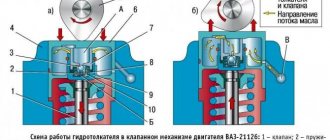
First of all, this applies to the timing belt of the car. The gas distribution mechanism of the engine has a very complex design. The main element is a valve that blocks the lumen of the inlet and outlet windows of the block head. The tighter the valve closes, the better. A special lever exerts pressure on the valve stem, if necessary, to open it.
Let us assume that all the parts fit together exactly when cold. As soon as the engine starts, they will begin to heat up and increase in size. The valve stem undergoes the greatest elongation. If there is no required thermal gap after heating, the valve will stop closing the window. This necessarily leads to loss of power and excessive fuel consumption. The designers calculated that there should be a thermal gap of 0.15 mm between the working part of the camshaft and the lever.
The procedure for adjusting the valves of the VAZ 2106
Adjusting valves on a VAZ
Many car enthusiasts are reluctant to adjust the thermal clearances of the gas distribution mechanism. This procedure requires certain skills, endurance, and takes time. Partially, the reluctance to make adjustments is due to ignorance of the algorithm for performing the work and the fear of doing something wrong.
Before you start work, you should prepare. The car must be installed on a level surface, the engine compartment must be well lit.
You will need tools to get the job done.:
- screwdriver;
- wrenches for “10”, “14” and “17”;
- a key to turn the crankshaft;
- dipstick
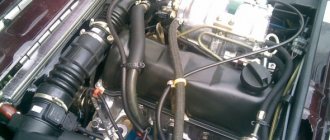
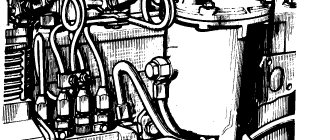
In order to gain full access to the gas distribution mechanism, remove the cylinder head cover and air filter. To begin the adjustment, you need to rotate the crankshaft until the marks on the pulley and the oil seal cover match. This position will correspond to the compression stroke in the 4th cylinder.
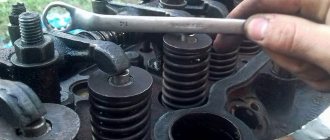
Checking the correctness of the gap adjustment is done as follows:
- a feeler gauge is inserted into the gap between the working part of the camshaft and the valve lever platform;
- when moving, the probe should pass with noticeable difficulty;
- If the dipstick passes too easily or does not pass, it is necessary to adjust the gap.
To regulate the size of the thermal gap, perform the following steps:
- use a wrench set to “14” to hold the head of the adjusting bolt, and use a wrench set to “17” to loosen the lock nut of the bolt;
- by turning the adjusting bolt, the gap size is adjusted;
- the locknut is tightened;
- Using a feeler gauge, the correct adjustment is checked. If necessary, the procedure is repeated.
Each valve must be adjusted at a specific camshaft position. To do this, you must strictly follow the procedure for adjusting the valves of the VAZ 2106. The 6th and 8th valves are adjusted first (counting from the front of the engine).
Next, to adjust the next pair of valves, turn the crankshaft 180º. The 4th and 7th valves are adjusted next, and with each subsequent cranking the following should be checked and adjusted: 1st and 3rd, 5th and 2nd valves. After the cycle is completed, it is necessary to rotate the crankshaft several times and check the clearance adjustments again.
We recommend: Why glass encapsulation is needed: advantages of glass in a capsule
When to adjust VAZ valves
Unnecessary intervention in the operation of the motor does not always lead to positive results. In order to open the cylinder head cover and begin adjusting the thermal clearances, compelling circumstances are needed. Obvious reasons to check valve settings are: the appearance of a characteristic noise in the valve cover area; a noticeable decrease in engine power and a change in acceleration dynamics; forced overheating of the engine at high speeds. In addition, you need to monitor your mileage. It is recommended to check the correct valve clearance adjustments every 10 thousand kilometers.
The only reason classic VAZ cars are still afloat is that there are a lot of them, they are cheap and easy to repair. These three aspects completely cover all its shortcomings - the archaic design, the increased flowability of some parts, and the obsolete appearance. The VAZ 2106 has a lot of fans that cannot be bought by any Volkswagen or Ford. They love their cars, take care of them and adjust the valves.
Why is valve adjustment necessary?
People will soon lose the habit of adjusting valves, just as they have forgotten how to hunt mammoths. Good or bad, but in any case, someday the last four-cylinder engine in the world with the numbers “2106” poured onto the cylinder block will knock.
But until this happens, we will have to service them and put them in order, and adjusting the VAZ 2106 valves, the video process of which you can watch on the page, will remain relevant.
Valve adjustment is carried out for a very simple reason - solids expand when heated, and the gaps between them decrease. And the gas distribution mechanism of the VAZ 2106 is designed in such a way that it requires a certain thermal gap between the valve pusher lever and the camshaft journal. When developing the six engine, it was determined that this gap should be 0.15 mm. With such a gap, when the timing parts heat up, the valves close tightly and ensure the normal supply of the combustible mixture to the combustion chamber and the timely removal of exhaust gases.
When to adjust valves
There are no specific regulations for adjusting the valves of VAZ engines. But they need to be adjusted in cases of violation of the integrity of the gas distribution mechanism - replacing the camshaft, replacing valve seals and other work that involves removing the camshaft.
The valves are adjusted as necessary, when this is indicated by a characteristic sound from under the valve cover. If the valves have lost the required clearance, the car is unstable because the valve timing is off. Excessive fuel consumption and loss of power may also occur.
Preparing for adjustment
The adjustment process itself is very simple, you need to know some patterns and order of operation of the cylinders, and be able to do just a little. You will also need a feeler gauge to check the gap when adjusting. You will also need:
- open-end wrench 14;
- carob at 17;
- the dipstick itself;
- key or “crooked starter” to turn the crankshaft.
It is advisable to carry out the work in good lighting and on a level area. Before we begin the adjustment, we will provide ourselves with access to the timing belt by first removing the air filter and the gas distribution mechanism cover.
Adjustment technology
To begin the adjustment, you need to align the marks on the crankshaft pulley and the front cover of the cylinder block. Now the piston of cylinder 4 is located at TDC on the compression stroke. We also check the mark on the wire timing gear. It falsely coincides with the tide on the camshaft housing. That is, now you can check those valves that are in a free state and are completely closed. These are the 6th and 8th valves.
Then we take the prepared dipstick and insert it into the gap between the rocker and the camshaft cam. The probe should pass with barely perceptible tension.
If it passes freely, the gap is large. If it doesn’t go through at all, the gap is insufficient.
If necessary, we adjust the gap with an adjusting bolt, tearing off the lock nut with a 17mm wrench, and adjust the position of the bolt relative to the rocker with the bolt itself. We ensure that the probe passes with a slight interference fit. Holding the adjusting bolt in the desired position, lock it with a lock nut. All adjustments. The remaining valves are adjusted in the same way, but in a certain order.
The procedure for adjusting timing valves VAZ 2106
Each of the valves is adjusted in a strict sequence that must be strictly followed. There is nothing complicated about this, and for clarity, we have summarized the methodology in a table:
Do-it-yourself adjustment of VAZ 2106 valves - step-by-step instructions.
Step 1: Prepare your tool.
This includes:
- open-end wrenches for 17 and 13;
- 0.15 mm feeler gauge (can be replaced with a micrometer);
- flat screwdriver;
- socket set and ratchet.
Step 2. Make sure that all the necessary conditions are met:
- the engine temperature is as close as possible to the temperature in the garage (outside);
- The timing belt has normal tension.
We recommend: Forged, cast or stamped - which wheels are better and how do they differ?
Step 3: Remove the valve cover.
- Unscrew the fastening nuts (3 pcs.) of the air filter cover and remove it.
- Remove the filter itself.
- Having loosened the 4 fastening nuts, disconnected the breather hose, the choke cable and the carburetor damper drive rod, remove the remaining part of the air filter housing.
- Unscrew the mounting nuts (8 pcs.) of the valve cover - here you will need a 10mm socket and a ratchet - and remove it.
Step 4. Align the crankshaft and camshaft pulley to the marks.
Essentially, if the timing chain tension was correct, the marks will align on their own - without adjustment. However, to be on the safe side, it is still better to double-check whether the crankshaft pulley mark and the longest mark on the carburetor front cover match, as well as the camshaft sprocket mark and the protrusion on the cover.
The procedure for adjusting the valves of the VAZ 2106.
Step 5: Adjust valves #6 and #8.
If the marks are correctly set, the piston of the 4th cylinder of the engine is at TDC (top dead center), which means it’s time to adjust valves No. 6 and No. 8. The valve number is counted from the front of the engine, that is, to your left.
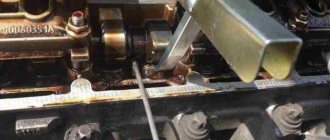
So, take a dipstick and insert it between the camshaft and the rocker. This procedure should be carried out with noticeable difficulty. If this is not the case: the dipstick goes in very easily or, conversely, does not insert at all - by acting on the adjusting bolt and control nut, the valves must be adjusted.
- Using a 17-mm open-end wrench, loosen the locknut clamp.
- Without releasing the latter, use a 13mm wrench to rotate the upper adjusting nut until the optimal clearance is obtained.
- Tighten the locknut to its original position.
- Take control measurements with a probe.
- If necessary, repeat all the above steps.
Step 6.
Turn the crankshaft 180 degrees and adjust valves No. 4 and No. 7 in the same way as step 5.
Step 7
Adjust valves No. 1 and No. 3, after first rotating the crankshaft 180 degrees (360 degrees from the initial position).
Step 8
Again, rotate the crankshaft 180 degrees (540 degrees from the original position) and adjust valves No. 2 and No. 5. The actions are the same.
Step 9
Complete the work on adjusting the valves on the VAZ 2106 by assembling all the removed parts in the reverse order.
The procedure for adjusting valve clearances on a VAZ 2106
The valves are regulated in a strictly defined sequence, as mentioned above. Below you will find data on how much you need to turn the crankshaft (in degrees) to adjust a particular valve:
- Matching marks (initial position) - 6th and 8th valve.
- Rotate the crankshaft 180 degrees - 4th and 7th valves.
- 360 degree rotation - 1st and 3rd valves
- Shaft position rotated 540 degrees - 5th and 2nd valve.
For convenience, you can put your marks on the crankshaft pulley, that is, divide it into two parts, making another mark opposite the factory one.
There is another way to check the shaft rotation angle. You can remove the distributor cover and adjust the valves according to the above data, only each next two valves are adjusted not after 180 degrees of rotation of the slider, but after 90, that is, 1/4 turn. You can make your own mark on the distributor body.
After completing this VAZ 2106 maintenance procedure, we replace all the removed parts in the reverse order of removal. If you have any questions, ask below in the comments, maybe I can help!
Adjustment of valves
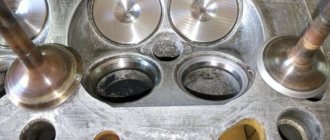
If knocking, unstable operation, or increased vibration occur, you should pay attention to the valves.
If the valve timing of the gas distribution mechanism is disrupted, they do not operate accurately, that is, the full volume of gas does not enter the working area of the cylinders, complete combustion of the fuel-air mixture in the working chamber does not occur, and the cylinders are not purged. This is all accompanied by the appearance of a shock load on the camshaft cams on the drive lever and the shaft rod. Fuel and engine oil consumption also increases. What happens if you drive with unadjusted valves? Answer: rapid wear of engine parts, increasing cost and repair time.
The greatest danger to a car engine is a gap that is less than permissible. Too little clearance between the drive lever and the camshaft cam prevents the valve head from sitting tightly in its seat on the cylinder heads. Through a valve that is not seated, gases from the burnt fuel-air mixture are knocked out of the combustion chamber. Because of this, the exhaust valve cap around the perimeter begins to burn.
Rubber oil deflectors, also known as oil deflectors, also burn out due to a burnt valve cap, which leads to increased engine oil consumption. If the wear of engine parts is large, then it may be better and easier to do an engine swap with your own hands or at a service station.
Even if your engine does not have a belt drive, but a chain drive, then if you do not change the chain before its service life expires, the valves will bend on the piston, as, for example, in the sr20det engine manufactured by Nissan.
Do-it-yourself valve adjustment on VAZ Classic cars
The first car to roll off the assembly line of the Volzhsky Automobile Plant was the VAZ-2101 model. Subsequently, the manufacturer produced 6 more models, up to the VAZ-2107.
All these cars are popularly designated “Classic” due to the layout features.
All these models were produced in a sedan body (except for 2102 and 2104 - which are station wagons), equipped with an in-line 4-cylinder engine with a longitudinal arrangement, as well as rear-wheel drive.
It is noteworthy that almost identical engines were installed on all these cars. And although as a result of modifications it was possible to change the performance characteristics of the power plants, their layout was the same.
Features of timing belt
For example, the gas distribution mechanism - with the upper position of the valves and camshaft. shaft The timing drive of the engine was carried out via a chain, and this is on all models.
A special feature of the valve mechanism is the use of push levers, also known as rockers. They are located between the camshaft and the end of the valve stem. That is, the cam acts on the valve not directly, but through the rocker. Also, thanks to the push lever, it is possible to adjust the thermal gap.
This gap is needed in order to compensate for the change in the geometric parameters of the constituent elements of the valve mechanism that occurs as a result of heating, during which the metal expands.
If this gap did not exist, then after heating the power plant there would be a violation of the valve timing.
To put it simply, when heated due to the expansion of the metal, the valves do not close completely, which leads to loss of compression and, as a result, a drop in power.
The list of maintenance work for the power plants of these models included such an operation as adjusting the valves. This is due to the design features of the valve mechanism. During operation, the working surfaces of the valve end, rocker and camshaft cams are erased, which leads to a violation of the thermal clearance.
Fortunately, the same design is quite simple, so the adjustment work is quite simple and you can do it yourself.
It is only important to know the order of work and the sequence of adjusting the valves on the “Classic”.
It is noteworthy that the operation is identical for almost all models, so the procedure for adjusting the valves of the VAZ-2101 and, for example, the VAZ-2105 is the same, only in the VAZ-2107 it is slightly different.
Since for most models the operation is done identically, then all Zhiguli models belonging to the “Classics” will appear below.
The first and basic rule of the operation is that it is performed only on a cooled engine. This is due to the same expansion of the metal.
If the valve adjustment on a VAZ-2102 or any other model is done on a heated unit, then the operation will not give a positive result, because when it cools, the metal will return to its original shape and the gap will not correspond to the norm, it will simply increase.
You also need to know when the VAZ-2105 valves should be adjusted. A sure sign that the valve mechanism is out of adjustment is a loud metallic knock from the engine compartment when the engine is running. Moreover, its intensity changes in proportion to the increase or decrease in speed.
Adjustment of valves on the VAZ-2104 must also be carried out every time repair work is carried out on the cylinder head associated with removing the camshaft.
Preparatory work
So, the engine is cooled down, and the car itself is placed on a flat surface and immobilized. You can start working:
- Remove the carburetor air filter cover and remove the filter;
- We unscrew the filter mounting bolts and remove it, having first disconnected the pipes going to it;
- We remove the cable for manual control of the air damper (choke) and disconnect the throttle linkage;
- Unscrew the bolts securing the valve cover and dismantle it;
- Check the chain tension (it must be normal, otherwise you will have to adjust the tension first);
- Remove the distributor cap.
Now you need to set the TDC of the piston in the 4th cylinder and the marks on the knees will help with this. camshaft drive shaft and cover. shaft, as well as on the camshaft gear and its cover.
To do this, you can use a key of appropriate size, which you need to rotate the knees. shaft for the drive pulley bolt. Or use one of the drive wheels. To do this, you need to hang it with a jack, engage 4th gear and slowly turn the raised wheel. In this case, the transmission will ensure rotation of the crankshaft. But with the second method, you will need an assistant, since it will be difficult to check the coincidence of the marks.
We recommend: What to do if the fan of the VAZ-2112 stove does not work