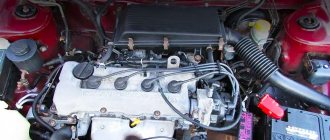
The Nissan Almera N16 was equipped with two petrol engines 1.5 (QG15DE) and 1.8 (QG18DE). Changing the gas distribution mechanism drive of these related engines follows the same algorithm. Replacing the Almera N16 timing chain may be required if direct or indirect faults occur. Direct signs of a stretched chain include:
- At the time of startup, when the engine is idling, periodic failures or rough operation .
- The appearance of extraneous noise , with a characteristic metallic ringing from the motor.
- When examining the gas distribution mechanism, wear of the teeth on the gears and increased output of the tension devices .
QG15DE on the attachment belt side
Among the indirect factors indicating problems with the timing drive:
- unreasonable increase in engine temperature;
- tapping valves;
- decreased cravings;
- periodic occurrence of metallic knocks;
- formation of thick smoke from the exhaust system;
- increased fuel consumption;
- jerks in movement.
We'll tell you how to independently replace the timing drive on a Nissan Almera N16.
QG18DE at implement belt side
Spare parts and tools for replacing the timing chain on Almera H16 gasoline engines
Timing drive spare parts set QG18DE
The process of replacing the Nissan Almera N16 timing chain begins with preparing the necessary tools and materials. To work you will need:
- pulley and sprocket pullers;
- jack;
- set of socket heads with extension;
- adjustable and torque wrench;
- chisel, hammer;
- a set of open-end and hex keys;
- screwdrivers for flat and Phillips heads;
- pliers;
- containers for draining used cooling and lubricating materials;
- solvent;
- sealant;
- block of wood;
- rags.
Pulley and sprocket puller
When selecting spare parts, you need to take into account what engine is on your Nissan Almera N16. For the 1.8 engine you will need spare parts under the article numbers:
- 13028-4M51A – timing chain;
- 13070-95FOA – hydraulic tensioner;
- 13085-7J600 – guide bar;
- 13091-7J600 – damper;
- 13510-95FOA – crankshaft oil seal;
- 15066-5E510 – ring-type gaskets for oil and water pumps;
- 13270-95FOB - cylinder head gasket.
For one and a half liter engines it is necessary to prepare spare parts with the following articles:
- 13028-4M51A – timing chain;
- 13271-4M501 – gasket for the crankcase ventilation system;
- 13533-AU000 – oil pump spacer;
- 21049-4M500, 15066-95F0B – rubber seal rings;
- 13510-10Y10, 13021-4M501 – oil seal, crankshaft gear.
Crankshaft oil seal
Replacement procedure
Mark on the crankshaft sprocket. Location of the tensioner bar and damper bar. The photo shows the sealing rings for supplying oil from the sump through the pump to the engine; we must replace them with new ones.
We apply high-temperature sealant using Elring. And in the end, seeing this: Now you can dismantle the oil pan.
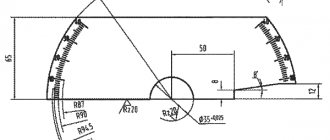
NISSAN ALMERA 1.5/1.8; ALMERA TINO 1.8 INSTALLING IGNITION TIMING MARKS
After loosening the pump pulley mounting bolts, you need to remove the drive belts for the air conditioner and power steering. By inserting a wooden block between the side of the crankcase and the crankshaft to secure it, remove the crankshaft pulley.
The pulley mounting bolt is unscrewed using an extension and a socket. The top bar is removed from the damper.
Changing the timing chain of Almera N16
Let's look at replacing the Almera H16 timing chain using the 1.8 (DE) engine as an example. Material about this procedure on the 1.5 engine (QG15DE) can be found at the link.
Remove the covers and pulley
Replacing the Almera H16 timing chain begins with draining the coolant and oil. Further:
It's better to unscrew the spark plugs
- Unscrew and remove the spark plugs.
- Remove the attachment belts.
- We dismantle the crankshaft pulley. The easiest way is to use the starter. To do this, place the key on the pulley fixing bolt and rest it against the engine mount or a rigid part of the body. Then crank the starter by turning the key in the ignition switch for a short time. This will loosen the tightening, after which the bolt is unscrewed so that a few turns remain in engagement. We install the puller, resting on the bolt, and remove the crankshaft pulley.
Crankshaft pulley
- After unscrewing the two bolts, remove the tension roller .
- Remove the pulley from the cooling pump , which is secured with four bolts.
- We install the motor on a jack . The best place for the stop will be the connection between the gearbox and the engine.
- We disconnect the wires from the sensors that interfere with access to the motor mount.
- We dismantle the pillow by unscrewing four bolts from the power plant and two from the body.
- Remove the valve cover by unscrewing the ten mounting bolts.
- Next, remove the timing belt protective cover , which is held in place by two nuts and six bolts.
- We dismantle the beams to obtain the necessary space to remove the engine pan.
Disconnect the wires and unscrew the engine mount
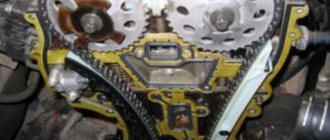
We install the gas distribution mechanism drive according to the marks
To correctly replace the Almera N16 timing chain, you need to set the marks by turning the crankshaft. Initially, you will need to set the oil pump bushing mark up. However, it does not fit the mark of the chain mechanism. Subsequently, the tension device is dismantled and the chain is removed.
Marks on camshafts
To install a new timing drive:
- Let's lock the tensioner with a wire of a suitable cross-section through a special technological hole.
- The timing marks must match the marks on the camshaft sprockets . On the left shaft it is made with one point, and on the right with four; the chain mark must be aligned with the second point. Sometimes you can find not dots, but marks made with paint.
- You also need to match the mark on the chain with the point on the crankshaft sprocket .
Mark on the crankshaft sprocket
End of replacement
At the final stage of replacing the Nissan Almera H16 timing drive, you should do:
- Thoroughly clean the contact surface of the protective casing of the gas distribution mechanism. Replace the pump and oil pump seals. Then apply sealant to the connecting part of the timing cover and install it in place.
- Install the valve cover.
- Install the oil pump bushing and accessory belt pulley.
- Install the remaining elements following the reverse sequence of actions.
- Check the operation of the power plant after the sealant has completely hardened. This takes half an hour. After starting the engine, pay attention to the absence of coolant and lubricant leaks.
Replacing front cover seals QG18DE
Can I replace it myself?
Yes. Despite the fact that replacing a timing chain is a fairly rare procedure, you can find instructions and photos of the work on the Internet.
Replacement is best done on a lift; in extreme cases, a pit will do.
Replacement Tools:
- Hexagons and heads
- Hammer
- Chisel
- Torque wrench
- Sealant and degreaser
- Clean rags
- Tanks for waste and antifreeze
- adjustable wrench
- Wood block
Replacement process:
- Turn off the power to the ignition coils and unscrew them. We label the coils with numbers so as not to confuse them during installation.
- Disconnect the air pipes from the valve stem.
- Unscrew the mounting bolts and remove the valve cover.
- Remove the right cushion.
- Drain the engine oil.
- Remove the oil filter.
- Remove the lower radiator pipe clamp and drain the coolant.
- Unscrew the radiator cap and drain the remaining fluid.
- Remove the radiator and generator drive belt.
- Remove the supply hose.
- Remove the cylinder head.
- Remove the muffler and unscrew the engine oil pan.
- Loosen the bolts that secure the pump pulley.
- Remove the accessory belts.
- Insert a block between the side surface of the crankcase and the crankshaft.
- Remove the crankshaft pulley.
- Unscrew the water pump pulley and remove it.
- Remove the oil pump.
- Set the first piston to the TDC position. The marks on the gears must certainly match (on any modification, including the Nissan Almera 2L 2000RSR 20)
- Secure the camshaft with an adjustable wrench and unscrew the bolts of its gears.
- Remove the parts in order: the upper damper bar, the tensioner, the damper tension bar (put the lower bar on the pin).
- Remove the timing chain.
- Use a flathead screwdriver to pry up the gear and remove it.
- Clean the side surface of the engine from dirt and old sealant.
- Install the pre-prepared chain, following the marks.
- Replace seals.
- Apply sealant to the side surface of the motor housing.
- Secure the mounting bolts.
- Attach the side cover and wait until the sealant sets.
- Install the pump along with a new gasket.
- Reassemble the parts in reverse order.
Once again we draw attention to the need to comply with the labels! Otherwise, the chain may break, which will lead to critical engine damage.
Replacing the 2001 Nissan Almera HR16DE chain is done in the same way.
A quick way to change the chain
Replacing the chain using the pulling method occurs without removing the front cover, replacing the tensioner, or the shoes of the Almera N16 gas distribution mechanism.
This will require draining the oil and coolant, as well as removing the valve cover. The essence of the method is to rivet the old and new chains. After this, they are connected, with further pulling along all timing sprockets. To do this, you will need to rotate the crankshaft, having previously unscrewed the spark plugs.
Opening the circuit
After the end of the new chain has made a full revolution , it is disconnected from the old timing drive and fixed with the second end of the new chain . All that remains is to install the previously removed elements.
Before performing operations, you should set a mark on the crankshaft pulley, and also fix the position of the camshaft marks in order to ensure that the links do not jump when pulling a new chain.
Connecting the chain
Replacing the timing chain of Nissan Primera P12
The model was discontinued in 2008; all its gasoline engine types were equipped with a chain as a drive. Modification of the QR series internal combustion engine on these vehicles is technically very complex. If the car owner has not had to deal with disassembling a power unit of this marking, you should trust the experience of professional Tech..
Even with specialized knowledge and the use of professional tools, repairing the valve timing system can take up to 1 business day.
A chain break, even with severe wear, is completely excluded, but when independently servicing and repairing a machine, unacceptable mistakes are often made, leading to breakdown of the valve group elements, loss of spark, or inability to start the engine.
If you discover any malfunctions in the operation of the gas distribution mechanism, contact specialists for an accurate diagnosis of malfunctions. This is the basis for high quality repair work.
According to the maintenance regulations, the drive mechanism cannot be replaced. The manufacturer assumed that the use of the original chain is sufficient for the entire mileage of the car. It is necessary to check the condition of the mechanism, at least visually, and it is recommended to do this every 15 thousand kilometers.
When buying a car through an intermediary and with mileage readings that may not be the most honest, inspecting the drive is mandatory. If the tensioner is displaced from the zero position by more than 1 cm, installation of a new set is required.
The timing chain on Nissan cars is a highly reliable device. In most cases, you need to seriously worry about its possible breakdown after 100-120 thousand km. A drive that produces metallic noises during operation, knocking, instability of traction and speed, signals from the dashboard are the first manifestations of stretching of the mechanism and a possible shift in valve timing.
Having discovered such failures, the operation of the car should be reduced to a minimum. As quickly as possible in Tech. will be able to carry out diagnostics and determine whether the circuit is suitable for further use.
https://carpedia.club/Zamena-tsepi-GRM-na-QG18DE-QG16DE-Nissan-Primera-2001-2007https://avtogrm.ru/zamena-cepi-grm-nissan-primera-r12-1-8. htmlhttps://avtobrands.ru/zamena-tsepnogo-privoda-grm-na-benzinovyh-dvigatelyah-nissan/https://autonissancar.ru/dvigateli/tsep-grm-qg18de-zamenahttps://www.nissan-nissan. ru/nissan/primera/p12/remont-dvigatelya/remont-grm/zamena-cepi-grm
Nissan X Trail: timing chain replacement
The Nissan X-Trail was produced in three generations - T30, T31 and T32, the crossover has been produced since 2001. The T30 engine line is represented by two four-cylinder power units QR20DE and QR25DE; in the T31 generation, the MR20DE engine began to be installed instead of the two-liter MR20DE.
On QR engines, the chain can stretch at a mileage of closer to 150 thousand km; signs of a malfunction include:
- reduction in engine power;
- adjustment at idle speed;
- Noisy operation of the internal combustion engine at idle.
On a Nissan X Trail, when replacing the timing chain (engine MR20DE), the following are included in the kit:
- two chains (main and oil pump drive);
- one balance shaft gear;
- two camshaft gears;
- one crankshaft gear;
- two tensioners (lower and upper);
- shoe;
- top and side tensioners.