A few weeks ago, I began to notice that when driving along the highway at a uniform speed, after about three minutes the car began to shake and it stopped moving, I went to the service center, they said, “The compression in the first cylinder is 8 points. Repair the main central bank,” and they quoted the amount in the region of six thousand rubles, well, of course I was upset, but what can I do, I left the car...
They called me an hour later and said that I just needed to adjust the valves, because... they are pinched, after that you will need to fill in the valve cleaner and drive off, the compression will be restored and the car will stop shaking.
I arrived, picked up the car, stopped by and bought this cleaner, filled it up, drove it full, and the car didn’t stop shaking (although it doesn’t jerk on the highway anymore, it drives very well).
I came back to the service center, they measured the compression again, it rose to 10 points. (all others have 12). He told me to fill the cleaner again (since there was no carbon deposits on the valves) and drive the tank full again.
I stopped by, bought it, filled it up and, just to be sure, filled in another 95 gasoline so that the injectors would still be drained))) the tank hasn’t left yet, we’re waiting for the results)
Brief description of the procedure
Nowadays, any modern car, except electric ones, has an internal combustion engine with a gas distribution mechanism. A lot of parameters depend on the proper operation of this system. And they include fuel consumption, engine response, environmental characteristics and other equally important indicators. The normal function of the gas distribution mechanism is ensured by the correct adjustment of the gaps between the valve and its pusher.
If the gap is too large, the camshaft cam will hit the pusher plate with force, and all this will lead to serious damage to engine components and mechanisms. In addition, the valve will not fully open when needed, thereby blocking the movement of exhaust gases or the fuel-air mixture, depending on the type of valve. Intakes are responsible for the supply of fuel, exhausts are responsible for exhaust gases directed to the exhaust manifold.
Operating principle of the valve mechanism
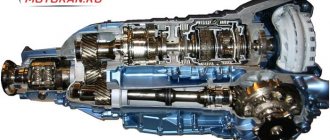
On the contrary, if the valve is tightly clamped, then mechanical damage to engine parts will be less than if the gap is too large. But the engine operation itself will be much worse. It is for good engine performance that it is necessary to carefully adjust the valves on VAZ cars. This procedure is carried out in several ways. The first is that the pusher is moved under the influence of the nut on the rod. The second is the selection of gasket washers of the required thickness. The third is automatic, regulated by engine oil pressure into hydraulic compensators.
- Symptoms and signs of a burnt valve. We accurately determine the problem
Signs
The symptoms of a burnt valve coincide one-to-one with a sign of a malfunction in the ignition system. Therefore, very often inexperienced mechanics begin to repair the ignition. At the same time, they change the distributor cap, install new high-voltage wires, spark plugs, and turn on the ignition, but there is no result. The engine has been running every now and then and continues to do so. They, cursing the creators of cars, continue to look for the cause, without even realizing the true cause of the problem. Moreover, even those who guessed that the problem lies in the engine will only find out about the burnt-out valves after removing the cylinder head.
However, there is a way to diagnose this malfunction without disassembling the engine. The search for the cause must occur according to a certain algorithm:
- Ignition is checked
. Here you need to pay attention to the performance of the distributor, the correct ignition timing, and the integrity of the wires; - Identify the problem cylinder. They do this in the following way. One by one, they pull off the high-voltage caps from the spark plugs. If the cylinder is working, the engine will start to stall. The faulty one will not respond to such an action, and the operation of the engine will not change. This should be done carefully. The caps must be removed using insulated pliers;
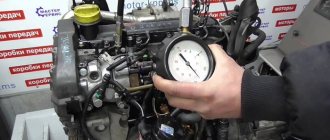
- After this, compression is measured. Most likely, it will be slightly lower than the required 11 points. But this may be an indicator of both problems with the valves and a malfunction of the piston group.
Usually at this stage, car enthusiasts grab a set of keys and begin to enthusiastically rev up the engine. But there is a way to recognize the true cause of the malfunction without disassembling the engine. It is worth preparing the necessary parts and tools in advance.
This is done as follows:
- First you will need to start the engine. After this, remove the breather hose. Just warm air should come out of it, or, in extreme cases, light smoke. If the smoke is gray and dense, and smells like exhaust, then the cause of poor compression is problems with the piston group. Possible burnout of the piston or sticking of the rings;
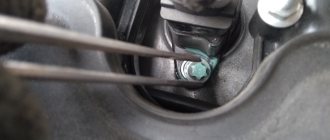
- Next, regardless of what you see when removing the hose, you should unscrew the spark plug from the problem cylinder. It should be considered. If the piston is damaged, it will be in oil. A burnt-out valve is easily determined by the absolutely normal condition of the spark plug;
- Remove the cylinder head and replace the damaged part. Even if you are not going to change the entire set of valves, but want to get by with replacing only the damaged one. Be sure to change all oil seals and lap the valves.
Conclusion
. Few drivers know how to correctly identify a burnt valve. Therefore, they spend time and money on completely different parts and components of the car, without solving the main problem. The symptoms and signs of a burnt valve are quite simple. Knowing them, even a novice auto mechanic will be able to make an accurate diagnosis in just 15 minutes.
How to determine a burnt valve in an engine? Many car enthusiasts are faced with the problem of valve burnout, but cannot accurately determine without removing the head. I’ll tell you the easiest way to determine if a valve is burned out. It all starts with the engine starting to misfire, but this problem can be associated with a bunch of reasons, but now let’s look at valve burnout. First you need to determine which cylinder is not working, this can be done in the old and proven way, start the engine and let it idle, start pulling off the caps from the spark plugs one by one, if you pulled off the cap from the spark plugs and the engine changed its speed (began to spin slower or stalls) This means that the cylinder is working. If, when you pull the cap off the spark plug, the engine spins and spins or changes its speed slightly, then this cylinder is not working and you need to find out the cause of the failure. Photo.
Checking engine compression and searching for a bad cylinder
Finding a non-working cylinder can be quite simple, the method is old, but very effective. With the engine running, the explosive wires are removed one by one, while you need to pay attention to the operation of the motor. If, when removing one or another wire, the engine operation does not change and the motor still runs rough, then the reason is in this cylinder. If you removed the wire, and the engine performance became even worse, and it began to work with even more interruptions, then this cylinder is working.
Next, you need to make sure that the spark plug is working and that’s not the problem. Checking a candle is quite simple; I think everyone knows these primitive methods. The easiest way is to take and swap the spark plugs or install a new spark plug and check again whether the engine operation has changed.
Afterwards, in order to eliminate the possibility of a faulty explosive wire, you need to check it, as written on how to do this.
It also doesn’t hurt to check the coil; read how to do this.
If all of the above assumptions do not come true, the valve may still be burned out.
A burnt-out valve means depressurization of the cylinder, hence a decrease in compression, so it’s a good idea to check the compression in the cylinders. Read:
. After checking the compression, it is recommended to check again, only using several “cubes” of oil. A few grams of engine oil are poured into the spark plug well and the compression is checked again. If, after pouring oil into the cylinder, the compression increases, we can conclude that the oil film acted as a sealant, as a result of which the increase occurred. This phenomenon is typical for a worn piston group; otherwise, when the compression remains low, valve burnout is quite possible.
Let's sum it up
Burnout of valves is an unpleasant phenomenon that can cause irreparable damage to the engine, but if the breakdown is detected at an early stage, problems can be avoided, and the cost of repairs will be minimal. If your car's engine requires regular checking of the valve clearance, you should not ignore this procedure, otherwise you may encounter valve burnout. Regularly monitor the condition and level of engine oil and replace it on time.
Only by following these simple rules can you protect yourself and your car from problems such as valve burnout in the engine. That's all, thank you for your attention, I hope you liked the article and share it with your friends using the social buttons. networks located below. Bye everyone!
Setting the gap on the VAZ 2114
In our case, on a VAZ 2114 car, this procedure is performed in the second way, using adjusting washers and a special tool.
- Special notes: replacing valve guides on a VAZ 2109
Firstly, you need to understand that correct adjustment on the VAZ 2114 can only be performed at an ambient temperature of 20 degrees Celsius, when the metal is at rest and is not subject to thermal expansion as on a warm engine. Secondly, for each specific car there is a table of the dimensions of the gaps with the camshaft cams raised.
For the fourteenth model the following dimensions are used:
Why do valves burn out?
In fact, there are many reasons. For those engines where the manufacturer recommended periodic valve adjustment, this problem occurs due to the incorrect adjustment of the thermal clearances. On engines where the clearance adjustment process is performed automatically, hydraulic compensators may fail - as a result, the valve simply burns out.
There are several most popular reasons, the result of which is the same - the valve has burned out. So, the first reason is that the parts are very tightly clamped. Next, the valve guide is in a state of severe wear. It is also common to see wear on the rod. And one more reason is that the engine runs on a lean mixture; owners of gas-powered cars especially often face the problem of burnout. Most often, exhaust elements burn out. They heat up to significantly higher temperatures than the intake ones. The intake valve is cooled during operation by a mixture of fuel and air.
The operating temperatures of the exhaust elements are about 400 degrees. This valve, unlike the intake valve, is not cooled in any way; in addition, it is additionally heated due to exhaust gases. Next, these valves are heated to approximately 650 degrees.
How to determine
Valve failure can be determined by several methods:
- Diagnostics by disassembling the engine. This method is reliable and accurate, but to do this it is necessary to disassemble the engine - remove the cylinder head. Due to the fact that this process is labor-intensive, time-consuming and requires certain skills and tools, it is worth moving on to it if all other causes of engine tripping have been excluded.
- Diagnostics using special tools. This method is the most preferable, because using it, you can quickly and with a higher probability determine the cause of the tripping without disassembling the engine, however, this will require a special device - a compression gauge. A decrease in cylinder compression leads to a loss of power and indicates that the car engine requires disassembly and repair.
- Engine tripping and reduced compression of cylinders 3 and 4 occur as a result of a malfunction of the vacuum brake booster. Low compression indicates a malfunction of the valves and problems of the cylinder-piston group - malfunctions of the piston rings, wear of the cylinder and piston. To eliminate problems with the CPG, you need to pour oil into the idle cylinder and crank the engine. If at the same time the compression increases, then the problem is the CPG is worn out, otherwise the valves are burnt out.
- Diagnostics without the use of special tools. Valve failure can be determined with high probability and without tools by following certain steps, which we will discuss in the instructions below.
Video: Signs of valve burnout
Something else useful for you:
Instructions
How to determine valve burnout without special tools? In this manual, we will look at how to determine burnout without resorting to special tools and disassembling the engine (provided that the ignition and power systems are adjusted in accordance with the requirements and are not the cause of the trip).
- We determine the faulty cylinder. To do this, the engine must be running and safety precautions must be observed. We disconnect the high-voltage wires from the distributor or from the spark plugs one by one and listen to the engine. If the sound of the running engine has changed and the tripping has become noticeable, then this cylinder is working. When you disconnect the faulty cylinder, the engine will operate the same as before it was disconnected.
- We determine the serviceability of high-voltage wires. We determine the serviceability of the wires in the same way as the serviceability of the spark plugs - by moving from a serviceable cylinder to a faulty one. In a dark room, if the wires are faulty, sparking can be observed.
- Checking the distributor and ignition coil. To check the serviceability of the distributor, capacitor and ignition coil, remove the spark plug, connect it to a high-voltage wire and crank the engine with the starter. In this case, the electrode of the spark plug is located at a distance of 1-2 cm from the vehicle’s mass. If a bright and blue spark appears as a result, this indicates their serviceability.
- Checking the vacuum brake booster. A faulty brake booster affects compression in cylinders 3 and 4. To diagnose its serviceability, disconnect the hose going from the vacuum pump to the motor and plug it. If the engine runs smoothly, replace the brake booster. If the elements of the electrical equipment and brake systems are in good condition, then you will have to disassemble the engine and repair it.
- Malfunction of the cylinder-piston group. A CPG malfunction differs from valve burnout by the presence of exhaust gases in the engine crankcase, which can be noticed by disconnecting the breather hose from the air filter. And the presence of oil on the spark plug electrode indicates a malfunction of the CPG.
- If, as a result of the diagnostics, no deficiencies are identified, then we can talk about burnout and the need for repairs.
- We determine the serviceability of the spark plug. The easiest way, which does not require knowledge, is to replace the spark plug. To do this, at the diagnostic stage it is not necessary to buy new spark plugs; swap spark plugs from the working and non-working cylinders. If at the same time the cylinder with the spark plug from the faulty cylinder stops working, then this indicates a malfunction of this spark plug, and if it works, then the problem is not in the spark plug.
In addition, you can determine a non-working spark plug by inspection. A faulty spark plug has the following external defects:
- spark plug electrodes with soot, soot and “wet”;
- the body has cracks;
- There are black dots and stripes on the body (the spark plug is broken). The electrodes of a serviceable spark plug are light or slightly brown in color, the body is without damage or black marks.
Having sufficient skills and tools, you can replace the valves yourself, but since this procedure is very responsible, complex and requires special tools and devices, it is better to entrust it to specialists.
- Replacing valves on a Priora 16 valves. Unavoidable repairs »
If the engine fails, do not put off diagnosing the cause until later, even if the budget does not allow for repairs in the near future. It is necessary to identify the reason why the engine is unstable. And if this reason is not related to burnout of valves and wear of the cylinder-piston group, then the car can be operated in a gentle mode, which will lead to increased fuel consumption and the possibility of stalling at the wrong moment. But otherwise, it is better to stop using it to avoid higher repair costs.
Necessary tool
The tool you need to get the job done:
- 1. Open-end and socket wrenches;
- 2. A device for lowering valve plates - costs a little more than a hundred rubles;
- 3. A set of specialized probes for measuring gaps in the mechanism;
- 4. Micrometer to determine the thickness of the adjusting washer;
- 5. Adjusting washers - they have a thickness of 3 to 4.5 mm. They are supplied to the market with an interval of 0.05 mm. That is, you can find washers in sizes 3.05 mm, 3.1 mm and so on up to 4.5 mm. (one washer costs about twenty rubles).
Valve pusher with adjusting washer
Where does valve adjustment begin?
The thermal gap is adjusted after measuring it, and if it does not correspond to what is required, by selecting a washer of a certain thickness.
According to the regulations, the thermal clearance on the VAZ 2114 must be checked and adjusted every 60 thousand kilometers, as well as when valve knocking occurs.
Next, we will consider the procedure for adjusting the thermal gap on a VAZ 2114. All work is not very complicated, but requires certain equipment. To complete the work you will need:
- set of open-end wrenches;
- spark plug key;
- set of probes;
- special device for squeezing valves;
- set of adjusting washers;
- rags;
The set includes a set of washers with thicknesses from 3.0 mm to 4.5 mm. The thickness size interval is 0.05 mm, which allows you to select a washer of the required thickness when performing work. This set is not cheap, but purchasing it will allow you to carry out all the work yourself for a long time, without going to a service station.
Also, to complete the work, you will need a valve cover gasket, since it is disposable and must be replaced when the cover is removed.
Content
Summarize
The first signs of valve burnout are a reason for prompt engine diagnosis. If the engine requires valve adjustment, then these operations must be performed strictly according to the manufacturer’s regulations. Don't wait for noise to start appearing. You should also know what compression should be in the engine in order to identify a breakdown in time and eliminate it without consequences.
For those who want to save money and operate a car on gas, you should pay maximum attention to the adjustment. On such engines, it is recommended to adjust the thermal clearances every 10 thousand kilometers. Gas engines are at risk, while gasoline engines burn out less often.
Signs of burnt valves
Experts identify various factors that have a direct impact on the integrity of parts. The most popular among them are:
- Extremely high temperatures. Automakers calculate the characteristics of the unit in such a way that it functions most of the time at 600-650C. In the case where there are malfunctions of the heat sink, excessive overheating is fraught with destruction.
- Manufacturing defects. Although all parts leaving the factory assembly line undergo strict control, there remains a low risk of defective parts. It can be determined independently by the heterogeneity of the metal, microcracks, defects in welding seams, etc.
- Low quality fuel. Running a lean fuel mixture may be the reason why valves burn out. The lack of fuel in the mixture is ruined by temperature fluctuations.
- Availability of connected gas equipment. Engines using gas as an alternative fuel are characterized by significant loads on gas distribution systems. Power plants with a poor gas supply are at risk. We recommend calibration at least every 12-14 thousand kilometers.
One of the main signs of a burnt-out valve is the engine tripping, which also indicates other problems not related to the valves, the elimination of which is cheaper and easier to repair. In addition to engine tripping, engine power decreases and fuel consumption increases.
The main indicator of the presence of a malfunction in the engine is its tripping in all operating modes (for example, with a faulty spark plug, tripping of a warmed-up engine operating at high speeds may not be noticeable).
Valves burn out for various reasons, including:
- factory defects or low-quality spare parts;
- incorrect valve adjustment or malfunction of hydraulic compensators;
- valve wear (valve stem or guide bushing);
- early or late ignition;
- lean mixture.
No one is safe from purchasing defective and low-quality spare parts, so buy spare parts from trusted sellers who value their reputation. If the valves are adjusted incorrectly (they are tightly clamped), the operation of the engine will be noticeable by the characteristic “tractor” sound. In this case, due to non-compliance with the thermal clearance, the valve overheats, which will invariably lead to its burnout.
Why does valve burnout occur?
The reasons can be very different, for example, untimely valve adjustment. Due to the violation of the thermal clearances of the valves, carbon deposits appear on the surface of the seats, as well as various derivatives of the increased clearance. In engines equipped with hydraulic compensators, adjustment is not necessary, but failure of one of the hydraulic compensators can lead to a burnt-out valve.
So, let's list the reasons for valve burnout:
- Increased wear of the guide bushing or the rod itself;
- Excessive valve tightening;
- “Poor” mixture (usually found on cars with HBO).
How will the engine work and what will happen if the valves are clamped?
How to understand that the valve is jammed
If after starting the engine runs normally, but during long operation the thrust drops - this is a symptom of pinched valves. Another sign of jammed valves can be shots into the muffler when releasing gas. Because The combustion chamber is not completely closed, compression decreases and a disruption in the working process occurs. When adjusting, it is better to exceed the permissible gap than to make it smaller.
The consequence of clamped valves is overheating, increased fuel consumption and, as a result, burnout. It is undesirable to operate the engine with a burnt-out valve; this leads to burnout of the valve seat. What the car owner will end up having to do is replace the entire head.
Diagnosis of valve burnout without removing the cylinder head
The first step is to identify the cylinder that is not functioning. Testing methods are similar to the process of diagnosing non-functioning spark plugs. For the test, start the engine and remove the spark plug caps while idling.
Next, you need to carefully monitor how the motor operates. If the unit starts up even more than before the test, or even stalls completely, then everything is fine with this cylinder. However, if the engine's performance has not changed, this indicates a problem in the cylinder.
After this, the spark plug on the found cylinder is unscrewed and replaced with a known working one. It would also be a good idea to check the high-voltage wire going to it. Additionally, check the ignition coil. Further starting the engine will show where the problem is hidden. If the engine, after replacing the spark plug and other parts, does not change its operation and continues to run, there is a high probability that the valve has burnt out.
What to do if the valve burns out?
1. Valve desiccation. To do this, the head is laid out on a flat surface and a rubber mat is placed under the valve. A tube with a diameter of 13 mm is placed on the valve so that the crackers are inside, and blows are applied with a hammer. The valve desiccates, and the crackers remain in the tube. The operation is also easily carried out using a special device that compresses the vein and allows you to pull out the crackers.
- The valve is pulled out, a new one is inserted, and the bushing guide is checked by shaking. If runout is up to 1 mm, the guide is not replaced.
3. If it is necessary to replace the guide, use a special mandrel. The old part is knocked out in the direction of the camshaft using a half-sledge hammer with a heavy blow so that the part does not crumble. Afterwards, a new bushing is driven into the head, having first put a retaining ring on it.
4. The new valve is secured with a retaining ring and the assembly is lubricated with oil.
5. Valve grinding. The seat is initially treated with a special cutter, after which lapping powder is applied to the edge of the valve, inserted into the head, the other end is clamped into the drill chuck, and by pulling it up and down, the valve is provided with a tight fit to the seat. It is advisable to carry out the operation for all valves.
6. Drying of the valve. To do this, press the spring firmly and insert crackers. The cylinder head is attached to the engine cylinder block.
The described method allows you to replace the burnt valves of all models of the VAZ: 2101, 2102, 2103, 2104, 2105, 2106, 2107, 2108, 2109, 21099, 2110, 2111, 2112, 2113, 2114, Niva, Lada Priora, viburnum, Grant, Grant, Grant. Vesta and most foreign cars.
In the case of burnt valves, repair consists not only of replacing them, but also of finding out the cause of the burnout. Therefore, the ignition and cooling systems should be checked.
You can replace the valve not only at a service station, but also in a garage if you are familiar with the basics of repair.
Thus, the valve is an important part of the engine, so in order to protect yourself from repairs, it is better to carry out routine maintenance on time.
Consequences
In the best case, burnt valves lead to increased fuel consumption and reduced vehicle power. However, this can quickly move on to more complex problems:
- damage to the cylinder head, cylinder, piston from fragments of a burnt out valve;
- breakdown of the cylinder block with large fragments;
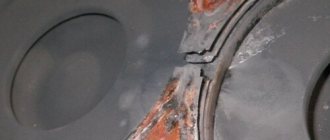
- burnout of the valve seat, which leads to the need to replace the cylinder head.
In addition, fire from an ignited combustible mixture with an unburned valve can enter both the intake manifold and the exhaust system, reducing their service life.
Consequences of burnout
If a valve burns out, it may immediately collapse. Its fragments will definitely fall into the combustion chamber. As a result, the engine will suffer serious damage and will require major repairs. Thus, the pistons, cylinder head and cylinder block are severely damaged. There is also a serious risk that large pieces of a destroyed, burnt-out valve will simply pierce the cylinder block, and this will actually lead to failure of not only the piston group and cylinder head parts, but also the cylinder block.
You should not operate an engine that exhibits symptoms of a burnt valve. This is fraught with high repair costs, and in the worst case, replacement of the entire motor. It is better to notice the problem in a timely manner, and then the only consequences are replacement of the valves. The consequences of operating a car with a burnt-out valve can be different - from significantly increased fuel consumption to a completely burnt-out valve seat.
What is burnout?
Metal destruction under the influence of high temperatures is typical for both diesel and gasoline engines. Even taking into account the fact that most of the important parts of the gas distribution mechanism are made of special high-strength steel grades, under certain conditions they are destroyed.
The actual combustion of the metal is not carried out in the classical form. Parts are destroyed from different sides.
Due to the fact that defects form on some coins, the tightness of the interface between the seat and the plate disappears. As a result, this results in engine problems, and can manifest itself in serious damage to the internal combustion engine.
How to determine
Valve failure can be determined by several methods:
Cars
It is useful for drivers to know all the symptoms and signs of a burnt valve. Owners of domestic cars often encounter this problem. This can also happen on other machines. Especially on not very new foreign cars, of which we have plenty. Valve problems can cause many problems. Including increased engine wear.
In addition, the symptoms make driving quite nervous. Which has a negative impact on the driver’s condition. In this regard, it is important to promptly identify this malfunction and eliminate it.
Fault localization
The most common and effective method for determining a burnt-out valve is compression measurements. If the results show low compression, then this is clearly a sign of burnout. But here you need to take into account a small nuance - using compression measurements it will not be possible to exclude CPG defects. Low compression is not only due to burnout. Various other defects can reduce it - for example, it could be broken rings. Therefore, if all the signs of a burnt valve are observed on a VAZ-2109 or on any other car, you will have to additionally diagnose the car.
The easiest way to help determine burnout after measurements is to pour a small amount of oil into the cylinder. Next, the compression is measured again. It should grow - this indicates that an oil film has been created. This is typical for a worn piston system. If the compression has not changed, then this is definitely a burnout. The way out of the situation is to replace the valves.
Another diagnostic method is a visual inspection of the spark plug from the problematic combustion chamber. If there is no characteristic deposit on the spark plug, then this is a clear sign of burnt-out valves. In addition, air or smoke will come out of the breather.
Why is there a problem?
The symptoms and signs of a burnt valve are very similar to other types of faults. Moreover, many drivers do not believe in this particular malfunction until the very end and waste time on unnecessary actions.
Valves perform an important function. They allow fuel to enter the combustion chamber. And they release the burnt gases after finishing their work. As is clear from the described valves, they are constantly in aggressive conditions. They are exposed to gases and high temperatures. This leads to the destruction of the metal that makes up the valve. Gradually it burns out.
This happens especially often with old cars whose valves were made of not very good materials. Also, many people make this problem themselves. They fill their car with fuel that is not intended for it. As a result, increased combustion temperature leads to damage to these elements of the cylinder head (cylinder head).
The main sign of burnt valves is engine tripping. That is, one or more cylinders are not working. With this malfunction, the tightness of the combustion chamber is compromised. A burnt-out valve allows gases to pass through during fuel combustion. As a result, they do not push the piston down, but simply go directly into the manifold. This causes one cylinder to miss.
The driver notices exactly this in the form of engine tripping. Another symptom of this problem is an increase in fuel consumption, which is not surprising, because part of it simply flies into the atmosphere.
Symptoms of the problem
So, the main signs of burnt-out valves are engine tripping. This effect is very noticeable and can be observed in any operating mode of the power unit. In addition, the motor loses a lot of power. Another reason is high fuel consumption.
There are certain difficulties in diagnosing this breakdown. The fact is that if a valve burns out, the symptoms are very similar to other malfunctions. At the same time, the car owner will be sure until the last moment that this is just another, minor breakdown. These are unnecessary costs and actions.
Signs
The symptoms of a burnt valve coincide one-to-one with a sign of a malfunction in the ignition system. Therefore, very often inexperienced mechanics begin to repair the ignition. At the same time, they change the distributor cap, install new high-voltage wires, spark plugs, and turn on the ignition, but there is no result. The engine has been running every now and then and continues to do so. They, cursing the creators of cars, continue to look for the cause, without even realizing the true cause of the problem. Moreover, even those who guessed that the problem lies in the engine will only find out about the burnt-out valves after removing the cylinder head.
However, there is a way to diagnose this malfunction without disassembling the engine. The search for the cause must occur according to a certain algorithm:
- Ignition is checked
. Here you need to pay attention to the performance of the distributor, the correct ignition timing, and the integrity of the wires; - Identify the problem cylinder. They do this in the following way. One by one, they pull off the high-voltage caps from the spark plugs. If the cylinder is working, the engine will start to stall. The faulty one will not respond to such an action, and the operation of the engine will not change. This should be done carefully. The caps must be removed using insulated pliers;
- After this, compression is measured. Most likely, it will be slightly lower than the required 11 points. But this may be an indicator of both problems with the valves and a malfunction of the piston group.
Usually at this stage, car enthusiasts grab a set of keys and begin to enthusiastically rev up the engine. But there is a way to recognize the true cause of the malfunction without disassembling the engine. It is worth preparing the necessary parts and tools in advance.
Difficulties in diagnosis
There is an opinion that if a valve burns out, symptoms and problems will be hidden in the ignition system. Very often, car mechanics, who still have little work experience, first of all begin diagnosing and repairing the ignition.
In the process of such repairs, the distributor cover is replaced, high-voltage wires and spark plugs are replaced. The ignition angle is also set - of course, there is no result and there will not be one. The engine has worked and will continue to work. The car mechanic will continue to look for the problem, not knowing the true cause of the problem. Even those mechanics who guessed that the problem lies in the engine see signs of burnt valves only after removing the cylinder head.
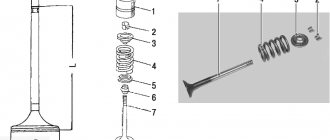
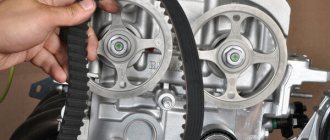
What are "pushers"?
Let's start with something simple (many, I'm sure, don't know what it is). In order for the upper part of the valve and the camshaft cam to run longer, so-called pushers began to be put on them. This is a cylinder, on one side it has a bottom, there is one on the opposite side (to exaggerate, it looks like a metal “cup”).
The hollow part fits onto the valve system with a spring, but the bottom rests on the “cam” of the camshaft. Since the surface of the pusher is large, from 25 to 45 mm (different manufacturers have different values), it will wear out longer than, say, just the upper part of the “rod” (which has a diameter of only 5-7 mm).
Pushers are divided into two types:
- Solid - their adjustment occurs completely by replacing the housing
- Collapsible - when there is a groove on top of the lid into which a special adjusting washer is installed. You can replace it, thus choosing the size of the thermal gap
These elements do not last forever, and they (or the washers on top) also need to be replaced after a certain mileage.
Thermal gap - what is it?
Ideally, the camshaft lobe and tappet should be pressed as close together as possible so that the surfaces are in perfect contact. BUT we all know that the engine consists of metal (aluminum and cast iron are not important), and valves, tappets and camshafts are also made of other metals. When heated, metals tend to expand (elongate).
And the gap, which was ideal on a cold engine, becomes incorrect on a hot one! In simple words, the valves become pinched (this is bad, we’ll talk about it below).
It follows from this that on a cold engine, it is necessary to leave special thermal gaps with compensation for expansion when hot. These values are small and are measured in microns with special probes. Moreover, at the inlet and outlet these values differ
If the thermal gap between the camshaft cam and the valve tappet decreases or increases, then this is VERY bad for the performance of the engine and the timing mechanism itself as a whole . Now each manufacturer has a special regulation for adjusting this “thermal gap” (this is called “valve adjustment”) - it usually ranges from 60 to 100,000 km , it all depends on the materials used in the design. As I wrote above, adjustment is carried out by selecting either “solid” pushers or replacing “washers” in the upper part.
Checking thermal clearances on VAZ 2114 valves
Checking and adjusting valve clearances on a VAZ 2114: video
To correctly measure the thermal clearances in the gas distribution mechanism of the VAZ 2114, you will need:
Adjustment device that is fixed above the valves
Correct adjustment of the VAZ 2114 valves is possible without using a micrometer, but in this case you will need to buy new washers with a margin in both directions. That is, if you need a 3.1 mm washer, it’s worth buying both 3.05 and 3.15, or even better, also 3.0 and 3.2. This is necessary so that if the actual size of the old washer does not correspond to the marking, the correct gap can be obtained by selecting and measuring with feeler gauges.
If the markings on old washers are erased, it is more difficult to do without a micrometer. It can be replaced with a caliper, but, again, you need a supply of washers. Since this measuring device has a relatively low accuracy (+-0.1 mm), you will need a large supply of washers from both the plus and minus measurements. That is, if the caliper showed the size of the old one to be 3.3 mm, but according to calculations for the correct gap you need 3.4 mm, it is advisable to purchase all sizes from 3.1 to 3.6 mm.
VAZ cars produced after 2011 (engine 11186) have gaps increased by 0.5 mm, which is caused by a different composition of the valve seat material. On 2114 (and other Samaras) such engines were not installed as standard, but take this into account if the engine on the car was changed.
When checking, use the procedure and the necessary tools for adjustment as described below.
How to measure valve clearances
The process of measuring clearances and adjusting valves on 8-valve VAZ engines
To measure valve clearances, follow this plan:
When the preparatory work has been completed, you can deliver a measuring tool (micrometer, probe), tweezers, and take direct measurements. You will also need a VAZ 2114 valve adjustment table that regulates the order of measurements.
The operating order of the VAZ 2114 valves, if counted from the belt side, regardless of the engine version, is as follows:
To measure the clearance, use feeler gauges by inserting them between the camshaft cam and the washer. Starting with a thin probe, work your way up. The size of the feeler gauge that fits “in tension” (the next one in size no longer fits through) will be the size of the gap of the selected valve. Record the value obtained for each valve on a piece of paper. The valve adjustment table should look something like this:
0,19
| 1 Cylinder | 2 Cylinder | 3 Cylinder | 4 Cylinder | |||||
| Valve | 1 | 2 | 3 | 4 | 5 | 6 | 7 | 8 |
| Purpose | Release | Inlet | Inlet | Release | Release | Inlet | Inlet | Release |
| Norm | 0,35 | 0,2 | 0,2 | 0,35 | 0,35 | 0,2 | 0,2 | 0,35 |
| Gap | 0,27 | 0,17 | 0,13 | 0,33 | 0,33 | 0,13 | 0,13 | 0,27 |
| Washer | 3,6 | 3,88 | 3,7 | 3,6 | 3,75 | 3,62 | 3,69 | 3,7 |
| Calculation result | 3,52 | 3,85 | 3,63 | 3,58 | 3,73 | 3,55 | 3,62 | 3,62 |
| New washer | 3,5 | 3,8 | 3,6 | 3,57 | 3,7 | 3,55 | 3,6 | 3,62 |
| Result | 0,02 | 0,05 | 0,03 | 0,01 | 0,03 | 0,02 | ||
| Gap after | 0,35 | 0,21 | 0,2 | 0,35 | 0,35 | 0,2 | 0,35 | |
| Installed washers | 350 zip | 380 zip | 360 plant | 357 | 370 plant | 355 zip | 360 plant | 362 plant |
| Care before adjustment | 0,08 | 0,03 | 0,07 | 0,02 | 0,02 | 0,07 | 0,07 | 0,08 |
The order of the VAZ 2114 valves during measurements will be as follows:
If you don't know the size of the washers you are using, you need to find them out after measuring each gap. To do this, you need to remove the washers one by one and write down their numbers, the numbering of the VAZ 2114 valves is as indicated above:
The procedure for adjusting the VAZ 2114 valves will be the same as when measuring clearances. But, before adjusting the VAZ 2114 valves, you will need to make calculations and select washers for adjustment according to the formula.
Valve adjustment formula
How to choose the right washer
The selection of washers after checking to set the correct gap should be made according to the following formula:
A=B+(CD) mm
Dipstick for adjusting the intake valves of the four
For example, you measured the exhaust valve clearance to be 0.45mm, the thickness of the washer used is 3.5mm, and the correct clearance should be 0.35mm. In total we get:
that is, you need to put a washer at 3.6 mm
After measurements have been made for all valves, it is necessary to select the correct size washers and replace them on all valves where the clearances do not correspond to the norm (0.35 ± 0.5 mm for exhaust, 0.2 ± 0.5 mm for intake) .
Valve clearance table for VAZ 2114
| Gap | Engine | |||||
| 21083 ( 2111, 21114, 11183) | 11186 | |||||
| Petrol | HBO | Petrol | HBO | |||
| Inlet | Minimum | 0.15 mm | 0.2 mm | 0.2 mm | 0.2 mm | 0.2 mm |
| Nominal | 0.2 mm | 0.25 mm | 0.25 mm | 0.25 mm | 0.25 mm | |
| Maximum | 0.25 mm | 0.3 mm | 0.3 mm | 0.3 mm | 0.3 mm | |
| High school graduation | Minimum | 0.3 mm | 0.35 mm | 0.35 mm | 0.2 mm | 0.4 mm |
| Nominal | 0.35 mm | 0.4 mm | 0.4 mm | 0.25 mm | 0.45 mm | |
| Maximum | 0.4 mm | 0.45 mm | 0.45 mm | 0.3 mm | 0.5 mm | |
“Heat load” of intake and exhaust valves
I want to start with the fact that these engine elements are very heat-loaded parts. They are quite miniature, often the valve stem diameter is only 5 mm, and the temperature in the combustion chamber can reach 1500 - 2000 ° C (albeit for a short time, but still).
As I wrote above, the clearances at the intake and exhaust valves differ; usually at the exhaust they are much larger (by about 30%). For example (on the engines of Korean cars), the “exhaust” ones have a thermal gap of about - 0.2 mm, and on the “exhaust” ones - about - 0.3 mm.
But why are the gaps larger at the outlet? The thing is that the exhaust valves “suffer” more than the intake valves. After all, HOT exhaust gases are discharged through them, and accordingly, they heat up more - therefore they expand (elongate) also more.