Owners of VAZ 2107 cars know that these cars are available in both carburetor and injection versions. And if everything is more or less clear with the maintenance of carburetor cars, then questions still arise with the injector on the “sevens”. For example, is it possible to adjust the valves on this machine with your own hands? And if so, how can I make the adjustment correctly? We will try to answer these questions in this article.
- 2 Reasons for adjustment
- 3 Tools needed
- 4 Scheme and procedure
- 5 Check
5.1 Video: how to adjust the valves on a VAZ 2107 injector with your own hands
A brief excursion into history
The VAZ 2107 was not always fuel-injected. At first, these cars were equipped with conventional carburetors. And the car began to be equipped with a forced fuel injection system only in 2006. The reason is simple: the automaker tried to fit its cars to the standard now known as Euro 2, and this required changing a number of characteristics of the car. The main advantage of replacing the carburetor system with an electronic system was that in the injection version there was no need to fine-tune the injection. That is, there was no “swimming” at idle speed for injection cars. But there were also disadvantages. For example, increased fuel requirements. The catalyst for the injection “sevens” was located directly under the bottom, which means the ground clearance became lower. Repairing such machines was more difficult because it was difficult to get to some parts.
How to properly adjust valves
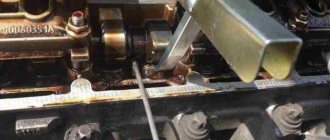
Valve adjustments should be made on a cold engine. You will need a special feeler gauge, which can be purchased at a car dealership, and you will also need two 13/17 keys. The adjustment proceeds as follows.
This adjustment is carried out as follows.
- Loosen the tightening of the adjusting bolt with a seventeen wrench.
- The feeler gauge is inserted into the gap between the lever and the valve cam.
- The height of the lever is adjusted with a thirteen key, achieving the required clearance.
- When the gap is set, you should tighten the lock nut (while holding the adjusting bolt from turning) and check the gap again (adjust it again if necessary).
- Then you need to rotate the crankshaft 360 degrees and adjust the clearance of the intake valve of the second cylinder (3rd cam), the exhaust valve of the third cylinder (5th cam), and the intake and exhaust valves of the first cylinder (2nd and 1st cams ).
Now the work on adjusting the valves on the VAZ 2107 has been completed.
Reasons for adjustment
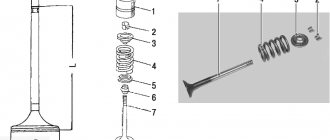
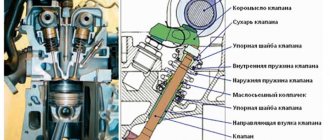
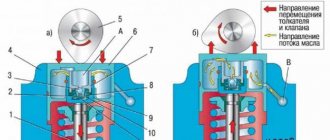
Valve system of an injection car VAZ 2107
In general, valve adjustment on the VAZ 2107 should be done every 20 thousand kilometers during scheduled maintenance. But sometimes you have to do this earlier. The reasons are stated below:
- Extraneous noise has appeared in the engine (usually very fast, not too loud clicks).
- Increased fuel consumption is observed in the complete absence of visible leaks.
- In addition, timely adjustment helps prevent premature wear of engine parts.
Work order
There is a certain scheme according to which you can correctly adjust the gas distribution of the VAZ 2107 with your own hands. It consists of adjusting the clearances of certain valves at different positions of the crankshaft, rotated through an angle of 180°. The procedure for adjusting the valves of the VAZ “Seven” is as follows:
- By rotating the crankshaft, place the mark on its pulley opposite the protrusion made on the cylinder block. In this case, the round mark on the camshaft gear becomes in the highest position, and the piston in cylinder 4 goes to top dead center.
- Insert the dipstick to check into the gap of valves 6 and 8; it should move there with force. If necessary, adjust the gap. The countdown is carried out similarly to the cylinder numbers - from the radiator.
- Turn the crankshaft clockwise 180° and adjust valves No. 4 and 7, inserting a feeler gauge in the same way into the gap between the camshaft journal and the lever. When turning, it is convenient to navigate by the camshaft gear: the mark on it will rotate 90°.
- At the next 180° turn, adjust valves No. 1 and 3.
- The last 180° turn is valves No. 5 and 2.
The gap is adjusted by turning the support bolt with a 13 mm wrench; you just need to first loosen the 17 mm locking nut. After making sure that the dipstick moves with some force, tighten the nut again and continue adjusting in the order prescribed by the diagram. When tightening the nut, take into account this nuance: the support bolt turns after it and the gap decreases. To avoid this, it is necessary to hold this bolt with a wrench when tightening.
Once you've finished setting up, reassemble the engine and other components in reverse order and start it up. The fact that the gaps do not exceed 0.15 mm should be indicated by the absence of noise from under the valve cover. You can make sure that the valves are not pinched by checking the compression in all cylinders.
Simultaneously with making adjustments, while the motor cover is removed, it is recommended to inspect the chain and related elements for wear on the linings. The loose chain should be tightened using a plunger mechanism mounted in the cylinder block to the right of the exhaust manifold.
Be sure to check the condition of the valve cover gasket and replace it if necessary.
Even an inexperienced driver, who is almost behind the wheel for the first time, probably knows what adjusting the valves on a VAZ 2107 injector means. This phrase - adjust the valves - is on everyone's lips. But not every newbie in the car industry knows why this is needed and how to do it correctly without turning to the services of professional craftsmen. But the efficiency of the engine, its throttle response, dynamics, and fuel mixture consumption depend on how correctly the valves function. And to do a similar procedure with a VAZ engine, according to some experts, is necessary with a regular frequency, when the car runs every 10-15 thousand kilometers. Adjusting the valves on the VAZ 2107 injector is slightly different from that on the VAZ 2109 and VAZ 2110. This is explained by the design features of these VAZ engines. But don’t be so alarmed right away: with certain skills and a love of tinkering in the depths of mechanisms, this task is quite feasible. Even everyone can do it if you use the step-by-step instructions below.
- At the same time, check the chain tension
. If it is weak, we tighten it. This procedure is also quite easy to do yourself. To do this, we need to loosen the tension nut, which is located under the pipe. You need to use a 38mm wrench to turn the shaft until characteristic resistance appears (to the maximum). Then, holding the crankshaft with the same key, we fix the nut for the tensioner. This fixed rotation of the crankshaft means that the 4th cylinder is at the top. In this situation, you can adjust the 4, 6, 7, 8th cams on 2, 3, 4 cylinders; - This is usually done with the assistance of a probe (a special device is used only at higher service stations). But if there is a device available, it’s even better for them. So, let's check the gaps. If the probe passes with a force that is not too significant into the gap and then moves more freely, then the gap corresponds to the norm. No further adjustment is required. Let's move on to the next valve. If not, then you need to use the 17th wrench to lower the nut to fix it. And on the 13th - turn the bolt for adjustment little by little, and set the required gap on the feeler gauge;
- Let's change the position of the cylinders
, but to do this we need to rotate the crankshaft another 60 degrees. This is also done using the 38th key. Next, we adjust the cams already remaining in the assortment (intake and exhaust) of cylinders 1, 2, 3. The operation is carried out similarly to the previous one using a probe and keys: check, release, check, tighten; - After this, you need to install the engine head cover in its original place and start the engine. High-quality adjustments will be heard immediately: the characteristic clatter disappears, engine response and power improve. But to finally be convinced of your coolness, you also need to take a ride around the city. You will immediately hear and see how well the motor works.
Results:
Now you know that adjusting valves on a VAZ 2107 injector is not such a difficult matter. However, as they say, don’t relax! You cannot be sure (especially with older engines) that the next adjustment will be required after 10 thousand kilometers traveled. Perhaps you will ride 5-6 times and you will need to carry out the procedure again. After all, if you ignore certain symptoms (clunking noise, loss of power, increased appetite for fuel), then this may result in valve burnout.
“Classic” engines do not have hydraulic compensators in the timing belt, so adjusting the valves of the VAZ 2107 is a mandatory element of regular vehicle maintenance. The work is simple and can be done independently. The special tool required for adjustment is quite accessible and does not require special qualifications to use.
Content
Examination
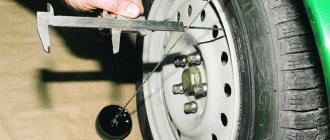
After all the valves have been adjusted, use a 38mm wrench to turn the crankshaft 3-4 full turns and take a control measurement of all clearances using a feeler gauge. If there are no gap violations, you can close the cylinder block cover and try to start the car engine.
Checking valve clearance using a feeler gauge
Video: how to adjust valves on a VAZ 2107 injector with your own hands
How to adjust valves in a VAZ-2107
- It is necessary to dismantle the air filter housing. First, do not forget to remove the fuel supply/return hoses from the carburetor, the choke and gas rods. So, you should unscrew the 3 nuts securing the cover, using a 10mm wrench. Next, unscrew 4 nuts. by 10 mm, which connects the air filter housing, as well as the carburetor. By the way, the carburetor does not need to be dismantled. To prevent foreign particles from entering the carburetor, it should be covered with a cloth.
- To facilitate access to the valve device, you will need to remove the distributor cover.
- As soon as you have access to the cylinder head cover, you need to remove it. 8 nuts must be unscrewed with a 10mm wrench.
- Since you have to rotate the crankshaft, to make this process easier, it makes sense to unscrew the spark plugs. This will make it possible to adjust the compression, that is, reduce it in the cylinders.
- Next, you need to connect the crankshaft pulley and the marks by turning the mounting bolt. This is where a 38mm wrench comes in handy. When turning the pulley, you need to feel for the slot on the pulley (this is done in the engine compartment), and then combine it with the longest mark on the block. So, the piston was installed at top dead center in the 1st and 4th cylinders.
- Now the camshaft gear must also align with the risk. If this coincides, this indicates that the timing phase has not shifted. If there is a discrepancy, the chain must be tensioned.
Note. It is not recommended to adjust valves in all internal combustion engines. When the machine is equipped with a hydraulic compensator, there is no need to adjust the valves.
If you are tired of adjusting the thermal valve clearances in the VAZ-2017, an alternative is to install a cylinder head with hydraulic compensators. Despite the high price, car owners often resort to assembling hydraulic compensators with their own hands.
Thus, when you managed to set the gaps, the engine’s performance will change significantly both by ear and while the car is moving. The dynamics of vehicle acceleration will increase, fuel consumption will decrease, and this is especially important for injection engines.
Setting valve clearances using an indicator
The procedure for adjusting the indicator when using the indicator generally does not differ from the sequence of actions when adjusting using a probe, but a different tool is used. To adjust the valve mechanism in this case, you will need a rack (bar) and the indicator itself; the device is sold as a set in specialized auto stores. If you really want to, you can make a bar for installing the indicator yourself; finding the necessary drawing on the Internet is not a problem.
When setting the gaps using an indicator, a more precise setting is obtained, since the feeler gauge is not able to catch all the irregularities of the camshaft cams and wear on the rockers. The procedure for the RK using a special device is as follows:
- just as when adjusting with a feeler gauge, set the gear to neutral, open the hood, remove the valve cover;
- we combine the camshaft marks to adjust the 8th and 6th valves;
- We attach the indicator strip to the studs on the left side of the camshaft bed;
- if we adjust the sixth valve, we fix the indicator on top of the corresponding (6th) rocker using a holder;
- Using a key or hand, we raise and lower the rocker, and note on the indicator how many divisions the arrow deviates.
Here it makes sense to refer to the table, which provides data on indicator settings, since when adjusting with a probe, TK is measured in millimeters, and with an indicator - in divisions. For example, for a standard value of 0.15 mm the indicator value is 52, which means that the arrow with the required gap deviates by fifty-two divisions. If the TK is greater than the norm, it needs to be reduced; let’s look at how this happens:
- Let’s say, instead of the required 52, the indicator showed the value 72 (“extra” 20 divisions);
- set the arrow to “zero”, loosen the lock nut, use a 13mm wrench to turn the adjusting bolt towards decreasing the gap, watch the indicator;
- when you turn the key, the indicator needle begins to deviate counterclockwise, it is necessary that it “passes” 20 divisions (since 72-52 = 20);
- Having achieved the desired reading on the dial gauge, holding it with a key of 13, use the “seventeenth” key to tighten the lock nut;
- Having adjusted both valves (8 and 6) in this way, turn the shaft and adjust the cl. No. 4 and 7, then we then repeat all the operations that were described earlier for a carburetor internal combustion engine.
After the adjustment, install the valve cover, start the engine, see how it works, listen for any extraneous sounds.
Adjusting valve clearances using an adjusting rack
1. As in the case described above, the car must be placed on a level surface. This second adjustment method will allow you to achieve greater accuracy when performing work. The same tools are used and the same steps are followed to remove the filter.
2. After aligning the marks of the pulley and the oil seal cover, install the rack, which is attached to the camshaft housing with three bolts.
3. Next, a dial indicator is installed in the slot on the rail, its scale is set to zero.
4. The existing gap is measured and, if necessary, adjusted in a similar way to the feeler gauge adjustment method. The adjustment is carried out according to the scheme discussed in the first case.
As a result, properly adjusted valves will reduce fuel consumption, increase engine power, stabilize its operation and reduce noise generation.
Below you can watch a video on how to independently adjust the valves on a VAZ-2106.
The need to adjust the valves in VAZ-2106 cars arises as the gas distribution mechanism consumes a certain resource. Constant exposure to high temperatures leads to the loss of its elements of their original properties. As a result, the gaps between the camshaft cams and the pressure levers increase.