All VAZ cars equipped with eight-valve engines require periodic adjustment of the thermal clearances of the gas distribution mechanism. Therefore, if the VAZ 2114 has 8 valves, then also every 20-30 thousand. km or even more often, it is necessary to check the valve clearances and adjust if necessary. But with the injector on the VAZ 2114 class 16, things are different.
The cost of adjusting valves on a VAZ 2114 is about 1000 rubles, but you can save this money by making the adjustment yourself. You will need a small handle, a set of bayonets and washers to set the correct thickness.
Symptoms of unadjusted VAZ 2114 valves
Signs of unregulated fittings on the VAZ 2114
To understand that the valves need to be adjusted, you need to know the main signs of a malfunction in the timing belt. Symptoms of unregulated VAZ 2114 valves are usually the following:
- Call on time. If, when starting a cold engine, you hear a distinct metallic knock in the cylinder head area, which disappears after warming up, this is a clear sign of too large gaps. If the compression in one or more cylinders is too low (less than 10 bar), it may also be a sign of a broken pushrod spring, a blown valve or valve seat. In this case, adjusting valves 2114 will not help: the cylinder head must be repaired.
- The engine is shaking. Uneven operation of the engine, its shaking, periodic “fallout” of the cylinder and overheating may indicate a clogged valve (its play is too small or “absent” at all). A compressed valve can be distinguished from a serious failure by compression: if it reaches 6-10 atmospheres, there is a high probability that adjustment will help, if less, you need to disassemble the engine.
- He shoots out his breath. Shots in the exhaust pipe, especially during a sharp release of gas, sometimes indicate a jammed valve that cannot close properly. Keep in mind that the characteristic symptoms of abnormal clearances can be caused by poor quality fuel with an HF below 92. So, you can first try changing the gas station and refuel with 95. If the symptoms disappear, you can continue driving without adjusting the timing. If filling with good quality gasoline does not help, measure the thermal clearances and adjust them. How to find out if your valve is loose or jammed, what to do after diagnosis - see the article below.
Frequency of valve adjustment on VAZ-2114
Such signs, if there are no other troubles, will gradually appear closer to 30 thousand. km. The range of kilometers over which the VAZ 2114 valves need to be adjusted will depend on 4 main factors:
- the fuel used (gas or gasoline, its octane number);
- general condition of the cylinder head (new, repaired, old);
- driving mode (slow in the city, in traffic jams or fast on the highway);
- engine thermal loads.
To prevent engine failure, you should aim for 10-15 thousand. km, taking into account engine operation by ear.
If the engine runs on propane-butane, and especially if dual-mode ECU software or variable valve timing is not used, the valves should be adjusted much more often - every 10,000 km. This is due to the fact that in such cases the cylinder head heats up more and the gaps are knocked out faster.
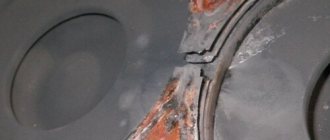
Often the valves need to be adjusted after the engine has overheated as they may
- saddles - go away;
- the washer or camshaft surface is too “ground in”;
- valves - deeper fit due to lapping.
You can determine how long it takes to adjust the VAZ 2114 valves specifically in your case using the instructions below. If you have questions about what valve adjustment is on a VAZ 2114, why it is needed and how to carry it out, this manual will give you comprehensive answers.
Why is valve adjustment necessary?
You can make a long list of what affects the valve adjustment of the VAZ 2114, but the main points of this list are:
- Smooth engine operation;
- service life of timing components;
- fuel consumption;
- propulsion and fuel injection in an internal combustion engine.
Even if you don’t take into account that unadjusted gaps reduce engine life (and this is 90 degrees, turn them forward so that the next cut you made earlier is 2-3 cuts in front of the tenon flap. Measure the gaps on the second (intake) and fifth (exhaust) valves.
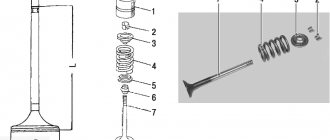
Selection of washers
The most difficult step in this work is to calculate the thickness of the new washers. According to the procedure for adjusting VAZ-2114 valves, it is necessary to remove the washers and adjust the gap by selecting new ones. The selection looks something like this (the data is approximate, yours will vary):
- Measure the gap between the valve and the cam. For example, it was 0.2 mm at graduation. And it should be 0.35 mm.
- And the washer that is installed in this valve drive has a thickness of 3.4 mm. You found this out by removing it and looking at the bottom.
- You need to increase the gap by 0.15mm. Therefore, you need to install a new washer, the thickness of which will be 0.15 mm less than the old one.
- The new washer should have a thickness of 3.25 mm.
If you get a value that is not a multiple of 5, you need to choose a washer whose size is closest in value to the calculated value. The same principle is used to select washers for the remaining valves. But is it worth adjusting the VAZ-2114 valves yourself? If you have a large set of shims, you can do this work yourself.
If you don’t have such washers, then it’s better to leave this job to professionals. The cost of adjusting the valves is about 800 rubles. A set of washers of various thicknesses will cost you no less than 2000 rubles. Moreover, it is not a fact that one set will be enough. But if there is a problem with good craftsmen in your city, or you are used to trusting only yourself, then you can purchase several kits and not have problems adjusting valves for many years.
What is needed to adjust thermal gaps?
Rotate the pulley forward another 90 degrees to the next mark. Measure the clearances on valves 6 (intake) and valves 8 (exhaust).
Rotate the pulley forward 90 degrees again so that the third timing mark you made is 2-3 notches before the block timing mark. Measure the play on the 4th (exhaust) and 7th (intake) valves.
If you don't know the size of the washers you are using, you will need to know them after measuring each gap. To do this, you need to remove the washers one by one and write down their numbers; the numbering of the VAZ 2114 valves in this case is as indicated above:
- Rotate the washer hole so that its notch faces forward. Use tweezers to remove the washer through this cut.
- Insert the tip of the tool between the washer and the camshaft, press the valve and hold it in this position.
- Insert the locking hammer into the gap between the camshaft and the washer seat, pressing it against the edge of the seat, leaving the seat recessed when the cam is released.
- Use tweezers to push the washer through the hole in the socket and remove it.
- Look at the marks on the pad (if you have a micrometer or wet marks, measure the thickness carefully), put it back in place (write down the numbers) and record it in the chart.
- Do the same (steps 1-5) with the remaining valves.
The sequence for adjusting the VAZ 2114 valves will be the same as when measuring the gaps. But, before adjusting the valves of the VAZ 2114, it will be necessary to make calculations and select gaskets for adjustment according to the formula.
What washers to buy for adjustment
The selection of washers after checking the correct installation of the groove should be made according to the following formula:
A = B + (CD) mm
Where:
- A is the thickness of the existing adjusting washer;
- B - thickness of the old washer;
- C - severance pay received;
- D is the correct slot.
Work order
Now the sequence of actions:
- We install the VAZ 2114 on a flat surface, the engine must cool completely so that there is no error in the measurements due to metal expansion;
- Remove the valve cover, as well as the side cover under which the timing belt is located. The surface under the lid must be wiped of oil. You should also carefully inspect the timing shaft for burrs, holes, and signs of significant wear. If there are any, the shaft will have to be replaced;
- We unscrew the spark plugs to make it much easier to turn the crankshaft in the future.
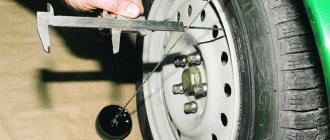
- We combine the mark on the camshaft drive gear with the protrusion on the cylinder head, that is, we set the TDC on the first cylinder. This can be done using a wrench, which we use to rotate the crankshaft by the pulley bolt. But some car enthusiasts do things a little differently - jack up the front wheel on the left and engage 4th gear. Then they simply rotate the wheel, and since the gear is engaged, this rotation will be transmitted through the transmission to the engine;
- After aligning the marks on the camshaft gear, strictly opposite the existing mark, we make another one with chalk. This will make future work somewhat easier.
- We use a feeler gauge to measure the gaps on valves 1 and 3 (you need to count from the camshaft gear. The 1st is exhaust, and the 3rd is intake);
- The gap on 1 valve should be 0.35 mm, but an error is allowed. That is, we take a feeler gauge 0.35 mm thick and insert it between the shaft cam and the adjusting washer. If the probe moves with little effort, then the gap is normal, but if the probe does not enter or is very loose, then adjustment is required. We do the same check on valve 3, but the gap on it should be 0.2 mm.
- The adjustment of the valves is carried out as follows: we attach the device for pressing the valves to the studs securing the cover. This device has a curved lever that we place between the cam and the washer. Using the handle of the device, we press on this lever, as a result of which it will press on the pusher. This device comes with a special clamp, which we place between the camshaft and the pusher. After releasing the handle, the latch will hold the valve in a squeezed state, while the washer will not be pinched and can be removed with tweezers.
- Let's look at an example of what kind of washer will need to be installed in order for the gap to be correct. For example, when checking the exhaust valve, it was found that it was not 0.35 mm, but 0.42 mm, that is, it was increased by 0.07 mm. Next, remove the washer that was installed. There should be a mark on it indicating its thickness (for example, 3.65 mm); if there is no such mark, then you will have to measure the thickness with a micrometer. Now we add to the thickness of the washer the value by which the gap is increased, in our case - 0.07 mm, as a result we get the value of the thickness of the washer for installation - 3.65 + 0.07 = 3.72 mm. But since a washer with such a thickness is not included in the kit, we install a new washer with a thickness as close as possible to the obtained value, that is, 3.7 mm. This is why an error of 0.05 mm is allowed.
- We install the washer of the required thickness in place with the size mark down (towards the pusher). Next, use the lever of the device to press the valve again and pull out the latch. This completes the adjustment.
- Next, the remaining valves are adjusted, but for this you need to know the order. After checking valves 1 and 3, turn the camshaft half a turn (for ease of installation, we made a mark on the gear in advance) and check valves 2 (intake) and 5 (exhaust). Then we turn it another half turn and adjust 6 (intake) and 8 (exhaust). To check the 4th (intake) and 7th (exhaust) valves, you still need to turn the camshaft half a turn once.
After all the work, we replace the removed covers and are satisfied with the smooth operation of the timing belt and the engine as a whole.
We recommend
- Reasons for engine overheating on a VAZ 2114
- Secrets of changing oil in a VAZ 2114 engine
- Replacing the timing belt on an 8-valve VAZ 2114 engine
- Installation of a turbine on an 8 valve VAZ 2114 engine
https://nadomkrat.ru
Checking thermal clearances on VAZ 2114 valves
- Dipstick for adjusting the intake valve on four-cylinder vehicles
- For example, the exhaust valve clearance was measured to be 0.45mm, the thickness of the gasket used was 3.5mm, and the correct clearance should be 0.35mm. Together we get:
- 3,5+ (0,45-0,35) = 3,6
- that is, a washer with a diameter of 3.6 mm must be installed
- After taking measurements for all valves, take washers of the appropriate size and replace them on all valves where the clearances are not within the standard (0.35 ± 0.5 mm for outlet, 0.2 ± 0.5 mm for inlet).
- Gap
- Engine
21083 (2111, 21114, 11183)
11186
petrol
HBO
Petrol
Lada 2114 Basma › Logbook › Self-adjustment of VAZ-2114 valves (why it’s better to do it yourself)
Preface. Good day everyone! I recently stopped by the service center and asked to adjust the valves on my four-wheeler, a young guy with a confident look adjusted the valves, having first cooled the engine, as it should be. I drove 5-6 thousand and I didn’t like the fact that the valves began to noticeably I decided to go back for adjustment, but to a different service center. There, an oily, skinny mechanic named Kolya spent half an hour fiddling around with the adjustment and adjusted it. He reported that the gaps were not the same - some were loose, some were tightened... I left the service center and drove around a little, the valves were clattering approximately the same as before the adjustment. But the worst thing began after a thousand kilometers - there was a knocking noise in the area of the head, and with mileage it intensified - I drove 200 km - the knocking got a little stronger, I drove another 200 and got even louder... I I no longer knew where they would go, I changed the bearings on the generator and generally climbed everything under the hood, I didn’t think about the valves at all, because I had recently adjusted them. As a result, in the same service, all this fuss and fuss led back under the valve cover, Kalyan looked at the gaps, and on the exhaust valve the clearance turned out to be 0.8, instead of the required 0.35. Kalyan took out the washer, and there was a hole in it. Yes! - says Kalyan, the washer was raw (not hardened).
VALVES ADJUSTMENT METHOD. Initially, I will say that I had not adjusted the valve before and therefore did not have a set of washers and other devices. Therefore, I decided to drive up to an auto parts store (which is located not far from the house, and there seem to be no raw washers there, because the guy who owns it doesn’t have a bad reputation road) and make the settings near it. I left the car there for 2 hours (it’s summer outside, 30 degrees Celsius air temperature). I came two hours later, the engine had already cooled down as it should (and it should be 20-25 degrees). You can feel it with your hand if the engine is not warm, then you can start setting up.
SO GET TO THE BUSINESS. 1. I bought a tool for pressing the pusher (250 rubles), took out from my tools tweezers, a set of probes, a disposable syringe with a tube (for pumping out oil), a thin flat screwdriver, a regular flat screwdriver and a 10mm wrench with a ratchet. I unscrewed the throttle cable frame (three nuts by 10), disconnected the cable itself and put it aside. Then he removed the plastic cover from the timing belt, disconnected the gas hoses and removed the valve cover (by unscrewing 2 nuts by 10) 2. Then set TDC (top dead center), turning the camshaft clockwise arrow by the bolt of the upper gear wheel (that is, in the direction in which it usually rotates. YOU CANNOT TURN IN THE REVERSE DIRECTION) and aligned the mark on the gear wheel and the belt casing.
-The gap on the intake valve must be 0.2 mm - an error of 0.05 mm is allowed. -The gap at the outlet should be 0.35 mm - an error of 0.05 mm is allowed (but it is better to avoid it)
The order of adjustment (the valves are counted from the gear wheel - the 1st is closest to the wheel, the 8th is the farthest). 1 (outlet) and 3 (inlet) 5 (outlet) and 2 (inlet); 8 (outlet) and 6 (inlet); 4 (outlet) and 7 (inlet). 5. In the TDC position, we check the gap by alternately inserting feeler gauges between the pusher and the camshaft. We determine what gap we currently have on valves 1 and 3, then rotate the shaft by about 30 degrees (special precision is not needed here, the main thing is that the camshaft cams are moved upward from the pointer, and since the large surface is round, when the convexity of the cam is moved away from the pointer it is visible to the naked eye) So we check the gap on the next pair, and so on, we turn the shaft and check the gap. 6. If the gap does not match, then push the pusher down with our tool and insert a clamp (from the valve adjustment kit) between the camshaft and the pusher.
If the car is on gas, then it is recommended to make the gap on the exhaust valves 0.05 mm larger than normal, that is, 0.35 normal + 0.05 = 0.4 mm, on the intake valves leave unchanged 0.2 mm