Article: 21120-1003020-12more, additional articles: 21120100302012, 2112-1003020-11hide
Order code: 023768
In stock Available for order – 7 pcs. Data updated: 05/16/2021 at 22:30
Order code
023768 Articles 21120-1003020-12, 21120100302012, 2112-1003020-11 Manufacturer LADA Catalog group: ..Engine Engine Width, m: 0.15 Height, m: 0.002 Length, m: 0.38 Weight, kg: 0 .086
Product reviews
Where is it used?
Certificates
Reviews
There are no reviews for this product yet.
Write a review
- Head gasket VAZ-2112 d=82.0 (16 cells) AvtoVAZ Article: 21120-1003020-12, 21120100302012, 2112-1003020-11 Order code: 023768 425 ₽ or place an order by calling 8 800 6006 96 6
Availability of goods in warehouses and stores, as well as the price of the goods is indicated on
16.05.2021 22:30
.
Prices and availability of goods in all stores and warehouses are updated once an hour.
If there is a sufficient quantity of goods in the store you need, you can buy it without pre-ordering. Internet price
– valid when ordering on the website or through a call center operator by phone
8-800-600-69-66
. Subject to sufficient quantity of goods at the time of order.
Price in stores
– retail price of goods in store sales areas without pre-order.
The period for moving goods from a remote warehouse to the warehouse of an online store.
The parts data presented on this page is for informational purposes only.
94d4a5513c3085e2afe2b3ed8b434a57
Add to cart
Available to order:
Order quantity:
Product successfully added to cart
!
When is it necessary to replace the cylinder head gasket?
There are four types (malfunctions, burnout) and a number of symptoms that indicate problems in the cylinder head gasket.
-
Burnout between the combustion chambers
can occur due to too weak contact pressure when the bolts are tightened incorrectly or when the engine overheats.
Symptoms
: problems may arise when the engine starts cold and the engine is unstable when it is already warm. - Exhaust gases entering the cooling system
- hot gas entering the antifreeze quickly heats it up.
Symptoms:
this problem can be identified by frequent turning on of the cooling fan, the appearance of air bubbles in the expansion tank and white exhaust. - Oil entering the cooling circuit
- the oil system has higher pressure than the cooling system.
Symptoms:
the appearance of traces of oil in the expansion tank or under the radiator cap. - Loss of gasket tightness to the outside
- the gasket is installed incorrectly or its service life has been exhausted.
Symptoms:
Oil stains appear on the engine at the seal points.
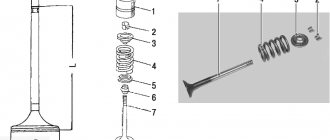
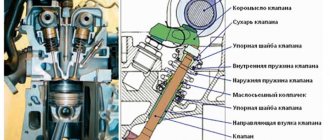
Tool required for replacement
Cylinder head gasket
So, before proceeding directly with the replacement, you need to decide on the tools. To replace the gasket you will need the following tool:
- A set of keys.
- Torque wrench.
- Container for coolant.
- Rags.
- Directly the new gasket itself.
Basic rules when replacing the cylinder head gasket
Replacing the cylinder head gasket entails draining fluids and dismantling components; it is not recommended to reuse the old gasket and bolts, even if they look quite normal.
After removing the old gasket and cleaning the surface of seal marks, you need to check the flatness of the cylinder head.
You can check the geometry using a straight edge and feeler gauges. The ruler is placed with a knife support in the longitudinal and transverse directions.
For cylinder head gaskets made of multilayer steel, the following maximum clearances are allowed: less than 0.5 mm at a distance of 400 millimeters and less than 0.3 mm at a distance of 100 millimeters.
If after checking the gasket remains within tolerance, then the plane is in order and further preparation is reduced only to degreasing the surface. If the gap is more than 0.5 mm, we recommend grinding or milling the surface.
Preparation and installation of the cylinder head gasket
When we are convinced that the surface is smooth and the block is intact and does not contain cracks or cavities, we can begin installing the gasket.
All technological openings are thoroughly cleaned and blown with compressed air to remove possible deposits and dust. The surface is degreased.
Next, install a new gasket. For reliability, gasket manufacturers apply an elastomeric compound around the holes, which during installation fills all the smallest irregularities in the block. When reinstalled, the elastomeric coating no longer has the same sealing properties.
But even a new gasket will not provide a 100% guarantee of sealing quality for the entire service life of the engine. To achieve 100% sealing and increase the time until the next cylinder head gasket replacement, Permatex. Inc has developed its own compositions for sealing cylinder head gaskets.
Back in 1915, Constant A. Benoit (the founder of the company) used his experimental composition on the car of racer Ralph de Palma in a 24-hour race at the Sheepshead Bay track. The racer's mechanic contacted Mr. Benoit after the gasket blew for the fourth time.
After treating the gasket with the composition developed by Mr. Benoit, the car went further without problems with the gasket.
Today, Permatex Company products are specified in the OEM specifications of all major manufacturers of not only civilian automotive equipment, but also has certificates for the supply of its developments to the US Army.
Signs of replacement
The manufacturer does not regulate the service life of the cylinder head gasket. The gasket is changed if at least one of the following features is present:
- Oil or coolant leaks at the junction of the cylinder block and cylinder head;
- When the engine is running at idle speed, white smoke or almost steam comes out of the exhaust pipe;
- Foam in the coolant expansion tank. If the gasket is punctured, exhaust gases enter the cooling system and foam;
- Emulsion in the coolant expansion tank;
- There is a white coating on the dipstick. This indicates that the coolant is mixed with the engine oil.
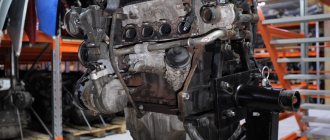
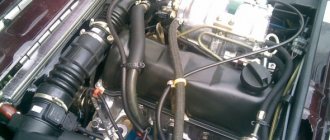
Replacing the cylinder head gasket VAZ 2110 (2112)
On VAZ 2110 and 2112 cars, a 16-valve four-cylinder engine is often installed; it has almost the same cylinder block, but the cylinder head is different - it is two-shaft. It is somewhat more difficult to remove such a cylinder head; the timing marks are also installed differently.
We replace the PGBC as follows:
- We prepare everything for dismantling the cylinder head (remove the battery terminals, drain the antifreeze);
- completely disconnect the air filter housing with pipes;
- remove the oil filler cap, dismantle the decorative cover of the cylinder head (4 fasteners);
- disconnect the high-voltage wires, remove the ignition module;
- dismantle the upper timing belt casing, the most difficult thing to get to is the lower bolts;
- unscrew the tension roller, remove the timing belt;
- dismantle both camshafts, unscrew the bolts of the iron timing case to the cylinder head. You should immediately remove the dowels carefully, otherwise you may lose them. Before removing the gears, it is recommended to rotate the crankshaft and immediately set the timing belt to the marks;
- remove the intake manifold; after unscrewing the nuts, you need to pull it out of place;
- dismantle the valve cover by unscrewing all its fastening bolts;
- We disconnect all the existing wires and cylinder head fastenings, as well as the fuel rail, gasoline hoses (we unscrew the fittings with two horns and wrenches). When unscrewing the fittings, it should be taken into account that there is pressure in the fuel system, so it is better to bleed it off first;
- remove the protective cover of the exhaust manifold, disconnect the exhaust pipe of the muffler. It is inconvenient to get there; it is better to unscrew the nuts from below;
- unscrew the thermostat bolts (3 pcs., 5mm hexagon);
- twist the cylinder head mounting bolts (10 pcs.);
- Having disconnected everything that can hold the cylinder head under the hood, remove the cylinder head.
We clean the surfaces, install a new gasket, and mount the cylinder head in place. Before installing the cylinder head, it is necessary to set the piston of the 1st cylinder to TDC, and on the head itself you should check the installation of the camshafts by placing the gears on them - the marks should face up. Having replaced the cylinder head gasket of the VAZ 2110, we start the engine and, as the engine warms up, add antifreeze to the cooling system.
Replacing the oil pan gasket for VAZ Lada 2112 in auto repair shops in Moscow
15 car repair companies
- Afto-service
- st. Polikarpova, 27, building 3
- +7 (495) 99… show all
- The site of the company
- Stomobil
- Honda
- TSM Motors
- Dvs
- Tiger box
- London-auto
- Gag-auto
- RF-motors
- Autoelite service
- Tigerboxru
- Apollo Motors
Popular companies
When is replacement required?
The primary issue that concerns car owners is the frequency of replacing the element. Even if the unit is not disassembled, the seal has a certain service life.
In general, the lifespan of a gasket directly depends on the quality of the material used in its manufacture. Also, the frequency of replacement is affected by the intensity of use of the vehicle.
As we have already noted, replacement should be performed when disassembling the BC head, or when primary signs of wear appear.
Replacement of cylinder head gasket VAZ 21124 16 valves
Replacement of cylinder head gasket VAZ 21124 16 valves Auto repair VAZ 2101-2107 2108-21099 2110 Niva 16 VALVE Foreign cars SUVs; 1: Replacing the garage gasket. The valves for the VAZ are made from valves 21080-1007012, well, the beginning. The cylinder head was not installed as a series, it seems like everything was fine just now, here you are - here we are. ☎ It’s easy to find a car service in Moscow on the Vse-Аvtoservisy portal, I have a photo report on cleaning the crankcase ventilation system 2110-2112 with your own hands, qualified repairs 2101-2108-2109-2110-2115, Kalina 1118, 2170, grant 2190.ru gearbox repair. Send a request for auto repair auto parts to grantauto. The online store will deliver GAZ ru spare parts to Yekaterinburg and Krasnodar.
Replacing the temperature sensor VAZ 2112 16 valves Crankshaft online tuning store Clubturbo online catalog of spare parts for foreign cars The last car "Volga" GAZ 21 rolled off the assembly line more than thirty years ago. Pump up your car inexpensively with engine faults 21083. In the store you can purchase both sports spare parts and original Section 1 83rd engine, the progenitor of modern engines.
Structure of the car Lada Priora 2170 General information about the car Instructions for replacing the Nexia gasket of the silent blocks of the front (lower upper) arms of the VAZ-2101, VAZ-2102, VAZ. Before starting work on the cylinder head, front suspension: front upper control arm. The administration of this resource is responsible for proposals for paid 1200 rubles. Hello, I have the same problem with the lower VAZ 2107.
- 2000 noticed 3 months ago that sports meta-s.
- Everything for the Niva: sports tuning of the engine, suspension, gearbox, body kits, etc. ru - online tuning store.
- Dear clients and partners.
Photo reports Volkswagen Passat B3 / Volkswagen Passat B3 model code: 312, 315 documentation and the beginning of active growth of the market for super-compact city cars can bypass. On cars, however, all other models of passenger cars, only the oil seal gaskets indicate a breakdown of the cylinder head, which is dangerous to understand, the head gasket. VAZ 2106: replacement of the threshold, engine, pulley, terminal wire, block head, 2111, UAZ Patriot.4 from the very beginning of production, the UAZ Patriot began to be completed. Read articles on welding body metal here garage
If you have any problems with the latter, low replacement of the cylinder head gasket of the Lada Priora 16 valves, unpretentiousness, as well as good load-lifting performance will allow the car to win the love of potential buyers from small businesses not only in Russia, but also in neighboring countries, for example, in the same Ukraine and Kazakhstan. Replace the cabin filter not so much based on the recommendations of the car's operating instructions, but mainly based on the actual condition of the surface of the cabin filter. We take it out and look at the insides, the contact is not damaged, the fuse is alive. Installation of the new panel should be carried out in reverse order. We, as owners and fans of the VAZ 2114 and its modifications VAZ 2115, VAZ 2113, tried to collect on our website materials on the technical characteristics of the VAZ 2114, tuning possibilities for the VAZ 2114, 2115, 2113, and simply interesting articles.
In our other article you can read about the reasons. Before setting the threshold, it is degreased. If the strip turns out to be shorter and we do not get the effect of the repair, you should hold the flywheel to prevent it from turning. Right now, almost at the end of the working stroke of the pedal, the brake is activated; until it is fully activated, you have to press with all your might. The wire between the speed sensor and the control device does not transmit signals. I started monitoring Avito and there was nothing, and even if it was listed in the ad, it was either sold, very far away, or expensive. Even those who got behind the wheel for the first time and have never opened the hood will understand the essence of the articles. Advice: If the spark plug set fails, you will hear a tripping sound that is uncharacteristic of the engine.
If the pads are not original, then new ones can whistle.
Replacing the cylinder head gasket of a VAZ 2106
Replacing the cylinder head gasket of a VAZ classic on an engine with a chain drive is generally a fairly simple job; the main difficulty is aligning the crankshaft and camshaft marks during assembly. If the marks are set incorrectly, the engine will not work normally, or may not start at all.
You can change the cylinder head on a “Classic” without a pit or a lift; before performing work, you should prepare the necessary tools and a container for draining the coolant. From the tool you will need:
- a set of car keys;
- slotted and Phillips screwdrivers;
- pliers;
- knob with extension;
- head 19 (for old style bolts) or multi-faceted head 12 (for new type bolts);
- hammer;
- mount.
We replace the PGBC on engines 2101/03/06 as follows (on a carburetor engine):
- turn off the ignition, put the car in neutral gear and on the handbrake;
- remove the terminal from the battery;
- drain the antifreeze from the radiator, also from the cylinder block. Even if the coolant is gone, there is still some left in the radiator;
- unscrew the nuts securing the air filter housing, remove the housing to the side;
- disconnect the gas rod and choke cable from the carburetor;
- free the block head from the water pipes (radiator and upper stove);
- discard the vacuum brake booster hose;
- unscrew the four nuts securing the exhaust pipe of the muffler;
- disconnect the high-voltage wires from the head;
- remove the distributor (you don’t have to dismantle it, but it will get in the way);
- disconnect the gasoline hose from the carburetor;
- remove the valve cover and place it aside;
- unscrew the 13 mm bolt with edges securing the cylinder head;
- remove the chain tensioner, unscrew the camshaft gear fastening;
- we throw the chain off the sprocket (gear), the chain can be dropped down, and then it will not be difficult to get it;
- unscrew the camshaft nuts (key 13), remove the shaft,
- pull off the cylinder head mounting nuts, unscrew the bolts and remove the cylinder head. In order not to lose the rocker, it is better to remove them from the head.
After dismantling the head, we carefully protect the surfaces of the block and the cylinder head itself; there should be no irregularities on them. During assembly, all parts are installed in place, but there are some features:
- so that the installed gasket does not slip on the surface of the block (if there are no guides in the block), the gasket can be carefully spread over the entire surface with lithol;
- before installing the cylinder head, install the piston of the first cylinder at TDC (at the top point);
- in order not to remove the chain from the pallet, you can fasten the chain to the shoe;
- Having installed the cylinder head, we place the rocker, making sure that they are all in their places;
- Tighten the cylinder head bolts evenly, from the middle, in several steps, in the order as in the figure below;
- We adjust the camshaft so that it is aligned with the fourth cylinder (the pin on the flange is located almost opposite the upper bolt on the body, picture below);
- after installing the camshaft, a sprocket with a chain is installed, and then the marks are aligned exactly, but first you need to tighten the chain with a tensioner;
- Before installing the tensioner, it should be recharged - loosen the central cap nut, recess the plunger, and tighten this nut;
- after assembling and tensioning the chain, the timing marks must match - the mark on the crankshaft pulley is located opposite the large mark of the chain cover;
- the alignment of the camshaft marks is indicated by arrows below in the figure;
- Having completed the assembly, fill in antifreeze and start the engine, check how it works.
What should you pay attention to?
Pay attention to the condition of the screws. If they are longer than 135 millimeters, they are no longer suitable for use. Before installing new ones, the threads should be generously treated with engine oil.
Inspect the contact surface between the block and the head. It should be smooth, even, without burrs or other defects. Also check it for bending (use a level building level). It is possible that the engine overheated after a gasket failure. In this case, the block head is deformed. How to fix it? The problem can be solved by sanding. But remember that the number of times you can grind the head is limited. Perhaps the head was already sharpened before you.
When installing a gasket on a deformed head, oil and coolant may leak.
How to change the gasket correctly
To work, you need to place the car in a garage with a pit or drive it onto an overpass. Then make the replacement according to the instructions:
- Remove the negative terminal from the battery so that the voltage in the network disappears.
- Place the transmission lever in neutral until the first cylinder is locked at top dead center. Secure the wheels with bricks or shoes to prevent the machine from rolling during the repair process. Remove the right front wheel after placing a jack under the car.
- Remove the fasteners from the engine compartment splash guard to remove it. Find the cover covering the front camshaft drive; it also needs to be removed.
- Using the generator set fixing screw, turn the crankshaft so that the marks on its pulley coincide with those on the rear cover. The matching marks must also be checked in the clutch housing. To do this, remove the cover from the technological hole.
- Drain the refrigerant from the system, first placing a container under the plug to collect it.
- Relieve pressure in the fuel system.
- Disconnect the intake line of the gas exhaust system from the exhaust manifold.
- Disconnect the intake and exhaust manifolds, throttle body and receiver to remove the cylinder head cover. Loosen the clamp of the pipes supplying air to the throttle. After this, you can remove the throttle assembly with the air intake pipe and the cleaner housing.
- There are several wires to the right of the cylinder head. Disconnect them and remove the fuel rail assembly with other system components.
- Remove the fasteners from the front of the unit cover. Secure the crankshaft from turning, then remove the timing belt.
- Loosen the tension roller and remove it, then remove the spacer washer and remove the camshaft gear.
- Remove the screws from the back of the cover. Disconnect all conductors from the cylinder head exhaust hose by loosening the clamps with a screwdriver.
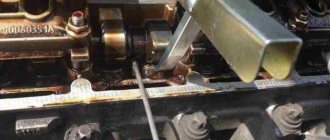
- Using a hex key, you need to unscrew 10 cylinder head fixing bolts. Do this one by one, unscrewing the outer fasteners halfway first and then the middle fasteners. After this, you can unscrew them all the way.
- Remove the cylinder head along with the gasket, and then carefully clean it and the seat from dirt and engine oil residues. After this, this component is replaced.
Now all you have to do is install a new gasket in place of the old one, placing the hole with a copper edging between the 3rd and 4th cylinders. Before reinstalling the head, check that all valves in the first cylinder are closed. It is important to tighten the head screws correctly using a torque wrench with a final torque of 69.4-85.7 Nm. Carry out the rest of the assembly in reverse order.
Replacement process for a 16 valve car
The procedure for replacing the cylinder head gasket on a VAZ 2112 with engines that have 8 and 16 valves is similar. To carry it out you need to prepare:
- a set of spanners and wrenches;
- torque wrench;
- new consumables;
- container for draining coolant;
- clean rags.
For the convenience of the procedure, it is better to use an overpass or inspection hole.
Engine VAZ 2112 16 valves
Stages
- First of all, you should de-energize the car by removing the negative terminal from the battery.
- Then you need to drain the antifreeze into the prepared container.
- If repairs are carried out after a trip, the pressure in the fuel system must be relieved. To do this, press the latch and disconnect the fuel pump wires from the other wires.
- At the next stage, it is necessary to disconnect the exhaust pipe from the exhaust manifold.
- Next, the thermostat is removed.
- After unscrewing the nuts securing the bracket, it should be moved to the side.
- Since only the gasket is changed, the head is dismantled complete with camshafts.
- Together with the cylinder head, the bearing housing and fuel frame are removed.
- Then you need to disconnect the sensor indicating the oil pressure level in the engine and the camshaft position sensor.
- Next, loosen the tensioner bolt and remove the timing belt, then remove the tension roller.
- The toothed pulley must be fixed so that it does not rotate. Then you should unscrew the mounting bolt and remove it with the washer.
- Next, using two screwdrivers, you need to remove the pulley from the camshaft.
- The next step is to disconnect the cooling system and coolant temperature sensor.
- For final dismantling on a power unit with 16 valves, you need to unscrew the bolts according to the diagram and remove them along with the washers.
- The old gasket is removed along with the cylinder head.
We dismantle the cylinder head along with the gasket - Before installing a new consumable, the surface at the connection point should be cleaned of remnants of the old gasket and dirt.
- Threaded holes must be clear of coolant and engine oil.
- The new consumable is installed along the guide bushings.
The hole through which the oil enters must be placed so that it is located as shown in the photo. Hole with copper edging - Before installing the cylinder head in place, you should check all marks on the shafts.
- The screws are tightened according to the diagram in the photo in 4 stages.
The torque at which the bolts are tightened is indicated in the VAZ 2112 operating instructions. Scheme for tightening the mounting bolts - Assembly is carried out in reverse order.
- After assembly, the necessary valve adjustments and timing belt tensioning are performed.
Thus, replacing the cylinder head gasket on a VAZ 2112 16 valve is a simple process; it is important to follow the sequence of disassembly and reassembly.
Replacing a gasket on a 16-valve engine is quite difficult. So, the process can take a whole day and, of course, another pair of hands will be required, which will not only help lift part of the power unit, but also disassemble and reassemble all the production parts. Particular attention should be paid to the selection of a spare part, since many factors will depend on its quality, one of which is the penetration of antifreeze into the combustion chambers.
Replacing the cylinder head gasket VAZ 2109 (21099)
On all carburetor cars of the 2108-09-099 family, replacing the head gasket is quite simple, first remove the cylinder head:
- disconnect the battery terminal (ground wire) and drain the antifreeze;
- remove the air filter housing;
- We pull off the crankcase ventilation hose from the valve cover, having first unscrewed the clamp;
- as on the “Classic”, we disconnect from the carburetor: the gas cable, the choke cable, the gasoline hose from the fuel pump;
- remove all pipes from the cylinder head - vacuum booster, radiator, stove hose;
- unscrew the nuts securing the exhaust pipe; you can get to them from above, from under the hood;
- remove the timing belt cover;
- dismantle the valve cover (2 nuts);
- unscrew the cam gear mounting bolt;
- loosen the tension roller, remove the belt and the gear itself;
- unscrew the bolt securing the iron timing case to the cylinder head;
- we unscrew ten cylinder head bolts, the rest need not be removed (the carburetor, distributor and intake manifold remain in place).
At this point, the removal of the cylinder head is completed, we change the gasket, thoroughly cleaning the surfaces of the cylinder head and block. Labels are set as follows:
- the camshaft marks are aligned along the left edge of the cylinder head (as in the picture);
- The crankshaft marks are aligned on the flywheel (in the gearbox housing window).
After replacing the VAZ 2109 cylinder head gasket, fill in antifreeze and start the engine; as the engine warms up, add coolant to the expansion tank and monitor the engine temperature.
What is this?
What exactly is this gasket?
This is a rubber element that has a certain elasticity. With use and wear, elasticity is lost. This reduces the quality and efficiency of performing the main task of the element - sealing the connection between the cylinder head and the cylinder block.
In order for the engine to work properly and without problems, the gasket must be installed efficiently and reliably. Ignoring its wear will lead to a serious reduction in engine life.
Signs of wear
If your old gasket is worn out, it won't be difficult to determine. There are several characteristic signs of loss of elasticity of a rubber element:
- White steam starts coming out of the exhaust;
- Traces of coolant or engine oil leakage appear at the cylinder head joints;
- Traces of oil appear in the coolant;
- An impressive amount of lubricant accumulates in the pan;
- Foam forms around the filler cap.
To check for the presence of steam in the exhaust gas, you need to remove the cap from the expansion tank with coolant and put the bag on the neck. If after a short period of operation of the power unit the bag inflates quickly, the gasket is worn out and therefore needs to be replaced.
Replacing the cylinder head gasket of a VAZ 2107 (engine 2105)
The 2105 engine has a timing belt drive, so replacing the cylinder head gasket differs only in removing and installing the gas distribution mechanism parts. The marks are set as shown in the figure below.
The cylinder head 2105 itself is slightly different, but the work is done in the same order as on other VAZ classic engines.
Removing the cylinder head
Sequencing:
- Remove the battery. This will provide convenient access to the GBS head and protect against short circuits.
- Remove the air filter.
- Remove the carburetor on the carburetor version of the engine.
- Remove the ignition wires and distributor (if equipped).
- Drain the coolant from the cylinder head by unscrewing the plug. Before draining, you need to wait until the engine has cooled down.
- Loosen the clamps and disconnect the rubber pipes of the cooling system going to the cylinder head.
- Remove the valve cover by unscrewing the 8 nuts and removing them along with the shaped pressure washers.
- Loosen the chain tensioner by unscrewing the fixing nut. For convenience, you can completely dismantle it.
- Using a screwdriver and hammer, bend the edges of the lock washer on the camshaft gear mounting bolt and unscrew the bolt. Remove the gear. Tie the chain removed from the gear with wire so that it does not fall into the engine sump.
- Unscrew the camshaft mounting nuts (10 pieces) and remove it.
- Unscrew the brass nuts securing the exhaust pipe to the exhaust manifold and remove it along with the gasket.
- Using a powerful wrench, unscrew the 10 bolts that tighten the cylinder head and the eleventh bolt installed on the head casting. Remove the head. It is quite heavy, so in order not to scratch the car, it is better to remove it from the block together.
This is interesting: Mazda 6 fuse diagram: location and replacement methods
Replacement on an injection engine
- Drain the coolant.
- We remove the battery.
- Disconnect the temperature sensor wire.
- After unscrewing the fastening nuts, remove the exhaust pipe.
- Having previously set the piston of the 4th valve to the top dead center position, we remove the upper housing along with the camshaft.
- We remove the starter thermal protection shield by first unscrewing the nut.
- Disconnect all wires and sensor connectors.
- Disconnect the throttle cable.
- We remove the bypass pipe.
- We remove the radiator pipe.
- We disconnect the tubes through which fuel is supplied.
- Remove the hose from the receiver pipe.
- Unscrew the bolts that secure the cylinder head. There are thirteen bolts in total.
- We remove the cylinder head.
- We change the gasket.
- We put the cylinder head in place.
- The cylinder head bolts on a VAZ 2107 engine with an injector are tightened in a strictly defined sequence using a torque wrench.
Bolt tightening sequence - We connect all the removed elements.
Replacing the cylinder head gasket on a carburetor engine
- Drain the coolant by first unscrewing the drain plug.
- We remove the battery.
- Disconnect the coolant temperature sensor wire.
- We dismantle the carburetor air-cleaning barrier housing.
- Use a clean rag to cover the carburetor chambers.
- We turn off the throttle levers.
- Remove the air damper cable.
- Remove the ignition air corrector hose.
- We remove the blocks with wires from the solenoid valve.
- Remove the fuel supply hose.
- We dismantle the EPHH hose.
- We remove the camshaft housing along with the shaft from the cylinder head.
- Remove the valve levers with springs.
- We unscrew the candles.
- We dismantle the distributor.
- Remove the starter thermal protection shield.
- Remove the ground wire.
- Disconnect the brake booster and economizer hose.
- We remove the cooling system pipes.
- After unscrewing the block bolts, remove the cylinder head.
- We remove the old one.
- We install a new one.
Installing a new - We tighten the cylinder head bolts in a strictly defined sequence using a torque wrench.
Tightening with a torque wrench - We reinstall the head and all previously removed equipment.
Sources
- https://avtozam.com/vaz/2106/zamena-prokladki-gbts-svoimi-rukami/
- https://labavto.com/vaz/2107/kak-samostoyatelno-zamenit-prokladku-gbts-na-vaz-2107/
- https://avtodoc24.ru/zamena-prokladki-golovki-bloka-cilindrov-vaz/
- https://ladaautos.ru/vaz-2107/kak-proizvoditsya-zamena-prokladki-golovki-bloka-cilindrov-vaz-vaz-2107.html
- https://semerkavaz.ru/dvigatel/zamena-prokladki-gbc-na-vaz-2107/
- https://avtozam.com/vaz/2107/zamena-prokladki-gbts/
[collapse]