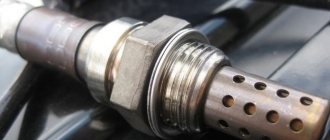
Every car must be equipped with a working speed sensor (DS). This device allows you to accurately determine the speed of a vehicle and display information about it on the speedometer. Operating a car with a non-working DS is not allowed, as this can lead to an emergency on the road. How to check the speed sensor and replace the device yourself - read about it below.
Description of DS
As we have already said, the main purpose of the speedometer drive sensor is to accurately determine the speed of the vehicle. Thanks to this device, the model can always know at what speed his car is moving. As for the varieties, DS can be of the contact or non-contact type. Today, most of our compatriots prefer contactless options. Contact DS, despite all the advantages, have one significant drawback - they are prone to contamination, which in turn will lead to inaccuracy of the displayed readings.
Design and principle of operation
Structurally, according to the diagram, this part consists of:
- speedometer drive;
- housings;
- as well as the controller itself with a connector for connecting to the on-board network.
As for the principle of operation, it is based on measuring the frequency level of signals from the controller, which is located on the gearbox housing or transfer case. At the output of the device, while driving, rectangular pulses are formed, the minimum value of which should be at least 1 volt, and the maximum value should be at least 5 volts.
According to international standards, the controller must generate about 6 thousand such pulses over one kilometer. The pulses themselves are subsequently converted into current, which is measured by a magnetoelectric device. It should be noted that the current value directly depends on the number of signals supplied per certain unit of time. That is, this value will be directly proportional to the speed of the vehicle.
In addition, thanks to the electronic circuit installed in the dashboard, the operation of the stepper motor is ensured by counting incoming signals. The latter is designed to rotate the counter reels, after which it displays the relevant information on a small screen, where the total and daily mileage of the car is shown. If we are talking about daily mileage, then this value can be reset to zero if necessary.
Symptoms of a problem
If the DS for some reason fails, this will lead to the control unit being unable to determine the speed of movement. However, this is not the only problem, since malfunctions in the performance of the power unit may also occur.
We suggest that you familiarize yourself in more detail with the signs of a malfunction, by which you can determine the failure of the DS:
- the speedometer on the dashboard has either stopped working altogether or displays incorrect readings;
- malfunctions appear in engine operation, in particular at idle speed;
- fuel consumption increased;
- engine performance has deteriorated, the power unit cannot reach the required speed;
- the engine may stop spontaneously while idling, in particular when the driver tries to press the clutch to change gear;
- if the car is equipped with an on-board computer, a Check indicator may appear on the dashboard;
- if the car is equipped with an electric power steering, this unit may also fail;
- in some cars, for example, Lada Kalina, failure of the diesel engine can also lead to increased sensitivity of the fuel level controller in the gas tank (the author of the video is the Autoelectrics HF channel).
As for the reasons, as a rule, they are caused by damage to the car's electrical wiring, so checking the functionality should begin with diagnosing the condition of the contacts and electrical circuits. Perhaps the problem lies in oxidized or dirty contacts, so they will need to be cleaned and treated with a lubricant, for example, Lithol. A broken wiring should be looked for first of all near the connection connector, since in this place the wires are bent and usually frayed.
Subtleties of checking for different car models
Depending on the vehicle, the location, malfunctions and details of the check may vary.
VAZ-2110
A common malfunction on the “ten” is incorrect operation of the odometer, expressed in incorrect speed data. The cause may be a broken speed sensor or drive.
Sometimes the malfunction is due to oxidation of the connectors or damage to the wiring.
The sensor is located near the collector, so the cause of the breakdown may be damage to the wiring due to high temperature.
To check the performance of the product, you can use one of the three methods discussed above.
If the device is faulty, replacement will require a 21 or 22 key. When purchasing a new speed sensor, it is recommended to choose a product with a metal rod. It lasts longer and is more reliable.
Kalina
As with other models, a popular reason for DC failure is damage to the wiring (oxidation, rust, poor contact, melting wires, etc.). A multimeter is used for control.
The probes are connected to the central contact (“plus”) and to the body (“minus”). When vibrations occur, the voltage should vary from 0.5 to 10 V.
You can check the operation in other ways - by hanging the wheel or using a test lamp.
The location of the Lada Kalina DS is shown below.
Priora
There are a number of features in checking the Lada Priora speed sensor. Often a problem with it is indicated by error P0501.
Before checking the DC, it must be removed from the vehicle, but the wires must not be disconnected.
Next, turn on the ignition and check the output voltage. To do this, you need to slowly change the rotation speed of the axis. The curve should have a voltage of five to one volt in the reverse direction.
If the voltage remains unchanged, this indicates a breakdown. An additional sign of failure is the engine stopping when changing gears, failure of the electric power steering.
To check the speed sensor, you can use a simulator - a device that changes the pulse frequency by pressing plus or minus. Using the product you can also check the machine's ECU.
Gazelle
To check the Gazelle speed sensor, you need to take the following steps:
It is worth considering that the “positive” signal is sent to the DS and the reverse signal. If the reversing lights turn on after moving the gearshift knob to the appropriate position, there is no need to check the fuses.
Nissan
Nissan uses two input signals from the automatic transmission control unit - from the speed sensor and the vehicle speed sensor.
The first determines the rotation speed of the secondary shaft and sends information to the unit, and the second is used as an additional controller. It sends data when the master node is faulty.
The Nissan speed sensor is built into the speedometer assembly and plays the role of an additional device. Symptoms of a malfunction are dropping into neutral or illogical gear shifting.
The sensor itself is located behind the left fender liner, and to replace it you need to remove the left plastic protection (using the example of a Nissan Liberty).
If error “2” appears, you need to check the DC chain, the integrity of the wires and connectors. Studying the operation of the controller itself is carried out according to the standard scheme:
If tension is present, you need to look for another reason.
To replace the DS you need:
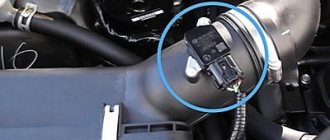
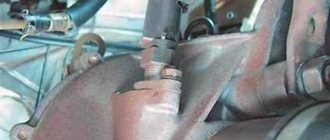
The Niva's speed sensor is located on the transfer case. It is made in a plastic case, and inside there is an electronic part.
The device is highly fragile, so you need to be careful.
To replace, you need to disconnect the terminals from the battery, press the plastic lock and use a wrench to unscrew the sensor (to simplify the work, you can use WD-40.
VAZ 21093 injector
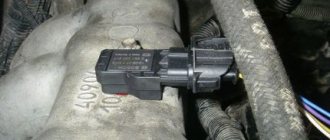
The VAZ 21093 injector speed sensor is located on the speedometer drive mechanism (at the gearbox). To find it, just open the hood and remove the adsorber https://autotopik.ru/obuchenie/1086-chto-takoe-adsorber.html.
Performing the last step is not necessary, but it is easier to get to the desired point in another way. On the right CV joint side there is a wire that goes to the gearbox. It connects to the connector of the desired sensor.
In the case of injection VAZ-2109, the main sign of a speed sensor failure is the engine stopping at idle or when the clutch is pressed.
Also, a light on the dashboard lights up asking you to check the engine (code 24). For control, one of the three methods discussed earlier is used.
Functionality check
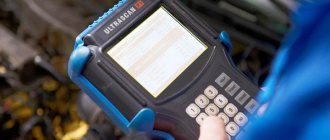
There are several options for diagnosing DS.
The first way to check is with a multimeter:
- First you need to dismantle the DS.
- Then, using a tester, you should determine what each contact on the connector is responsible for; you need to find exactly the pulse one.
- After this, the positive probe of the tester must be connected to this contact, and the negative probe to the power unit or car body.
- Next, you should install a piece of tube on the controller axis and start rotating it at low speed. At the same time, monitor the controller readings - the higher the rotation speed of the DS tube, the higher the values on the tester display and the voltage parameter will be (the author of the video is the REMONTYCA channel).
Second method, without removing the controller:
- Using a jack, you will need to lift the front wheel of the car. Which one - right or left - does not matter.
- Then the tester should be connected to the DC wiring.
- After this, you begin to rotate the car wheel with your hands and monitor the readings on the tester display. If there are impulses, then this indicates that the DS is operating in normal mode.
If you don’t have a multimeter, you can diagnose the DC using a test light or any other 12-volt lamp.
The verification procedure is similar to the method described above:
- First, you need to disconnect the pulse cable from the DC.
- With the ignition on, using a tester, you need to find the positive and negative contacts.
- Then the front wheel of the car is raised on a jack.
- Next, the control must be connected to the signal wire. The wheel must be rotated - if at this moment the minus light on the control panel lights up, this indicates that the DS is working (the author of the video is the PivovarovNikolay channel).
As for a 12-volt light bulb, it must be connected to a battery, as well as a signal contact. If a working DS is used, the light source will blink. If the diagnostics showed that the DS is working, then it is necessary to check the functionality of its drive. To do this, jack up the front wheel, feel for the DS drive, then rotate the suspended wheel with your foot and control with your hand whether the device rotates or not.
DIY replacement instructions
The self-replacement procedure is as follows:
- First you need to turn off the ignition, open the hood and disconnect the terminals from the battery.
- Next, you will need to find the DS itself. As stated above, the location of the controller may vary, so check the installation location in the service book. When the DC is found, you will need to clean the area around the controller from dirt. This is done in order to prevent contaminants from entering the transmission.
- Disconnect the power connector from the speed sensor.
- Next, you will need a wrench to unscrew the device. If you cannot unscrew the device the first time, you do not need to apply force, as this may damage the case (usually it is made of plastic). It is better to treat the DS with WD-40 liquid and wait a few minutes.
- When the device is removed, it is necessary to install a new controller, then connect a new sensor.
- If your car is equipped with a control unit, then after replacing it you need to reset its errors. It happens that due to the fact that the error is not reset, the indicator on the dashboard continues to light, and the control unit sends signals about its malfunction.
Replacement
Now to the question of how to make replacements. To do this, we dismantle the old device and connect a new one in its place. Your steps look like this step by step:
- Remove the negative cable from the battery, which will allow you to turn off the power to the car;
- Now disconnect the wires from the sensor and be sure to remember what form the pinout was in;
- The device can be dismantled by simply twisting it by hand. There is usually no need to use any tools. But if the device fits tightly, then use 22 or 21 millimeter keys. Depending on the modification of your “ten”, the design of the sensor may differ slightly;
- At the same time, we recommend checking the wiring;
- After removing the meter, unscrew the fixing nut that holds the wire going to the gearbox;
- Remove carefully so as not to drop the rod into the box. If this happens, you will have to completely disassemble the gearbox. This is clearly not in your best interest;
- A new device with a rubber ring must be lubricated with transmission fluid so that the fixation in the new place is as reliable as possible;
- Assembly is performed in reverse order;
- Pay special attention to the pinout. Connect the multimeter with the ignition on. If the device showed “minus”, then you connected the wire to positive, which is absolutely not allowed. This is why we initially advised using a sensor that is not labeled 1, 2, or 3.
If you couldn’t avoid using a new device with inconvenient markings 1, 2 and 3, then remember an important pinout detail:
- 1 corresponds to “+”;
- 2 denotes signal output;
- 3 is “-“.
Video “Visual instructions for replacing DS”
We offer a more visual understanding of the process of replacing a speed sensor using the example of a VAZ 2110 car (the author of the video is the channel In Sandro’s Garage).
All vehicles are equipped with speed sensors. There are two types of such devices: induction and reed. In induction, the signal is similar to the oscillations of a wave pulse. In it, the voltage changes depending on the rotation speed. The principle of operation of such a speed sensor is in many ways similar to the operation of a crankshaft angle sensor. In reed sensors, the signal is transmitted using rectangular pulses. The cycle of such a signal is 40-60%. It switches at 0-5 Volts and when the battery voltage reaches 12 Volts. A device of this type is located mainly on the vehicle’s gearbox.
Design and diagram of the Gas 3110 speedometer
The electric-drive speedometer Gas 3110 is designed in the same way as all modern cars. The readings on the scale depend on the number of revolutions of the secondary shaft of the gearbox. It drives the speedometer gearbox, which has a built-in sensor. The sensor can be of several types and we will talk about it separately. The very basic electrical diagram of the speedometer operation is shown in the photograph.
Basically, it is structured as follows. The rotational speed of the secondary shaft of the gearbox is converted into electrical impulses, which the sensor transmits at a certain frequency to the actuator in the instrument panel. A precision servo drive converts the electrical signal into a mechanical one and, like a mechanical speedometer, drives the speedometer needle and odometer gears. There are also digital odometers, where the readings are displayed not in the usual analog form, but on a liquid crystal display. In principle, there is no problem with making the speedometer completely digital. It's just a matter of habit.
A person is used to evaluating data using a dial indicator, even if you have a stake on his head. That's why engineers have to complicate their lives by converting an analog signal into a digital signal twice and vice versa. Even the most sophisticated cars have painted instrument panel dials. This is how the tidy is organized on the penultimate generation BMW 7 Series. Moreover, depending on the speed of movement, the tidy can change color and appearance.
How does the speed sensor affect the motor?
For many drivers, the question remains as to what the speed sensor can influence. By obtaining data on the current speed of the vehicle, the fuel supply is calculated. Therefore, when the driver takes his foot off the gas pedal, a sharp decrease in fuel occurs, which allows the engine to monitor its rational consumption. If an element breaks down, the necessary information is no longer supplied to the control unit, which leads to excessive fuel consumption and uneven engine operation. Sometimes its functioning may occur with noticeable jerks. The reason for this behavior is that the electronic control unit is forced to set the engine speed at 1500 and deactivate the fuel cut-off mode. When this mode is turned on naturally, you can significantly affect fuel consumption, thereby reducing it by 2 liters when driving in urban conditions. In addition, the speed sensor plays an important role in the correct connection of the automatic transmission. If the sensor fails, cruise control usually stops working. On some car models, this may also affect the operation of the electric power steering.
Main malfunctions of the Volga speedometer
Most often, owners are forced to switch to mechanics by the frequent failure of the speedometer needle actuator. If the odometer shows mileage, but the needle drops dead or is already in convulsions, then that’s the problem. In this case, only replacing the block will save the situation. It is not recommended to disassemble the instrument panel and the arrow drive. Is it only for general educational purposes?
You can also check the integrity of the circuits in the electronic engine control unit, but you usually don’t go there with a soldering iron. Checking the computer is carried out only in a service station and in the presence of appropriate equipment and computer software specially adapted for Gas 3110. Replacing the device with a new one is the most common way out of the situation. Today they have learned to make them not only abroad, but also in Vladimir, so buying a dashboard for the Gas 3110 is not a problem.
As for the mechanical part of the Volga speedometer drive, everything remains the same, as in the mechanical drive.
The drive is located on the gearbox, attached directly to its crankcase, and from its visual condition one can conclude that both the sensor and the gearbox are working. Don't exceed the Greenwich speed limit, and good luck on the road!
Symptoms of malfunction and checking the speed sensor
Any motorist can identify malfunctions associated with the speed sensor. As a rule, they can be accompanied by incorrect operation of the speedometer or its complete failure, manifest itself in the form of unstable engine behavior, or be accompanied by increased fuel consumption. In addition, there may be a sharp loss of engine power or spontaneous engine stop when coasting at idle. A motorist can check the speed sensor in three ways. The first of them involves dismantling the device with the ignition off using a digital multimeter. With its help, the contact through which the pulse is supplied is determined. In this case, the negative probe must be connected to the car body, and the positive probe must be connected to the DSA. After which they begin to rotate the DS axis and a small voltage will appear on the multimeter, the value of which will increase parallel to the rotation speed. The second method involves dismantling the DS. One drive wheel is lifted with a jack. The multimeter probes close with the sensor contacts and begin to rotate the wheel by hand. In this case, voltage information should appear on the device. If this does not happen, then we can confidently say that the sensor is faulty. In the third option, the test can be performed without a multimeter. To do this, you will need a 12 V test lamp. The verification procedure is carried out similarly to the second method. The serviceability is indicated by the glow of the light bulb while the car wheel rotates.
More details about the speed sensor will be discussed in this video:
Vehicle speed, once measured mechanically, is now determined using special electromagnetic devices. These include a sensor operating on the basis of the Hall effect. This device plays an important role in the control system and in regulating the fuel supply. Therefore, every driver should know how to check the speed sensor on their own, having decided on the need to replace it.
What is a speed sensor?
The main task of an automobile speed sensor (or DSA) is to transmit a pulse-frequency signal to the controller. The value of the pulse frequency is directly related to the speed of the vehicle. The faster the car moves, the more often the device transmits signals that are used by the controller to perform the following functions:
- speed calculation;
- control of the operation of the power unit at idle speed;
- supplying air past the throttle mechanism.
On average, the DSA sends about 6 pulses per 1 meter of distance. And its additional task is to save fuel. When the vehicle is moving in neutral gear or with the clutch pedal depressed at speeds above 20 km/h, the controller receiving the signals does not supply fuel to the engine.
DSA, which uses the Hall effect for operation, is the most popular sensor option. However, not the only one. There are other devices for determining speed, with reed and inductive operating principles.
Signs and causes of DSA failure
The need to check the performance of the DSA appears when the following signs of its malfunction are detected:
- unstable engine operation at idle;
- incorrect speedometer readings, which may stop working altogether;
- increased fuel consumption;
- displaying an error on the on-board computer screen - changing the DSA readings to zero.
Problems with the sensor often appear when the integrity of the wires is damaged, and it is advisable to start checking with them. Most often, a break occurs a few millimeters from the connector. At this point the wires are bent and may fray over time. Another problem is contamination of the contacts, which can be solved by cleaning and lubricating them. And sometimes the cause is wear on the speedometer cable, which breaks, leading to sensor failure.
Why can the speedometer lie?
In the case of this device, it is easy to understand its greater inaccuracy. First of all, this reduces the risk of the driver breaking the speed limit and receiving a fine. In the background is the fact that with underestimated speed readings, car owners would sue car manufacturers and prove that accidents and fines are the fault of the meter’s malfunction.
The whole problem is that it is much more difficult for it to show accurate data than the rest of the car's measuring instruments. This depends on the fact that driving speed is most often measured by the speed of rotation of the wheels. In turn, this speed is affected by the size of the wheel, and this is a variable figure.
Now they produce devices that have an inaccuracy of 10%, but the speed must be 200 km/h. This is usually a variable parameter, that is, when driving at a speed of 110 km/h, the deviation will be 5-10 km/h, and if you drive 60 km/h or less, then the inaccuracy is quite insignificant.
Ways to check the device
If the operating principle of the DSA is based on the Hall effect, the speed sensor is checked in three ways. For the first two you will need a multimeter. In the third case, you can get by with a regular light bulb.
The first method of checking the sensor requires removing it and using a multimeter to find the pulse contact and connect the positive probe of the device to it. The second probe is attached to the body or car engine. After this, a small tube is put on the DSA axis and rotated, checking the voltage with a multimeter. As the rotation speed increases, the number of pulses should also increase.
For the second method, you will need a jack, which can be used to lift any front wheel of the car. A multimeter is connected to the sensor wires and rotation begins. The faster the wheel spins, the more pulses the device registers. If this rule is not followed, then the sensor is faulty.
For the last method, you will need a 12-volt light bulb, which will be used instead of a multimeter. The wheel is lifted with a jack, and the lamp is connected to the DSA pulse wire. Its blinking when the wheel rotates proves that the device is working.
Checking other types of DSA and sensor drive
Sensors whose operating principle is not related to the Hall effect are checked using a multimeter:
- diagnostics of DSA with reed switches is carried out by monitoring the voltage, the value of which should be in the range of 0–5 V (or from zero to the operating voltage of the battery);
- For induction type sensors, voltage is also controlled. To do this, you will have to remove it, connect a multimeter and check the readings of the device by bringing any metal object to the DSA. If the voltage does not change, the device is faulty.
The solution to the problem with a faulty device is solved simply by replacing it. But, if the test results show that the sensor is working, you should perform a few more steps. That is, lift the wheel again and, rotating it, check the operation of the DSA drive. If this part does not rotate, it is disassembled and damaged parts are replaced - most likely gears.
Speed sensor test video