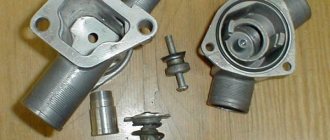
Design of valve stem seals
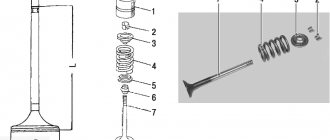
The valve stem seal has a simple design consisting of three basic elements:
- base . It is represented by a steel bushing. This is a kind of frame to give strength;
- spring _ Thanks to this element, maximum adherence of the edge of the rubber seal to the valve stem is ensured;
- stuffing box . It is made from rubber or recycled rubber. This element removes excess lubricant.
Necessary tool
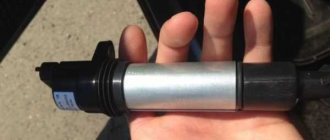
The tool we need is a desiccant, it is sold on any auto market and looks like this.
Desiccant.
We will also need pliers for removing valve seals, finding them at any car market is not a problem, and any rod with a diameter of 5-7 millimeters.
Pliers for removing oil seals.
What is included in the list of works for changing MSK
The VAZ classic has the shortest path to the caps, which is why repairs are cheap:
- Removing the valve cover.
- Removing the timing chain.
- Removing the camshaft.
- Valves desiccation.
- Changing rubber deflectors.
- Reassembly.
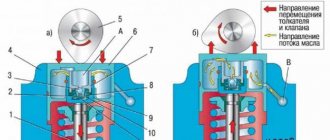
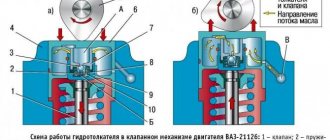
Already on injection-powered Priors, VAZ 2110 and Vestas you will have to work hard to remove the intake manifold. On foreign cars, it is necessary to contrive to dismantle the camshaft phase shifters and the valve lift control system. Getting all systems back on track is not an easy job.
Replacing valve stem seals on a VAZ 2110: step-by-step instructions
So, the procedure for replacing caps comes down to the following steps:
- Removing the battery terminals
- Removing the valve cover
- Loosen the camshaft bearing cap nuts
- Removing the camshaft key
- We remove the shaft itself
- Then we dismantle the oil seal
- Through special hole, make sure the piston is at TDC
Next we need to install a device to compress the valve springs. When the spring is fully compressed, it becomes possible to remove the two “crackers” on the valve. Then remove the plate and the spring itself. To pull out the cap, install the collet and hit the striker. Be sure to dip new caps in oil before installing them. New MSCs are pressed onto a new plate, after which the spring is put in place.
Be sure to do all the work as soon as possible. After all, you risk encountering increased fuel and engine oil consumption (more than 1 liter per 1000 km). You will have to suffer with carbon deposits on the spark plugs. The new oil will quickly become contaminated and engine power will decrease. This is only a small part of the negative impacts that fail caps entail.
AutoNews / Reviews / Tests
Replacement of valve stem seals VAZ 2110 16kl
VAZ 2110 valve stem seal - why replacement is needed
Valve seal for VAZ 2110
The purpose of the valve stem seals is to seal with guide bushings to connect the valve stems, preventing oil from penetrating into the gap. Previously, such products were made of fluoroplastic, unreinforced, with a wide sealing surface. Modern engines are equipped with rubber caps that have a narrow iron sleeve and an expander spring that presses the sealing edge to the valve stem. The design used has the least sensitivity to distortions in the bushing and valve stem, ensures a good and reliable fit of the cap, and the introduction of acrylate or fluorine rubber makes the seal have the highest service life, which is more than 150,000 km of vehicle mileage.
- the cost of “original” caps is more expensive than those available in a nearby car shop;
- if one of the caps is damaged, and there is virtually no time to search. Replacing thresholds on a VAZ 2110 - video. Repair of VAZ stoves VAZ 2110, 2111, 2112 7 70k 0 replacement of VAZ 2110 with your own hands” collected. Therefore, you have to use another option, but make sure that the replacement does not worsen the reliability of the motor.
Product selection
The choice of valve stem seals should be taken seriously, since the normal operation of the power unit will depend on this.
A visual inspection is required before installation.
Typically, the manufacturer recommends installing only original (factory-produced) parts. As for AvtoVAZ, for 2110 it will be under catalog number 2112-1007026 . The average cost will be 700 rubles.
Analogs
Motorists recommend paying attention to analogues!
But, as practice shows, most car engine repair specialists do not recommend using original caps. Valve seals manufactured by Elring with catalog number 825.050 . Their price will be 700 rubles , the same as the original ones, but the quality is much higher.
In addition to the presented companies, there are a number of analogues that can be used for installation on the VAZ-2110.
| Manufacturer | Catalog number | Cost in rubles |
| At program | AT 7026-008SB | 100 |
| Master-sport | 825-050-FPM-SET/16/-MS | 500 |
| Trialli | CV 057 | 500 |
| Corteco | 19030310 | 500 |
| Reinz | 12-26058-01 | 500 |
| Payen | HR662 | 600 |
| Elwis royal | 9056004 | 650 |
We change valve stem seals on a VAZ-2110 with an 8-valve engine
Many car enthusiasts were faced with the fact that the time had come to change valve seals on a VAZ-2110. These seals are also popularly called caps. The change process itself is quite simple, but it will require some knowledge of car design, as well as the availability of tools.
Video material
Video material about replacing valve stem seals, as well as the subtleties and nuances of the procedure.
Replacement with VAZ-2110, 8-valve engine
It is better to do all work in the garage, but in good lighting. So, everything you need is available, which means you can start working. The sequence of the process is as follows:
- We immobilize the car using the parking brake and the gearbox engaged. Remove the negative terminal from the battery;
- We remove the air filter housing, fuel pump and ignition distributor from the engine. After the accessory drive housing. All this is located at the rear of the engine, where the clutch and gearbox are located.
- At the front of the engine, remove the protective housing of the camshaft drive.
- We remove the camshaft drive belt, and then the toothed pulley mounted on the shaft.
You must immediately monitor the key located in the groove of the shaft; it is better to remove it immediately.
Next, remove the valve cover from the block head. - Let's move on to the rear of the engine, since next we need to remove the rear cylinder head cover. We first unscrew the two nuts of the ground wires, remove the wiring, and then two more nuts and one bolt securing the cover, and dismantle it.
- Under the valve cover there are two camshaft mounting housings. We unscrew the bolts securing these housings, and then remove them.
- Remove the camshaft along with the oil seal. When assembling, it is better to replace this oil seal with a new one.
- In order to easily replace the valve stem seals, it is necessary to install the piston at TDC on the cylinder that will be replaced. A tin rod, which is inserted into the hole under the spark plug, will help with this.
- After installing the piston at TDC on the required cylinder, we position the rod so that it stands between the piston and the valve on which the oil seal will be changed. This rod will prevent the valve from going down after drying out.
- We install a device on top of the head for desiccation of the valve. Using this device, we remove the springs on the desired valve and remove the valve crackers with tweezers. Then remove the valve plate and springs.
- Using a collet for removing oil seals, press the oil seal off the valve guide.
- Before installing the new oil seal, it is better to immediately remove the spring from the cap so as not to damage it while passing through the grooves under the crackers. The oil seal itself must be lubricated with oil, and then carefully pressed onto the guide until it stops. And only after that put a spring on it.
- We install the springs and the plate in place, after which we clamp the springs with a device and put the crackers in place.
In order for these crackers to completely fall into place, after working with the device (installing the crackers in the grooves), it is necessary to apply a gentle blow with hammers to the end of the valve. - We replace the remaining valve stem seals in a similar way - raise the piston to TDC, install the rod, dry it out, remove the cap, install a new one, dry it out, and move on to the second valve.
- After replacing all valve stem seals, we begin assembling the car. We place the camshaft in its seat so that the tops of the cams of the first cylinder point upward. We install the camshaft mounting housings, put in place all the removed elements from the cylinder head, in addition to the valve cover.
- Having completed the assembly, you will need to check and, if necessary, set the valve clearances, as well as adjust the ignition, and then completely assemble the engine.
READ ON THE TOPIC: Typical malfunctions of the VAZ 2110 and other cars in the series.
Procedure for replacement
If you need to replace VAZ 2110 8 valve stem seals intended for other cars, then the following points must be taken into account:
- The diameters of the valve stem and the guide bushing, the location of which is the seat belt, must match.
- In comparison with the “original” valve, the height should not be exceeded by more than 0.5 millimeters. Otherwise, the valve stroke will be very large and the spring retainer may be damaged.
- The cap should not have a diameter that is too large. This will ensure freedom of passage inside the valve spring. This is most important for those engines whose valve has two springs. In this case, the outer diameter of the cap will be limited by the internal spring.
- The length of the seat on the cap and the guide sleeve should be close in size. If the belt is short, it may be damaged by the edge of the sleeve.
- Pay attention to the internal profile that the surface of the cap has.
- When replacing VAZ 2110 valve stem seals, the year it was produced is taken into account.
How to organize the replacement of valve stem seals for a VAZ 2110 8-valve car in a garage?
Even an ordinary motorist can easily install new valve seals. If we consider that dismantling the cylinder head is not included in the technological list, then the repair does not present any difficulties at all.
When purchasing spare parts, it is important to pay attention to the internal profile of the seals. Quite often, parts that are not equipped with a reinforcing sleeve have an annular protrusion on the landing plane in their design. During installation it may be damaged, but otherwise the process is no more complicated than changing the damper support on a “ten”.
Preparatory stage
First of all, it is worth noting that replacing valve stem seals on a VAZ 2110 with an 8-valve engine uses the same technology for both carburetor and injection engines. Therefore, the tool set is similar in both cases:
Before starting work, it is advisable to clean the cylinder head with kerosene, after which the air filter, fuel pump and ignition distribution device should be removed. Next, use a No. 5 hexagon to unscrew the screw that secures the auxiliary device drive housing. Be sure to remove the negative terminal from the battery, as well as the toothed pulley from the camshaft.
Preparatory dismantling stage
Removing the old seal
This stage of replacing deformed valve stem seals for VAZ 2110 8 valves includes installing the piston where the work is being done to the TDC position. Further actions are performed according to the following scheme:
Installation of a new seal
Algorithm of actions for replacing valve stem seals on a VAZ 2110
Of course, to carry out such actions you will need certain tools.
First, the caps must be removed:
- The wire should be disconnected from the minus terminal of the power source.
- The camshaft has a pulley with teeth. It needs to be removed.
- The block head is released from the cover.
- The mass must be removed from the studs. To do this, you need to unscrew the two fastening nuts.
- The back cover is removed from the block head. It is secured with a bolt and two nuts.
- The cylinder head is closed with a cover. It along with the sealing ring should be removed.
- The nuts that secure the front and rear bearing housings must be unscrewed evenly.
- Both housings must be removed.
Important! The camshaft key must be removed immediately. Otherwise, you can simply lose it, since it does not fit quite tightly.
- The next step is to remove the camshaft from the cylinder head.
- It is necessary to remove the oil seal from it.
- The crankshaft should be turned. But this must be done so that the location of the piston is at top dead center.
- Next, you need to unscrew the spark plug. To prevent the valve from falling through, a metal rod must be inserted into the resulting hole.
- Then a device is installed that will compress the valve spring. You will need a nut that does not have a toothed collar.
- When the spring is compressed and two crackers are removed, the device is removed.
Advice. When removing the caps, they should not be turned, otherwise this will damage the guide sleeve.
Then you need to install the caps:
- The cap must be inserted into the mandrel, but it must first be “bathed” in engine oil.
- The part is pressed all the way into the lower plate.
- After this, the spring is installed.
Install all remaining valve stem seals in a similar manner.
It is easy to see that replacing the oil seals on a VAZ 2110 8 valves without removing the head can be done completely independently, without resorting to the services of a car service. But it must be said that such actions are carried out only if the model is VAZ 2110. If there are other models, such procedures will not be required.
And one moment. Of course, independent work on changing valve stem seals is only possible if the car owner is knowledgeable about technology and is familiar with the tool. Otherwise, there is nothing left to do but seek help from a car service center. Qualified specialists will provide active assistance in this.
Replacing valve stem seals on VAZ-2112, 2111 and 2110
Dear friends, today we will tell you in detail and with photographs how to independently replace valve stem seals on VAZ-2112, 2111 and 2112 equipped with a 16 valve engine . The beauty of our story is that in order to replace the oil caps we will not remove the head from the engine, and this is a significant saving of time and labor costs, there is no need to drain the antifreeze, unscrew the manifold, etc. At the same time, we will do this without using an expensive valve depressurizer, which allows us to do this, but will use a regular valve depressurizer for the VAZ-2110, which can be bought on the car market for 200 rubles. Even before starting work, I recommend purchasing this desiccant, if you have little experience in desiccaning and drying, then take a stock of heels of crackers, we will also need an anaerobic (do not use silicone) sealant, unlike conventional silicone, when in contact with oil, it does not clog the channels but dissolves in it, and also buy a key for tensioning the timing pulley for 50 rubles, since the belt will have to be removed and then set according to the marks. By the way, it wouldn’t hurt to replace the timing belt and rollers at the same time, ideally. If you are ready to do it yourself - no problem, if you lack determination - I can recommend turning to the guys to replace the timing belt in Minsk, they will definitely do it well and inexpensively. Well, if you’re ready to do everything yourself, then let’s get started. To begin, remove the plastic cover from the engine and gain access to the “intake manifold.” In the photo below it has already been removed and two bolts securing the throttle cable are circled in green circles, unscrew them and remove the cable from engagement with the throttle valve in the place indicated by the green arrow. Circled in red are the clamps that need to be loosened to disconnect the hoses, and circled in blue is the connector for the instantaneous air flow sensor, disconnect it, and the blue arrow also shows the place where there are two more connectors at the bottom of the throttle valve, remove them too. You can immediately turn off the ignition module.
We remove the high-voltage wires and unscrew the three nuts of the ignition module. Circled in green in the photo below is the module connector, which also needs to be disconnected. We take out the ignition module.
We remove the air filter with the housing and the mass air flow sensor, the clamp is already loosened, the connector is disconnected, let’s see what’s happening in the air intake corrugation...
unscrew the upper clamps of the intake receiver rubber bands
Unscrew the two nuts of the intake receiver, indicated by arrows in the photo.
We pull the receiver towards us, remove it and put it aside.
We see this picture and proceed to unscrew the valve cover, the bolts are circled in the photo below:
We remove the valve cover from our ten and put it aside for subsequent washing and cleaning
We gain access to the camshaft cover. To remove it, we need to unscrew 20 bolts, circled in the photo:
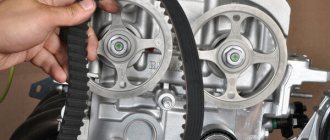
But before unscrewing them, I would recommend removing the timing belt; in order to remove the timing belt on the 16 valve VAZ-2112 engine, we need to unscrew the plastic protection of the timing mechanism. To do this, unscrew the bolts circled in the photo below.
Now, in order to remove it, we will first have to remove the alternator belt, it will get in the way. To do this, loosen the tension bolt and bolts on the generator, the bottom bolt is not visible in the photo, the location is indicated by the arrow
We remove the protective cover and before removing the belt, I would recommend pulling off the bolts of the camshaft pulleys. To do this, we put a friend in the car, put it in 5th gear and ask him to press the brake. We unscrew the bolts, then, according to the principle described in the material about replacing the timing belt on the VAZ-2112, VAZ-2111 and VAZ-2110, we unscrew the tension and guide rollers and remove the belt, after which we carefully dismantle the camshaft pulleys, do not lose the “crackers” with which they are locked to the camshafts
Unscrew the bolts securing the INNER timing belt protection casing. Now we proceed to unscrew the bolt of the upper engine mount and remove the support bracket itself, which is screwed to the engine head. Please note that it is held on by three nuts and to unscrew them we will need a “15” socket. We unscrew and move the bracket back; it is not necessary to remove it from the studs.
After this, unscrew the 20 bolts securing the camshaft cover and remove it along with the camshafts, we will see the following picture.
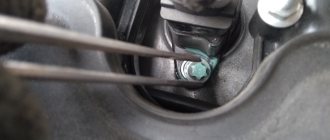
Now our task is to remove the hydraulic compensators. You can carefully remove them one by one with pliers; I would recommend spreading them out so as not to mix them up during installation, since each hydraulic has already rubbed into its seat in the cylinder head. I don’t recommend washing the hydraulics, unless, of course, you have them clicking; you can check their functionality by pressing on them - a faulty hydraulics falls easily under the pressure of a finger, without effort. I recommend storing them TURNED UP from their usual position. There is no need to be afraid of the hydraulics becoming airy. So, we remove the hydraulics and now you can desiccate, but it would seem impossible to do this with a regular desiccant, because between the valve and the piston, even at TDC, there is a distance that will allow the valve to go down and will not allow it to desiccate. This is where the old-fashioned method comes in handy. We take a rope of a suitable diameter so that it easily fits into the spark plug hole, place pistons 1 and 4 at the lowest point, push as much as it will fit into the desired chamber of the rope, and then raise the piston until it rests upward, compressing the rope as much as possible into a certain solid mass, thereby supporting the valve plates It's like in the photo:
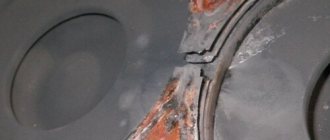
We dry out the four valves and change the oil seals. Attention, try not to scratch the mirrors of the landing wells of the hydraulics. Use the standard desiccant carefully. The valve stem seals themselves can be removed without a special puller; it was convenient for me to use long narrow pliers so as not to scratch the mirrors. This is the picture that presented itself to my eyes, I think comments are unnecessary.
In order to turn the crankshaft, I used a 17mm socket with an extension and a ratchet.
You can “press in” the valve stem seals with a long 12mm socket wrench. I actually sawed off the edges on it, processed it so that they were not sharp, and it turned out to be a wonderful tool for pressing in valve stem seals. We carefully place them on the valve, having previously lubricated the internal contact edges with oil so as not to damage them with clean motor oil or whatever is in the engine. And then lightly tapping on the presser until you get the characteristic feeling that they have hit the metal. It’s impossible not to feel it, don’t overdo it.
Dry the valves, lubricate the hydraulics and put them in place. Each one should ideally be in its own place where it stood. We thoroughly wash the camshaft covers and degrease the areas where the sealant is applied. Let me remind you that during assembly we use anaerobic sealant. Here is a diagram of how to apply the sealant.
Attention! When installing, do not forget to lubricate the camshaft journals and cams with engine oil.
We tighten the camshaft cover according to this scheme:
Don’t forget to press the camshaft seals into place. By the way, on the back side there are two camshaft plugs, which are quite capricious things and sometimes fly out of their seats. I also installed them with sealant. Now we put the valve cover on the sealant, to be honest, I don’t really care how to tighten it, I started with the central bolt and went in a spiral. We put the crankshaft pulleys in place, set the timing belt places, as - see the article on replacing the timing belt. By the way, there is a nice nuance - you can set the timing marks without removing the generator pulley from the crankshaft, otherwise you won’t be able to see the mark there. A nice bonus is the presence of a mark on the flywheel, which can be seen under the rubber plug on top of the gearbox, here is a photo.
An additional problem that I encountered during assembly was that when tightening the timing pulley, the threads on the stud were licked off.
There is nothing critical about this, take a stud puller
And we go to the market to get a new hairpin, and we use it to screw it back into place.
By the way, anaerobic sealant is often sold in syringes, don’t be alarmed, this is normal
To tension the timing roller we use the following key:
In general, we carry out the assembly in the reverse order, there should be no extra bolts left, they don’t joke with the timing belt, after tightening the belt roller, check the marks again, turn the crankshaft a couple of turns and again check the marks on the flywheel and camshaft pulleys. Thus, with minimal labor costs, we replaced the valve stem seals on a VAZ-2112, VAZ-2111 and VAZ-2110 with a 1.5 16V engine . Good luck and fewer breakdowns!
What is a car's timing belt?
The smooth functioning of the gas distribution mechanism is very important for the smooth operation of the internal combustion engine. The timing belt supplies the combustible mixture to the cylinders and removes exhaust gases from the combustion chamber.
Timely gas distribution is ensured by the movement of the intake and exhaust valves by transferring force to them from the camshaft through cams. In modern car models, the gas distribution mechanism also affects the power and environmental friendliness of the internal combustion engine.
Useful tips
- There are additives for restoring seals. When you are tempted to use one of them instead of changing the caps, remember that there are no miracles in the operation of the internal combustion engine and natural wear and tear. These additives soften hardened rubber and supposedly restore the quality of the seals. Experience shows that these additives either have no effect on the rubber, or soften it too much, and as a result, the size of the working edge increases, and oil consumption after using the additive increases significantly. So you better think about how to change the valve stem seals. How much it will cost you depends on the type of internal combustion engine. But you will definitely be sure that the caps perform their function. Additives, alas, cannot guarantee you such an effect. You should not try such additives on your car.
- If you haven't found a device with a collet clamp for removing caps, but that hasn't stopped you. Remember that the landing step under the cap has a wall thickness of just over a millimeter and is very fragile, and when you try to remove the cap with pliers, this part of the valve guide is broken very often, and the repairs that are necessary after this (replacing the guide, milling the seat and lapping the valve) are much more expensive more expensive than replacing caps and related devices.
Valve seals perform an important function in the timing mechanism of a car; they remove excess oil from the valve stems as they move and prevent foreign substances from entering the combustion chamber. When the valve stem seals wear out, it is very important to replace them in a timely manner to avoid increased oil consumption and carbon deposits on car parts and mechanisms. Car owners with no repair experience will learn from this article how to replace the caps without removing the cylinder head.
Oil seal removal technology
To do this, you will need to perform a series of sequential operations.
- First you need to disconnect the wire from the negative terminal of the battery.
- The pulley with teeth is removed from the distribution shaft.
- Then you need to remove the cover from the block head.
- Unscrew the fixing nuts on the bulk wires (there are two of them) and remove the conductor tips from the studs. Unscrew the nuts (2 pieces) from the 2nd and 3rd fastenings of the rear cover of the cylinder heads. There are O-rings under the screw head. After this, you need to remove the cover from the block heads.
- Unscrew six nuts from the rear and four from the front housing of the distribution shaft bearings by the same amount. Then remove the washers. At the next stage, both bodies must be removed.
- In order not to spoil the key on the camshaft, you need to find out whether it fits snugly into the groove or not. If the connection is loose, then this part must be removed.
- Now comes the turn to remove the distribution shaft - it is removed from the block head.
- The oil seal must also be removed from the shaft.
- At the next stage of work, the crankshaft is turned to such a position that the piston reaches its top “dead” point. It is necessary to ensure that the dimensions of the piston and the valve stem seals being replaced are identical.
- The candle is turned out and a tin rod is inserted into its hole. This must be done so that the valve does not fall down.
- Next, you need to use a device to compress the valve springs. To do this, it is recommended to use a nut that does not have a toothed mandrel. All valve springs must be compressed.
- You need to get two crackers out with tweezers and the device can be removed.
- Remove the inner and outer valve springs and their upper plate.
- The valve stem seals are located on its guide sleeve, so they must be compressed until they stop. In order to carry out this operation, it is necessary to install a puller collet for removing VAZ caps directly on these parts. Apply a sharp blow to the sleeve of the device and the striker of its handle. These steps remove the valve stem seals.
- Then you need to remove them from the puller collet. If this setting is not available, then you can use pliers, but there is a great danger of damaging the valve stem seals, since you will have to apply force strictly vertically upward, without turning the parts to the side.
- It is recommended to remove the springs from them before installation, otherwise the caps may be damaged when passing through the grooves under the crackers on the valve.
The main thing when disassembling parts is to follow the order, because when they are subsequently installed back, they all need to fall into place. It is recommended to lay them out on cardboard in the order they were removed, then there will be no mistakes.
Replacement process on a 16-valve engine
Here the process is a little different. It is not possible to use a rod here. The head must be removed from the engine to be able to press the valve against the seat during replacement. In all other respects, by and large, the work is carried out similarly.
The differences in replacement between carburetor and injection engines lie in the features of disassembly performed in order to get to the oil seal. But the replacement sequence itself is identical.
As for tools, you can exclude the collet, but be sure to have a device for loosening the valves. To compress the seals, pliers are sometimes used. But in this case, during removal, you need to pull the cap exclusively vertically and make sure that the oil seal does not rotate, otherwise there is a high probability of scratches on the surface of the guide.
In conclusion, we note that the process is quite labor-intensive, but you can cope with this task yourself if you wish.
Replacing valve seals on a VAZ 2110 8kl.
Replacing the MSC is carried out using the example of the 8-valve VAZ-2111 engine, so it is not necessary to remove the heads from the cylinder block, but you will need a tin rod with a diameter of about 8 mm.
We begin the procedure by removing the air filter, fuel pump, ignition distributor and auxiliary drive housing. Then remove the timing pulley from the camshaft, and then the cylinder head cover.
Replacing oil seals on a carburetor is no different from injection engines.