From 1987 to 2008, the domestic automaker VAZ produced a small-class car called the Oka. This car was positioned by the plant as a car for urban use, as well as a car for the disabled.
The Oka car attracted the interest of motorists due to a number of its characteristics:
- small dimensions. "Oka" is considered the smallest car that was produced on the assembly line of the Volga Automobile Plant;
- cheapness. This car was one of the cheapest in the whole world;
- special engine. The unit for the Oka car was developed by designers from scratch, and not simply taken from other models.
Another very interesting factor regarding the power plant of the Oka car - it turns out that the Oka is the only domestically produced car that is equipped with a full-fledged two-cylinder transverse unit. In addition, this engine has a timing belt drive and a water cooling system. Naturally, when creating this engine, the designers went by unifying existing VAZ engines, but still this is a completely new engine, with its own specific features. It is worth noting that the unification of engine components made its production as cheap as possible.
I would like to devote a few words to the engines that were installed on Oka cars during the entire period of its production on the assembly line of the VAZ plant. Initially, the Oka car was equipped with an engine that had a displacement of 0.65 cubic meters. l. This engine was based on the 1.3-liter unit, which was used on the VAZ-2108 model. The designers reduced the number of cylinders from four to two, so people often said that the Oka uses half of the V8 engine. The Oka model with such an engine was labeled VAZ-1111.
Next, representatives of the design bureau introduced a 1.5-liter engine of the same VAZ-2108 model, resulting in the appearance of a new Oka VAZ-1113 model, equipped with a unit with a volume of 0.75 cubic liters. At the same time, the power ratings of the engines also changed. So the engine of the VAZ-1111 model had 29.3 horsepower, and the VAZ-1113 already had 33 horsepower. The VAZ-1113 model turned out to be more popular, which is why it was mass-produced at the car plant. Therefore, we will consider the repair and maintenance of the engine installed on this model. In addition, the latest Oka models were produced with a three-cylinder one-liter engine made in China, but few such cars were produced, so we will not talk about them.
Features of engine maintenance and repair
Any power plant, including the one installed on the VAZ-1113, requires periodic maintenance, and after operating a certain number of engine hours, a major engine overhaul may be necessary. This type of repair is performed when the elements of the crank mechanism of the cylinder-piston group are severely worn. Note that the designers calculated a certain “life” resource of the motor, after which it is necessary to do a major overhaul, but it is significantly reduced due to the operating characteristics of the unit, the frequency of maintenance, the use of cheap technical fluids and low-quality filters.
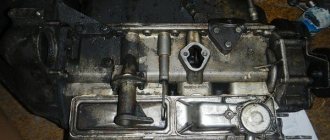
Repair of the Oka car engine in most cases is carried out without removing it from the body. In some cases, some components and systems are removed from the vehicle for repair or replacement. Such components include power supply, cooling, starting, electrical supply and gas distribution systems.
Removal of the motor and subsequent disassembly is necessary only when performing repairs (replacement) of the crank mechanism (CPM), cylinder-piston group (CPG), as well as the shaft balancing system. It is worth noting that such a system is a design feature of the Oka two-cylinder engine. The thing is that in this engine the pistons move in pairs, and not as in other engines - separately. However, the power strokes in the cylinders are not synchronous. For example, both pistons rise up, but in one cylinder the compression stroke is performed, and in the second - the exhaust stroke. Further, after the pistons pass TDC, the power stroke is observed in one cylinder, and the intake stroke is observed in the second, and so on, in a circle. The balancing system available in this engine prevents the appearance of additional vibrations, which necessarily arise during such synchronous operation of the piston group cylinders.
Engine repair VAZ 1111 OKA
- Repair manuals
- Repair manual for VAZ 1111 (Oka) 1988-2003.
- Engine repair
Repair of the cylinder head is described in subsection 10.5.1.
| You will need | |
| |
Before starting work
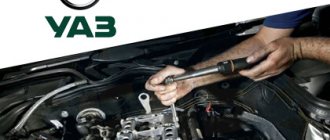
Remove the power unit from the car and the gearbox from the engine ( see subsection 10.6. ).
| EXECUTION ORDER |
↓ Comments ↓1. Description of the car 1.0 Description of the car 1.1 Appearance 1.2 Engine compartment 1.3 General data 1.4 Technical characteristics 1.5 Passport data 1.6 Doors 1.7 Hood lock 1.8 Luggage compartment 1.9 Increasing the volume of the luggage compartment 2. Safety requirements 2.0 Safety requirements 2.1 Safety requirements 2.2 Preparing the car for operation 2.3 What you need to have in the car 2.4 Operating the car during the warranty period 2.5 Running in the car 2.6 Preparing the car for departure 2.7 Checking the wheels 2.8 Checking the coolant level 2.9 Checking the oil level in the engine crankcase 3. Maintenance 3.0 Maintenance 3.1 Checking the tightness of the cooling system 3.2 Checking the tightness of the cooling system 3.3 Checking the tightness of the power system 3.4 Checking the tightness of the brake system 3.5 Replacing the coolant 3.6 Checking the functionality of the thermostat 3.7 Replacing the engine oil and oil filter 3.8 Replacing the air filter element 3.9 Removing and installing the air filter filter 4. Car storage 4.0 Vehicle storage 4.1 Maintenance during storage 4.2 Removal from storage 5. Chassis 5.0 Chassis 5.1. Front suspension 5.2. Rear suspension 6. Steering 6.0 Steering 6.1 Removing and installing the steering wheel 6.2 Replacing the intermediate steering shaft 6.3 Replacing the steering shaft bearings 6.4 Replacing the tie rod end and protective boot of the ball joint 6.5 Removing and installing the steering mechanism 6.6 Replacing the steering rod 7. Brake system 7.0 Brake system 7.1. Front brake mechanism 7.2. Rear brake mechanism 7.3. Brake system drive 7.4. Parking brake 8. Electrical equipment 8.0 Electrical equipment 8.1. Fuse and relay block 8.2. Generator 8.3. Ignition system 8.4. Lighting and alarm 8.5. Instrument cluster 8.6. Switches and switches 8.7. Windshield wipers and washers 8.8 Replacing the electric radiator fan motor of the cooling system 9. Body 9.0 Body 9.1 Removing and installing the front buffer 9.2 Removing and installing the rear buffer 9.3 Replacing the front fender 9.4 Removing and installing the radiator trim 9.5. Hood 9.6. Side door 9.7. Rear door 9.8. Rear view mirrors 9.9. Seats 9.11. Heater 10. Engine and its systems 10.0 Engine and its systems 10.1 Installing the piston of the first cylinder to the TDC position of the compression stroke 10.2 Adjusting the clearances in the valve drive 10.3. Camshaft drive belt 10.4. Replacement of engine seal parts 10.5. Cylinder head 10.6 Removing and installing the power unit 10.7. Engine repair 10.8. Lubrication system 10.9. Cooling system 10.10. Power system 10.11. Exhaust system 11. Transmission 11.0 Transmission 11.1. Gearbox 11.2. Clutch 11.3. Front wheel drives 12. Applications 12.0 Appendix 12.1 Appendix: Tightening torques for threaded connections 12.2 Appendix: Fuels and lubricants and operating fluids 12.3 Appendix: Basic data for adjustments and control 12.4 Appendix: Filling volumes 12.5 Appendix: Lamps used in the car 12.6 Appendix: Layout of rolling bearings 12.7 Appendix : Oil seals 12.8 Appendix: Service book 12.9 Appendix: Vehicle electrical diagram |
Removing the power unit from the Oka car
- We place the car on a flat surface (preferably in a garage) and immobilize it.
- We jack up the car completely (on both sides, not just the front).
- We drain all technical fluids from the engine (engine oil, coolant).
- We remove the air filter along with the housing and dismantle the carburetor.
- We disconnect the drive cables of the air and throttle valves, and also unhook the wires of the electric idle valve.
- We disconnect the high-voltage wires and all wiring going to the spark sensor.
- Carefully release the fastening clamps on the fuel supply pipe to the fuel pump and then remove it.
- We loosen the clamps, and then remove the pipes that go to the thermostat and go further to the radiator.
- We disconnect the pipes going to the cabin heater.
- Loosen and carefully disconnect the clutch cable.
- We proceed to disconnect the speedometer drive from the gearbox housing. We also disconnect the wiring to the reverse alarm sensor, as well as the ground wire, which is attached to the gearbox housing stud.
- Carefully disconnect all electrical wiring that comes from the generator and starter.
- We go down under the car and there we loosen the clamp located at the entrance of the exhaust pipe, which goes from the manifold to the receiving pipe of the resonator. Then we move the resonator a little back, thereby disconnecting the existing connection.
- Now disconnect the wire that goes to the oil pressure sensor.
- Then we move on to the gearbox lever rod - we also disconnect it.
- We remove both front wheels and unscrew the fastening nuts that are on the outer CV joint shafts. Then we tighten the hubs.
- We unscrew the bolts that secure the steering brackets to the subframe.
- We take the prepared bars and place them under the subframe. Now you can carefully lower the jacks, while making sure that the subframe along with the engine rests firmly on the placed blocks.
- We unscrew the subframe mounting bolts that secure it to the body.
After completing all the steps described above, you should check that everything is disconnected and only then can you begin to lift the front end. Note that the front end without an engine is not heavy. You lift the body and roll it back, and the engine, gearbox and subframe remain on wooden blocks.
Then you can proceed to the immediate disassembly and reassembly of worn-out components, and then to the assembly of the Oka car engine. After repairing and assembling the engine, it is again installed in the engine compartment of the car. To do this, all steps are performed in reverse order.
Engine repair VAZ "OKA" 1111 1988-2008
/ VAZ/ vaz-oka/ Section 2. ENGINE/ engine
Disassembly
Troubleshooting
Assembly
Repairing auto parts yourself is a responsible task that should be taken as seriously as possible. Sometimes a faulty spare part takes the driver by surprise, forcing him to spend a lot of time and money searching for a good service station, but there is an alternative solution to the problem; this requires a small amount of knowledge and a set of tools.
When repairing the engine of a VAZ "OKA" 1111 1988-2008, you need to be extremely careful and not neglect the little things. To get acquainted with the issue, car enthusiasts often use various Internet portals dedicated to auto parts. Some of them use narrowly focused forums. But, as a rule, only generalized information is provided there, which is known initially. Where can you find a reliable source that offers really useful things? Our portal is open for this 24 hours a day. Online mode allows us to help clients at any time convenient for them. Moreover, a mobile version has been developed that is available to everyone.
A detailed description of such a unit as the repair of the VAZ OKA 1111 1988-2008 engine has a good structure with thematic headings. In addition, there is always the opportunity to familiarize yourself with the intricacies of installation. There are often situations when a driver is confident in his abilities, but when he gets down to work, questions begin to arise. Thanks to our portal, such moments can be easily avoided. The site is a database that is updated regularly. By using it as a support during repair work, the car enthusiast receives a serious advantage. Each of the articles has reliable support, tested in practice.
In addition to the repair manual, the owner of a personal car will be able to prevent a lot of breakdowns that occur due to the human factor, thanks to the information located on the site. Users are presented with a lot of useful recommendations for proper operation, which will help significantly extend the life of the unit and avoid many negative consequences.
Online support is an excellent and most convenient way to obtain the necessary information. Another significant plus is that articles are written for people. We understand that the reader will do everything with his own hands, and we try to make it as convenient and efficient as possible. Use the resource at any time of the day and find the answer to any question you may have regarding cars.
Disassembly You will need: keys “8”, “10”, “13”, “17” and “19”, replaceable heads “10”, “13”, “17” and “19” ", wrenches for internal hexagon bolts "5" and "10", wrench, pliers, screwdriver, set of flat feeler gauges, micrometers (with measurement ranges 0–25, 25–50 and 75–100 mm)…
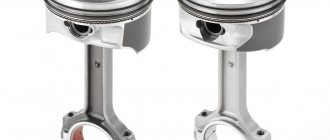
Troubleshooting When replacing parts of the connecting rod and piston group, it is necessary to match the pistons to the cylinders by diameter and weight, as well as piston pins to the pistons by diameter and connecting rods by weight. The following data is stamped on the bottom of the piston: 1 – piston class based on the pin hole (1, 2, 3); 2 – piston class according to...
Assembly 1. Install the bearing retaining rings, press the plugs with a thin layer of sealant on them, and the front balance shaft bearings into the cylinder block mounting sockets. Press in the bearings using a mandrel (Dout.=50 mm, din.=30 mm, L=100 mm), applying force to…
Comments
No comments yet
Leave a comment Cancel reply
VAZ-1113 engine repair
The described method of removing the engine is the simplest, since it does not require any professional tools. Next, we suggest you figure out what repairs can be performed on a removed engine. As stated above, the engine is dismantled when problems with the CPG and the crankshaft are identified, as well as when it is necessary to completely replace the engine.
One of the most common jobs performed on an Oka engine is replacing the piston rings. This operation cannot be called easy, since it requires almost complete disassembly of the engine, due to the fact that you will need to remove the pistons. It is logical that it is easier to disassemble the engine if it is removed from the engine and installed on the floor - this way it can always be turned over into the required plane. In addition, it is more convenient to carry out work related to the repair and replacement of the crankshaft on a dismantled engine, since it is simply impossible to dismantle and install the shaft without removing the box.
Design and repair of the OKA 11113 engine
Typical breakdowns of the VAZ-1111
In general, the Oka car is a fairly reliable and unpretentious model: the car has low fuel consumption, a high-quality chassis that is perfectly adapted to our roads. However, during operation, certain technical problems appear with enviable regularity in various systems and mechanisms of the machine. We will tell you in more detail about the most common breakdowns and malfunctions.
Starter problems
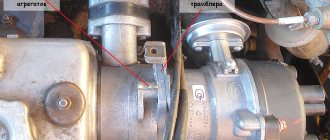
Probably all VAZ-1111 owners are familiar with the situation when you turn the ignition key, but the car does not react at all - the starter does not even try to turn the crankshaft. How to find out what the problem is and what to do in such a situation? First, check the battery terminals: are they securely clamped, is there any oxide on them. Perhaps the “plus” or “minus” just disappeared. Secondly, it is necessary to prevent jamming of the crankshaft. To do this, rotate the coolant pump (pump) or the generator shaft. If they do not rotate, you should contact a service station; such a problem cannot be fixed on site. Third, inspect the ignition switch and starter - perhaps one of the contacts has become disconnected and therefore no electric current is supplied. Fourth, if you hear a crackling sound under the hood when you turn the ignition key, then most likely the starter traction relay has burned out. It needs to be replaced. Fifth, it is not uncommon for the starter to make a lot of noise when operating. A possible cause is incorrect installation of the starter or a loose fastening. Tighten loose bolts or align the entire mechanism. Sixth, strong noise is also possible due to wear of the bearing bushings. In this case, they should be replaced.
If the starter turns the crankshaft freely, but the engine still does not start, then do the following: • check the battery capacity, there may not be enough voltage. Most often in this case, a crash is heard. If so, recharge the battery or replace it; • check the Hall sensor using a voltmeter; if the required device is not at hand, then install a known-good sensor (experienced motorists recommend always carrying a spare Hall sensor with you); • the engine may not start due to a faulty switch. It cannot be repaired - it should be replaced immediately; • check that the ignition timing is set correctly; • make sure that the marks on the crankshaft and camshaft match.
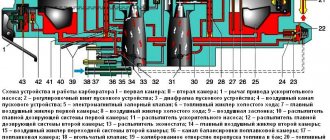
If after this the car still does not start, then we proceed to checking the spark plugs: • unscrew the spark plugs and measure the gap (standard – 0.7-0.8 mm); • if there are spare working spark plugs, screw them in; it may be that the old ones have simply become unusable. Carburetor malfunctions
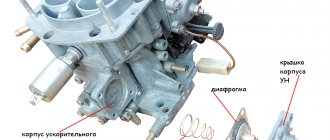
The second mechanism that may be causing the car to not start is the carburetor: • the needle valve may be stuck in the closed position - lightly tap the carburetor cover. Replace the faulty valve as soon as possible; • if there is no gasoline in the carburetor float chamber, then check the filters and pipes of the fuel system. They may be clogged or pinched; • in hot weather, especially after standing for a long time, gasoline may evaporate from the carburetor. Try manually pumping fuel; • the pump may be faulty - unscrew the fuel hose from the carburetor, clamp it with your finger and pump gasoline manually - a working pump will create noticeable pressure; • check the jets (main fuel and idle), maybe dirt has gotten into them; • tighten all carburetor bolts and fastenings.
Selection of pistons and rings
To begin with, we suggest you figure out how to choose replacement piston rings. Everything is quite simple here. The designers responsible for the creation of this engine tried to unify this unit as much as possible, thereby making it similar to other VAZ engines. That is why the dimensions of the Oka engine pistons completely coincide with the “eight” engine - they differ only in quantity. True, when choosing rings you need to focus on the size of your engine. If you have an Oka with a 0.65 cubic liter engine, then the rings from a 1.3 liter V8 will suit you, but if the engine capacity of your Oka is 0.75 liters, then you need to take the rings already from a 1.5-liter V8. The only drawback that motorists face when purchasing rings for their Oka is the lack of kits for this particular engine; as a result, they have to take a full set of rings for the VAZ-2108 and only use half of it.
Video - how to remove the engine
The Oka car began to be produced quite a long time ago and has earned considerable popularity among domestic car enthusiasts. Of course, the technical characteristics of the car in question are far from the requirements of a modern car enthusiast. Despite this, at one time Oka was very popular due to its inherent efficiency. Owners of an Oka car from early years of production often encounter engine system malfunctions. This can easily be explained by the service life and operating conditions of the vehicle. One of the most effective ways to return a vehicle to serviceability is a major overhaul of the Oka or VAZ 11113 engine. Carrying out repairs yourself is quite difficult, since many processes will require expensive equipment. In order to save money, you can prepare the Eye for major repairs yourself.
The benefits of a major overhaul are obvious. Large-scale engine repairs will allow you to: increase the service life of the vehicle, increase the service life of the engine and increase its performance.
The first stage of a major restoration is a detailed diagnosis of the internal combustion engine. Carrying out an inspection in a garage is quite difficult. In order to determine engine productivity, computer equipment and appropriate skills will be required.
Sequence of actions when replacing piston rings
Next, we propose to move on to the direct process of replacing the rings on the Oka car engine without removing it from the engine compartment. This is done this way:
- The car is placed on a viewing hole and must be immobilized.
- All working fluids (engine oil and coolant) are drained from the engine.
- For the convenience of performing all subsequent work, we recommend removing the hood from the body of your car.
- Disconnect the air filter housing, all wiring, fuel pipe, and drive cables.
- We proceed to removing the protective timing cover. Then loosen the drive roller and remove the belt from the gear. Next, unscrew the gear bolt and remove it. We do everything carefully so as not to lose the key.
- Next, we disconnect all the pipes and unscrew the valve cover mounting bolts, after which we dismantle it too.
- Don't forget to disconnect the pipe going to the vacuum regulator.
- Unscrew the fuel pump and the spark sensor mounting bolts.
- Now unscrew the upper mounting bolt on the rear cover of the drive belt and then move it to the side.
- We unscrew the fasteners of the camshaft bearing housing, and then remove it.
- We take out the camshaft. It is important to remember that the camshaft must be removed along with the oil seal, which should then be replaced with a new one. If you are disassembling the engine to replace the camshaft, then no further disassembly is necessary.
- Remove the generator mounting bracket. Then we dismantle the tension roller.
- We disconnect all the elements of the cooling system (pipeline) that go to the engine cooling jacket.
- Disconnect the electrical wiring with the block that goes to the coolant temperature sensor.
- Unscrew the fastening nuts on the exhaust pipes and carefully remove them.
- Next, we proceed to unscrewing the mounting bolts on the block head. At the same time, we strictly observe the sequence of loosening these fasteners. We take out the unscrewed bolts.
- Remove the head with the carburetor and intake manifold.
The process of disassembling the engine in the engine compartment after removing the head can be considered complete. The remaining actions are performed under the car. In order to get the pistons you need:
- Unscrew the existing bolts securing the engine tray and carefully remove it.
- Unscrew the connecting rod cap fasteners and then remove them. We recommend marking where each cover was and how it was installed. You can use a core to make a mark on each cover.
- Scroll the crankshaft until the pistons go up and the connecting rods themselves are removed from the crankshaft journals. After this, all you have to do is take a screwdriver and push out the pistons with connecting rods, and then remove them.
Sequencing
Let's move on directly to the process of replacing piston rings on a VAZ Oka without removing the engine (key points are shown in the photo). Everything is done like this:
- The car is placed on a viewing hole and immobilized;
- Working fluids (coolant, oil) are drained;
- The first stage of work takes place entirely in the engine compartment. For ease of work, you can completely remove the hood from the car;
- We remove the air filter housing from the carburetor, disconnect the drive cables, the XX solenoid valve wire and the gasoline pipelines;
5. Remove the protective cover of the timing drive, loosen the drive roller, and remove the belt from the camshaft gear. We unscrew the bolt of this wheel and remove it from the shaft (carefully so as not to lose the key);
6. Disconnect the pipes from the valve cover, unscrew the bolts securing it and remove it from the car;
7. Disconnect the vacuum regulator pipe;
8. Unscrew the bolts securing the spark torque sensor and move it to the side;
9. Unscrew the fuel pump and put it aside;
10. Unscrew the fastening of the spark torque sensor drive housing and remove it;
11. Unscrew the upper bolt securing the rear timing belt cover and move it to the side;
12. Unscrew the nuts securing the camshaft bearing housing and remove it;
13. Carefully dismantle the camshaft along with the oil seal. When assembling, it is better to replace the Oka camshaft oil seal. If you are only replacing the camshaft on the Oka, further disassembly is not necessary;
14. Remove the generator mounting bracket;
15. Remove the tension roller;
16. Disconnect the cooling system pipelines leading to the cooling jacket;
17. Disconnect the wire of the coolant temperature sensor;
18. Unscrew the nuts securing the exhaust pipes from the head, then carefully remove them from the studs;
19. Unscrew the head mounting bolts. In this case, you need to follow the correct sequence of their relaxation. Remove the bolts;
20. Carefully remove the head along with the intake manifold and carburetor.
This concludes the disassembly in the engine compartment. The rest is done under the car. To remove the pistons, you must:
- Unscrew the engine sump mounting bolts and carefully remove it;
- Unscrew the nuts securing the connecting rod caps and remove them. It is important to immediately mark where each cover is and how it was installed. To do this, marks can be placed on the low tide by punching;
- We turn the crankshaft. At the same time, the pistons will come up, and the connecting rods will be removed from the shaft journals. All that remains is to use a screwdriver to completely push out the pistons along with the connecting rods and remove them.
After replacing the rings, using a special device for seating the pistons, we put them in place, trying to immediately guide and place the connecting rods correctly (you can ask an assistant to guide them from below). And then all the removed elements are simply installed in place.