Responsible for successful engine starting starter solenoid relay. The situation when there is no response to turning the key in the ignition switch is familiar to many car enthusiasts. Under the hood you can hear the buzz of an electric motor, dry clicks, or even complete silence. The result is the same - the car will not start.
- Starter solenoid relay. Device and principle of operation. Video:
- Checking the starter solenoid relay. Video:
- How to disassemble the starter solenoid relay?
This may indicate that a single part is faulty, which simultaneously performs two functions:
- It closes the circuit of the main electric motor of the starter, causing its rotor to rotate.
- Creates a force on the fork that moves the Bendix rotor along the shaft. The Bendix gear meshes with the ring gear of the internal combustion engine flywheel and transmits torque from the electric motor to the crankshaft.
On a long journey, it is not always possible to use the services of a repair shop or call a visiting team of specialists for help. You have to cope on your own. In order not to be completely helpless, it is necessary to study the principle of operation of the starter and retractor relay and their structure. Let's start in order.
There is a similar article on this topic - Do-it-yourself repair of car starters and generators.
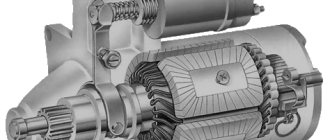
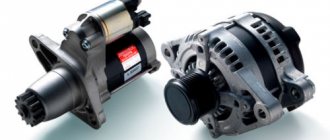
Starter design
The unit used to start a car engine is essentially a compact and powerful electric motor, the design of which is supplemented with several specific details:
- A bendix (overrunning clutch) located on the armature shaft, necessary to transmit torque from the electric motor to the crankshaft of the internal combustion engine.
- A fork that longitudinally moves the coupling along the armature shaft. It is installed in the front cover (mask) of the starter.
- A retractor relay that drives the plug and closes the electrical circuit through which current is supplied to the windings of the electric motor. It, like the fork, is installed on the front cover.
The transmission of torque to the bendix can be done directly or through a torque-increasing planetary gearbox, which is mounted in the main body of the unit, its front or rear cover.
Starter solenoid relay diagram
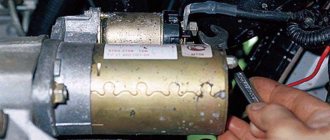
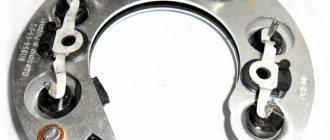
Starter retractor relay device
The design of the unit is quite simple. Inside the metal case are:
- The core, also called the armature or rotor. The core is made of a magnetic or magnetizable alloy, or is made in the form of a steel rod with a winding.
- Drive rod fixed to the core.
- Armature return spring.
- Closing rod with a contact plate located on it.
- Contact plate compression and return springs.
- Pull-in winding.
- Holding winding.
- The back cover of the relay is made of dielectric material, most often plastic.
- Bolts passing through the cover with contact plates located at their inner ends. From one of these bolts, current is supplied to the pull-in and holding windings.
- In some cases, there are one or two additional terminals to supply voltage to the windings.
The assembly is secured with screws or bolts to the front cover (mask) of the starter.
Operating principle of the starter and retractor relay
From the description of the device, let's move on to the principles of its operation. The moment you turn the key in the ignition, the following happens:
- The terminals of the contact group are closed. Current is supplied to the bolts of the contact plates, and through them to the windings.
- The electromagnetic field formed on the windings moves the core in the direction of the back cover.
- The core pulls the end of the fork fixed in the starter mask. The fork moves the bendix (overrunning clutch), located on the shaft of the main starter motor.
- The Bendix engages the ring gear of the crankshaft.
- The closing rod, under pressure from the core, moves back and bridges the contact plates.
- The current flows to the windings of the main electric motor. The armature rotates and drives the crankshaft of the internal combustion engine.
- After the power supply is stopped, the parts of the assembly return to their original position under the influence of return springs.
If the unit fails, the starter stops functioning normally and problems arise with starting the car engine. Possible malfunctions include:
- Mechanical damage.
- Break in the winding.
- Burning or destruction of the end plates.
It is not enough to study the device and understand how the mechanism works. It is advisable to learn how to identify and repair breakdowns.
Starter solenoid relay. Device and principle of operation. Video:
Signs of a faulty starter solenoid relay
Diagnosis and repair should begin when the first alarming symptoms appear. This will significantly reduce repair costs and avoid serious troubles. We list the main symptoms:
- The starter turns idle, the crankshaft does not rotate.
- There are clicks in the relay area, but the electric motor does not work.
- The engine starts, but the bendix does not disengage from the crankshaft flywheel ring gear.
- There is no response at all to turning the key in the ignition or pressing the “Start” button.
There are a number of primary reasons why the starter solenoid relay does not operate.
Before moving on, you should make sure that the electrical wiring is in good condition, check the fuses and the ignition switch contact group.
It is quite possible that they are the source of the problems that have arisen.
Signs and causes of relay failure
If the relay is broken, the following signs will tell you about it:
- when you try to start the engine with the key, it does not start, or starts only after two or three attempts;
- There is a buzzing sound after the engine starts. This means that the starter rotates at higher speeds, although it should no longer be.
If at least one of these signs is observed, then this is a reason to be wary. The relay may soon break. There are several reasons why this happens:
- one of the windings, or both, were burned or broken at once;
- deformation of the return spring inside the mechanism;
- a short circuit has occurred inside the part on one of the windings;
- The surface area of the contact plates has decreased, or they have completely burned out.
Understanding the reasons why the relay fails, repairs will take less time, because It’s immediately clear where to look for the problem.
We recommend: What to do if the engine stalls?
How to remove the solenoid relay?
You should not try to find and fix the problem directly on the car. It is much easier to do this by completely dismantling the starter. To do this you will have to:
- Disconnect the battery by removing its terminals. Otherwise, a short circuit may occur during the work, as a result of which the battery and other electrical components will fail.
- Disconnect the electrical wiring from the solenoid relay.
- Unscrew the bolts that secure the starter to the car engine and remove the part.
Only after this can we proceed to diagnostics, removal, repair or replacement of the unit of interest to us. The first check is performed without preliminary disassembly. To do it:
- Current is supplied from the positive terminal of the battery to the contacts of the solenoid relay.
- Using a wire, the body of the part (ground) is bridged with the negative terminal of the battery.
When everything is in order, the electric motor will begin to rotate and the bendix will move forward. When the voltage supply is interrupted, the electric motor stops working and the clutch returns to its original position. But there may be other options:
- The electric motor works, the bendix extends, but does not return back.
- The Bendix extends, but the electric motor does not turn on.
- The relay clicks or does not work at all. Bendix is motionless. The starter doesn't turn over.
But these are all symptoms, and it is necessary to identify the causes of the malfunction. To find them, you need to dismantle the relay by unscrewing the bolts securing it to the cover and carefully disconnecting the rod from the plug.
In some cases, this can be done only by removing the entire front cover.
Checking the starter solenoid relay. Video:
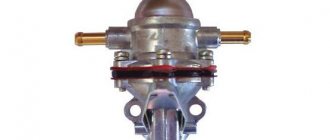
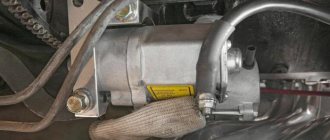
Solenoid relay
The starter, by its design, is a small electric motor, a special coupling (Bendix) of which engages with the flywheel of the power unit for a few seconds, causing the crankshaft to rotate. Despite the small size of the starter, when the engine starts, currents that reach hundreds of amperes pass through it. If power is supplied to this device directly through the ZZ, then no contacts will withstand such loads and will burn out. Therefore, to connect the starter to the power source, a special retractor relay is used, which is designed with contacts designed for high currents. This mechanism is structurally located on the starter housing.
The switching device in question is assigned a number of functions:
- connecting the starter to the power source;
- engagement and retention of the bendix with the engine flywheel;
- turning off the starter power after the engine starts running.
Operating principle
The retractor mechanism operates in the following order:
- When you turn the key in the ZZ, an additional relay is activated.
- Power from the battery is supplied to the traction relay coil.
- Under the influence of a magnetic field, the armature moves inside the winding.
- The starter fork is driven and extends the bendix.
- The starter sprocket engages with the flywheel of the power unit.
- A plate attached to the end of the solenoid relay rod connects the contacts to each other.
With the described actions, the engine starts within a few seconds. After activating the starter, the retractor winding stops working, and the current passes through the holding coil, due to which the armature remains in its extreme position. The presence of two windings reduces battery energy consumption during engine starting.
After the motor starts working, the starter's electrical circuit opens, the current through the holding coil stops flowing, and the armature, due to the spring, returns to its original position. At the same time, the clutch and coin are removed from the relay contacts, the bendix moves away from the flywheel and the starter is disconnected from the battery.
Malfunctions
Since the retractor operates every time the power unit is started and is subjected to high loads, it gradually wears out and fails. Relay malfunctions can be judged by characteristic signs:
- when the engine starts, the starter continues to operate, making a buzzing sound;
- when the engine starts, the relay makes a click, but the starter does not function;
- When you turn the key, the starter spins, but does not engage the flywheel.
Problems can occur for several reasons:
- violation of the integrity of the relay housing;
- problems with the retractor or retention coil;
- burning of contacts;
- weakening of the spring.
All of the listed problems occur as a result of natural wear, burnout of the windings, or destruction of parts of the assembly.
Examination
You can check the relay in two ways - without dismantling the starter and with the device removed. Let's consider both options.
By car
We carry out diagnostics with a multimeter or “control”:
- Visually assess the integrity of the relay wiring.
- We check the operation of the relay, for which we turn the key in the ignition switch and listen to the starter: if the click is not heard, the relay is considered faulty.
- If there is a characteristic sound, but the starter does not turn, the contact coins in the relay itself may be burnt. To check, remove the chip that comes from the ZZ and close the two threaded contacts together. With this connection, the starter will be powered bypassing the relay. Rotation of the starter will indicate a problem with the switching element.
- We connect the multimeter to the “+” relay, i.e. to the contact where power comes from the battery, and connect the minus to ground. We turn on the ignition and if the voltage is below 12 V, then most likely the battery charge is not enough to start the engine, but enough to trigger the relay.
Video: diagnosing the starter without removing it from the car
With the starter removed
Before dismantling the starter, you need to perform several steps that will allow you to determine the problem:
- we check the condition of the battery and starter terminals, the battery charge and, if necessary, clean the contacts with sandpaper;
- Determine the functionality of the starter relay.
If the above actions did not produce results and the starter still does not work properly, remove it from the car. We clean the assembly from dirt, clean the contacts, and then check:
- We install the starter near the battery.
- We connect the battery and the starter using thick wires with “crocodiles”, for example, a “lighting” kit. We connect the minus of the battery to the housing, and connect the plus to the contact of the traction relay. If there is a distinct click of the relay and the bendix moves out, this indicates the working condition of the relay. If the retractor does not work, it means it needs to be replaced or repaired.
Video: checking the starter traction relay
Which relay to choose
Solenoid relays are either collapsible or non-dismountable. The first design is older, but such products are interchangeable with the second option. For the VAZ 2107 and other “classics”, the device in question is produced by several manufacturers:
- "KATEK" and "KZATE" (Samara);
- BATE (Belarus);
- "Kedr" (Chelyabinsk);
- Dynamo AD (Bulgaria);
- Iskra (Belarus).
From the above list, the products of “KATEK” and “KZATE” are the highest quality. The cost of solenoid relays from these manufacturers is about 700–800 rubles.
Traction relay repair
Dismantling the solenoid relay is necessary in two cases - to repair or replace the mechanism. Removing it is not difficult, but first you will need to remove the starter itself from the car.
Removing the starter and relay
You will need the following list of tools for work:
- flat screwdriver;
- key for 8, 10 and 13.
The procedure is carried out as follows:
- Remove the negative terminal from the battery.
- Unscrew the starter mount to the clutch housing.
Disassembly
The solenoid relay is disassembled in order to replace or clean the contacts (nickels):
- Using a wrench or socket 8, unscrew the fastening of the relay cover to the body.
Video: repairing the starter traction relay
Malfunctions of the additional and retractor relays lead to difficulties or impossibility of starting the starter. The cause of the problem can be identified by the characteristic signs, and repairs can be carried out by every car enthusiast according to step-by-step instructions.
How to check the starter solenoid relay?
The reason that the clutch does not return to its original position is mechanical failure - damage to the rod, core, return springs. The part definitely needs to be replaced. In other cases, you can continue checking and try to restore the node to its lost functionality. Checking the starter retractor relay is carried out in several stages:
1. Connect the terminals of the windings and contact plates to the positive of the battery, and touch the negative with the relay body. Does the rod move? Let's move on to the next stage of diagnostics.
2. Using a multimeter, measure the resistance between the contacts of the windings. There are many videos posted online showing how such measurements are made. Their authors do everything, in principle, correctly. They just forget to say that the resistance parameters are different depending on the starter model.
In search of accurate indicators, you have to study technical documentation.
If there is no access to reliable data, you will have to assume that there should be no open circuit or resistance exceeding 10 ohms.
It will not be possible to restore the windings on your own, especially in the field. This will probably require a new spare part. But if the resistance indicators are normal, we check further.
3. Connect the multimeter probes to the power terminals of the relay. We insert and recess the core completely. The indicators should not differ significantly from those obtained by measuring the resistance on the holding winding. The difference in readings indicates damage to the contact plates.
In the latter case, you can try to disassemble the assembly and clean the contact plates. To do this, at a minimum, the design of the part must provide for the possibility of disassembly.
Do-it-yourself starter retractor relay repair
Self-repair requires certain skills. It’s not worth getting down to business without having either experience or the necessary tools. Strictly speaking, installing a new part is always preferable to repairing a broken one.
But sometimes there is simply no other choice. For example, if the breakdown occurred on the road, far from spare parts stores.
If you decide to take an important step, you will first have to remove dirt from the surface of the assembly using a stiff brush and a rag soaked in kerosene, white spirit, etc. After this, an external inspection is carried out to familiarize yourself with the structure of the relay housing.
Do-it-yourself repair and replacement of the catalyst. - there is more useful information here.
How to disassemble the starter solenoid relay?
There is no point in opening a rolled case. This is a complex procedure with unpredictable results. But, if the manufacturer has provided for the possibility of opening the solenoid relay by securing its back cover with separate screws or nuts on the power terminals, then access to the contact plates will not become a serious problem. Simply unscrew the fasteners and pry up the cover using a knife or screwdriver.
You will be interested in this article - Do-it-yourself repair of car starters and generators.
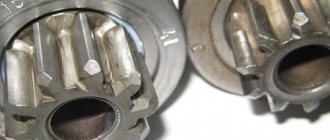
Cleaning contacts and replacing individual parts
After removing the cover, you can assess the condition of the contact plates. Carbon deposits or oxidation should be removed using sandpaper. You can try to replace damaged springs, if any, by selecting ones that are suitable in size and characteristics. Selecting springs is a very complicated matter. It is necessary to measure not only the dimensions, but also the force developed. It will not be possible to do this without having special equipment at your disposal.
Having completed the repair, we place the cover in place, lubricate the joint with sealant, secure it and recheck it. After making sure that all parameters are normal, we install the relay on the starter and perform final assembly.
To be honest, such repairs will not last long. Over time, the plates fade, become thinner and are no longer able to provide reliable contact. We note once again that it is advisable to carry out such work only in situations where there is no access to spare parts. In other cases, the correct solution is to replace the starter solenoid relay with a new and known good part.
How to repair a relay with your own hands
Basically, repair work involves dismantling a number of mechanisms. Here it is important to remember to take precautions - do not rush, do everything very carefully, turn off the power to the machine. It is also worth considering carefully whether there is a need to repair the starter retractor relay yourself. In the absence of the necessary skills, abilities and tools, you should entrust everything to the hands of professionals - otherwise you can not only aggravate the breakdown, but also get injured.
At the same time, if you decide to carry out repair work yourself, disconnect the power from the battery. This is the initial step to disassemble the starter, otherwise all the car's wiring may burn out.
Do not rush to dismantle the device; first, wipe all elements from dirt so that dust does not penetrate inside the system. Only after this we begin to unscrew the brush assembly nut. Next we get the contact. Then we proceed to the coupling screws, the task of which is to connect the assembly to the mass.
If everything is done correctly, we will be able to completely remove the relay from the mechanism. Now we proceed to unscrew the nut at the end, as a result of which the part is divided into two parts. This way we gain access to the core, thanks to which we can replace the faulty element, after which we install the mechanism in its place.
We recommend: How to repair a power steering pump with your own hands?
As a final step, it is worth checking the serviceability of the elements. If everything functions as it should, we mount the relay in the vehicle. After completing the repair work, we once again evaluate the performance of the system.