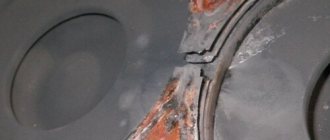
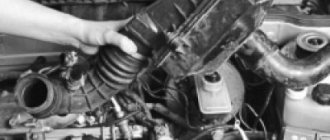
The consequence of freezing of condensate in the ventilation hoses can lead to the fact that the gasket under the valve cover can simply be squeezed out by pressure, which may result in a leak. To eliminate this problem, it is necessary to replace this gasket; during the replacement process, you will also need to adjust (adjust) the valve clearances and marks on the pulleys. This photo report shows how to adjust the valves and replace the valve cover gasket on a Chevrolet Aveo with a 1.2 liter gasoline engine with your own hands B12S1.
What parts and tools will be needed?
This work is quite labor-intensive, but not difficult. To replace you will need:
- Head for 17 and 10 or a regular spanner for the same 10 and 17;
- Hexagon 5;
- Regular wrench 12;
- A set of probes and a regular flat-head and Phillips screwdriver;
The original GM gasket 96325175 is suitable for replacement at a price of 850 rubles. If you choose popular analogues, you can save a lot, for example Reinz 71-54182-00 - 690 rubles, and Pmc P1G-C014 costs only 110 rubles.
Problems and reliability of Chevrolet Aveo 1.4 (f14d4)
The F14D4 engine was produced in Korea, but it is based on a 1.4-liter engine created by Opel engineers. This is not a complete analogue of the German engine, but a simplified and cheaper version for budget cars. There are not many similar or interchangeable parts for Korean and German engines.
In general, the first sample of a 1.4-liter engine for Korean Chevrolets appeared in 2002. This is the F14D3 engine. In 2008, the engine was updated - thus, the F14D4 modification appeared. This unit develops 101 hp. versus 94 for its predecessor.
The increase in power was provided by phase shifters that appeared on both camshafts. The upgraded engine also received an electronic throttle. But after the modernization, the hydraulic compensators were gone. The compression ratio increased by 1 unit (from 9.5 to 10.5).
This engine is quite reliable, but its maintenance causes some trouble. Although its predecessor surprised many with its unexpected death due to the meeting of pistons and valves.
On our YouTube channel you can watch a disassembly of a 1.4 engine removed from a Chevrolet Aveo.
You can select and buy an engine for Chevrolet in our catalog of contract engines.
Throttle valve
The electronic throttle valve fails due to chafing of the graphite track of the potentiometer or bending of the antenna contact. In this case, an error occurs indicating a discrepancy in the readings of the damper sensors: there is a double sensor. Sometimes opening the cover of the potentiometer sensor and bending the antenna helps solve the problem. If worn potentiometer tracks are found, the entire damper will have to be replaced.
Also, the culprit for errors in the throttle valve may be the connectors on it and on the engine control unit. Dirt and moisture get on them, which leads to malfunctions and failures.
Coolant expansion tank cap
A common problem associated with the F14D4 engine is a malfunction of the valve in the coolant expansion tank cap. If there is a malfunction, the engine begins to “boil” without signs of temperature increase. Of course, this is due to excess pressure in the cooling circuit. In many cases, excess pressure leads to cracking of the tank itself.
But to solve or prevent this problem, it is enough to change the tank cap. The valve in the lid “sticks” with regularity once every 4-5 years.
Phase regulators
The F14D4 engine introduced Aveo owners to the so-called “dieseling”: this is when a gasoline engine starts to rumble like an old diesel. Usually such a clattering noise is heard in the first seconds after starting the engine. Of course, the point is in the phase regulators built into the camshaft gears, or in the valves that control them. It is they who click and rattle due to a lack of oil entering them.
The first two years of production, the F14D4 engine was equipped with defective phase shifters, which failed within 10,000 - 30,000 km. The phase shifters were replaced entirely under warranty. New serviceable gears of the F14D4 engine have the following numbers: on the intake camshaft 55567049, and on the exhaust camshaft - or 55567048. By the way, defective phase shifters also went to GM F16D4 and F18D4 engines, as well as similar Opel Z16XER, Z18XER units (the numbers of serviceable phase shifters are as follows: 5636632, 563663 1 ). They had to be replaced together with control valves.
More about Aveo: Rear wheel hub Aveo T300/Cobalt with ABS 19350426 Ac Delco. Wholesale and retail.
Phase regulator valves
Valve life is highly dependent on the quality and cleanliness of the engine oil. Their work is disrupted when the filter meshes built into them become clogged. Again, in most cases, the operation of the phase regulator valves can be restored by washing them in a solvent. If flushing does not help, then you will have to buy and install new valves (55567050 or 1235299).
In the event of malfunctions associated with the operation of the phase regulators, errors occur in the synchronization and position of the camshafts.
Oil heat exchanger
An oil heat exchanger appeared on the F14D4 engine; its predecessor did not have one. The situation here is standard: the sealing gasket or ring often breaks through, which is why antifreeze can be mixed with the engine oil or vice versa. The heat exchanger has about 9 different rubber seals that need to be replaced as a set.
Electronic thermostat
The F14D4 engine received an electronically controlled thermostat. In appearance, this is an ordinary thermostat, only it has an electrical connector, and inside there is a control heating element. The thermostat may begin to act strangely, causing a risk of overheating or, conversely, the engine will not warm up well. A new thermostat for the F14D4 engine costs about 50 USD. And it runs about 60,000 – 90,000 km.
Before replacing, it is worth cleaning the contacts in the connector. It is possible that cleaning will improve the situation with its performance.
The F14D4 engine turned out to be hot: the circulation of antifreeze in a large circle begins at a temperature of 105°C, and the thermostat opens completely at 120°C. This circumstance affects the oil life and the service life of the rubber seals of the F14D4 engine.
Ignition coil module
The ignition coils on the F14D4 engine come in one unit, which is typical for GM / Opel engines. If one coil fails, the entire unit has to be replaced. The corresponding errors indicate a malfunction of the coil module.
In most cases, a malfunction and error occurs due to a breakdown of the plastic insulator - traces of melting will be visible on it. In fact, you can simply restore the insulation - remove the plastic at the breakdown site and restore the insulation with a dielectric polymer.
Well, you can extend the service life of the ignition module by regularly replacing spark plugs in a timely manner.
You can select and buy an ignition coil for a Chevrolet engine on our website.
Timing belt
On the predecessor engine of the F14D3, the timing belt was just a disaster. It needs to be changed at intervals of 60,000 km, but in practice it broke at half the mileage. The engine had to be overhauled. On the F14D4 engine, the belt runs incomparably better, and it can be changed at intervals of 160 thousand km.
The belt lasts long enough and does not break at the most inopportune moment.
By the way, when replacing the timing belt, unqualified technicians can make a mistake: break off the petal of the exhaust camshaft impulse ring. To install it, you will have to remove the camshaft and install the new ring correctly, which will require a special guide.
Valve drive
If there is no problem with the timing belt life on the F14D4 engine, then the valve drive has added its own troubles. The valve clearances on this engine need to be monitored and, if necessary, adjusted every 100,000 km. The problem is that the adjustment process is very complicated. It is necessary to measure the existing gaps and remove the camshafts. Then it is advisable to measure the existing cup pushers and calculate the sizes of the cups for adjustment. The pusher cups are not cheap, there are 16 of them (according to the number of valves). Install . And it often happens that after installing the camshafts, the gaps do not fall within the tolerances. And then the selection needs to start virtually from scratch.
Incorrect valve clearances cause misfires.
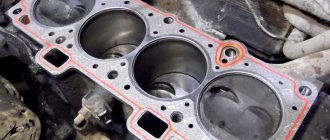
Cylinder block
The cylinder block of the Chevrolet Lacetti and Chevrolet Aveo internal combustion engines is cast iron, the cylinders are bored directly into the block. The engine cooling jacket and oil channels are made in the body of the cylinder block.
Here, via the link, you will find a current list of specific Chevrolet vehicles being dismantled and you will be able to order spare parts from them.
Modernization
There are several ways to convert the B12D1 engine. All of them will increase the power of the internal combustion engine. There are usually 3 main types of tuning.
- The cylinder head is changed to a 16-valve analogue. This is the most radical way, making it possible to increase power up to 100 hp. With. and higher.
- The stock camshaft is installed. This will increase power to 85 hp. With. It is enough to be able to disassemble the cylinder head to cope with the work yourself.
- The ECU is being reflashed. The thrust increases to 75-80 hp. With. However, the environmental parameters of the exhaust are deteriorating.
It will be useful to upgrade the lubrication supply system. To do this, you will need to drill out the nozzle from 0.8 mm to 1.2 mm. This modification will partially solve the problem of camshaft jamming.
It is important to understand that any type of tuning will negatively affect the exhaust manifold. Therefore, it is necessary to carry out modernization in a comprehensive manner - unreasonable actions significantly reduce the service life of the engine.
| Freelancer | With timely maintenance - changing the engine oil, replacing filters and filling with high-quality gasoline, this engine will last about 300 thousand kilometers or more. But it happens that it malfunctions, for example, oil leaks begin, or smoke appears from the exhaust pipe. Repairing this internal combustion engine is expensive, and not every specialist will undertake it, since small-volume engines are usually considered disposable. So, diagnose such an engine before purchasing - measure the compression, check if it is burning oil, if there are any leaks, carbon deposits, etc. |
| Airat | The B12D1 engine has a good service life of 200-300 thousand! The timing chain is a chain that needs to be replaced after 10 years or 250,000 km, whichever comes first. In this car, already next year problems with the chain may begin and a replacement will be required - 20 thousand rubles will be needed. |
| Tikhonov | Mileage B12D1 340 thousand, everything is fine with the engine. Despite the fact that I don’t change the oil often due to carelessness. It happens that I ride 25 thousand before replacement. Now from replacement to replacement I add about 1 liter. |
| Beginner aveod | Good day to all. I'll liven up the topic a little. I myself struggle with engine temperature all the time. (Well, it doesn’t rise above half the sensor). It was decided to replace the thermostat (since the thought was in my head that the thermostat was always in the open position). They replaced the thermostat, replaced the cabin filter (immediately the heater began to blow much stronger), but the temperature remained the same. It was decided to seal the “face” in polystyrene foam (with a foil layer). The result has not changed. This condition was accidentally discovered: at the temperature of half the sensor, the fan turns on. It turns out that the fan blows out all the heat? Who is responsible for turning on the valve? Maybe the problem is with this sensor. |
| Dmitry 57 | I already own the second Aveshka with the b12d1 engine, my relatives have the same one. The thing is that our engine itself warms up very slowly at idle! I will even say that it hardly warms up! It would be nice if this happened on one machine, but on three!!! And all of different years of production (2008, 2009, 2021). As a rule, in winter I start the engine and wait 10-15 minutes (depending on the temperature), I don’t turn on the heater and I don’t get into the car (I’m sweeping away the snow, wiping off the headlights, etc.). I don’t turn on the heater so as not to take heat from the engine into the cabin, and I don’t get into the car so that the windows don’t fog up. The arrow rises one notch - and that’s it, no more! Then it’s just moving. I’ll make a reservation right away that I don’t stuff any cardboard or blankets for insulation, and there’s no standard hood insulation either. In the summer everything is simpler: just chatter for a couple of minutes and go. I had a Lada Kalina in the interval between aveskas. Here it warmed up to 60 degrees at idle in 10-15 minutes at -25 outside. But it also has a 1.6 engine, and consumption is up to 10-11 liters. So here's what I think: this is just a feature of the b12d1 engine. Well, it doesn’t warm up at idle, and that’s it! And when driving, everything is normal: the arrow rises, the cabin becomes warm. This is assuming there are no faults. There are, of course, special cases of failures due to a malfunction of the thermostat or something else, but that’s something else. You need to look here. |
| Scales | I was faced with the problem of selecting the best spark plugs for the B12D1 1.2 V16 engine. Actually, I bought myself an NGK DCPR7E (Order No. 3932). Before that I had the original Champion RA7YC, they cost 18,000. There were no complaints about them, but before the winter I decided to change them. I read before shopping topic “Spark Plugs” and didn’t come to a clear conclusion. Many bad reviews were written about the Champion RA7YC, so the choice fell on the NGK DCPR7E, but...... I drove 600 km on them and, frankly speaking, I’m not delighted. The dynamics are worse than on the old ones. Engine It became louder at rpm from 3000. You can say that it all seems like it, but after reading various forums, including Ukrainian, I came to the conclusion: we need other spark plugs! |
| Beard78 | Champion RA7YC changed the spark plugs like spark plugs at 30,000, got tired of the gap, at first I set the minimum, I didn’t like something, then I set it as much as 1 mm because I looked at the old ones where 1 and where 1.1 in the end now it costs 0.9 everything works fine although at first it seemed that to start the engine, the starter began to turn more before the car started, it turned out that it was my glitch and excessive pickiness, the fuel economy seemed to be somewhere in the range of 100-200 grams, but this could be due to the driving style, it’s unlikely that the spark plugs would help influenced. In short, there are no changes, most likely this is a good result. You shouldn’t expect that when you replace the spark plugs with some cool ones, the car will fly, this won’t happen, if the car’s behavior hasn’t worsened, then everything is top-notch. In your case, it’s probably not the spark plugs that are to blame, because of the spark plugs the engine may stall, it’s hard to start, misfires, and dragging is a consequence; if the cylinder doesn’t work, it won’t pull, maybe your engine air filter is clogged and it won’t pull. Try old spark plugs install and check, or you need to check new ones on a pressure gauge, maybe some spark plug is defective. |
More about Aveo: Chevrolet Aveo |
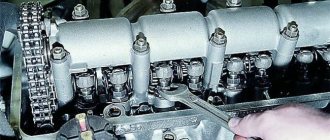
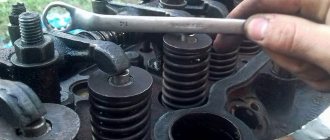
Checking and adjusting thermal clearances in valves
Attention: checking and adjusting the thermal clearances in the valves is carried out on a cold engine,
1. Disconnect the wiring harness. 2. Disconnect the crankcase ventilation system hoses. 3. Disconnect the high-voltage wires, 4. Remove the cylinder head cover 5. Set the piston of the 1st cylinder to the TDC position on the compression stroke a) Turn the crankshaft pulley clockwise and align the groove on the pulley with the “O” mark on the cover No. 1 camshaft drive belt.
b) Make sure that the hole on the camshaft drive pulley aligns with the mark on the bearing cap.
If this condition is not met, then turn the crankshaft clockwise 1 turn (360°) and again align the groove on the pulley with the corresponding mark.
6. Check the thermal clearance in the valves marked in the figure:
a) Using a feeler gauge, measure the gap between the valve tappet and the back of the camshaft cam b) Write down the values of the gap outside the specified limits. These values will be used to select the required shim size.
More about Aveo: ✅ The check light on the Chevrolet Aveo T250 came on -
Nominal thermal clearance in valves (on a cold engine): intake. 0.15-0.25 mm graduation. 0.25-0.35 mm
7. Rotate the crankshaft 1 revolution (360°) and again align the groove on the pulley with the corresponding mark as indicated in paragraph 2, and check the clearances in the valves marked in the figure by repeating the procedure in paragraph 3.
8, Adjust the thermal clearance in the valves.
Notes:— In these engines, to adjust the thermal clearance in the valves, it is necessary to dismantle the camshafts.— Since the axial clearance of the camshaft is very small, when dismantling the shaft it should be held in a horizontal position, otherwise the seat of the camshaft thrust washer in the head may be damaged cylinder block, which may cause the camshaft to seize or break.
8.1. Adjust the thermal clearances in the intake valves.
8.1.1. Remove the intake camshaft a) Turn the crankshaft pulley so that the hole in the auxiliary gear is at the top; in this case, the cams of the 1st and 3rd cylinders equally press the pushers of the corresponding valves.
b) Unscrew the 2 bolts and remove the 1st camshaft bearing cover c) Attach the camshaft sub gear to the drive gear using a set bolt
Recommended installation bolt dimensions: diameter - 6 mm, thread pitch - 1.0 mm, length - 16-20 mm
Note: When removing the camshaft, make sure that the torsional force transmitted to the auxiliary gear by the spring is relieved by the above operation.
d) Evenly loosen and remove the 8 camshaft bearing cap bolts in several passes in the sequence shown in the figure. Then remove the bearing caps and camshaft
Attention:— If the camshaft cannot be removed when performing the above operations, reinstall the bearing cap No. 3 and tighten it with two bolts.— After this, loosen and unscrew the bolts in sequence, while trying to pull the camshaft by the gear—Do not try to remove the camshaft by applying large force effort or using additional levers and devices.
8.1.2 Remove the shim using a small screwdriver
8.1.3. Determine the size (thickness) of the shim that will provide clearance to specifications. a) Using a micrometer, measure the thickness of the removed adjusting washer. b) Using the formula, determine the thickness of the new adjusting washer, which will provide the required thermal clearance in the valves:
For intake valves. N I- (A - 0.20) mm where N is the thickness of the new washer. T is the thickness of the removed (used) washer. A - measured gap in this valve c) Select an adjusting washer whose thickness is closest to the calculated value
Note: shims have 16 sizes (thickness values) from 2.55 mm to 3.30 mm in 0.05 mm increments,
8.1.4, Install a new adjusting washer on the valve tappet 8.1.5, Install the intake camshaft a) Rotate the crankshaft pulley and install the exhaust camshaft in such a position that its alignment pin is higher than the cut of the cylinder head,
b) Apply grease to the camshaft thrust surfaces. c) Align the intake camshaft gear with the exhaust camshaft gear, aligning the timing marks of both gears.
Attention: it is necessary to distinguish installation marks from TDC marks and do not use the latter in this case
d) After this, place the camshaft in the bearing bed, maintaining the mesh of the gears.
Attention: this position of the camshaft allows the cams of the first and third cylinders to evenly press the pushers of the corresponding valves.
e) Reinstall the four camshaft bearing caps f) Apply a thin layer of engine oil to the threads and under the heads of the camshaft bearing cap bolts g) Install and evenly tighten the 8 bearing cap bolts in several passes in the specified torque sequence. 13 N m
h) Remove the installation bolt i) Install the 1st bearing cover with the mark facing forward
Attention: if the 1st bearing cap does not fit into place, use a screwdriver to move the camshaft back.
j) Apply a thin layer of engine oil to the threads and under the camshaft bearing cap bolt heads. k) Install and evenly tighten the 2 front bearing cap bolts in several passes. Tightening torque. 13 N m m) Rotate the crankshaft and check the alignment of the marks
8.1 6. Check valve clearances
8.2. Adjust the thermal clearances in the exhaust valves.
8.2.1. Remove the shims a) Rotate the crankshaft so that the lobe of the adjustable valve cam is oriented upward. b) Position the valve tappet notch towards the front of the vehicle.
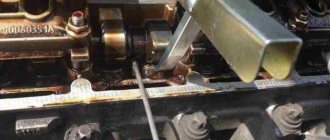
c) Using tool (A), press down on the pushrod and install tool (B) between the cam shaft and the pushrod. Then remove tool (A).
Attention: - Insert the tool (B) at a slight angle from the side marked “9”, as shown in the figure. In this case, the notch should be in the position shown in the figure.
— The tool (B) should not be inserted too deeply, so as not to pinch the adjusting washer. To prevent jamming, insert the tool smoothly from the intake camshaft side as shown in the figure - The cam profile makes it difficult to install the tool (B)
More about Aveo: Chevrolet Aveo T250 (2006-2012) Price, Technical Specifications, Photo, Video Aveo Review
d) Remove the shim using a small screwdriver and a magnetic stick.
8.2.2. Determine the size (thickness) of the shim to provide clearance to specifications
a) Using a micrometer, measure the thickness of the removed adjusting washer b) Using the formula, determine the thickness of the new adjusting washer, which will provide the required thermal clearance in the valves: For exhaust valves. N=T (A- 0.30) mm, where N is the thickness of the new washer. T is the thickness of the removed (used) washer, A is the measured gap in this valve.
c) Select an adjusting washer whose thickness is closest to the calculated value.
Note: The shims come in 16 sizes (thicknesses) from 2.55mm to 3.30mm at 0.05mm intervals,
8.2.3, Install a new shim a) Install the washer on the valve tappet b) Using tool (A), press the pusher and remove tool (B).
8.2.4. Check the thermal clearance in the valves
9. Install the cylinder head cover a) Remove the old sealant. b) Apply a coat of fresh sealant to the areas shown in the illustration.
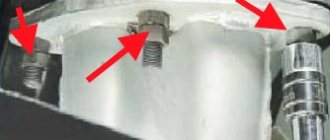
c) Install the gasket under the cylinder head cover d) Install the cylinder head cover, securing it with 4 nuts installed on the sealing washers. Tightening torque. 6 N m 10. Connect the high-voltage wires. 11. Connect the crankcase ventilation hoses 12. Connect the wiring harness.
Source