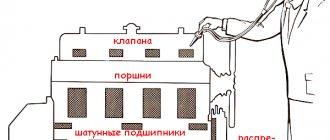
About soot
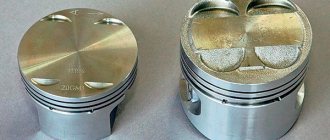
After long-term use of the vehicle, carbon deposits on the surfaces of the valve and seat chamfers, microcracks and scuffs appear.
As a result, the contact patch between the surfaces decreases, the valve does not fit tightly to the seat, which is why it begins to leak and the engine’s compression decreases.
To remove carbon deposits, shells, and scuffs, valve lapping is used, as a result of which the contact patch between the valve and the seat is restored.
In addition to performing this operation as part of a major overhaul, valve grinding is carried out in a number of cases.
So, these works are carried out:
- If the valve or seat burns;
- When the valve disc burns out;
- When replacing them in case of damage, in general, whenever problems arise with these elements.
Required Tool
The work of grinding valves is not particularly difficult, but it takes a long time to complete, especially if you do it yourself.
It is impossible to perform them on a car; you will have to partially disassemble the power plant, namely remove the cylinder head.
Therefore, when deciding to grind the valves, you should immediately take care of having a new cylinder head gasket.
The tools you will need to perform this operation are:
- Set of keys and sockets;
- Device for desiccation of valves;
- Device for performing grinding;
- Grinding pastes;
- Rags;
- Kerosene.
Tools for performing work, lapping pastes
Let's go through the valve accessories.
There are special tools for removing the crackers that hold the valve head in the seat plate.
There are many designs, we won’t describe them all. Let us only note that they all operate on the same principle.
With this device, the valve springs are compressed, the valve mounting plate moves down, releasing the crackers, and they are removed.
But you can do it in a simple way. You will need a piece of tube with a diameter slightly smaller than the mounting plate.
This tube is placed on a plate and hit sharply with a hammer. Due to the impact, the springs are compressed, the plate sags and the crackers jump out.
In this case, it is better to cover the hole on the side on which the blow will be struck with something so that the crackers do not fly out through it.
Now about the lapping device.
It can be purchased, usually such a device consists of a nut clamp, a rod and a wrench.
But you can do it yourself. To do this, you will need a rod with a diameter equal to the diameter of the valve. A knob is welded to it to form a T-shaped structure.
On the other side of the knob, a piece of rubber tube is placed on the rod.
1 – metal rod with a diameter of 5 – 8 mm, depending on the diameter of the valve stem, 2 – rubber tube, 3 – clamp clamps.
The inner diameter of the tube must be chosen so that it fits tightly onto the rod.
You will also need another clamp; it will clamp the edge of the rubber tube, which will be placed on the valve stem.
Pastas.
For grinding valves, devices alone are not enough, since this operation is performed using special pastes.
They are not difficult to find; you can buy both cheap lapping pastes and very expensive ones.
For lapping, it is better to purchase kits consisting of two pastes or just two pastes - for primary roughing and for secondary finishing.
You may also need to use a cutter. It is a conical head for a drill with metal cutters inserted into it.
Use it to treat the damaged surface of the saddle.
Need advice on valve lapping
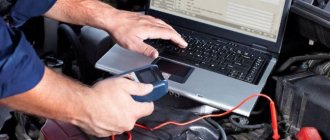
The right pot doesn't idle well, I think it's the valves. Tell me how to disassemble - grind - assemble without special tools and without losses. A ?
for Smoke
: It’s a hell of a job to paint there, although all the manipulations are simple, like: drying, lapping, checking, assembling. It will be easier if you get a knowledgeable little man from him and do all the manipulations with him!
To begin, remove the head, place it on a flat surface with the combustion chamber facing up and pour gasoline into it to the brim. Smoke for half an hour and see if the level has not dropped, then forget it - your head is most likely fine.
It’s quite easy to disassemble - you take a spark plug key (which is made of a tube) or something similar, press it against the valve plate and don’t hit the spark plug too hard with a hammer, while trying not to let the key bounce off the plate too much, otherwise the crackers will fly apart. You need to rub it in with a special paste, sold in auto parts stores, coat the valve seat with a thin layer, insert it into the head, and from the back side, pull a piece of gas hose onto the valve and start turning back and forth with periodic lifting of the valve.. But put everything in place with a “trenching tool” this is a gimor.. If you have a Dnepr motor, it’s easier - you insert a thicker axle into the ears of the rocker arm mountings and through the axle you press on the plate (I did this with an open-end wrench size 13). If it’s Ural, then I did this: I took an old rocker arm and two old pins (with which the head is attached to the cylinder), put the rocker arm in its regular place in the head, and on the other side I attached nuts and pressed the rocker arm through it with a wrench (at 19 :-). Oh how..
There is a quicker and easier way to grind in. You grab the valve stem with a small drill, and carefully rub it at low speeds, pressing the valve with your fingers. Periodically wash off the paste and add new one. and finally just rub with a clean valve. Don’t forget to rinse the head and bushing thoroughly, because the slegonta paste scatters. The work will take 5-10 minutes. The fit is perfect. If the drill is reverse, then it’s absolutely great. rub in both directions.
Everything is elementary there. It’s just advisable to see how someone did it. In words it turns out too abstruse and cumbersome. The manual describes the procedure clearly. And how to grind it in and how to check it.
Once you take the head apart, look at the saddles: the chamfer should be 1-1.5 mm, without burnout. the valve plate is not broken and smooth, the valve stem is at least 7.85 mm, the guides are on the inside. diameter - no more than 8.13 mm. actions in the worst case scenario: 1- replace the guides 2- grind the seats, making a working chamfer of the required width at an angle of 45* 3- lap the valves, finish by lapping in oil without abrasive 4- check with kerosene, and if it does not leak in 3-5 minutes, then: 5- ah, well done, collect your head
if it doesn’t help, look at the piston and carburetor
It is better to check with kerosene - it has better fluidity and pour it into the inlet or outlet channel so that the leaks are immediately visible and from which valve. And regarding the width of the valve fit. When I changed the bushings, I only had a cutter at 45 degrees and after processing I got a strip 3 mm wide, I assembled it at my own risk and you know it’s been working for a season. Last week I did a preventive piston overhaul - the valves are not leaking. If you are going to change the guide bushings, use the classic ones.
there, someone spoke out about grinding valves with a drill, under no circumstances if you don’t want to completely screw it up. as I do at my work: 1. open the valve and see how efficient it is. 2. if possible, check the angles on the saddle. If I’m wrong, there are three angles: 15; 45; 75. We are most interested in the 45 degree angle, since it is the working one, the other two are for improved performance. 3. Carry out the valve lapping manually through a rubber hose; you can use different lapping pastes with different dispersions. (If you have nothing to cut the corners with, I recommend rubbing the valves longer with different lapping pastes, gradually reducing its dispersion). Good luck. PS For those who are from Moscow, I can give it to anyone who needs lapping paste, otherwise they’ll throw it away anyway, I have a couple of kilos of it.
[Edited 17/9/2003 serjant]
So, just in case, I’m writing. If you lose the crackers, you can buy eight or more from auto stores. Fits with minimal modifications. You just need to file the top plate down from the bottom. Saw off its protrusion, otherwise it will rest against the guide. By the way, the spring is also tightened, which is not bad. I myself encountered such a problem, I had to go urgently, but I lost a cracker, and where it was repaired, they don’t sell Ural crackers anymore.
You can combine a drill and a hose. You put the hose on the valve when it is already in the seat, and you put the hose or PVC tube (there are transparent ones - they will be harder) on a steel rod of a suitable size and clamp it into a drill, with an adjustable speed. and then, with a slight pull of the drill towards you, you begin to rotate.
Guys, well, you don’t need to work with a drill, my advice to you. The work there is only 5 minutes maximum, I grind the standard 8 valves on a car in half an hour. I’ve already gotten into trouble with a drill once. By hand, better by hand. Good luck.
Tell me how you got there, otherwise I’ll ask anyone why everyone shrugs their shoulders so badly with a drill.
for Burnt_Chopper
: Scuffs and risks remain from the drill. This is, of course, if you approach the procedure crazy. I first rough it with diamond paste, then wash it off and sand it clean with graphite lubricant using a drill. The main thing in the process is that the products do not get into the valve guide, otherwise they will grind the valve stem like that.
Where? They don’t stay on the saddle – I’ve done it myself many times and have it all written down. Or on the valve from the clamp? You have to do it through a hose. in short it’s not clear
Seriously a couple of kilos? What kind of paste is this, give it if you don’t need it.
Well, in general, I don’t know how to describe it, this is production waste that is not waste at all. After grinding the cylinder head on a cast iron plate (we are not engaged in a blog-gifted business) with the help of kerosene and corundum, ground corundum remains, more like dust, if dried, we We just grind it in, if the grinding is good, then the valve holds the kerosene for 40 minutes or more, then a thorough cleaning is just coming and all the good stuff goes to the landfill, the last cleaning was about 5 months ago, so a lot of money has accumulated.
in fact, it’s just difficult to assemble everything, just have one guy hold his head (put a rag under the valve), the other guy presses the valve plate with a 19 key and uses tweezers to insert the crackers only then, when two crackers fit into the grooves, knock quietly on the plate so that everything falls into place. but in general, first before removing the head, see if this is the problem 1) measure the compression, if it’s tight then don’t touch it 2) if it’s tight then add a little oil and measure again if it’s grown, then the rings and if it’s also bad, then the valves, then take it apart (if the rings then you will have to bore the cylinders) it is better to sharpen it immediately for the second repair.
nelzia s drelju, po krainei mere eto neprofesonalno. rukami eto bystro i gorazdo tocneje, ot dreli vibracyja i netocnost idiot, there custvovat nado..
I completely agree with ZIURKE. It’s better to do it with your hands, you do it for yourself.
for Sharapov
: FUCK, AT LEAST SOMETIMES YOU GIVE GOOD ADVICE, PATSAN
thank you for the axl, of course, why can such a thing help the patsans, I’m always on the hunt, I also know how to embroider
Lapping process
First, remove the head from the engine. Next, the camshaft, adjusting washers or hydraulic compensators are removed from the head.
The next step is desiccation of the valves. To do this, either a device is used, or they are knocked out with a spacer.
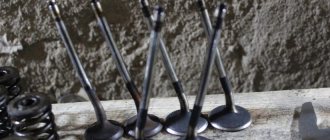
After this, the mounting plates and springs are removed. The valve itself is removed from the head to assess its condition and the condition of the seat.
If it has no signs of burning and its rod is not bent, then it is not necessary to change it; it will be suitable for further use.
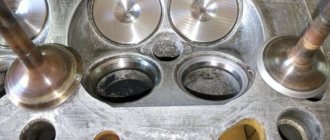
The saddle also needs to be inspected for signs of burning. If there are traces of burning of the seat, its surface is first treated with a rolling cutter.
After making sure that there is no burning on the surfaces, the grinding process begins.
To do this, apply a little initial processing paste to the valve chamfer.
Next, it is put in place, and a lapping device is put on its rod. If it is homemade, then the rubber tube on the rod must be clamped with a clamp.
Then the valve is pressed against the seat using the device and grinding begins.
To do this, turn the valve 180 degrees using the knob, and then turn it in the opposite direction. These movements are used to perform grinding.
It takes approximately 5-7 minutes to treat the surface with one type of paste. time.
The valve position changes periodically. That is, it needs to be turned approximately 90 degrees. from the extreme position when grinding in, after which the process continues again with turning it 180 degrees. and return back.
It is not advisable to mechanize the process by using a drill with an attachment on the valve stem.
Drills usually have high speeds, so when grinding with them there is a possibility of overheating the valve seat and chamfer.
In this case, a screwdriver is better. But the circular motion that will be provided by a drill or screwdriver is not recommended during lapping; this operation is best performed by half-turning the valve and then turning it in the opposite direction, that is, manual lapping.
After grinding in with roughing paste, the surfaces are thoroughly cleaned with a rag to remove any remaining paste.
Then finishing paste is applied to the valve chamfer and the grinding process is repeated.
A successful result of the grinding-in will be a uniform gray matte color of the ground surfaces without any traces of holes or scratches.
So, one by one, grind all the valves, both intake and exhaust. There is no particular difference in which car engine this operation is performed on.
The valve grinding process is the same for both VAZ-2106 and VAZ-2109 and later models.
The difference in the complexity of the work for these cars can only be the process of removing the cylinder head, preparing for lapping, and the ease of access to the valves due to the slightly different shapes of the cylinder head.
How to fix valve leaks? Valve lapping
1. Elimination of valve leaks is carried out by grinding them into the seats; if there are no cracks or damage on the plate and valve, it can be restored by grinding. To perform this procedure you must:
2. Remove the oil seal from the valve.
3. Remove the valve that does not fit well from the guide sleeve.
4. Next, a special lapping paste, for example “Diamond”, is applied to the working surface (the one that needs to be ground).
5. The valve is installed in the cylinder head, and a “device” for grinding valves .
6. Pressing the valve to the seat, grinding is performed by rotating the valve from side to side, making 10-15 such movements, turn it 90° and continue grinding again. Grinding should be carried out until a uniform, flat surface is formed on the plate and seat, and the parts themselves fit perfectly to each other.
7. Upon completion, the remaining lapping paste is removed, and the valve with new oil seals is installed in place.
That's all for me, I wish you good luck in your work! Thank you for reading us, see you again on Question Auto!
Hi all ! Tell me, there were shells on the exhaust valves, they were ground, I ground them in and the working chamfer was somewhere around 1.5-1.8 mm. But they don’t pass the kerosene test after a day, smudges are visible. I blew the compressor into the outlet window and if you blow 9 bar (+ losses) then small bubbles are visible (2-3 leak points) if the pressure is lower then there are no leaks)))
The new intake valves are used perfectly, 9 bar holds no bubbles, but they also don’t pass the kerosene test, after a day smudges are visible.
All the kerosene doesn’t go away, 10-20 percent, so I pour it into the combustion chamber.
Are the exhaust valves to be changed or will they go? they will slam over time) I grind it by hand, I rub it for a long time for fear of ruining the saddle.