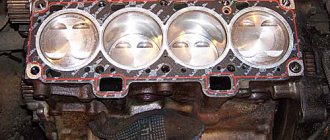
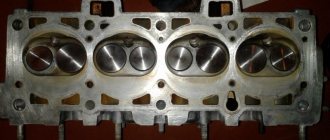
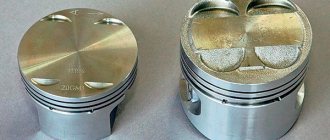
It’s easy to replace a burnt-out valve yourself at home; the only thing you need to know is how to remove the head from the engine. And I will explain all the work involved in replacing and lapping the valve.
I will assume that you have never replaced a burnt-out valve or you have changed the valve but not successfully (the valve does not hold and the engine suffers). This method of replacing and grinding the valve is suitable for any make of car, UAZ, Zhiguli, Gas, etc. All valves are basically the same and the only difference is in size and location in the engine head, and they all grind in the same way.
The first thing you need to do before replacing and lapping the valve is to buy lapping powder (the powder can be different, dry and ready-to-use). The dry lapping powder will need to be diluted with any machine oil (it’s easier to take the oil that you pour into your engine), the ready-made lapping powder has already been diluted. To dilute the lapping powder for valves, pour it into any small container, even a bottle cap (you don’t need a lot of it, but you can always add it) and fill it with oil to make a medium-thick porridge. There are many types of lapping powder; in principle, any one will do, but it is better if it is smaller.
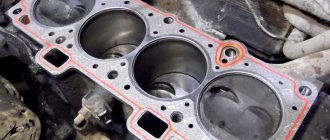
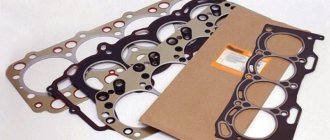
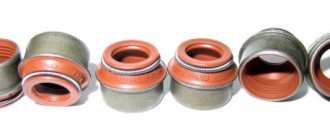
Also, do not forget to buy a new head gasket and valve seals, even if you recently changed the valve seals, it is still better to install new ones after grinding in the valves.
Usually exhaust valves burn out, I have never seen an intake valve burn out. Therefore, buy a replacement valve or valves; if there is a good working valve, then you can install it.
Valves burn out for various reasons, the valve was pinched, a very lean fuel mixture (especially if the engine runs on gas), a lot of wear on the valve guide (the valve hangs loosely in the guide), or wear on the valve stem itself (abrasion of the valve stem).
Let's start replacing the burnt out valve
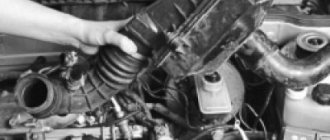
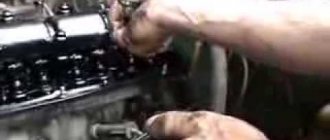
Advice, do not remove the carburetor and manifold from the head, they do not interfere and you have less hassle with disassembling unnecessary parts. The first thing you need to do is dry out the valve, most likely you don’t have a valve puller, if you do, that’s great, but you can do without a valve puller. Place the head on a flat surface, preferably a strong table or wooden shield; you can also lay a rubber mat under it. Place any piece of iron under the valve that needs to be dry, the main thing is that the valve rests against it, take a tube with an internal diameter of 13 mm or more, the main thing is that it is no larger than the valve spring plate (for Zhiguli), for UAZ and GAZ the tube should be at least 16 mm. Place this tube on the valve so that the valve crackers are inside the tube, and hit the tube with a hammer, usually on the 3rd or 5th blow, the valve cracks and the crackers remain in the tube and are not lost, just press the tube tightly against the valve plate so that it does not jump off the valve plate upon impact . I’ll tell you right away, don’t be afraid, the spring won’t fly away and won’t hit your hand.
The valve is dry, pull it out, insert a new valve and shake it; if the runout is about a millimeter, then it is still tolerable, you can leave this valve guide, but if the valve dangles too much to the sides, it is advisable to replace the valve guide with a new one.
Preparatory work before replacing valves
Studying instructions, watching videos on the Internet, visiting thematic forums, gaining an understanding of the procedure.
Selection of tools, spare parts, materials, measuring instruments, devices.
To work you will need:
- Sets of wrenches of various types (open-end wrenches, socket wrenches, socket wrenches, ratchet wrenches).
- Screwdrivers, flat, Phillips.
- Hammer, metal tube 15 cm long with an internal diameter of 15 mm.
- Jack (in case of absence of inspection hole).
- Compressometer.
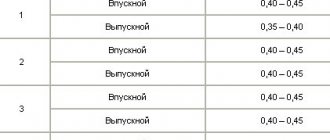
- Set of valve shims.
- A set of feeler gauges for measuring gaps.
- Valve release device.
- Long tweezers.
- Electric drill with adjustable speed and reverse.
- A set of new intake and exhaust valves.
- Seats, oil seals, guides, valve stem seals.
- Oil seal remover.
- Vernier calipers (micrometer).
- Engine oil.
- Paste (powder, diluted with oil) for grinding valves.
- Rags.
Tool
If we are replacing valves with our own hands, be it a VAZ or another car, we must not miss such a nuance as the presence of a special tool. Here's what you'll need:
Sets: wrenches, sockets, screwdrivers for dismantling and installing machine elements.
Valve desiccant. It is needed to compress the springs in order to eliminate the cracks (locking elements).
Lapping tool. The valves require lapping to ensure compression. Purchasing a special device is not advisable; you can use a drill and a piece of hose.
This is interesting: How to train the throttle valve of a Nissan Almera Classic
The hose tightly connects the valve stem and the drill attachment and grinds in with translational movements. Then pour diesel fuel at the junction of the valve and the seat; if it does not leak, then the job is done efficiently.
Tool for removing oil seals. When replacing valves, you need to change the caps on the bushings, which will be quite difficult to do with your own hands. It is better to use a special puller.
Using improvised tools can cause damage to the integrity of the part, which will lead to the need to purchase new seals.
There is another device - a micrometer. It will give an accurate measurement of the rod parameter and identify valve wear defects.
A key for fixing the crankshaft in order to adjust the correct operation of the timing belt.
It is advisable to have a torque wrench to tighten the bolts.
Consumables
In addition to valves, you will need:
- suitable sealing caps;
- cylinder head gasket;
- valve cover gasket;
- if necessary, sealant;
- cylinder head mounting bolts, sometimes it is possible to use old bolts;
- lapping paste or powder.
What to prepare for before replacing
The process of replacing valves yourself may seem like a fairly simple task. But do not delude yourself, since the procedure is inevitable without partial disassembly/assembly of attachments, monitoring thermal clearances, and checking dimensional tolerances. To perform all procedures correctly, you should methodically follow the instruction manual for your car. It is in the car manual that you will find all the necessary information about thermal clearances, tightening torques, methods of adjustment and adaptation of mechanisms that need this after removal. The more complex the design of the engine in your car, the more difficult it will be to replace it.
It is worth remembering that repairs may not be limited to replacing bent or burnt valves. If the new products dangle, the guide bushings should be changed. If the seats are too sagging and the valves do not fit tightly, the manufacturer often recommends replacing the cylinder head. Often, owners of cars with engines ZMZ-405, ZMZ-406, in order to prevent the camshaft cam from touching the hydraulic tappet housing and to avoid installing a new cylinder head, shorten the rods, performing the so-called valve trimming.
To prevent engine repairs from being in vain, after disassembling the cylinder head, it is necessary to properly repair the defect.
How to Replace a Valve Guide
In order to knock out the valve guide, you need a special mandrel, which you most likely don’t have, well, we don’t need to knock it out without it, take a round timber Ǿ12-13.5 millimeters or a long bolt Ǿ12mm for the Zhiguli head, for the UAZ and Gaza round timber Ǿ15-16mm or 16mm bolt. But there is a very important point on which I want to draw your attention, you need to knock out the guide sleeve from the inside towards the camshaft (from bottom to top) and it is very important to knock it out with a very heavy hammer with a half-hammer, the blow should not be very strong, the main thing is it must be heavy (the guide sleeve is easy will come out and won't crumble). If you start knocking out the valve bushing with a light hammer, the bushing will crumble and you will only suffer.
Photo. Valve with guide bushings, at the top is the left bushing from the VAZ 01-07 model, at the bottom is the factory bushing VAZ 08-09
How to drive a valve guide into a head
First you need to choose a valve bushing before hammering it in, there is a large selection of valve bushings in stores, ask the seller for factory guide bushings, and naturally he will answer yes (he needs to sell it and the sellers know how to hang noodles). And then you get a headache, the bushing is clogged and the valve won’t fit, but for this the mechanic has a special rubber that you don’t have. I’ll explain how to distinguish a high-quality valve bushing from the left (underground) ones. Take the valve with you and when buying valve bushings, try to put it on the valve, the factory bushing will fit easily and will move freely along the valve and the outer wall of the bushing will be polished to a shine, and the place where it is stuffed The valve seal will be matte in color. The left valve sleeve will not fit onto the valve or will fit tightly and its color will be completely dull. The valve sleeve should fit easily onto the valve, since when it is hammered into the head, it is slightly compressed and the valve fits in as it should.
Before hammering the valve sleeve into the head, put the retaining ring on it, remove it from the old sleeve, lubricate the hole in the valve head where you will drive the sleeve with oil, the sleeve is driven from top to bottom until the retaining ring (do not overdo it!!!).
Zhiguli valve bushings must be driven in carefully, do not hit the place where the valve seal is packed, this place is very fragile, find a tube with an internal diameter of 12 and maximum 13 mm, place it on the bushing so that the place where the seal is packed is inside the tube, and also carefully hammer it into the head with a sledgehammer.
Drive the valve bushings onto the head of the UAZ or GAZ in such a way that on the edge on which you will hit, place a piece of tin or a thin piece of wood, place a bolt or round timber with which you knocked it out, and also hammer it into the head with a sledgehammer. If you suddenly accidentally slightly bend the edge of the bushing hole, you can level it with a drill or a file.
Replacement of cylinder head valves! Instructions, photos, videos! Adviсe!
Valves in internal combustion engines are an element of the gas distribution mechanism (GRM). Their task is to regulate and supply the air-fuel mixture (or air) into the cylinders and release combustion products. According to the location of the timing part, the timing belt can be lower valve or overhead valve, however, in modern engines only the latter option is used.
The valves have a simple design and are highly wear-resistant. The latter is due to the manufacturing material, which must withstand increased loads.
The valve itself consists of several sections:
- plates (lower expanded part of the part);
- rod (the upper narrow part of the part, going from the plate upward);
- chamfers (the place where the plate adheres to the cylinder block);
- plate edges;
- the end of the rod (its upper part located above the groove);
- recesses for crackers (small groove under the end).
The contact point between the plate and the cylinder head is called the seat. It is made of steel or cast iron and pressed into the cylinder head.
According to their purpose, valves are of two types:
Inlet
Responsible for supplying the air-fuel mixture to the cylinder-piston system. They have a solid rod and, usually, a larger diameter plate to improve working properties.
Grinding the valve to the head
If the valve is burnt out, then the valve seat is also burnt out; usually mechanics first level the seat with a special cutter, which you don’t have; no, we can do without it (the engine has been tested and runs no worse). I’m amazed at how some motorists grind valves by hand (I’d go crazy) let an electric drill do the work for us (if you have a left-right reverse drill, it’s even better, but if not, this one will do). Spread the edge of the valve with rubbing powder, insert the valve into the head and clamp the end of the valve into the drill chuck, but not deeply, but to a depth of about 15 mm, the main thing is not to scratch the place where the valve comes into contact with the oil seal. Pull the valve up with a drill and turn it on, let the valve grind, make such movements up a little down and up again (I think you understand) if the drill is in reverse, switch the rotation. On a nine or eight, it is difficult to reach the valve with a drill; you need a very small chuck, but you can do this by taking a strong piece of reinforced rubber hose that fits very tightly onto the valve, take an 8mm pin and pull this piece of hose onto it as tightly as possible, clamp the pin into the drill and the other end hose onto the valve and also begin to grind the valve onto the head seat.
Valve lapping
The key point of replacement is grinding the valve to the seat. The procedure is aimed at eliminating the slightest discrepancies in the contact of parts during operation and increasing tightness.
Lapping paste
Before you get started, you should get some lapping paste. The market is replete with options, ranging from cheap compounds of dubious origin to professional pastes. According to their performance characteristics, lapping pastes can be coarse-grained or fine-grained (sometimes something in between). You need to get both. Coarse-grained ones are used for initial grinding. Fine-grained - for finishing. Essentially, the paste acts as sandpaper, polishing the parts and making them as compatible as possible with each other. The sequence of steps for grinding valves is as follows:
- A thin, uniform layer of coarse-grained composition is applied to the chamfer (the valve must first be cleaned if there is no need to replace it with a new one).
- The valve is inserted into the bushing, the spring should be in place. It is recommended to apply graphite lubricant to the rod. This will reduce resistance during rotation and make the rotation process easier. Plus, graphite lubricant prevents paste particles from entering the bushing.
- A grinding tool is attached to the rod. Typically, a drill operating in reverse mode is used, which is connected to the valve using a hose secured with special clamps on the rod and the drill itself. You can also use a hand drill or screwdriver, but this will take much longer.
- The rotation of the drill must occur at low speeds, approximately 500 rpm. Otherwise, overheating of the valve belts and seats will occur.
- In the process, it is necessary to simulate the forward-return movements of the valves, and not be limited to circular ones.
- When all the irregularities have been smoothed out, the valve is removed and thoroughly cleaned. The completion of grinding can be recognized by a grayish strip (several millimeters wide) on the surface of the leg. If the strip is present, then the grinding in is complete.
- Then a layer of paste is applied to the chamfer for secondary processing, and all manipulations are repeated. It is important to thoroughly clean the part from dirt at the end.
- To determine the degree of grinding, you can use oil, as before the paste, and perform a final grinding. After this you will see how well the valve fits to the seat.
- The tightness is checked using kerosene. To do this, the valve is installed in its place, in the head, along with the spring. With the head on its side, you need to pour a little kerosene into the channel closed by the valve. The sealed design prevents kerosene from entering the combustion chamber.
Replacing valves is a rather troublesome procedure, although not that complicated. For an amateur, the greatest difficulty is to correctly disassemble and reassemble the timing belt. To avoid mistakes, you should carefully remember the location of all disassembled structural elements relative to each other. In order not to confuse anything during assembly, some people use a special marker during the dismantling process, marking the joints and locations of certain elements on the parts. Video about replacing and grinding in cylinder head valves:
It is very important to correctly determine whether the valve is worn in or not!!!
The drill did the job for you when grinding in the valve, now you need to know for sure whether the valve is grinding in or not. Pull out the valve and wipe it clean with a rag, the ground area will have a gray matte color and the unground area will either shine if the valve is new or different from gray, but simply make sure that the color of the valve is the same all around and if there are shades of color, it’s better to let the drill work. Usually the valve grinds in immediately if it is not crooked.
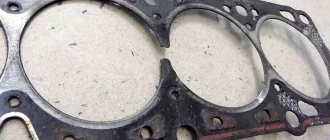
Photo. Poorly lapped valve seat.
But the valve seat does not always grind in quickly, it depends on how deep it is burned, also wipe the valve seat clean and carefully look at the color of the area being ground in; if there are different shades of color, start grinding again, let the iron drill work. Remember, if you don’t rub the valve well, then after a while it will burn out again, so it’s better to rub the valve one more time than it will burn out after some time.
Another tip, even if you only have one valve burnt out, don’t be lazy, grind all the valves!!!
Photo. Adapter for grinding valves VAZ 08-09
What is an automobile internal combustion engine valve?
The valve group directs gas flows in the hot “heart” of the car. It is represented by 2 types of devices - inlet and outlet valves. The design in both cases is the same, but the execution is different.
The motor valve looks like an upside-down nail. The lower part (plate) sits in the saddle, hermetically blocking the flow of the working medium. The upper one (rod or rod) guides the head-plate, being placed in the sleeve.
The head is made of heat-resistant, the rod is made of alloy steel. They are welded together and then ground, since the transition between the elements must be smooth. The better this rule is observed, the less turbulence in the circulation of the fuel mixture and the more melodious the engine operation.
The rod is sometimes made hollow and filled with liquid sodium to improve heat dissipation. A rigid chamfer and rim are placed on the head. To ensure that it fits as tightly as possible in the saddle, be sure to perform grinding.
In addition to the intake and exhaust valves, the engine flow shutoff system is formed by:
- hard spring;
- a guide sleeve that “clings” to the rod with the help of crackers (through a special groove);
- a seat into which the chamfer of the valve disc “sits”;
- cylindrical rim (it keeps the diameter of the part unchanged during lapping and adds rigidity to the plate).
Stuffing the valve seals
But first you need to remove the old valve seals, on Zhiguli they must be removed carefully and in no case should you try to knock them off with a blow, the place where the seal is packed will break off, take pliers, hold the valve seal with them and try to turn it if it doesn’t work right away, grab it and try to turn it again, then grab it with the pliers and the valve seal will loosen and rotate and come out. Also remove the valve seals from the UAZ and GAZ.
And now we will fill the valve seals on the Zhiguli, insert the valve and put the valve seal on it up to the guide sleeve, take a tube with an internal diameter of 13 mm and carefully, with a light hammer, tap the valve seal with light blows, just do not overdo it, otherwise you will break the seal. If there is no such tube, you can flatten the larger tube a little to size, and saw the smaller one a little lengthwise and spread it to size. You can also first remove the spring from the valve seal so as not to accidentally damage it and then put it on the seal.
On UAZ and Gas, fill it in the same way as on Zhiguli, but the tube should have an internal diameter of 16mm.
Dry the valve
It was easy to remove the valve, but drying the valve without a valve remover is not very easy, but you can, put a piece of iron under the valve so that it rests on it, put on the springs, place a plate of springs on the springs and put crackers in it, take a 19 or 22 open-end wrench and firmly press on the springs and let your friend insert the crackers, this is all checked, I inserted the crackers into the valves like this several times.
I hope my advice will help you and you can replace the burnt valve yourself.
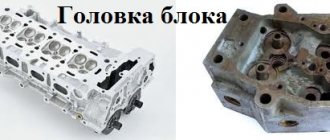
Disassembly, repair and assembly of the engine cylinder head
If it is necessary to repair the cylinder head of an engine installed on a vehicle, remove the head (see “Replacing the cylinder head gasket”). In most cases, cylinder head repair involves grinding or replacing valves, grinding or replacing valve seats. In case of such malfunctions as a violation of the tightness of the channels of the cooling system jacket and warping of the mating surface to the cylinder block, the cylinder head is replaced. You will need: keys “10”, “12”, “13”, a spark plug wrench, a magnetized screwdriver (or tweezers), tools for compressing valve springs and removing valve stem seals.
How to grind in a valve seat faster?
Sometimes a car enthusiast, while repairing his car, is faced with the problem of valve lapping. This manifests itself in the fact that the valve seat is worn out and the valve is not ground in evenly and the valve seat is not completely ground in. You have to spend a long time grinding the seat, which also wears out the valve itself. You can use a cutter if you have one, but most likely not, but a cutter can also ruin the valve seat if there is even a little play in the guide bushing. Therefore, I strongly advise non-masters not to get carried away with the roller cutter. But there is a good way to align the valve seat faster. If there is an old working valve, then grind grooves on it as shown in the photo below, smear lapping powder on it and lap the valve seat. After lapping the seat, lap the main valve.
Photo. Valve for quick lapping of valve seat.
Replacement procedure
Technological processes carried out when replacing valves:
- removal of attachments (throttle assembly, exhaust manifold, pipes, etc.). Remember, and if you cannot remember, then write down or photograph the location and method of installation of unfamiliar elements, vacuum tubes, pipes, etc. This will save you time and nerves during assembly;
- removing the cylinder head. After dismantling, the head should be washed and the cylinder head should be inspected for cracks. Check the tightness of the valves to the seats. To do this, turn the head upside down with the plates and pour gasoline into the cavity of the combustion chamber. Apply compressed air to the appropriate channel. The number of bubbles will indicate the degree of tightness;
- desiccation of valves. The process is quite simple and is well shown in the video. It is best to remove crackers with tweezers;
- removing springs and upper plates;
- dismantling valves. If not all valves are replaced, the old parts must be marked and subsequently installed in their places;
- grinding the cylinder head mating plane.
How to determine if the valve is tightly seated on the seat?
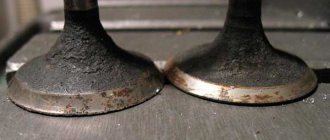
If you have removed the head, be sure to pay attention to the valves; at first glance, it may seem that the valves are good, but there is one sure sign that the valve definitely needs to be changed or ground in. Valves can be of different colors, white, brown, black, etc. This is normal, it all depends on the carburetor settings and engine oil consumption. But if the valve has different shades as shown in the photo below, this is a sure sign that the valve is poorly ground to the seat. This valve must be ground in or replaced with a new one, but it must be ground in.
Photo. Valve showing signs of burnout.
The valve in the photo can still be ground in, but if there is a blue tint, it is better to replace such a valve with a new one.
Fault diagnosis
Before starting work, it is logical to make sure of the feasibility of this event, initiated by the following reasons:
- The time has come to perform periodic checks, adjustments, and replacement of parts and components. Determined by mileage (15,000 – 30,000 km), operating conditions of the vehicle.
- The appearance of characteristic symptoms of damage, the occurrence of breakdowns.
This is interesting: Replacing a Daewoo Nexia headlight: instructions, photos, videos, process
The main signs signaling the driver to pay attention to the valves are:
- noticeable loss of engine power;
- “tripleting” of the engine, which manifests itself when operating at different loads (one or several cylinders fail, the mixture in the combustion chamber does not ignite, ignites with a delay, is not completely consumed, the phenomenon of detonation occurs);
- noticeable increase in fuel consumption;
- the car moves jerkily, the idle speed “floats”;
- the appearance of soot and soot on the spark plugs;
- extraneous knocks, noises in the engine compartment.
Similar symptoms are typical for different types of car malfunctions. An engine is not a fountain pen. Unreasonable disassembly and reassembly is a long, troublesome undertaking. You should first make sure that it is necessary.
Idle cylinder detection
If unstable engine behavior occurs, it is necessary to try to localize the cause, moving from simple checks to complex diagnostic examination methods. You should first make sure that the starter is working properly and that the battery is fully charged.
- Start the engine and leave it at idle speed.
- Raise the hood.
- Remove the spark plug cap from the first cylinder. The engine has stalled - the cylinder is working, no changes have occurred - intervention is required. In this way, go through the remaining cylinders.
- Change spark plugs and high-voltage wires on rejected cylinders. Repeat testing. The persistence of the situation indicates a search for a breakdown inside the engine.
Presence of spark, fuel
- Check for spark. On an engine equipped with an injector, disconnect the injector power supply connector. Unscrew the spark plugs one by one, lean the body against the ground of the car, start the starter, watch, observing safety precautions. It is more convenient to perform these actions together (one is under the hood, the other is in the cabin).
- Make sure there is fuel supply. On a cold engine, connect the injectors, disconnect the ignition module control connector. Turn out the spark plugs. Use the starter to crank the engine for seven to ten seconds. The threads of the spark plug seats are filled with fuel - this is normal. Dry holes mean problems with fuel supply. Questions arise about the fuel system and electronic control unit.
Compression test method
The search for the culprit continues by measuring the pressure in the cylinders at maximum compression. A compression gauge is inserted instead of a spark plug. The piston is installed at top dead center (the special mark on the camshaft gear is aligned with the mark on the cylinder head). Excessive pressure is created in the upper part of the cylinder. The normal value according to the device should be in the range of 11 – 13 kg/cm3. The acceptable value is indicated by the manufacturer in the technical documentation for the vehicle. Low compression - lack of tightness of the combustion chamber.
- The rings on the piston are worn out.
- The valves do not fit tightly.
- The cylinder head gasket is damaged.
- Cracks in the block, cylinder head.
Pour a little clean motor oil (20 - 30 ml) used for this engine onto the piston. Repeat measurement. The indicator has improved - repairs and replacement of the piston group are awaiting. The situation has not changed - the valves probably burned out. Replacing valves and rings at the same time is not excluded. It's time to open up the engine.
It is possible to determine the cylinder with the lowest compression by hand. Alternately leaving the spark plug in the combustion chamber under test, removing the rest, turn the crankshaft by hand. The option of applying minimal force will indicate a suspicious object. The method is safe and simple.