Ignition coil device
It is known that on 8-valve engines an ignition module was used (module repair, diagnostics) with two channels and coils that are capable of transmitting a spark to a pair of spark plugs at once. However, on a 16-valve engine, the coils became individual for each spark plug.
Prices and articles
The ignition coil from the Russian manufacturer SOATE for the VAZ-2112 has article number 2112-3705010-12 and costs around 1,000 rubles in stores. Analogs from Bosch can cost twice as much, but the quality of these parts is much higher. In any case, the choice is always yours.
Ignition coil from Bosch.
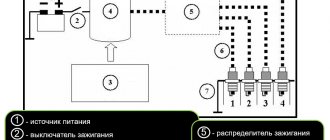
It is probably clear to all drivers that the main purpose of the high-voltage coil on a car was and remains one thing: to set fire to the air-fuel mixture. To do this, it generates high voltage, the value of which is about 40 thousand volts.
It is a transformer that increases the low voltage of the battery to high. The transformer consists of two windings, one of them is primary and the other will be secondary, which are wound with copper wire on an iron core.
The primary winding is wound on the core, and the “secondary” is wound on top of it. The entire structure is covered with a casing. If the low-voltage winding has only about 150 turns, then the “secondary” already has several thousand.
There are no high-voltage wires, since it is placed directly on the spark plug. When, at the right moment, an impulse is sent from the engine control unit to the “primary” of the coil, a magnetic field is excited around the core, which contributes to the appearance of high voltage in the “secondary”. In this case, the spark plug plays the role of a spark gap that ignites the working mixture in the engine cylinders.
Prices and articles
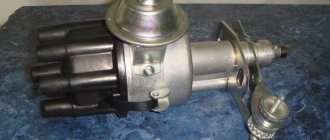
Purpose and design of the ignition coil of the VAZ 2112
To create a pulse (spark) between the electrodes of the spark plug of the VAZ 2112 carburetor engine, a “standard”, classic or case coil was used for a non-contact ignition system (BSI), which is a high-voltage pulse step-up transformer with an open or closed magnetic circuit. Its use on “two-wheelers” continued until it was replaced by a two-spark (four-terminal) ignition coil (module) for 8-valve injection engines and an individual coil for power units with 16 valves.
New ignition coil for VAZ 2112
Diagnostics of malfunctions of the VAZ 2112 housing ignition coil for BSZ, nomenclature number 3122.3705 or 8352.12, consists of measuring the resistance of its primary and secondary windings and comparing the obtained data with table values. The resistance of the primary winding of coil 3122.3705 should be 0.43 (±0.04) Ohm, the secondary winding - 4.08 (±0.4) kOhm. The resistance of the coil 8352.12 is respectively 0.42 (±0.05) Ohm and 5 (±1) kOhm. The insulation resistance to ground must be at least 50 MOhm.
If measurement results differ by more than tolerance values, the coil must be replaced. You need the VAZ 2112 ignition coil, with its relatively low price, it is quite reliable and its replacement is rather an exception to the rule.
Ignition module VAZ 2112
The ignition module (four-terminal coil) provides simultaneous sparking in two cylinders (the first and fourth or the second and third). It needs to be checked for serviceability if there is no spark on one or more spark plugs. It is checked using a stand that simulates various engine operating modes and an oscilloscope. Checking “in the field” consists of connecting a known working spark plug one by one to the tips of high-voltage wires, grounding it to ground and, turning the crankshaft with the starter, visually detecting spark formation on the electrodes of the “test” spark plug.
The process of checking all ignition coils on a VAZ-2112
The VAZ-2112 engine with 16 valves uses individual Bosch ignition coils and in order to check them, the following procedure must be followed:
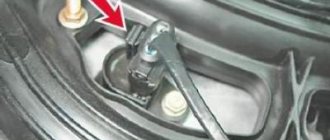
- First of all, we remove each coil from its landing well.
The order of dismantling does not matter. - Then we turn off the power supply and remove them all together as an assembly.
- First of all, we pay attention to its external condition, the absence of cracks and various breaks.
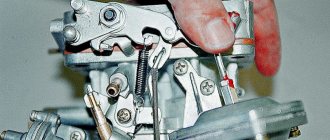
If there is damage on it, we replace it. - The same applies to the spring located inside the coil, look at its position, it should be exactly in the center.
Let's look at its correct location. Despite the fact that many people on the Internet talk about the impossibility of checking a coil with their own hands, it is possible to check it only by knowing their initial values, which are measured in ohms.
- In order not to make false measurements, first of all we check the internal resistance of the wires and the multimeter itself.
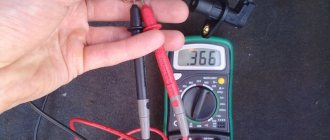
To do this, switch the device to the OM position and connect the probes to each other. What value the multimeter gives is its internal resistance. The value can range from 0.0 to 0.3 ohm. On the multimeter, a value of 00.3 Ohm is normal. - First of all, we “ring” the primary winding, which is located on the first and third contacts; when connecting, the polarity does not matter.
- Depending on the presence of error readings and coil readings, we add up the final indicators.
For example, if the internal resistance is 0.2 ohms and the coil value is 0.7 ohms, therefore the correct value would be 0.5 ohms. Which is the norm. The value of 00.8 ohms is subtracted from the resistance of the multimeter and we get 00.5, which is the norm. - We continue diagnostics with each of the coils.
- If it happens that there are no indications, then we once again check the quality of the connections and the correctness of the connection. If the readings are still zero, then the primary winding on this coil is faulty.
When the readings on the primary winding on all coils are correct and show their values, we proceed to checking the secondary winding.
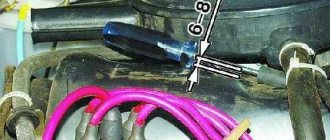
- To do this, set the switch to 2000 kOhm mode.
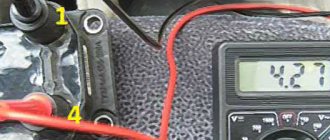
- Next, we place the multimeter probe on the coil, observing the polarity, black to pin 2, which is located exactly in the middle of the connector, and the red probe to the spring, inside the rubber plug.
- Three-digit values will mean the coil is working properly, and infinity values will indicate its failure.
Such designations indicate the serviceability of the ignition coil.The number “1” stands for infinity and indicates a faulty ignition coil.
- Please note that if you cannot measure the resistance correctly the first time, you can wipe the fixed elements from dirt and deposits, since dirty parts can interfere with the signal output.
- When replacing old coils with new ones, you should strictly use analogues, taking the faulty part with you to the store in advance.
How can you check the coils?
In any case, checking the ignition coil on a Priora always begins with its external inspection. Even very small cracks or tears in its elastic bands are not allowed. Their presence indicates that the device has been replaced.
Cracks, chips and other damage to plastic parts indicate that the coil was overheated and it could simply “burn out”. Next, the internal parts are inspected, especially the spiral, its location. If the inspection does not reveal any visible defects, proceed to further inspection.
There are several ways to check the ignition coil, which will be discussed below. During the operation of the machine, it is not often, but there is a need to check it. Doing this when there are no obvious signs of failure is not easy without special equipment such as a spark gap or an oscilloscope.
Let's look at how to check the ignition coil without instruments. To begin with, you can simply swap the devices and see how the engine behaves after that. If the interruptions move into the cylinder along with the coil, then there is a malfunction in it and it needs to be replaced.
You can check the high-voltage ignition coil directly on the car. To do this, you need to remove it from the engine, insert a working spark plug into the high-voltage terminal, turn off the fuel pump and, with the ignition on, crank the engine with the starter. A working coil will show itself as a spark on the spark plug. In this case, you must beware of high voltage and use protective equipment.
In cars that have an on-board computer installed, the system will report problems in the cylinders with a signal in the form of numbers from 0301 to 0304, where the last digit indicates the number of the “problem” cylinder. All that remains is to figure out who is to blame, the coil or the spark plug.
After visual inspection and control, you can begin checking using measuring instruments. It is best to use digital multimeters for these purposes, or devices such as MD-1 or AZ-1. They can be freely purchased, and their price is low. Now let's talk about how to check the ignition coil on a Priora using instruments.
Before checking, the device must be removed from the engine. This can be done this way:
- Disconnect the battery terminals;
- Remove the protective plastic casing from the engine;
- Squeeze the latch with your fingers and disconnect the connector with wires;
- Using a “10” wrench, unscrew the fastening bolt and remove the coil from the mounting socket.
We unscrew the coil with a key - it’s simple! (naturally, the internal combustion engine has 16 valves, a coil of spark plugs in the well) Now you can start checking with instruments. First you need to check and calibrate the measuring device. To do this, set the measurement switch to the position for measuring resistance at “200 Ohms”, and connect the probes to each other.
- Both probes of the device are connected to the coil connector (polarity is not necessary) and the resistance of the primary (low-voltage) winding is measured. Pinout of contacts for measurements 1 and 3, measuring limit of the device is “200 Ohm”. It should show approximately 0.8 ohms. The indicator obtained during calibration is subtracted from this value and the true value of the winding resistance is obtained. If there are no readings, you need to check the reliability of the contact between the probes and the coil leads. If after several attempts the readings do not appear, it means that there is a break in the primary winding and it must be replaced;
- The next step will be to check the high voltage winding. Set the resistance measurement limit to 2 MΩ. In this case, polarity must be observed, since the high-voltage winding has a diode. Therefore, the red probe is inserted into the coil terminal, and the black one is connected to the connector terminal number 2, which is the middle one in the block. The device should show approximately 342 kOhm. It should be taken into account that the readings of the device are highly dependent on the heating of the coil. It is best to test on a cold coil. In this case, it is also necessary to ensure good contact of the device probe with the high-voltage terminal. If the readings are close to infinity, the part needs to be replaced.
Checking with a multimeter A little about whether the ignition coil can be repaired. It is not possible to restore the primary or secondary winding, but even novice drivers can replace the tip on it. To do this, stock up:
- New tip:
- New sealing ring;
- Degreasing agent;
- High temperature silicone sealant.
The site where the tip is installed is cleaned and thoroughly degreased. The skirt of the new tip must be turned inside out and a small layer of sealant applied to it. While it dries a little, install a new O-ring.
Next you need to install the rubber tip in its place. This will complete the repairs.
Description of the ignition module
Before we talk about testing and replacing the MZ in our VAZ 2111, let's understand the basic information. To begin with, we suggest finding out what the 2111 ignition module is and where it is located.
Purpose and location
As mentioned above, the MZ is one of the main devices in the ignition system. Of course, if you think about it, all the components of the system are very important, since the quality of operation of the power unit as a whole depends on them. But if this unit begins to work intermittently, then at least two cylinders in the engine will stop working, or even all four. This is due to the fact that the module itself consists of two coils, with one of them supplying current to the first and fourth cylinders, and the second to the second and third. Accordingly, if one coil fails, this will lead to two cylinders being inoperative, which will affect the operation of the engine as a whole.
The purpose of this device is that it converts the voltage supplied from the interrupter device into a high-voltage signal. This impulse, accordingly, is supplied to the cylinder spark plugs in a certain order. It is used to ignite the combustible mixture in the engine cylinders, which facilitates its normal starting and operation.
Lada twelfth model
As for the location, it is not difficult to find 2112 16 valves; it is located in the engine compartment. Open the hood and look at the spark plugs - they are connected to them, which come directly from the module itself. The MZ itself is a small black square box, so you won’t be able to confuse it with anything else.
Common faults
Only diagnostics will allow you to accurately determine the malfunction of the module, but there are indirect signs that can inform the car owner about a problem in the operation of the device.
If the MZ malfunctions, an error light appears on the dashboard.
So, in what cases is it necessary to replace or repair the VAZ ignition module:
- Starting the power unit has become more difficult. Now the driver needs to turn the starter more to start the engine.
- Engine idling has become unstable. The engine may rev, and the speed may rise and fall.
- The power of the power unit as a whole has decreased. When you press the gas pedal, the car takes longer to accelerate. This symptom is especially obvious when driving uphill. Also, when pressing the gas pedal, dips may be observed - the driver presses the gas, but there is no effect.
- Fuel consumption has increased. Of course, without a fuel consumption meter, it will be difficult to determine such a malfunction. But if you are used to refueling a certain amount of fuel for a certain mileage, you will also be able to recognize this sign (the author of the video is the Auto_Remont channel).
All these symptoms, as stated above, are indirect, since they can also appear with other malfunctions. For example, if the fuel filter is clogged or its service life has come to an end. Also, such signs appear as a result of wear of the spark plugs or high-voltage wires. Therefore, if you are faced with such a problem, then first of all you should make sure that there is no carbon deposits on them, and also check the armored wires. It happens that one of the wires is simply poorly connected to the spark plug, or it is broken or worn out.