We'll tell you and teach you
If the injection engine stops starting, you should not turn it with the starter for a long time, discharging the battery to zero.
It is better to immediately move on to troubleshooting. For stable and trouble-free operation of the engine, a certain amount of high-quality combustible mixture prepared from gasoline and air must enter its combustion chamber.
To ignite this combustible mixture, a spark discharge must appear in the combustion chamber strictly at specified time intervals.
That is why self-diagnosis of a car engine consists of checking the flow of fuel into the cylinders and the presence of an electric spark on the spark plugs.
Is fuel getting to the cylinders?
First of all, take a look at the gasoline level sensor, making sure that there is gasoline in the tank.
As funny (and sad) as it may be, there are still attempts to start the engine without fuel. If the sensor arrow shows that there is gasoline, check whether fuel is entering the combustion chamber. After turning the engine with the starter for 5-6 seconds, turn off the ignition, disconnect the high-voltage wire and unscrew the spark plug.
The wet end of the spark plug (where the side and center electrodes are located) will indicate that gasoline is entering the cylinders.
If you cannot find any remaining fuel on the spark plug, proceed to search for the link where the flow of gasoline stops.
Check if fuel is being pumped into the ramp. After turning the engine with the starter for a few seconds, turn off the ignition and quickly disconnect the inlet gasoline hose leading from the fuel tank from the fuel rail fitting.
Be careful! If the fuel pump is working, you are guaranteed to be doused with gasoline, so cover the fitting from yourself with at least the palm of your other hand. To avoid fuel ignition, do not perform this test on a hot engine.
If the engine was not going to pour fuel on you, then there is no gasoline in the fuel line or it is supplied, but under insignificant pressure.
What to do next? Check the fuel pump. It could either fail completely or not start working due to a blown fuse.
The reason for the low pressure created by the fuel pump may be severe clogging of its filter mesh or wear of the pump valves.
But what if fuel is supplied to the ramp, but does not enter the cylinders? Why don't the injectors allow gasoline to enter the combustion chamber?
Try disconnecting the wires from the throttle position sensor (TPS), located on the throttle block near the fuel rail. If the engine starts with the TPS disabled, the reason is a malfunction of this particular device.
If the engine does not start, reconnect the wires.
For monoinjection engines equipped with a single injector, a malfunction of the injector can be suspected.
On engines with distributed injection, all injectors cannot fail at the same time, and they do not work, most likely due to the lack of a command signal from the control unit.
Is there a spark?
Check for spark discharge.
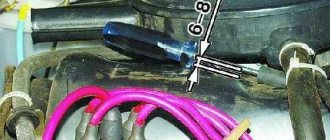
After removing the high-voltage wire from one of the spark plugs, connect it to the spark gap. Using an alligator clip, securely connect the wire from the arrester body to engine ground.
Select the crocodile mounting location as far away from the engine electronic modules as possible.
Turn on the ignition and, turning the engine crankshaft with the starter, observe whether a spark appears rhythmically between the spark gap electrodes and whether it appears at all?
You can make a test spark gap yourself by cutting off the side electrode of the spark plug and soldering one end of the wire to the spark plug body and the other to an alligator clip.
If you don’t have a spark gap at hand, unscrew the spark plug, attach a high-voltage wire to it and place the spark plug on the engine away from the electronic elements so that there is reliable contact between the spark plug body and the engine ground.
Check all high voltage wires and spark plugs. If everything is in order and there is a spark discharge, but the engine does not start, check the fuel system.
injector and carburetor - Auto-Self.ru
Let's start with the fact that during the operation of the car, drivers quite often encounter the fact that the engine does not start, runs intermittently, or suddenly stalls. In this case, diagnostics usually affect the ignition system (on gasoline cars) and the power system.
As practice shows, unstable operation of the power unit on gasoline cars is in many cases due to the fact that gasoline is not supplied to the engine. In this article we will talk about why this happens, as well as what the driver should do if there is no gasoline entering the engine.
For what reasons is fuel not supplied to the cylinders?
So, the general scheme of operation of the power system involves taking fuel from the gas tank, after which the fuel enters the carburetor or injector.
Next, the fuel is supplied to the intake manifold, then the fuel-air mixture enters the combustion chamber through the intake valves.
It becomes clear that if gasoline does not flow into the engine, then this problem occurs both on engines with a carburetor and on injection internal combustion engines. The simplest reason can be considered a lack of gasoline in the tank or damage to the fuel lines. In other words, we are talking about leaks as a result of any damage to the tank or fuel lines, when gasoline leaks out before it gets into the cylinders.
Common problems with the supply of gasoline to the internal combustion engine
If we exclude leaks, the next reason why gasoline is not supplied to the engine is various problems with the fuel pump. Note that on cars with a carburetor there is a mechanical type fuel pump and is located in the engine compartment.
At the same time, injection engines have an electric fuel pump. This pump is located directly in the fuel tank. If we talk about a mechanical device, then often its breakdown or incorrect operation results from damage to the membranes, as well as overheating.
The electric fuel pump usually fails in cases where it operates with a minimum amount of fuel in the tank. The fact is that cooling of this type of pump occurs precisely due to fuel. You should also highlight problems with the fuel pump relay or a break in the wiring through which it is supplied with electricity.
Let us add that if the device is not able to create the required pressure in the fuel system (no or low pressure), then the injectors on some internal combustion engines may not open, and in this case the engine will not start. In other cases, the injectors still open, but there is still not enough fuel. In this case, the unit begins to work intermittently, stalls in different modes, etc.
At the initial stage, it is necessary to measure the fuel pressure in the fuel rail of an injection engine, while at the same time not forgetting about possible problems with the pressure regulator in the rail.
Another problem that prevents fuel from getting into the engine cylinders is dirty fuel system filters. In addition to the usual fuel filter, the injector also has a fuel pump mesh, and in the event of severe contamination of the fuel pump mesh filter, the performance of the device drops noticeably.
If the fine fuel filter becomes dirty, then the flow of fuel into the engine can be completely blocked. As for the carburetor, these cars also have a fuel filter, which is usually installed in front of the carburetor. If the filter element becomes clogged, then difficulties begin with starting the engine and supplying fuel in different modes.
To avoid the above problems, filters must be changed promptly on both carburetor and injection engines. You also need to remember that the filter mesh on the fuel pump needs to be periodically cleaned or completely replaced with a new one every 50-60 thousand km. mileage
The list of possible causes of a malfunction in the fuel supply to the engine ends with contamination of the carburetor or injection nozzles, as well as failure of individual elements. As a rule, the jets in the carburetor can become clogged, and the nozzles in the injectors are subject to contamination. Debris and deposits may also partially or completely block thin channels, etc.
To prevent this from happening, the injector must be periodically cleaned using one of the available methods (ultrasound, special cleaners on a bench, etc.). It should also be added that the carburetor may require cleaning, repair or separate tuning. For example, an insufficient amount of gasoline in the float chamber will result in insufficient fuel for normal operation of the internal combustion engine.
Telegram
What is needed to check the fuel supply system to the carburetor?
Let's look at the solution to the problem using the example of the common VAZ 2109 car.
- several screwdrivers (slotted and Phillips);
- set of wrenches;
- car compressor (available in the trunk of a self-respecting driver);
- container (you can use a PET bottle);
- clean rags.
It is advisable to have a fire extinguisher on hand (working, not for technical inspection). Of course, no open flames during work!
Troubleshooting is carried out according to the principle: from simple to complex. Reasons why the supply of gasoline to the carburetor is disrupted:
- Remember the last time the fuel filter was changed. Perhaps it is simply clogged with dirt;
- Water got into the gas line and an ice plug formed (relevant for sub-zero temperatures, “cured” with a mug of hot water);
- Lack of pressure in the fuel line - banal leaks at the joints. Pay attention to whether there is a smell of gasoline around the car after trying to start;
- There is an obstacle in the hose from the gas tank - a piece of rust, a plug of dirt;
- Fuel pump failure;
- Clogged mesh filter near the fitting in the carburetor.
To determine the location of the fault, there are two primitive but effective ways to check:
- Remove the fuel supply rod and press the manual pumping lever several times. If fuel flows, then the pump is working, we continue to search for the cause in the carburetor. The fuel line from the tank to the pump is also in good condition;
- We fill a container with some gasoline, connect it to the fuel supply hose, and place the bottle as high as possible. We try to start the engine. If the engine starts, the reason is in the chain: gas tank, fuel line, filter, pump.
Next, we look for the cause in localized nodes.
Carburetor check sequence
On the car we tested, the engine air filter is located directly on the carburetor. Therefore, to gain access it must be disassembled.
- Remove the filter cover using a wrench. We take out the filter element (at the same time check its cleanliness) and unscrew the bolts securing the casing to the carburetor. Remove the body;
- Let's look inside the carburetor. Depending on the engine temperature, the throttle valve may be open or closed. In the second case, we open it by hand. Then we press the throttle mechanism drive and check whether a stream of gasoline appears from the pump;
- After making sure that there is gasoline in the carburetor, we get into the car, press the gas, and try to start the engine. If it doesn’t start, look further;
- Remove the top carburetor cover so that the fuel level in the carburetor chamber can be seen. The cover is secured with 5 screws. You should also disconnect the throttle cable bracket and turn off the idle air valve;
- Having released the float chamber, we assess the gasoline level. During normal operation of the fuel supply system, the level should be 23 mm below the walls. You can estimate the level using the tail of a caliper, having previously set it to a depth of 22-23 mm;
- We put the cover back on, fix it with a pair of screws, and start the engine again, having first depressed the gas pedal all the way;
- If the chamber is empty, the verification algorithm is slightly different. We put the lid on, leaving a small gap between the upper edge of the float chamber and the plane of the lid. We fix the gap with a flat steel ruler or a small screwdriver;
- We fill the chamber by manual pumping or by turning the crankshaft a few turns with the starter. After filling the chamber, we try to start again, having first secured the lid;
- The motor starts working - this is a sign of a malfunctioning needle valve. It should be replaced because it is almost impossible to restore it.
The Chinese lawn mower won't start. We climb into the carburetor.
4.7 / 5 ( 26 votes)
“It doesn’t pump gasoline into the cylinder, you spray it from a syringe, it starts and stalls,” - these are the words with which a large number of lawn mowers arrive at our service center in the summer.
Can it be cured? Unfortunately, not always... We will try to talk about common malfunctions of this carburetor and how to fix them yourself.
Before performing any manipulations with the carburetor, it is necessary to eliminate possible malfunctions that could affect the operation of the lawn mower (create an imitation of a non-working or not configured carburetor:
Fuel filter (hoses): no mechanical damage to the filter housing, no contamination, good throughput
Air filter: no mechanical damage on the filter surface, no contamination, good throughput
Malfunctions of the ignition system: a working spark plug “paired” with the ignition module should ensure stable engine operation
A working exhaust system: the cylinder exhaust port, as well as the muffler, should not be clogged with carbon deposits - as a result of which the scythe will “chop” and not develop speed - creating an imitation of a faulty carburetor.
Engine crankcase tightness. Crankshaft oil seals and rubber intake adapters - as a result of damage (natural wear) allow excess air into the engine - usually manifests itself in a strong increase in speed and the inability to adjust the carburetor.
If, after checking all these components, suspicions remain about the carburetor, you can proceed to its initial inspection. Relatively speaking, after unsuccessful attempts to start the engine, the spark plug was unscrewed and it was “dry”
Disassembly of the carburetor should be carried out on a clean, light surface so as not to lose small parts. The disassembly process can be recorded on a photo/video camera, making it easier to reassemble.
What can you check at home with your own hands?
“Standard” version of a modern Chinese lawn mower. It has the same layout and many manufacturer options (Patriot, Forward, Green, Etalon, Prorab, Varyag and many others)
Remove the air filter cover by unscrewing the screw.
Next, unscrew the two screws securing the air filter housing and remove it.
Next, unscrew the cable securing nut and remove it from the throttle valve boss. The screw indicated by the arrow adjusts the idle speed on these carburetors.
We pull off the fuel hoses.
The carburetor gasket should not be damaged; if necessary, replace it.
This quality screw is adjusted by the manufacturer; it cannot “go out of adjustment” by itself. During operation, adjustments are possible due to wear of the piston group, but it will have “minimum values”.
As practice shows, the factory value of this adjustment is 1.5 turns (If you have “misadjusted” it, tighten it completely and unscrew it by 1.5 turns. With this value, provided that the components are in good working order, the trimmer must start. After warming up, the screw may need to be adjusted (should be stable operation at gas speed))
There is no need to twist it unnecessarily!
Carburetors of Chinese lawn mowers are on the left for engine volumes of 26 and 33 cm³, on the right for engine volumes of 43 and 52 cm³. The design is the same, the difference is indicated in the photo. They are understood the same way.
Let's start disassembling:
Unscrew the 4 mounting screws
Let's sort it out in sequence
We immediately examine the condition of the aperture blades. They should not be “bent” from the plane of the carburetor. The diaphragm itself should not be damaged.
The membrane gasket must also not be torn or damaged.
The carburetor body is also free of dirt or deposits that could clog the channels and impair the operation of the carburetor.
The membrane must be “integer” and have no damage to its surface.
The “patch” of the membrane should not “scroll”
Pay attention to the “inlet needle area”. If there is any dirt or even traces of rust, be sure to clean everything.
The needle stroke should be smooth, without jamming or wedging.
To check the needle, press the “sandwich” to the carburetor - fill the needle area with gasoline (carburetor cleaner) (highlighted by an orange arrow)
We put a hose on the fuel supply fitting (marked with a red arrow), blow in air, and at the same time inspect the needle for the absence of air “bubbles”.
If there are no bubbles, then the needle holds, there are no problems. If bubbles are present, we disassemble further.
Unscrew the screw securing the rocker arm axle.
There is a spring under the rocker arm, be careful when disassembling it so as not to lose small parts.
We remove the axle with the rocker arm, the needle and the spring.
I would like to note the following: if the “seat” itself for the needle is broken, then no manipulation will help - you will have to replace the carburetor.
Let's continue.
A very important point in checking the condition of the rocker axis. We check this way: by turning the axle in the rocker arm, we observe that if there is no dirt or damage on the axle, the rocker arm should remain in place.
If, when the axle rotates, the rocker moves along with the axle, jams and “prevents” the axle from rotating freely, it is necessary to clean the axle.
You can try cleaning the axle with gasoline or carburetor cleaner.
If this does not help, you will have to resort to mechanical action.
We clamp the axle in the screwdriver chuck and rotate it at low speed.
We press fine-grain sandpaper (“zero”) against the axle. Don't get carried away - just a few seconds.
The needle itself, if necessary, can be cleaned in the same way. BUT! The sandpaper should not touch the “tip” of the needle.
Go ahead.
Just in case, we use carburetor cleaner to blow through the channels (on the back of the sandwich)
Go ahead.
Just in case, we use carburetor cleaner to blow through the channels (on the back of the sandwich)
The filter mesh must be perfectly clean; under no circumstances should the carburetor be operated without it.
Well, actually the injector valve itself. It is precisely because the membrane of this valve “sticks” that gasoline does not enter the combustion chamber and the lawn mower does not start.
Further actions should be as careful as possible. This valve cannot be purchased separately. If it is damaged (lost) or malfunctions, the entire carburetor will have to be replaced.
By leaning the hose close to the valve, we check its operation. We blow in and suck in air. Correct work - if
If this valve does not work, we will try to “reanimate” it.
First, we try to fill it with the well-known WD-40 liquid.
Next, using a blunt object, we try to “stir” the valve membrane a little as CAREFULLY as possible.
If after these manipulations no changes for the better have occurred, all that remains is to replace the carburetor assembly.
Of course, you can try to remove the valve membrane, but there is a very high chance of damaging it. Using a blunt object from the back of the sandwich, carefully “push” the membrane out of its seat in the valve.
And we carefully monitor the membrane so as not to lose it.
Perhaps you can make it yourself. Diameter - 3mm, thickness 1mm. But it is necessary to select the appropriate material and a suitable “punch”. Does anyone have any manufacturing experience? Share)
If there is a donor, or you have made this membrane yourself, you must place it in the valve correctly and without damage.
If suddenly you forgot the assembly sequence...
All that can be bought for this kind of carburetors is the so-called repair kit. A convenient option is produced by the company IGP (Champion) - in addition to the diaphragm, diaphragm and gaskets, it also contains: a needle, an axle and a rocker arm with a spring. Article: 1700042
That’s all we wanted to tell you about the carburetor of the Chinese lawn mower. We hope that this material will help you troubleshoot and work with pleasure. Good luck with your work!
View a detailed photo report of the disassembly of a Chinese lawn mower
More information about the analysis of damage to the piston group can be read in the article
View a detailed photo report of replacing the piston group on a Chinese lawn mower
Frequent malfunctions and repairs of Chinese trimmers 43-52cm³.
4.4 9 votes
Article rating