How to clean the carburetor of a VAZ 2107
If you decide to independently adjust the VAZ 2107 carburetor, then first you will have to service it and clear it of all blockages.
Preliminary work
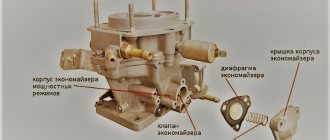
In order to properly maintain the carburetor, you will need to rinse the strainer, which is located in the float chamber at its inlet. Clean all carburetor parts, including air jets, from dirt. Clean the float chamber itself from deposits.
And only after that can the VAZ 2107 carburetor be adjusted, which includes adjustments:
- idle systems;
- float mechanism;
- starting device;
- the level of fuel located in the float chamber;
- adjusting the air damper opening gap.
and some other minor adjustments.
To remove or not to remove the carburetor
When carrying out some maintenance work and adjusting the VAZ 2107 carburetor, you do not have to remove it, but if you want to carry out its full maintenance, then you cannot do without removing it.
You should also know that during operation of the carburetor, all its parts that are constantly moving are self-cleaning, so even after a year of operation, such a carburetor can work no worse than a new, clean one.
Plaque on carburetor parts
If you disassemble the carburetor to service it, you may notice a dark brown tarry coating on its internal parts, do not be alarmed. This plaque is a natural formation. It is formed as a result of the operation of forced crankcase ventilation.
And the older the engine, it has more wear, and as a result, the amount of these gases that rise in the cavity of the air filter increases, while more contamination of carburetor parts occurs. This is the relationship.
Plaque on carburetor parts and the walls that are located near them must be cleaned. But it is not necessary to clean the deposits on the walls of the neck, the walls of the dampers, and diffusers, since this deposit does not significantly affect the overall operation of the carburetor.
So don't waste your time. Although if you are a pedantic person and you have time, you can clean the carburetor to perfect cleanliness, in any case it won’t make it worse and in the future it will have a better effect on the adjustment of the VAZ 2107 carburetor.
Due to the fact that the secondary chamber of the carburetor is in operation for a short time, its secondary jet and the main air jet do not become very dirty. However, it is still necessary to check the degree of contamination.
It is recommended to do this every time you remove the carburetor cover.
It is recommended to clean the jets with either gasoline or solvent. You can use a thin wire for this.
To ensure that you do not encounter any troubles related to the operation of the carburetor along the way, every 50 - 80 thousand kilometers, check the condition of the mesh filter, which is located in the float chamber of the carburetor at the inlet.
The fact is that thanks to the effective operation of the fuel purification system of the VAZ 2107, this filter rarely becomes clogged. However, if you do not change the fine fuel filter in a timely manner, then there may be problems along the way, since this mesh filter will quickly become clogged.
All parts and cavities of the carburetor must be washed carefully. Let's say the float chamber, where there are resin deposits, it is advisable to wash it with a solvent or other effective means.
But, for example, you should only wash the diaphragms themselves and gaskets with pure gasoline, since all solvents can seriously damage them, and for this they must be washed separately.
How to wash the strainer
Washing the strainer is a recommendation.
- Before you start washing the strainer, pump fuel into the carburetor using a fuel pump; naturally, this is done manually. This is done so that the required amount of fuel enters the float chamber and the closing valve closes.
- Next, unscrew the plug that holds the mesh filter, remove it, wash it (you can wash it with a solvent) and be sure to clean it with compressed air, to be sure.
- Also note that it is not recommended to clean the float chamber with a rag, since fibers from the rag can remain inside unnoticed by you and clog the fuel jets, including the idle jet.
- For cleaning, use a rubber bulb, which sucks out all the contaminants that are located at the bottom of the float chamber. Try to act carefully so as not to lift dirt from the bottom.
- After you have washed all the carburetor parts and jets, blow out all the holes and the float chamber itself with pressurized air.
- Next, check the tightness of the locking needle. To do this, connect an ordinary bulb to the inlet fitting and, pressing it, check the tightness of the shut-off valve. In this case, a pressure of 0.2 to 0.4 kgf will be created, which corresponds to the pressure created by the fuel pump.
- We create pressure and listen to whether the shut-off valve allows air to pass through. If air passes through, the valve body and needle should be replaced.
POPULAR WITH READERS: Specifics of repairing Mercedes engines
Also, do not forget to check the sizes of the jets using special gauges. For such a check, you can use drills of the required sizes.
The specifics of servicing the VAZ 2107 carburetor are very similar to the specifics of servicing carburetors of other brands of VAZ cars. We also recommend reading the article about adjusting valves on the VAZ 2106.
Nail Poroshin presents.
Source: https://AutoTopik.ru/remont/340-obsluzhivanie-karbyuratora-vaz-2107.html
Carburetor repair sequence
Regardless of the design of the carburetor, its repair and cleaning is carried out according to the following algorithm:
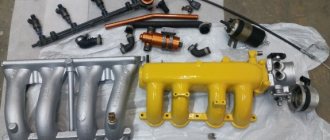
- Removing the carburetor. To do this, first disconnect the battery (negative terminal), dismantle the air filter and its housing, disconnect the wires, rods and pipelines. Before carrying out work, it is recommended to treat all threaded connections with a chemical liquid that corrodes rust (for example, WD-40).
- Complete disassembly of the carburetor. This is done to inspect and identify damage, defects and contamination on all components.
- Cleaning and flushing individual parts of the carburetor. In particular, the atomizer, filter, jets, fuel valve, emulsion tubes, as well as the accelerator pump cover. Washing is done in gasoline or cleaning liquid. After this procedure, it is recommended to blow out the jets and valve (other parts are possible) with compressed air from the compressor. However, it is not recommended to wipe them with a rag (to prevent lint or debris from getting on them)!
- Replacement of failed parts and consumables.
- Assembling and adjusting the carburetor.
We present to your attention the relative values of fuel jets for Solex carburetors. The closer they correspond to the specified parameters, the more efficiently the engine will be used and fuel consumed.
| Relative values of fuel jets for Solex carburetors | |||||
| Ratio | Diffuser diameters | ||||
| Factory values | 14 | 95,0 | 102,0 | 107,0 | 115,0 |
| Economical and power | 13,5 | 98,5 | 105,8 | 111,0 | 119,3 |
| Power moderate | 13 | 102,3 | 109,8 | 115,2 | 123,8 |
| Power normal | 12,5 | 106,4 | 114,2 | 119,8 | 128,8 |
| Powerful dynamic | 12 | 110,8 | 119,0 | 124,8 | 134,2 |
| Sport | 11,5 | 115,7 | 124,2 | 130,3 | 140,0 |
Replacing parts from the carburetor repair kit is carried out in the following sequence:
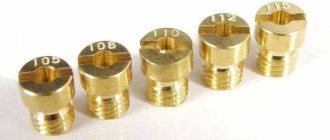
- Install and tighten new fuel jets . At the same time, do not overdo it with physical effort so as not to damage them. After all, it is the fuel jets that are responsible for the uniform supply of fuel to the engine cylinders.
- Replace air jets.
- If necessary, it is worth replacing the pump accelerators . Although if the old ones look good, you can leave them, but be sure to clean them.
- The fuel filter also does not need to be changed. It all depends on his condition. However, if you do not plan to replace it, it is still worth washing the installed filter.
- Next, install sealing gaskets , having previously treated them with sealant.
Replacing jets in the carburetor
After the carburetor is completely assembled, it is adjusted, tuned, and, if necessary, tuning. However, we advise you to undertake tuning yourself only if you have sufficient skills in performing plumbing work. Otherwise, contact a specialist.
It is worth adding that in order to repair the carburetor as rarely as possible, it makes sense to change the air and fuel filters on time. And besides this, fill the car with high-quality high-octane fuel. It usually makes sense to carry out repairs using a repair kit no later than after 100 thousand kilometers . This is if there are no malfunctions or problems in the operation of the machine. Otherwise, repairs need to be carried out more often.
Manufacturers of carburetor repair kits
- PEKAR (“Baker”), whose products are manufactured in Russia. Repair kits are produced for almost all brands of domestic equipment. One set K2105-1107980-20 for the VAZ-2105-20 carb costs $4.
- Pierburg is a branch of the German concern KolbenSchmidt Pierburg AG, which is one of the world leaders in the production of engine parts. Set art. 401249010 will cost $9.
- Weber is an Italian manufacturer of carburetors and repair kits for them, managed by Magneti Marelli SpA. For Ford, their W5491 set will cost $13.
- Keihin is a Japanese company, a manufacturer of fuel systems, carburetors and repair kits for them. The price of their N751 kit for KEIHIN DEO 4A carburetors of the Audi 80 will be no less than $14.
- DAAZ (JSC Dimitrov Automobile Unit Plant). A popular manufacturer of spare parts for cars and trucks on the domestic market, including carburetor repair kits. One set of gaskets and jets for the carburetor will cost $2. For example: OZONE (cat. no. 2105-1107010-20), K151 (K1511107910PK) and others.
- NAPCO is another manufacturer from Japan, whose products are of excellent quality and reliability, and the price of various repair kits is between 10-13 dollars.
- ZENITH - nowadays you can still find carburetors and repair kits from this English company, which used to be very common. She also developed STROMBERG and AISAN carburetors.
DIY carburetor repair VAZ 2105 2106 2107 2108 2109 21099 21083
Cars without an injector are still relevant on our roads. Moreover, their owners usually like to repair breakdowns themselves, which are already quite common with long service life. Among these breakdowns there are malfunctions of the most complex air and gasoline supply unit. Therefore, many car enthusiasts are faced with the question of how to repair a carburetor with their own hands.
Especially when engine interruptions begin, and it is not possible to configure such a complex unit. In practice, it fails, and for several reasons. Let's list them.
- Due to the complexity of the channel design, the service life of the unit is short.
- Regular use of bad gasoline negatively affects parts, channels, and surfaces of the assembly unit.
- The entry of crankcase gases into the unit when engine components are worn out also has an effect.
- The entry of dirt particles, for example through the air filter housing, can have an abrasive effect, which can cause defects on surfaces.
Next, we’ll look step by step at how to repair a VAZ car with your own hands.
How to make repairs for a “classic”
Initially, we will discuss the carburetor repair instructions from 2107. For the work, we will need the following tools:
- screwdrivers;
- spanners;
- pliers;
- ruler.
Also learn about replacing the oil filter without changing the oil and changing the brake fluid yourself.
We begin repairing the VAZ 2107 carburetor by dismantling the unit from the car. It is produced in the following sequence.
- First of all, we dismantle the air filter housing together with the filter element by unscrewing the nuts.
- After unscrewing the fasteners, disconnect the throttle cable and the choke cable.
- We disconnect the crankcase gas exhaust hose.
- Loosen the clamp and remove the fuel hose.
- Disconnect the vacuum regulator hose.
- Disconnect the pneumatic valve from the economizer.
- Remove the microswitch from the terminals.
- Using a screwdriver, press the tip away from the damper drive rod, and then remove the return spring.
- We dismantle the entire assembly unit.
Now, to repair a carburetor from a VAZ 2107 with our own hands, we need to disassemble it, replace the defective parts with new spare parts (they are sometimes sold in the form of a special repair kit for repairing VAZ 2105 - 2107), and we may also have to process the filler plane. We will describe how to do all this.
- We dismantle the three-arm lever, spring and rod.
- We remove the cover, as well as the housing from the throttle valves. Replace the gasket if necessary.
- Carefully dismantle the float by pulling out the axle.
- We unscrew the fuel needle valve, as well as the fuel jets from the float chamber. If necessary, we replace parts.
- We unscrew the fuel nozzle of the idle system. If necessary, we replace it.
- After unscrewing the accelerator pump bolt, remove the pump cover, diaphragm and spring. These parts can also be replaced.
- We take out the diffusers that worked above the dampers.
- Unscrew the screw for the amount of mixture.
- We wash all disassembled metal parts in acetone.
- We apply the edge of the ruler to the plane of the upper body, which is connected to another plane of the body for fastening the dampers. Checking the curvature. By the way, if before this it was not possible to properly adjust the stable idle speed, the culprit could be precisely this curvature, which causes air leaks. If necessary, we process the plane with an emery wheel manually, without an electric drive of the wheel, after first removing the adapter tubes from the plane. We perform this operation extremely carefully.
- We assemble it in the reverse order, just like installing it on a car.
THIS IS INTERESTING: Replacing the Ford Mondeo 4 clutch
Let us add that repairing a carburetor from a VAZ 2106 is done in exactly the same way, since the unit is the same, under the DAAZ 2107 brand. Generally speaking, repairing a VAZ 2105 is done in the same way, because again the brand of the unit is the same.
Differences for front-wheel drive
Now let’s look at the features of the process when it is necessary to repair a VAZ 2109 carburetor.
With the front-wheel drive Lada, a unit called “Solex” was used, somewhat improved compared to the DAAZ 2107. Its removal from the car is carried out according to the already described scenario. Let's see what differences there are from the above manuals when disassembling and repairing a carburetor from a VAZ 2109. The same tools are needed. We move point by point in the same way and look at the differences.
- Removing the lever.
- The cover and housing from the throttle valves are removed in the same way as the previous instructions.
- The float chamber here is arranged in a similar way - let's disassemble it.
- We unscrew the similar fuel jets plus the needle valve.
- The fuel jet of the idle system is definitely replaced here with a solenoid valve; we unscrew the valve with a wrench. We then install a new one instead - this is desirable.
- The accelerator pump is disassembled in a similar way, its parts, especially the diaphragm, are replaced with new ones.
- We remove the diffusers.
- The mixture quantity screw is of a different type here; we also dismantle it.
- We wash parts that are not worn out in acetone.
- If necessary, we process the plane of the upper body according to the above recommendations.
- We do the assembly, moving back step by step, this also applies to installation on the car.
As you can see, the instructions differ little from those given earlier. Here it must be added that when repairing a carburetor, most often it is necessary to replace the jets, since due to their small size, coupled with the strict requirements for their operation, the life of these parts is short.
In addition, it is important to know that on the “nines” they actually installed a carburetor with brand 2108, so repairing a carburetor from a VAZ 2108 is carried out exactly according to the instructions given. In addition, the “eight” and “nine” modifications have the same unit, but modified, with slightly different clearances. Therefore, repairs on 21083 are done in the same way, but when making adjustments they are guided by slightly different gap values. Their values should be taken from the technical documentation. The same goes for repairs on 21099.
Settings must be made after installation.
Something about cost and non-repairability
Of course, not everyone can repair such a complex mechanism as a carburetor. Many car enthusiasts would rather resort to the services of car services. Let's see how much money they have to shell out. Here are the average data for major cities of the Russian Federation.
| City | Price |
| Moscow | 2500 rub. |
| St. Petersburg | 2500 rub. |
| Ekaterinburg | 1800 rub. |
| Samara | 1700 rub. |
| Krasnodar | 1800 rub. |
These prices are indicated approximately for the repair of a carburetor type 2108. The cost is not small, however, it is approximately two times lower than purchasing a new unit. Although sometimes you can’t do without a purchase. After all, there may be cases when repairs and adjustments will not help the carburetor.
For example, the processing of curved planes, which was discussed above, may be useless due to the general so-called “fatigue” of the metal. It is not uncommon for threaded holes for jets to become worn out. In addition, the combination of many minor defects in the unit can persuade the owner to buy a new one.
Return to top
So, above was the basic information on carburetor repair for cars like VAZ 2106, as well as for front-wheel drive VAZs. It should help with repair work.
Now read why oil is thrown into the air filter and the oil pressure light is on.
Source: https://DaciaClubmd.ru/repair/engine/remont-karbyuratora-svoimi-rukami
How to remove and repair a carburetor on a VAZ 2106/2107
For decades, the carburetor mechanisms of VAZ 2106/2107 vehicles ensured stable operation of the vehicle’s power units. However, regardless of the year of manufacture and configuration, the carburetor requires special attention to maintenance. In most cases, repairs or adjustments can be made by the driver himself, but it is recommended to be extremely careful.
What models are installed on VAZ 2106/2107 cars
All types of carburetor mechanisms equipped with the VAZ 2106/2107 are aimed at reducing fuel consumption and giving the car maximum dynamism. In addition, an important role is played by such an indicator as environmental friendliness. For a decade, AvtoVAZ engineers gave preference to the most environmentally friendly types of carburetors.
Carburetors of three different models were installed on modern VAZ 2106/2107, as well as on cars produced in previous years:
- Manufacturer: Dimitrovgrad Automobile Assembly Plant (or DAAZ). It should be noted that the company produced carburetors under license from Weber.
Structurally, these devices were as simple as possible both in operation and in further maintenance. In addition, their main advantage was to provide excellent speed performance for cars of the sixth and seventh VAZ models.
At the same time, DAAZ carburetors consume a very large amount of gasoline - from 10 to 14 liters per 100 kilometers.
- Manufacturer: DAAZ, modification “Ozone”. This is a more advanced version of the first type of DAAZ, which has high environmental performance. The device provides good acceleration characteristics and consumes less than 10 liters of fuel per 100 kilometers. However, the disadvantage of this model is that it comes with a second camera. In its operation, a pneumatic valve plays an important role, which, in case of contamination or poor-quality adjustment, can stop the carburetor from working.
- Manufacturer: DAAZ, modification 21053, which is produced under license from Solex. One of the most modern types of carburetors for equipping the VAZ 2106/2107. Maximum environmentally friendly and productive. It has a more complex design; the first in the DAAZ line is equipped with a reverse fuel supply system, which makes it as economical as possible. However, Solexes are demanding on the quality of gasoline - otherwise the fuel nozzles become clogged very quickly.
Modern VAZ 2107 models are equipped with this unit.
Common features in the design of carburetors for the VAZ Six and VAZ Seven
The carburetor mechanisms that are equipped with all VAZ 2106/2107 models throughout the entire production period of the car are two-chamber, that is, they have two internal combustion chambers . Structurally, all carburetors have three indivisible parts:
- at the top there is a cover of the device, which protects the mechanism from dirt, and fuel fittings;
- the middle part is a housing, inside which the chambers and diffusers themselves are located, transfers the air-fuel mixture to the engine;
- The float compartment and throttle valves are located in the lower part.
In the operation of DAAZ carburetors, small parts are of great importance - gaskets, jets, float, economizer or dampers. All elements of the system are interconnected and failures in one part will inevitably lead to failure of the entire device.
The DAAZ carburetor on the VAZ 2106/2107 works according to the following principle:
- Gasoline enters the float chamber through the inlet valve.
- The required fuel level is regulated by the needle of the forced idle economizer or power stroke economizer - in any case, fuel enters the chamber in a strictly defined proportion.
- Next, the fuel is sent to emulsion chamber No. 1 through nozzles.
- In the chamber (or VBC), gasoline is crushed into small parts and mixed with air.
- When the torque increases during acceleration, internal combustion chamber No. 2 may also be activated.
- After the formation of the air-fuel mixture, the pump directs it to the diffusers, and through them to the engine.
THIS IS INTERESTING: Where is the temperature sensor on the viburnum
That is, the main task of the carburetor is to form the air-fuel mixture in a strictly adjusted proportion to ensure smooth operation of the engine.
The presence of many small elements ensures reliable operation
How to repair a carburetor yourself
Repair work on the VAZ 2106/2107 carburetor involves removing and disassembling the mechanism. In this case, the repair includes all two stages:
- Washing (cleaning, blowing) elements from carbon deposits and adhering dirt.
- Replacement of worn or failed parts.
Before carrying out any actions with the unit, you must firmly make sure that the carburetor is faulty. Often, incorrect operation of other systems can affect the performance of the carburetor mechanism.
Source: https://vazweb.ru/desyatka/dvigatel/remont-karbyuratora-vaz-2107.html
Self-adjustment of the VAZ 2107 carburetor
Old VAZ models, as a rule, were equipped with carburetors of the following brands: Solex, Weber and Ozone; their popularity over many years of operation has not decreased, but rather, on the contrary, increased. However, like everything in this world, over time, carburetors fail and need repair, cleaning, and adjustment, which in turn puts a considerable burden on car owners, requiring them to have certain knowledge and free time.
In order to save time and money, I bring to your attention a detailed guide on how to clean the carburetor, service it, and also how to adjust the VAZ 2107 carburetor.
What is a carburetor and what does it go with?
The principle of operation of a carburetor from different manufacturers is essentially the same, its task is to create a fuel-air mixture, mixing it in certain proportions with fuel and air, after which it is supplied to the combustion chamber, where ignition occurs. Well, I think the rest is clear!?
There are three types of carburetors: float - this is perhaps the most common among all, needle and bubbler - quite rare.
In today’s article, we’ll talk about the Ozone carburetor, which is installed on a VAZ 2107. After that, you will learn how to clean the carburetor and how to adjust the VAZ 2107 carburetor. Before you begin, you need to understand something, the fact is that some modifications of carburetors can significantly differ from those installed on a similar car model.
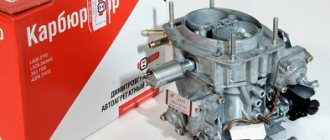
- DAAZ 2107-1107010 - installed on the VAZ 2105, as well as the VAZ 2107.
- DAAZ 2107-1107010-20 - installed, as a rule, on new VAZ 2106 VAZ 2103.
- DAAZ 2107-1107010-10 – installed on VAZ 2106 or VAZ 2103 engines without a vacuum corrector with an ignition distributor.
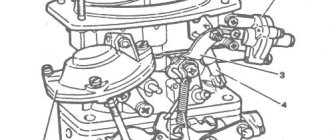
Let's look at the main part of the VAZ 2107 carburetor components
- Autonomous idle system.
- Float chamber.
- Idle shut-off valve.
- Econostat.
- Dosing system.
- Throttle valve.
- Crankcase gas exhaust compartment.
- Transition system for both cameras.
This knowledge is enough to clean and adjust the VAZ 2107 carburetor yourself. There is no need to know more, although it will not hurt for overall development.
Now let's look at how the carburetor works, ensuring the distribution of the fuel-air mixture:
- Acceleration pump.
- Econostat system.
- Maintains constant fuel level.
- Idle support.
- Support for engine starting and warming up.
- Jets (air and fuel), diffuser, VTS atomizer, well and emulsion tube are located in the main metering chamber.
The carburetor is adjusted after cleaning and assembly.
Before you start disassembling and cleaning, I suggest you remember the main saying of any auto mechanic - “Don’t make a fuss while it’s quiet,” meaning that you shouldn’t get into a place where everything is in order or disassemble something that has nothing to do with the breakdown.
How to properly adjust the carburetor of a VAZ 2107
- First of all, a detailed inspection should be carried out, then everything should be thoroughly washed and cleaned of dirt and other imperfections.
- Afterwards, you need to clean the mesh filter and wash the float chamber.
- Next you need to clean the air jets.
- And finally - adjustment of the float system (1), trigger mechanism (2) and idle speed (3).
Attention! This work does not require dismantling the carburetor.
The strainer, which is located in front of the entrance to the float chamber, is checked at least once every 60,000 mileage.
How to check the strainer
This is done as follows. Use manual fuel pumping and fill the float chamber with fuel, after which you will be able to see the shut-off valve close. Then move the top filter cover and remove the valve. It must be thoroughly washed in solvent, then dried using compressed air.
When the engine behaves incorrectly during loads, there are dips or loss of power, or the car “reacts poorly to the pedal,” most likely you have a problem with the fuel supply. In addition, often the cause is a faulty strainer.
Important! It is strictly forbidden to wipe the bottom of the float chamber using a fluffy or any other rag, since after such cleaning, invisible fibers may remain on the bottom of the chamber, which will clog your jets during operation.
Source: https://vaz-remont.ru/samostoyatelnaya-regulirovka-karbyuratora-vaz-2107/
Purpose of VAZ carburetor repair kits
Carburetor engines are gradually becoming a thing of the past, giving way to more successful injectors, but in Russia there are still many VAZ Classic cars in use, which are equipped with good old engines with carburetors that have proven their reliability and unpretentiousness. However, the carburetor is a unit that requires more attention from the car owner than the fuel injection system, which is due to the peculiarities of its design and operation.
One of the features of the operation of VAZ carburetors (as well as others) is that over time its parts become clogged, lose their strength properties under the influence of gasoline, and are destroyed, and all this leads to a deterioration in the performance of the entire carburetor as a whole. And repairing any carburetor usually comes down to washing and replacing a limited number of parts.
That is why today repair kits for VAZ carburetors, which contain all the spare parts necessary for repair, are widely used. The repair kit greatly simplifies the maintenance, repair and restoration of the carburetor, eliminating the need to run around the store in search of many parts, cut out gaskets, etc.
If you intend to repair the carburetor, then first of all you need to purchase one, or even two repair kits (fortunately, their price is very, very affordable) - without it there is no point in starting repairs. But first you need to figure out which repair kit you should buy.
Replacing the carburetor VAZ 2107
The age of carburetor cars is gradually coming to an end. All over the world there are practically no manufacturing plants left that produce engines with carburetors. Nevertheless, the number of such cars is still huge, and first of all this concerns the Zhiguli classics and, of course, the sales leader of the domestic automobile industry, the VAZ 2107 - “Seven”.
Due to its design features (the presence of small parts, dependence on the purity of the fuel, many manual adjustments and a large number of functions performed during operation), a part such as a carburetor very often fails during operation. Replacing the repair kit, purging and cleaning can restore the normal functioning of the unit.
When is it necessary to repair a VAZ 2107 carburetor?
- excessive fuel consumption;
- poor start;
- absence or unstable idle speed;
- failures during acceleration and movement;
- lack of dynamics when overtaking and accelerating;
- gasoline leakage from the chambers;
- fuel overflow.
Conditions for carburetor repair
- mandatory replacement of all sealing gaskets and rubber rings (including under the carburetor);
- When cleaning channels, do not use soft wire or cable (there is a possibility of breakage in the channel);
- after repair - check for leaks of all connecting parts of the carburetor (it is also necessary to check the internal chambers so that there are no overflows)
- adjustment of the fuel level in the float chamber and the quality of the mixture after each intervention in the device;
There are cases when repairs do not bring results (or repairs are not cost-effective), for example, complete coking of air or fuel channels or bending of connecting planes, causing air leaks or fuel leakage. And then the only correct action will be to replace the carburetor of the VAZ 2107. Moreover, it is possible to change it not only for a similar one, but also for a more efficient one, and one step higher in classification, “Solex”.
This carburetor is much more economical due to the optimization of mixture dosing, the presence of a reverse fuel flow (return) and a more efficient idle system (including the EPH system and shutting off the fuel supply from the idle system during acceleration and movement).
Installing such a carburetor is not particularly difficult; it is practically no different from installing a conventional carburetor. You just need to buy a tee for the return, a bracket for throttle (“gas”) control, another insert (smaller) for the carburetor and a hose for the return, with a check valve, from 2108
THIS IS INTERESTING: Replacing the Lada Granta 8 valve pump
Replacement and installation
First of all, before removing the carburetor on a car, it is necessary to cool the engine if it has been used before, since when removing the fuel hose, gasoline may get onto the hot exhaust manifold and ignite.
Procedure:
- remove the air filter (be careful when removing, as the filter mounting nuts may accidentally fall into the carburetor, and then into the engine, damaging it when starting);
- remove the throttle control rods;
- disconnect the fuel supply hoses (by plugging the hose, for example with a bolt) and ventilation;
- disconnect the cold start control cable;
- remove the ignition angle advance control hose;
- disconnect the idle air solenoid valve control wire;
- unscrew the four carburetor mounting nuts;
Before installing the VAZ 2107 carburetor, you should carefully check the ceramic spacer insert for cracks and chips. Replace the paranitic gaskets located under the carburetor to prevent air from entering through the air channels.
Install the carburetor and screw it on. Tightening must be done in a cold engine (at ambient temperature) and the tightening force is the smallest on the entire car (only 1.5 kg/m), exceeding the force is fraught with curvature of the mating plane and air leaks, even on a completely new carburetor.
Assemble the remaining parts:
- install the throttle control levers;
- connect the fuel supply, vacuum and low ventilation hoses, as well as the idle air valve control wire;
- start the engine, checking for fuel leaks outside and inside the carburetor;
- install an air filter;
- adjust idle speed if necessary (after warming up)
As a rule, all new carburetors go on sale already adjusted on the bench, so initial adjustment is not required. After passing the thousand-kilometer mark, it is necessary to check the CO level and, if necessary, adjust the quality of the mixture.
Source: https://avtooverview.ru/remont/zamena-karbyuratora-vaz-2107/
The use of repair kits for repairing VAZ carburetors
Any carburetor repair is carried out in approximately the same order:
- Removing the carburetor from the engine (for which you first remove the terminal from the battery, remove the air filter and dismantle its housing, and disconnect all pipelines, wires and rods);
- Complete disassembly of the carburetor with inspection of parts for their condition, presence of defects and contamination;
- Wash some parts in kerosene or gasoline - fuel valve, jets, filter, spray nozzle, emulsion tubes and accelerator pump cover. After washing, it is recommended to blow out the jets, valve and other parts with compressed air; wiping them is not recommended (as fluff may remain that will disrupt the operation of the carburetor);
- Replacement of failed parts;
- Assembling, installing and adjusting the carburetor.
All parts of the disassembled carburetor must be inspected, checked for functionality, and replaced if necessary. Almost always, new diaphragms with springs and a fuel valve are installed, and all sealing elements must be replaced (this rule is true for any units, since seals lose their quality after dismantling and will definitely leak after reinstallation). Also, with each new installation of a carburetor, it is necessary to use new cardboard and poronite gaskets (here the reason is the same as in the case of seals).
All the parts needed to repair the carburetor are in the repair kit, so there will be no problems with replacing them if you have the right kit. Repairing a VAZ carburetor with a repair kit is not a very complicated procedure that is accessible even to inexperienced owners of domestic cars.
The temperature inside the vehicle's interior depends on the coordinated operation of the vehicle's heating system. The temperature regime affects not only the comfort of its driver and passengers, but also the ability to optimally control the vehicle. A key role in the operation of the heating system is played by the heater tap, which will allow you to start or stop the operation of the corresponding system at the right time.
Carburetor VAZ 2107 - features of its adjustment +
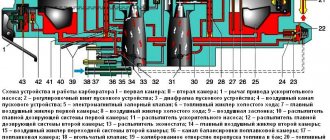
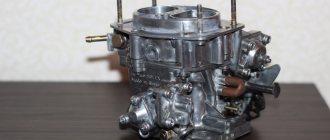
The VAZ 2107 carburetor is designated DAAZ 1107010. It is a two-chamber emulsion-type device with a falling flow, equipped with a balanced float chamber.
The design of the carburetor we are interested in is classic for the Ozone product line. In total, its design has more than 60 elements, which are arranged into several main functional units. These nodes include:
- dosing systems (in this version of “Ozone” there are two of them);
- pneumatic throttle valve drive;
- float chamber;
- an enrichment device called an econostat, which is located in one of the float chambers;
- crankcase gas removal mechanism;
- diaphragm accelerator pump equipped with a special sprayer (the pump is located in one of the chambers);
- autonomous idle mechanism with shut-off solenoid valve;
- float chamber transition systems;
- jets metering air and liquid fuel.
The throttle valves of the float chambers are opened as follows: the first chamber - from the passenger compartment using a control drive (the driver simply presses the pedal and the valve opens); the second chamber is driven by a pneumatic drive.
The carburetor jets are marked as follows: fuel: 112 (first chamber) and 150 (second); air: 190 and 150; accelerator pump: 40 and 40; pneumatic drive: 150 and 120. Idle jets are marked differently: fuel - 50 and 60, air - 170 and 70.
Adjusting the DAAZ 1107010 carburetor - general requirements for the operation
The 2107 carburetor is adjusted according to the same principles as any other carburetor. The adjustment is carried out on the basis of standard calibration data, which contains all the parameters without which high-quality adjustment and tuning of the device is impossible. Experts advise performing these procedures at least once a year (some pros believe that adjustments and tuning should be carried out every six months if the car is used quite intensively).
Qualified carburetor maintenance consists of the following steps:
- thorough inspection of the device from the outside, cleaning and washing it;
- visual inspection of all units and components for wear;
- cleaning and washing the float, the idle system, the strainer (checking it for functionality, by the way, is required at least every 30 thousand kilometers of the “Seven”), the starting mechanism, and the jets.
After this, you can proceed directly to adjusting all of the above components.
Features of servicing the strainer and float chamber
The filter is checked and serviced according to the following scheme: pump up fuel (manually); the float chamber is filled with fuel and the valve is monitored; then dismantle the filter (you need to slightly move the lid covering the filter from above); wash the mesh product in a solvent and dry it using a jet of compressed air. After these simple procedures, the filter will again be ready to perform its functions, protecting the vehicle from losses and power failures under load.
Be sure to clean the float chamber. This is done using a rubber bulb (after cleaning and washing, you need to dry the chamber with compressed air). Please note that under no circumstances should the bottom of the chamber be wiped with rags with a fluffy surface (it is better not to use rags at all), since after such treatment there is a high probability of clogging the carburetor jets with fiber particles that a person simply cannot see.
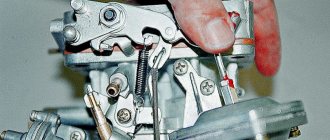
Adjusting the float mechanism
The operation is carried out in three stages. First, the float is checked to ensure its correct location in relation to the walls of the chamber and its lid. This procedure makes it possible to achieve “ideal” immersion of the float by eliminating the phenomena of deformation of the bracket on which it is mounted. Deformation can be eliminated simply by straightening the fastening element with your fingers.
Secondly, close the needle valve and begin to adjust the 2107 carburetor: put the lid in a vertical position, move the float to the side, and bend the bracket tongue (using a screwdriver). All these operations are performed in order to achieve a gap between the float and the cover at a level of 6–7 mm. Thirdly, open the valve, move the float to the side, and achieve a gap of 15 mm between the needle seat and the float.
As you can see, adjusting the float cannot be considered a very difficult task. Dealing with it is not so difficult, the main thing is to be very careful and careful and not try to do everything quickly.
Do-it-yourself adjustment - is it possible?
If, after replacing the carburetor, you decide to adjust and configure the device yourself, then our advice will be useful to you. It is best to start tuning by adjusting the fuel in the float chambers. To do this, you need to start the engine and let it run for a few minutes, then turn it off and remove the air filter cover.
The floats must be strictly parallel to each other; if necessary, you can adjust them by acting on their brackets.
At the next stage, be sure to adjust the starting device; it is best to do this with the carburetor removed. With the air damper closed, you need to use a caliper to take measurements between the carburetor chamber and the damper. These values should be in the range from 1 to 1.3 mm; they are different for each car model.
The last stage of adjustment is to set the engine idle speed. This work must be done with the engine running, trying to achieve an average value of 900 rpm, because in winter and summer these values can be different. Adjusting the idle speed is done by turning the fuel screw on the carburetor.