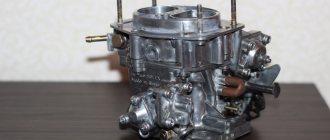
The carburetor fuel system is most often found on older foreign-made cars, as well as on domestic cars that run on gasoline. Situations often arise when interruptions in engine operation appear in the form of jerks and failures. In addition, in some cases the engine may not start and may operate intermittently at idle speed. At the same time, fuel consumption increases.
In most cases, such problems are associated with contamination of the carburetor. This device needs to be cleaned periodically. Such a timely procedure ensures safety and uninterrupted operation of the power unit. Every driver should know how to clean it in the field without removing it from the car.
Emergency cleaning on the road without cleaner
There are situations when a car literally refuses to go right on the highway. Under such circumstances, you need to take emergency measures, since you need to at least get to the repair shop under your own power.
Often the cause of the problem is contamination of the carburetor. You can clean it on the road in a simple way that even a beginner can do.
You need to act in the following order:
- Remove the high-voltage wires from the first and fourth cylinders.
- Place the cable from the first cylinder on the fourth, and place the wire from the fourth on the first, swapping their places.
- Start the engine.
- Let the car idle.
During this, due to a violation of synchronization, untimely ignition of the air-fuel mixture, additional pressure is created, under the influence of which debris from the clogged jets will be blown back into the carburetor float chamber.
- After cleaning the dosing system, install the high-voltage wires in place, start the car and check the operation of the motor.
Features of cleaning GDS jets Solex 2108, 21081, 21083
Almost always, to restore normal operation of the carburetor and, accordingly, the car engine, it is recommended to clean the fuel and air jets of the main metering systems of the carburetor.
For example, this procedure is necessary for the following problems with the engine: difficulty starting a cold or hot engine, insufficient power and throttle response, “failure” when pressing the gas pedal, the engine stalls in different modes, etc.
Let's look at the features of cleaning the HDS jets on a Solex carburetor (2108, 21081, 21083). To achieve the maximum cleaning effect, you need to stock up on a bottle of acetone or carburetor cleaner aerosol. It is not necessary to remove the carburetor from the engine.
Preparatory work
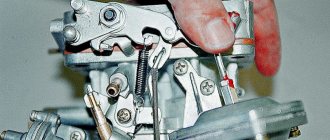
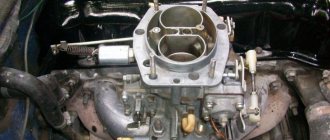
— Remove the engine air filter housing.
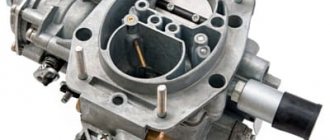
— Remove the top part of the carburetor (cover).
See photo above.
The procedure for cleaning the fuel and air jets of the Solex GDS
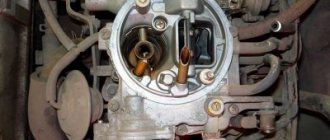
A feature of the Solex carburetor is that the air jets are structurally combined with the emulsion tubes and are located in their upper part. Therefore, we clean the jets and tubes together.
Fuel jets are located at the bottom of the emulsion wells. To unscrew them, you will need a long slotted screwdriver with a thin blade.
— Using a slotted screwdriver, unscrew the GDS air jets and remove them together with the emulsion tubes from the emulsion wells.
We turn out the air jets of the GDS carburetor of the Solex carburetor.
Soak them for a while in a container with acetone. The duration depends on the degree of contamination, but not less than half an hour.
— Use a slotted screwdriver to remove the fuel injection nozzles from the bottom of the emulsion wells of each carburetor chamber.
We turn out the fuel jets of the GDS carburetor of the Solex carburetor.
Similarly to the air jets, we also soak them in acetone for a while.
— Pour a little acetone into the emulsion wells or spray with an aerosol spray to clean the carburetor.
Cleaning the emulsion wells of the GDS carburetor of the Solex carburetor with an aerosol carburetor cleaner
. We also leave it for some time.
— We clean the fuel and air jets with a thin wooden stick or copper wire and blow them with compressed air
(pump or compressor). We also blow out emulsion wells with compressed air.
We install everything in the reverse order (first the fuel jets, then the air jets with tubes). Before installation, we check the calibration data of all removed elements since the jets and tubes for the first and second chambers are different.
Notes and additions
— While the carburetor cover is removed, it is advisable to simultaneously clean the fuel mesh filter at the inlet of the carburetor, measure the fuel level in the float chamber and check the tightness of the shut-off needle valve to make sure that the GDS is in good working order as a whole.
Twokarburators VK - More information on the topic in our VKontakte group, on Facebook Twokarburators FS and on Odnoklassniki - Twokarburators OK
More articles on Solex carburetor jets
— Signs of clogging of the air jets of the GDS carburetor of the Solex carburetor
— Solex carburetor jets
— Cleaning the idle system of the Solex carburetor
— In-place cleaning of the Solex carburetor with an aerosol carburetor cleaner
— Cleaning the carburetor Solex 2108, 21081. 21083 with dismantling and disassembly
— How to disassemble the carburetor “cover” Solex 2108, 21081, 21083
Homemade carburetor cleaning
Also, some car enthusiasts are interested in the question of whether it is possible to make carburetor cleaning fluid with your own hands. Since the carburetor type of gasoline engine has been used for several decades, there are several “folk” methods for cleaning the “carb”. As a rule, traditional liquids are used for this - gasoline (however, there is an opinion that it is undesirable to use it), kerosene, diesel fuel, and various solvents. In a word, whatever is at hand.
Do not use harsh solvents on non-metallic carburetor parts as it may damage them. For them, you can use, for example, gasoline. It is best to blow out the air jets with a compressor.
Often, the carburetor is not even dismantled. However, do not forget to remove the air cleaner, and during operation, make sure that no dirt gets inside the carburetor. The work consists of cleaning the external and internal surfaces of existing carbon deposits. Also remember to clean the strainer. To do this, it is better to use a solvent (it doesn’t matter which one). After this, rinse the filter cavity, and only then install it back.
Troubleshooting the fuel system of the Lada 2107 with your own hands, Repair instructions for the power system of the Lada 2105, troubleshooting and inspection of the batteries of the VAZ 2104, VAZ 2105, VAZ 2107. Maintenance of the Lada 2104 engine. Repair instructions for the engine and systems: power supply, cooling and lubrication of the Lada 2105. Inspection and repair of the crankshaft and camshaft, piston group of Lada 2107. Instructions for disassembling and assembling the cylinder head and block.
Fuel filter VAZ 2105. Wash the filter in gasoline and blow with compressed air. Check the condition of the VAZ 2104, VAZ 2105, VAZ 2107 filter and the conical sealing ring of the filter plug. If the filter or plug is damaged, replace it with a new one. Float mechanism . Wash the parts in acetone or gasoline. The float must not be damaged or distorted in any way. The mass of the float should be 11–13 g. The sealing surfaces of the needle valve and its seat must not be damaged to impair the tightness of the valve. The valve should move freely in its seat, and its ball should move freely and not hang up. Replace faulty parts with new ones. Carburetor cover VAZ 2104. Clean the cover and all holes and channels from dirt and oil. Wash the lid in gasoline or acetone and blow with compressed air. Inspect the sealing surfaces of the cover. If damage is found, replace the cover with a new one. Starting device . Clean all parts of the starting device, rinse with gasoline and blow with compressed air. Inspect the parts, replace damaged ones with new ones. Jets and emulsion tubes . Clean the jets and emulsion tubes from dirt and resinous deposits. Wash them with acetone or gasoline and blow with compressed air.
WARNING It is not allowed to clean the jets with a metal tool or wire, or to wipe the jets and other parts of the VAZ 2107 carburetor with cotton wool, cloth or rags, as lint can clog the fuel-emulsion path. If the blockage is severe, you can clean the jets with a soft wood needle moistened with acetone.
Carburetor body . Clean the housing from dirt and oil. Wash the housing and its channels with gasoline or acetone and blow with compressed air. If necessary, clean the channels and emulsion wells with special reamers. Inspect the sealing surfaces of the housing; if they are damaged, replace the housing with a new one.
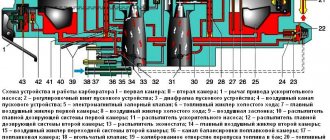
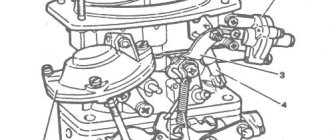
Parts of the carburetor body of the VAZ 2104, VAZ 2105, VAZ 2107: 1 - pneumatic rod of the second throttle valve; 2 — pneumatic drive housing; 3 - diaphragm; 4 — pneumatic drive cover; 5 — fuel jet of the transition system of the second chamber; 6 — fuel nozzle body; 7 — small diffuser of the second chamber; 8 — accelerator pump nozzle; 9 — screw valve of the accelerator pump; 10 — main air jet of the second chamber; 11 — emulsion tube of the second chamber; 12 — main air jet of the first chamber; 13 — emulsion tube of the first chamber; 14 — main fuel jet of the second chamber; 15 — main fuel jet of the first chamber; 16 — accelerator pump adjusting screw; 17 — fuel jet of the idle system; 18 — fuel nozzle body; 19 — return spring of the accelerator pump; 20 — accelerator pump diaphragm; 21 — accelerator pump cover; 22 — small diffuser of the first chamber; 23 — lever return spring; 24 — three-arm air damper control lever; 25 — connection rod with the throttle valve; 26 — throttle valve return spring bracket
Acceleration pump . Clean the pump parts, rinse them and blow them with compressed air. Check the ease of movement of the ball in the screw valve 9 and the condition of the sealing surfaces and gaskets. Check the ease of movement of the moving elements of the Lada Classic pump (lever, roller, diaphragm parts). Jams are not allowed. The diaphragm must be intact, without deformation. Replace damaged parts with new ones. Pneumatic drive of the throttle valve of the second chamber . Clean the parts, rinse and blow with compressed air. Check the condition of the diaphragm; it should not be damaged. Throttle body and its parts. Clean the carburetor parts of VAZ 2104, VAZ 2105, VAZ 2107 and rinse them with gasoline or acetone. Inspect the parts, replace damaged ones.
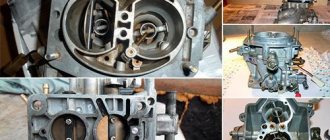
Cleaning and disassembling the carburetor
To carry out manual cleaning with dismantling and disassembling the carburetor, you need to pull out the device and disassemble it. We remove the rubber parts separately; the product should not get on it. Spray the cleaner onto metal parts. If the carburetor has not been cleaned for a long time and there is a lot of deposits on its parts, then the carburetor should be filled with cleaning agent and left for one night. The next day, carefully clean with a brush. We blow out the cavities with compressed air and dry them at the same time. Be sure to keep the instructions handy. Do not forget to adjust the starter, idle speed and float mechanism of the device.
What types of cleaners are there?
Carburetor cleaning products differ not only in their physical state, but also in the method of application. In particular, some of them are designed for manual use, while others are designed for automatic use. Sprays are great for manual cleaning . Ease of use in this case is ensured by the special tube attachments included in the kit. With their help, the product can be applied to the most difficult to reach places.
According to statistics, the most popular cleaners are aerosols due to their ease of use and high efficiency.
As for the composition of the carburetor cleaner, the basic element of any modern “carburetor cleaner,” regardless of its brand and manufacturer, is gasoline or acetone. The latter, as is known, is a strong solvent that can significantly soften the carbon deposits formed as a result of the combustion of the fuel-air mixture. In addition, the spray contains various chemical compounds that enhance the effect of acetone. For example, toluene, benzene, various acids and other organic and inorganic compounds.
Carburetor cleaning sprays and liquids also contain various additives. They are designed to protect the surface from corrosion and high temperatures, form a protective film, and lubricate the moving parts of the carburetor. Thanks to them, during the cleaning process, the carburetor is not only subjected to “scraping”, but also protected from subsequent exposure to harmful factors.
Adding cleaner to the tank
The second state in which the purifier is realized is liquid . It is used in a different way. Conventionally, it is called automatic, since a person does not directly participate in the cleaning process. So, the composition is poured into the fuel tank, where it is mixed with gasoline and enters the carburetor. There, during the combustion of the fuel-air mixture, substances that make up the purifier are released. In the combustion chamber, they initiate chemical reactions and physical processes that are aimed at softening carbon deposits and removing them naturally through the exhaust system. However, such “cleaners” are not as effective as aerosol ones, so they are not used as often.
In some cases, car owners use two types of cleaners in succession. First, the liquid composition is poured into the tank, and then the carburetor is disassembled and manually cleaned using aerosols.
As a rule, the carburetor is washed not only inside, but also outside. To do this, the unit is dismantled, and the external wash is carried out before the internal one. The process involves cleaning the housing, filter, external components and mechanisms. For cleaning, it is better to use an aerosol product, as it is more convenient and effective.