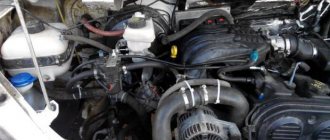
Injector with gas equipment
Gas is supplied to the injection engine through the air manifold. The injector runs on gas, the injectors and the fuel pump are turned off, only the gas damper, spark and knock sensor work. Therefore, if the injector works well on gasoline, but poorly on gas, diagnostics will not help (everything is fine with the injector), adjust the gas reducer.
There are injectors with installed gas injectors, these injectors are connected to a control unit (computer), but I think there is little point in installing such injectors on purpose, since it is expensive and you cannot set them up manually.
Another good thing about gas on an injector, I saw an injection car with dead injection equipment, there wasn’t even a gas pump in the tank. But on gas it worked perfectly; when running on gas, it was enough for this engine to have a spark and the gas damper control sensors worked during warm-up.
Replacing a carburetor with an injector on a ZMZ-4063 engine
In order to improve technical characteristics, quite often Gazelle owners replace the carburetor system with an injector, although this pleasure is not cheap. For such a modification it will be necessary to purchase additionally:
- air flow sensor;
- electric fuel pump;
- other wiring for the engine;
- intake manifold (receiver) assembled with dampers;
- air pipes;
- DTOV (ambient temperature) and TPS (throttle position) sensors;
- fuel rail with injectors and fuel pressure regulator;
- the engine control unit;
- front small engine cover;
- both camshafts (differ in cam profile);
- fuel filter;
- air filter housing (“can”) assembled with a filter element;
- idle speed controller.
You may also need various small things, such as gasoline hoses, clamps, fuses, gaskets, fuel filter bracket, etc. The work here is labor-intensive, but the end justifies the means. The advantages of an injector over a carburetor are significant:
- the engine receives a significant increase in power;
- no need to constantly struggle with adjusting and cleaning the carburetor;
- You can install HBO of almost any generation, except the first.
Some injector spare parts are expensive, but it is not necessary to purchase them at the store. Excellent quality used parts can be found at car dismantling yards or through advertisements from private traders, especially since you can almost always bargain. Definitely, it is better to buy a used collector (receiver), since it almost never wears out, and there is no point in overpaying here.
Video on repairing the Gazelle ZMZ 406 engine:
source
Gas reducer freezes
If the gas reducer freezes, a possible reason is that the manifold pipe from which coolant flows through the tube into the gas reducer is clogged. The pipe itself, which goes into the gas reducer, may also become clogged.
Checking and repairing the freezing problem of the gas reducer, first disconnect the cooling tube from the manifold and see if the coolant is flowing, then another tube, and if the coolant is not flowing with any of these pipes, then clean this outlet hole. Also check whether the liquid passes through the gas reducer, remove the two tubes and blow into one of them; if air does not flow, then look for a clogged place.
And the most common reason for freezing of the gas reducer is that there is not enough coolant, or an air lock, the air lock can be removed like this, remove the cooling tube from the manifold, and wait until liquid comes out of the manifold and the tube.
The gas reducer can also freeze if the gasket under the head is slightly burned out and gases break into the coolant, signs, bubbles come out of the radiator, the engine begins to overheat, and the stove does not heat well.
Connecting hoses
The complex structure of the K-151 is also evident when it is connected to the engine. It provides for the use of a whole range of hoses, but only two different sizes are used, so it is quite possible to confuse them, and the motor will malfunction in certain modes. The order of connecting the hoses to the carburetor:
- Fuel is supplied through the fuel pipe to a fitting located under the float chamber on the engine side;
- the return hose is put on the lower fitting - it looks in the direction opposite from the power unit and is located below the inlet;
- two small cross-section hoses are connected to the solenoid valve, the other end of one of them is connected to the economizer valve;
- the second end of the thin hose is put on the fitting located in the lower part of the K-151 on the back side of the DZ body (there are two of them standing next to each other, we use the lower one);
- onto the upper fitting of this pair we pull the hose that goes to the vacuum ignition advancer (it is located on the distributor);
- a large diameter fitting on the DZ housing is used to connect the forced crankcase ventilation pipe, a device usually located on the valve cover;
- a small diameter fitting located in the middle part of the K-151 is used to connect a thermal vacuum switch, however, this pipe is used only if the engine has an exhaust gas recirculation system. If such a system is not provided for a particular modification of the motor, a plug is simply installed on this fitting. True, such a precaution is unnecessary - there is no air leak through this fitting.
Could it be that the coolant is not circulating through the gas reducer due to a broken thermostat?
If the thermostat breaks in the open position, then of course the circulation of coolant through the reducer will decrease, but not to such an extent that there is no circulation at all. Perhaps the tube leading the liquid into the gas reducer is clogged, there is air in the cooling system due to a burnt-out gasket under the head, a sign that the heater is not heating as well, bubbles are coming into the radiator, you can see by opening the radiator cap, the engine begins to overheat and boil. Or the system is simply poorly filled with coolant.
To fill the gas reducer with coolant, you need to disconnect the upper pipe from the reducer and wait until the liquid flows from the reducer, or blow into the radiator to quickly fill the reducer with liquid.
The procedure for connecting pipes to the K151D carburetor
The carburetor unit (CU) in the K151D modification is identical in appearance, design and many components to the K151S model, which was installed on ZMZ-402 engines. The device itself is not very complicated, moreover, it is easy to install, but some drivers (car owners) have difficulties connecting the hoses, since there are quite a lot of them.
Let's dwell on this issue in more detail, consider with the help of diagrams (photos) where the pipes are connected, and what each of the fittings is needed for:
The first two fittings are the most important, designed to connect the hoses for supplying and discharging excess fuel; they cannot be confused with each other, since the “return” is equipped with a valve, and fuel will not flow through it into the CU from the gas tank, and the engine will not start. Number three connects the pipe for the forced removal of crankcase gases from the engine, which fall under the influence of vacuum into the intake manifold. Since this outlet is located in the lower part of the housing, crankcase gases do not enter the carburetor assembly itself.
Numbers 4 and 5 (they are in different pictures) are outlets with hoses with which the EMC is connected to control the XX (idle) economizer; this valve often breaks (although the fuse may also fail). In addition, it is believed that it does not play a big role, has practically no effect on fuel economy, and it is often turned off by looping the bends together with a tube. You cannot leave the fittings unconnected or turn them off - the engine will stall, operate with significant interruptions, and lose power.
Number 6 is the most “optional” of all the taps, since the recirculation valve only affects the environmental friendliness of the exhaust gases, moreover, this device is not always installed on the car. If desired, fitting No. 6 can be plugged, but it is not at all necessary; if it is left open, nothing will change and will not affect the operation of the internal combustion engine in any way.
VAZ 2107 on propane, what air filter to install and how often to change it?
In principle, there is no big difference in air filters, so you can install any one. The main thing is that it is advisable to set up gas equipment with a new air filter. There is also a peculiarity in the operation of a propane engine: gas consumption and engine power depend on the throughput of the air filter. The first sign that you need to change the air filter is that the engine starts to slow down and consumes more gas, which means that the filter is clogged and does not allow the required amount of air to pass through. At this point, it is advisable to replace the air filter.
Interestingly, the gas can be adjusted for any air filter, even a clogged one, using the settings described in the article above.
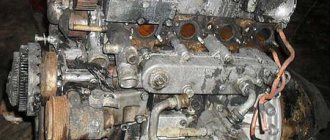
How to adjust the carburetor on a gazelle with 406
Everyone knows that the power of a car engine largely depends on how well its carburetor works (and the Gazelle is no exception). Sometimes during operation of the car, malfunctions in the carburetor appear, and this often happens at the most inopportune time. As you probably already guessed, today we will look at how to adjust the carburetor on a Gazelle. It must be emphasized that the Gazelle car is in most cases equipped with ZMZ-4063.10 and ZMZ-4061.10 engines, which use a K-151d carburetor.
It starts poorly on VAZ gas. Video
Video How to adjust gas on the injector and carburetor.
Video How to set up the 4th generation HBO gas injectors yourself
© Andrey Zelin (YMBR)
To begin with, we will divide all gearboxes of the 2nd (2+) generation into 3 groups.
- Old “Dutch” models from the late 1980s, early-mid 1990s, VIALLE type. Very reliable devices (resource under 200 thousand). There are few of them in Belarus and, as a rule, they are already “dead”.
- Gearboxes made in Italy, Poland or Turkey. For example, LONGAS, BRC, VOLTRAN. In general, they are similar to each other and have 2 adjusting screws.
- Gearboxes made in Italy or licensed with one adjusting screw. For example, LOVATO.
Adjusting the carburetor K-151d (Gazelle with engine 406)
1. Remove the air filter, as well as the carburetor cover. To do this, you need to disconnect the air damper drive cable.
2. Check the level in the float chamber. It is necessary that it be at a height of 3 cm from the upper edge of the middle part of the K-151d carburetor. To take this measurement, it is recommended to use the front part of a matchbox, having first folded it in half.
3. Remove the float rod plug and make sure that the O-ring valve located on the needle valve is sealed. If there are no problems, install the upper part of the carburetor, the choke drive cable, and the air filter.
4. We begin the process of adjusting the Gazelle carburetor itself. To do this, you need to completely screw in the idle speed adjustment screw and unscrew it 5 turns.
5. We carry out similar actions with the quality screw, but unscrew it back only 3 turns.
6. Start the power unit and wait until it warms up to 90 degrees.
7. By rotating the operational adjustment screw, we select a stable engine crankshaft speed at 700-800 rpm.
8. Press the accelerator pedal and quickly release it, which must be done in order to ensure that the K-151d carburetor is adjusted correctly. If the engine stalls, it is necessary to increase the crankshaft speed, but do not exceed the permitted value.
9. We drive towards the nearest service station and adjust the CH and CO indicators of our Gazelle’s engine.
Now you know how to adjust the carburetor on a Gazelle.
The fuel system is one of the most important in a car, it ensures uninterrupted operation of the vehicle, moderate fuel consumption, and the engine life depends on its settings. The carburetor on a Gazelle with a 406 engine also plays a fairly important role, so it must be kept clean and in good technical condition.
GAZelle commercial vehicles with a ZMZ-406 engine and a similar power system have already been discontinued, but there are still quite a lot of such vehicles on Russian roads, they transport cargo and passengers. Carburetor cars have their advantages - the relative simplicity of the device, a minimum of sensors, the ability to repair the engine yourself, fairly high reliability, and the low price of spare parts.
Method for adjusting gearboxes with two adjusting screws
The gearbox regulates two main parameters: the pressure in the second stage (hereinafter referred to as “sensitivity” - this is closer to the truth) and the amount of gas passing through the idle channel - the idle screw.
The engine must be started on gasoline and warmed up to operating temperature.
Initial adjustment position:
- the dispenser is turned to the maximum (maximum cross-section of the gas supply channel);
- screw the idle speed screw all the way and then unscrew it 3–5 turns;
- The sensitivity screw is set to the middle position.
Idle speed setting
Start the car on gas. If this fails, then start it on gasoline and switch to gas, maintaining the speed at about 2000 rpm. Reduce the speed to idle and turn the idle speed screw to find its position when the engine does not stall. If the engine stalls, repeat the operation until the idle speed is stable (idling speed). Then, turning the idle speed screw, you need to find the maximum speed. Next, gradually tighten the sensitivity screw; if the speed changes, then you need to adjust it with the idle speed screw to maximum. If that doesn’t work, turn the sensitivity screw 2 turns and repeat again. As a result, the sensitivity screw is turned almost all the way, the engine idles at maximum - somewhere around 1100–1200 rpm. Using the idle screw, turn it in to lower the speed slightly below the nominal speed and then turn it back, set it to 950–1000 rpm.
Functions and design of the carburetor
In modern engines, an electronic system working in tandem with an injector is responsible for preparing fuel assemblies. The predecessor of this circuit is a carburetor, which is able to prepare a high-quality combustible mixture without any participation of electronic brains. And since the proportions of the mixture change depending on the operating mode of the engine, the carburetor must be able to prepare the optimal composition under any load, from idle to maximum crankshaft speed. And, I must say, he copes with this task well. Even today, K-151 can be found on such domestic cars as the Gazelle with all its modifications, IZH, Volga, and, of course, UAZ.
Although there are many models in the assortment of the Pekar brand, the “one hundred and fifty-first” is given pride of place, and there are many modifications of this carburetor, differing in the name by the letter after the numerical designation of the model. In particular, GAZ-3302 (or simply “Gazelle”), as well as GAZ-3102 (“Volga”) cars are equipped with a K-151S modification carburetor. The differences between the modifications consist of jets of different diameters, designed to prepare fuel assemblies for specific power units.
Composition of the Pekar-151 carburetor:
- body with a float chamber;
- a secondary upper housing in which throttle valves are installed, controlled by a drive cable connected to the accelerator pedal;
- PC cover, which serves as a platform for installing a locking mechanism that prevents the chamber from overflowing with fuel. An air damper is also located here, used when starting and warming up a cold engine;
- a dosing system, which is responsible for the formation of the air-fuel mixture and includes channels of a certain diameter, two air and the same number of fuel nozzles;
- idle subsystem used when the power unit operates in idle speed mode. Includes a bypass channel, one fuel and air nozzle each, screws for adjusting the quantity/quality of the combustible mixture, a membrane-type economizer valve;
- accelerator pump, responsible for uniform engine dynamics, without failures with a sharp increase in speed. Includes additional channels passing through the housing with a float chamber, a membrane device, a ball valve and a gasoline sprayer;
- econostat is a part that enriches the mixture when the engine operates at high speeds. Includes a system of additional channels designed to supply an unscheduled portion of fuel to the intake manifold with the throttle valves fully open;
- a transition system, which is activated at the initial stage of opening the remote control, located in the secondary chamber and serves for a smooth increase in speed. Includes a pair of jets of both types.
Thus, the K-151 belongs to the category of two-chamber carburetors, in which the throttle body opens sequentially. A strainer is integrated into the inlet fitting. It also has a fuel line designed to drain excess gasoline back into the tank and to protect against excess pressure in the chamber. As you can see, this device cannot be called simple, so setting it up requires considerable experience.
Setting the sensitivity of the gearbox
Gradually unscrew the sensitivity screw until it begins to affect the engine speed at idle, then turn it back 0.75–1.25 turns. We try to accelerate sharply - the engine should respond well to the gas pedal. If it responds poorly (“dull”), repeat the operation.
Dispenser setup
On a gas-powered engine, set 3000–3500 rpm, and tighten the metering screw until the threshold for changing the speed is found. It can be heard by the sound of the engine running. You can turn the dispenser screw more/less to make sure. Unscrew the dispenser screw 0.5–0.75 turns from the found threshold.
Final adjustment
It is also carried out in several steps. Sharply press the throttle, then turn the sensitivity screw 0.25 turns until you feel a dip in the speed gain. After this, unscrew the sensitivity screw 0.5 turns. It is better to carry out the last operation not by ear, but by “starting” the car from a stop at low throttle. After this, repeat the procedure for setting up the dispenser.
The gearbox is configured. You can drive safely. The only problem that may arise is high CO levels. A characteristic sign is a strong specific smell of unburnt gas from the exhaust at idle. In this case, you need to tighten the XX screw a little. To pass a technical inspection, it’s a good idea to go to a service station with a gas analyzer and check the CO level in the exhaust.
The power supply system consists of a fuel tank, fuel lines, a fuel pump, a sediment filter, a fine fuel filter, a carburetor K-151 (ZMZ-402), K-151S, K-151T (UMZ-4215) or K-151D (ZMZ- 406) with a drive for throttle and air dampers and an air filter.
Fuel, under the influence of vacuum created by the fuel pump, enters through the fuel intake grid and passes through the fuel line into the filter-sump housing and is supplied to the fuel pump. After the pump, the fuel passes through the fine filter element and enters the carburetor. Air is supplied to the carburetor through the air filter. Fuel tank— located on the left side on the frame side member. When installing two tanks, they are located on both sides of the car and are also attached to the side members using brackets and clamps. The filling capacity of the metal tank is 70 l, the plastic tank is 60 l.
Air filter
— dry type, with a replaceable filter element made of porous cardboard, installed on the carburetor through a rubber gasket. The filter is equipped with an air intake corrugated hose connected to a metal pipe located on the mudguard on the right.
Fuel pump
- diaphragm type, driven by an eccentric on the camshaft. The fuel pump of the ZMZ-4061, 4063 engines is driven by an eccentric mounted on the engine intake camshaft through an intermediate lever. The fuel pump consists of a housing assembly with a diaphragm and a drive lever. The pump valve consists of a holder made of zinc alloy, a rubber valve and a brass plate, pressed by a spring made of bronze wire. A filter made of fine brass mesh is installed above the pump suction valves. To fill the carburetor with fuel when the engine is not running, the pump has a manual drive lever. To prevent gasoline from entering the crankcase if the diaphragm is damaged, there is a hole in the pump housing with a strainer.
Fuel filter-sump
installed on the left frame side member in front of the fuel tank and is designed to separate water and mechanical impurities larger than 0.05 mm from the fuel. To drain the sediment, there is a drain plug at the bottom of the filter housing.
Fine fuel filter
is installed on the engine in front of the carburetor and consists of a housing, a rubber gasket, a rubber sealing bushing, a ceramic or paper filter element, a spring, a settling cup and its fastening parts.
Exhaust gas recirculation system
installed on ZMZ-406 engines and on parts of ZMZ-402 and UMZ-4215 engines and serves to reduce the emission of toxic substances from exhaust gases by supplying part of the exhaust gases from the exhaust manifold to the engine cylinders. Exhaust gas recirculation is carried out on the engine, warmed up to a coolant temperature of at least 35-40 ° C at partial loads. The exhaust gas recirculation system does not operate at idle or when the throttle valves are fully open. The operation of this system is controlled by vacuum from the first chamber of the carburetor, transmitted through hoses through a thermal vacuum switch installed in the heating jacket of the intake pipe and to the recirculation valve installed on the intake pipe. In this case, part of the exhaust gases supplied through a tube from the exhaust manifold through the open recirculation valve enters the intake pipe and then into the engine cylinders. If there is no control vacuum in the hose, the recirculation valve is closed under the action of a spring and the exhaust gas recirculation system does not work. Operating a vehicle with a faulty exhaust gas recirculation system leads to unstable engine idling, excessive fuel consumption and increased emissions of toxic substances.
Method for adjusting gearboxes with one adjusting screw
The only adjustment screw is the combined idle/sensitivity control. How to configure such a gearbox. As in the previous method, start the car on gas (or on gasoline with subsequent transfer) and adjust the idle speed. Set the adjustment screw to the maximum speed - 1000–1100 rpm. Then, turning the screw, reduce the speed a little less than the nominal one and then, turning it back, set it to 950–1000 rpm.
Adjust the dispenser as in the previous method. You can tighten the dispenser screw 0.5 turns and ride. If the machine does not start to “stupid”, you can press it another 0.5 turns. As soon as the machine starts to become dull, unscrew the screw until the dullness disappears. This will be the most efficient mode without damaging the engine due to a lean mixture.
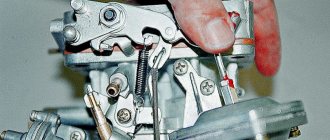
Disassembly and assembly of K151D
All repair work on the carburetor unit is carried out in a dry room, on a clean table, where there are no foreign objects (only the necessary tools and devices). When disassembling we remove:
- top cover (held on by seven screws)
- to completely dismantle it, it is also necessary to disconnect the telescopic suction rod;
- then we remove the top gasket, it can be replaced in any case, unscrew the side plug screw, remove the axle, remove the float from the chamber;
- the float must be without external damage and without gasoline inside (to determine this, you need to shake it);
- we remove the needle of the locking mechanism, it can be removed here freely;
- Next, we unscrew the GDS (main dosing system) jets; the fuel jets are located at the bottom, inside the chamber, the air jets are at the top;
- each jet has its own marking, and when replacing them, you need to install strictly in their places those parts that correspond to the parameters;
- Next, we remove the accelerator pump nozzle, the primary/secondary chamber diffusers (we pry them off very carefully, trying not to damage them anywhere, and there are also small gaskets installed there);
- unscrew the four screws of the accelerator pump diaphragm housing; if the diaphragm is not even torn, but has lost elasticity, it is better to replace it immediately;
- turn the case over, unscrew the two screws securing the lower part with the throttle valve, the screws are located almost in the middle;
- between the housings there are two thin and one thick gaskets, it is also advisable to change them immediately;
- All that remains is to unscrew the three screws securing the forced idle economizer housing (EFS), and at this point the main disassembly can be considered complete.