How to set up a VAZ-2106 carburetor: preparation
Before you begin the adjustment, you need to perform a number of operations, namely:
- First you need to choose a place and prepare it where the carburetor will be disassembled and adjusted. It must be clean and covered with rags.
- Next you need to prepare the tools. To work, you will need a Phillips and flathead screwdriver, a set of wrenches and socket wrenches.
- Then you need to prepare a repair kit for the carburetor. This will include various rubber and metal parts.
- The last step is to disassemble the carburetor. Instructions for this work are written in the service book for the car.
Directly adjusting the carburetor should begin with adjusting the float, since the unit directly depends on it. The higher the float is, the more oxygenated the fuel mixture will be. This is good for a certain time, but subsequently the engine's performance decreases, which is why it needs more fuel. To prevent this, you need to adjust the float tongue. You should also set the mechanism so that its stroke is 8 mm. A smaller size will result in loss of power. After this, it is necessary to check the float system assembly, because thanks to it, fuel enters the manifold.
If a problem is detected, you will have to remove the accelerator pump, disassemble it, and then clean this unit.
Carburetor mixture adjustment
Here you need to configure the device at idle. The fact is that if there are problems, gasoline consumption increases significantly, and problems begin in the operation of the engine while driving. This is why setting the mixture is very important. It is performed as follows:
- The engine starts and heats up to 90 degrees.
- The screws for the quality and quantity of the fuel mixture are fully tightened.
- Two screws are opened three turns, after which the idle speed is adjusted.
The principle of setting the required idle speed is to slowly reduce the saturation of the fuel mixture with a quality screw. You also need to reduce this with the quantity screw.
How to adjust the carburetor starter
Adjusting the starter is a much more difficult task. To solve this without having the appropriate experience, you will need to completely remove the carburetor from the engine in order to increase the clearances at the valve edges to achieve normal values.
If it is not possible to dismantle the device, it makes sense to proceed in the following sequence:
- warm up the engine well;
- open the air damper about a third;
- we bend the rod in such a way as to achieve an engine rotation speed of 3200 rpm;
- Using a special screw, we adjust the speed so that the rotation speed is approximately 400 rpm lower.
When performing this adjustment, it is necessary to close the hole under the plug to prevent air vacuum under the diaphragm.
Traction adjustment
This final procedure consists of the following steps:
- first you need to unscrew and remove the housing of the air filtration and cleaning system;
- after this you need to measure the distance between the central guide rods of the unit. The size should be exactly 80 mm (factory parameters);
- then the operation of the accelerator is checked;
- The length of the pull rod is checked and compared with the value in the vehicle owner's manual.
This completes the work on adjusting the carburetor. Sometimes you still need to adjust the ignition timing. All these procedures are necessary for the smooth functioning of the carburetor. As we can see, if the sequence is followed, it is not difficult to adjust the device or repair it. It is only important to familiarize yourself with the nuances of the work in advance so that the result meets your expectations.
The fuel mixture is supplied to the cylinders in cars of the VAZ 2016 family using a mechanism called a carburetor. The mechanism is responsible for stable engine operation and moderate fuel consumption. It is not uncommon for the VAZ 2106 carburetor setting to fail; in such situations, it requires adjustment and maintenance. Repairs are carried out at service stations; most owners try to do carburetor maintenance themselves to save money.
Starting device
Adjusting the VAZ 2107 carburetor - checking and subsequent adjustment of the starting device.
To quickly and efficiently carry out this adjustment, prepare a small piece of wire with a diameter of 0.7 - 0.8 mm and a template made of dense material with a width of 5 to 5.5 millimeters.
Next, remove the air filter of the VAZ 2107 car, clean the carburetor from dirt until it is completely clean.
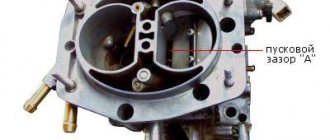
Completely close the air damper of the VAZ 2107 carburetor.
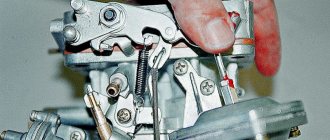
The tail of the rod, indicated by the letter A in the figure, which connects the trigger rod to the choke lever, must be in such a position that, without moving the trigger rod, it takes a position at the end of the rod groove. If something doesn’t work out, then bend the rod, this is acceptable.
Next, we recess the starting rod until it stops.
As it shown on the picture,
Using template B, we measure the gap between the edge of the air damper and the wall of the combustion chamber, it should be in the range from 5,0
up to
5.5
mm.
The design of the VAZ 2106 carburetor
High-quality independent maintenance of any vehicle system requires a detailed study of the components and mechanisms responsible for its operation.
Before adjusting the carburetor on the VAZ 2106 , you need to consider the main units:
- System for supplying and dosing the combustible mixture;
- Control of mixture enrichment flaps, throttle position;
- The structure of the float chamber and its main purpose;
- Operation of the accelerator pump and idle mechanisms.
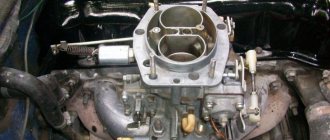
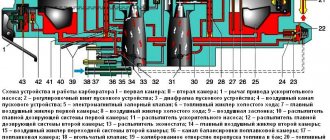
View of the carburetor from the throttle valve drive side: 1 - air damper; 2 — starting device; 3 — air damper control lever; 4 - telescopic rod; 5 — lever for driving the throttle valve of the primary chamber; 6 - lever that limits the opening of the throttle valve of the secondary chamber; 7 - return spring; 8 - rod connecting the throttle valve of the primary chamber with the air damper control lever; 9 — pneumatic drive rod; 10 - pneumatic drive.
The process occurs by filling the float chamber with fuel, which must have a stable level. The fuel is transferred to the spray mechanism, where, in turn, it is mixed with air in proportions of 1 to 15, the quality of the mixture is regulated by the throttle valve.
Preparing to adjust the carburetor
Car repair and maintenance requires prepared tools and space.
Setting up the carburetor of the six is no exception; for fast, competent work you need to carry out the following steps:
- Before work, the car is placed on a flat surface, a place is prepared for disassembling components in the form of a table or a clean area. A container for washing and clean rags will definitely be needed.
- Prepare a set of keys and screwdrivers; without tools, it will not be possible to carry out the work.
- Purchase a repair kit from an auto parts store that contains all the O-rings, gaskets and mechanisms.
- Disassembly and adjustment of the VAZ 2106 carburetor occurs after completing the tool and the necessary materials.
↑
How does a carburetor work in a VAZ-2106 car?
Before proceeding directly to setting up the carburetor, we will describe its structure in detail. Since about 1980, the manufacturer began installing such devices known to our compatriots as Solex and Ozone on VAZ-2106 cars, so we will focus your attention on them.
The following elements are used in the design of these carburetors:
- float chamber in which the needle valve is located. Its main task is to maintain a stable level of fuel entering the device;
- a dosing system in which the required amount of fuel is set using a special throttle valve;
- control mechanisms that regulate the position of the throttle valves and enrichment of the air-fuel mixture;
- an econostat designed to use fuel wisely, as well as an accelerator pump;
- idle system.
The carburetor works on a very simple principle. The fuel moves from the float chamber to a special compartment in which it is mixed with air.
All proportions are regulated by dampers. If the settings are made correctly, a mixture is obtained that ensures normal engine starting. Otherwise, you will encounter the following problems:
- severe overheating of the engine even at low load;
- the appearance of black smoke from the exhaust pipe;
- excessive fuel consumption;
- a significant reduction in the power of the power unit.
Tuning and adjusting the carburetor VAZ 2106
Before adjusting the carburetor on a VAZ 2106, you need to check the ignition system and fuel supply. The main causes of ozone carburetor malfunctions are a rich or lean mixture, which directly affect the stable operation of the engine. An enriched mixture manifests itself in the form of increased engine temperature under stable operating conditions and increased fuel consumption. Before adjusting the carburetor on a VAZ 2106 car, you must completely check the adjacent systems and filters.
A lean mixture leads to a loss of power, acceleration dynamics of the car, and loud sounds in the form of pops. You should pay attention to the engine temperature; if the increase occurs too quickly, it is necessary to correctly adjust the amount of mixture. As a preventive measure during car maintenance, it is recommended to check thermal clearances, the condition of the fuel system and filters.
Checking the strainer
The correct amount of fuel is not always supplied to the carburetor. The reason is negligence regarding the frequency of replacement of coarse filters, which has a detrimental effect on the mesh filter, which cleans the fuel before being supplied to the float chamber of the carb. The filter is dismantled after unscrewing the plug that protects the structure. Cleaning of soot and dirt must be done from the inside by thoroughly blowing the filter with compressed air. The operation must be performed with extreme caution; if the thin walls of the filter are damaged, it cannot be restored.
When installing, pay attention to the condition of the fuel supply nozzle. If it is possible to visually determine scale or dirt, it is necessary to remove and blow it out. Before removing the nozzle, the float chamber should be emptied of fuel, because the needle valve may be damaged or the system settings may be lost. When screwing the plug, it is necessary to visually inspect the gasket; if damaged, replace it with a new sealing ring.
Setting up the float chamber
The float chamber device is responsible for the constant presence of fuel in the system. The camera mechanisms can be adjusted and answer the question of how to adjust the VAZ 2106 carburetor for lower fuel consumption. The main reason for incorrect float settings may be increased fuel consumption and unstable engine operation during acceleration. Before dismantling, you must make sure that the fuel nozzle is screwed in place, because It is not uncommon for it to twist out of place due to increased vehicle vibrations. Fuel overflow can also occur due to a low fuel level in the float chamber, which may result in weak engine thrust, popping noises or wet spark plugs.
Idle adjustment: the last stage of carburetor tuning
After setting up the float chamber and debugging the starting device, you can safely move on to the final stage, which allows you to adjust the engine idle speed.
For this purpose, the carburetor design includes so-called quantitative and qualitative screws. As in the case of debugging the starting mechanism, it is necessary to warm up the engine well beforehand. After this we perform the following steps:
- Using a high-quality screw, we set the maximum engine rotation speed;
- Let's move on to the quantity screw. Using it, you need to reduce the speed by about 100 rpm. After this, we start the power unit and continue to turn the screw to achieve the optimal level of engine speed.
Correct adjustment of the idle speed makes it possible to achieve stable operation of the engine, as well as eliminate possible malfunctions and failures. If your goal is also to increase power, you can make a number of changes to the design of the standard carburetor or replace it with a Solex-type device that functions more efficiently.
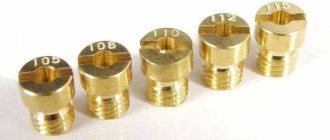
To tune the carburetor, work is carried out such as removing the spring from the vacuum drive, installing more efficient air and fuel jets, as well as installing a new diffuser marked 4.5 (instead of the standard 3.5). Such a simple modification makes it possible to significantly improve the performance of both the device itself and the car engine.
The operation of each automobile engine depends on the quantity and quality of the air-fuel mixture prepared by a special device called a carburetor. All carburetor systems create the mixture and help distribute it evenly throughout the cylinders. You can mix fuel with air flow in different ways. For example, there are membrane-needle carburetors, and there are float carburetors. It is this type that includes carburetors of the VAZ family, produced by the Dimitrovograd Automotive Aggregate Plant (DAAZ).
Adjusting the VAZ 2107 carburetor is an important means of keeping the engine in working condition.
Before adjusting the carburetor, you need to know what type is installed on the car. To do this, you need to remember that:
- If you have a vacuum ignition corrector, this means that you have the latest type of VAZ 2103 or 2106 engine installed, and the modification of the 2107 carburetor is 1107010-20.
- If your “seven” is equipped with a six-wheel engine, but there is no installed vacuum corrector, then you have a carburetor modification 2107-1107010-10.
Main carburetor components to be adjusted:
In order to adjust the carburetor, you need to know the main signs of its malfunction. Since the carburetor is responsible for the acceleration dynamics of the car, these include the following:
- difficulty starting the engine, prolonged “sneezing”;
- all sorts of “jerks”, “jerks”, “failures” when you press the gas pedal;
- sluggish acceleration ability of the car;
- unexplained increase in gasoline consumption.
So, if your car has corresponding “complaints”, let’s start adjusting it.
Attention! The most accurate adjustment can be made with the carburetor removed. Adjusting the VAZ 2107 carburetor does not involve the use of fleecy and woolen fabric, as well as various wires for cleaning the jets.
How to adjust the carburetor yourself on a VAZ 2107? When removing the carburetor cover, the float system is adjusted first, so convenient.
Adjusting valve clearances
Fixing valve tappets when replacing the adjusting washer: 1 – clamp 67.7800.9504; 2 – adjusting washer
Checking and adjustment work (if necessary) is carried out on a “cold” engine using a wide probe 0.15 millimeters thick or a special adjusting device with a micrometer head.
Setting the ignition timing
The ignition timing is adjusted by aligning the corresponding marks on the timing cover with the mark on the flywheel of the power unit. Technically, this means that the moment the spark occurs on the spark plug of the first cylinder and the contacts of the distributor-distributor opens before the piston of the first cylinder reaches TDC by an angle of 0+10.
Setting the fuel level
This parameter has a significant impact on the composition of the fuel mixture, exhaust toxicity, the dynamics of the power unit and fuel consumption and consists of performing the following manipulations:
- Unscrew the screws securing the carburetor cover and install it in a vertical position. A prerequisite for installing the cover is light contact between the needle ball and the float tongue.
- Using a special gauge, we measure the gap between the plane of the cover (including the cardboard spacer) and the bottom surface of the float. The gap should be 6.5+0.25 millimeters (pos. A).
- If the gap does not correspond to the specified value, it (the value) is corrected by bending the float tongue (pos. a).
- Finally, we control the stroke of the float. It should be 8.0+0.25 millimeters.
Attention! If a special gauge is not available, you can use a regular drill of the appropriate diameter.
Adjusting the float system
The free play of the float varies between the following values: 6.5 mm on one side and 14 on the other. This can be adjusted using a checking template by placing the camera vertically. In this case, the float lightly touches, but does not press, the valve ball.
If the distance is less than 6.5 mm, then you need to slightly bend the valve tongue (needle-shaped), which is shown in the figure as the letter “A”.
After this, we adjust the degree of opening of the needle valve, which allows gasoline to flow into the float chamber. When the float rises, the fuel supply decreases; when you sharply press the gas pedal and open the throttle, the fuel consumption increases and the float drops.
Now we adjust the deflection of the float in the other direction. To do this, we move it away from the lid as much as possible and check it with a template, the thickness of which is 14 mm with a certain tolerance.