Most modern gasoline cars are equipped with fuel injection systems, but before they gained dominance, all cars were equipped with carburetor systems. For this system to work correctly, the carburetor settings must be performed flawlessly. High-quality carburetor adjustment will reduce fuel consumption, make the engine run smoothly at idle, reduce the emission of harmful substances into the atmosphere and increase the overall engine life.
Most domestic cars have a carburetor system, and the question of how to adjust the carburetor will not lose its relevance for a long time. Many owners of rare old foreign cars also face the problem of how to adjust the carburetor. Since the principle of operation of carburetors around the world is no different, the algorithm of work will be the same.
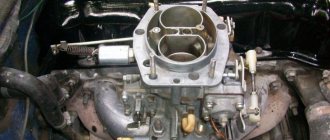
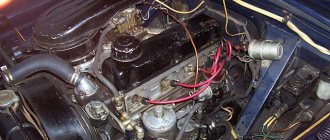
The carburetor is the main component of the fuel system of any carburetor car. This is where air and fuel mix to form a fuel mixture that enters the engine's combustion chambers. A properly adjusted carburetor produces a fuel mixture in the required proportions. Such a mixture will not detonate in the cylinders, which will increase the life of your engine.
How to adjust the carburetor and when to do it
Do-it-yourself carburetor adjustment is done after using low-quality gasoline or when engine operation is no longer stable. For prevention, the manufacturer recommends flushing the carburetor with a special compound every 6-7 thousand kilometers.
Possible malfunctions in the carburetor:
- Fuel leaks on the carburetor. In this case, you need to measure the fuel pressure. This is done using a special pressure gauge. The operating instructions will tell you what the pressure should be. Typically it ranges from 0.2 to 0.3 atmospheres. If the pressure is normal, the problem is in the float chamber and the fuel level needs to be adjusted;
- Carbon deposits on spark plugs with the smell of gasoline. This clearly indicates a problem with adjusting the carburetor floats or a burnt valve;
- Rough engine idling may not only be due to the carburetor. This often happens due to incorrect adjustment of the throttle cable. To check, you need to disconnect the cable and turn the valve manually.
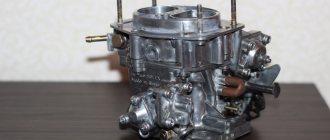
Before you adjust the carburetor correctly, you need to clean it thoroughly. It is recommended to use special liquids for cleaning. The jets cannot be cleaned with toothpicks or needles. Damage to the jets will lead to calibration failure. If the holes cannot be cleaned with aerosols, you can carefully clean them with a soft wire. When cleaning, do not use rags. Threads can clog the holes, which will lead to malfunction of the carburetor. If the aerosol does not remove all contaminants the first time, you need to repeat the procedure.
Setting up the float mechanism
The level of the fuel mixture in the float chamber is directly related to its quality. At an increased level, the mixture will turn out to be lean, which will negatively affect gasoline consumption and increase toxicity. Without adjusting the floats, the question of how to adjust the carburetor cannot be solved. The process of adjusting the floats includes the following operations:
- Adjusting the floats in relation to the lid and walls of the fuel chamber. If deformation of the float fixing bracket is noticed, it should be aligned manually;
- We adjust the bracket with the needle valve closed;
- We adjust with the float retracted and the valve open; the distance between the float and the valve should in this case be set to about 15 millimeters.
Setting up the carburetor float system
This operation is carried out in several stages:
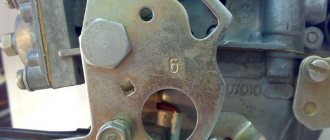
- Checking the float: the procedure ensures that it sinks evenly. This is achieved by aligning the bracket with your hands (fingers). It is not at all difficult to install the float in the correct position with some skill.
- Setting up the valve (when it is closed): the chamber cover is placed in a vertical position, the float is removed to the side, the tongue on the bracket is bent (the operation is simple if you use a screwdriver). As a result of the described actions, a gap of insignificant size (6–7 millimeters) is formed between the float and the cover. Then the ball in contact with the tongue is immersed in the body of the needle. A gap of less than 2 mm indicates normal operation of the valve. If its value is higher, most likely the valve is sticking (sometimes it happens that it sticks).
- Setting the valve in the open state: the space between the needle and the float, which is extended to its full length, is equal to one and a half centimeters according to the standard.
Setting the fuel mixture supply
The carburetor control screws will help you figure out this setting. Before performing this procedure, you should know that the screws have a plastic factory press-on that limits the rotation of the screws (from 50 to 70 degrees). If turning in this range does not bring results, you need to break the press-on and turn the screws as much as necessary. Before setting the position of the screws, you should warm up the car engine to operating temperature.
To adjust the idle speed of the carburetor, you need to turn out the quantity screw and the mixture quality screw a few turns and, turning them, listen to the operation of the engine. When the engine starts to run smoothly, the carburetor idle adjustment is complete.
Carburetor adjustment with screws
First of all, before proceeding with the appropriate adjustment, it is necessary to debug the ignition system, make sure that the spark plugs are in good condition, adjust the fuel supply system, set the permissible gap on the device for automatically interrupting the current circuit, remove the gas pedal rod from the throttle valve and only then proceed to carburetor settings.
The engine must be warmed up to operating condition, otherwise after debugging “cold” during operation it will work completely differently. We completely disconnect the crankcase tube, completely eliminating the influence on the crankcase gas setting. The equipment you will need is a simple slotted screwdriver and preferably a tachometer (digital, since the dial does not show revolutions up to 10 units). In service centers, they could use a gas analyzer as a necessary, but not obligatory, one for fine tuning, but we will make do with the specified accessories.
- We reduce the number of idle speeds to a minimum using the “quantity” screw (the engine is running, but is about to stall).
- Using the “quality” screw, we look for the position at which the number of revolutions is maximum. We begin to screw it in, raising the speed; if the engine stalls, we unscrew it to the required criterion.
- We check the quality of the fuel mixture.
Give the gas sharply - the engine should not stall. If it suddenly stalls, then unscrew the “quality” screw until the engine starts working normally. The setup is complete.
Experienced drivers make such adjustments “by ear” based on the sound of the engine; for “confident” drivers, there are many instructions and training videos; for “beginners”, it is better to carry out the correct carburetor adjustment in the appropriate service centers.
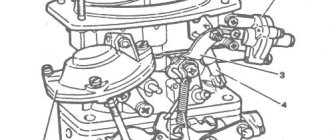
Adjusting the carburetor draft
Before you begin adjusting the rods, you should remove the air filter cover so that nothing interferes with the process. First, using a caliper, measure the distance between the rod tips. According to factory parameters, it should be 80 millimeters. To adjust the length of the rods, you need to loosen their clamps.
Checking the strainer should be carried out when there is fuel in the float chamber. This will help you see if the shutoff valve is closing completely. After examining the valve, you need to clean and dry it. Problems with loss of power and engine failures occur due to obstructed fuel supply. This is another reason to thoroughly flush the carburetor.
The tightness of the shut-off needle can be checked using a rubber bulb, while listening for air leaks. If they are present, it is time to change the needle.
Why does a chainsaw shoot into the carburetor?
Often, chainsaw carburetor malfunctions are associated with loud extraneous sounds that come from the unit. Ignoring them will lead to even more serious damage, which will be much more difficult to eliminate.
First of all, you need to understand the causes of extraneous sounds. The first of them is an incorrectly set ignition, due to which the used fuel does not have time to burn in the internal combustion engine cylinder in time. This leads to the formation of a short-term shooting noise that is repeated with each cycle of fuel injection into the cylinder.
To fix the problem, you need to adjust the gap between the flywheel and the standard ignition coil of the chainsaw. To do this, you need to remove the left protective cover of the plastic case and clean the parts underneath. To the right of the ignition coil there are 2 screws, turning them counterclockwise will allow you to move the flywheel away from the standard coil. Next, you will need to attach a template to the side of the coil and begin to slowly turn the factory screws in the opposite direction. As soon as the built-in flywheel comes close to the previously installed template, you will need to stop turning the screws.
After adjusting the ignition gap, you need to check the operation of the chainsaw. If it still fires, then you need to inspect the spark plug. If carbon deposits have accumulated on it, the part must be cleaned and completely dried.
Another reason why the chainsaw you are using is firing is due to the incorrect proportion of the prepared fuel mixture. If there is too little gasoline or motor oil, the engine of the garden tool will not be able to operate stably. In this case, you will need to completely drain the fuel and prepare the mixture in accordance with the manufacturer's instructions.
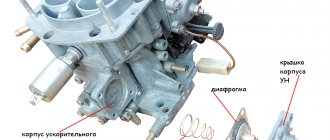
How to properly adjust a Solex carburetor
There are still many representatives of VAZ classics driving along the roads. Many of these cars have Solex carburetors under the hood. This carburetor is more economical and is capable of producing a higher quality mixture of fuel and air. For smooth operation of the engine, this carburetor must be properly tuned and adjusted. The class of carburetor masters is gradually dying out, so many people have to do the carburetor adjustments themselves.