- Purpose and principle of operation of DPKV
- Types of DPKV on the VAZ-2114
- Errors and main symptoms of DPKV malfunction
- Instructions for replacing the sensor on a VAZ-2114
- Useful video
- Conclusion
One of the smallest, but extremely important mechanisms in the car system is the VAZ 2114 crankshaft sensor, which is responsible for the synchronized operation of the ignition system and the car’s power system.
Malfunctions in the operation of the sensor significantly worsen the technical condition of the machine, and failure of the DPKV completely stops the operation of the engine. What are the main signs of a mechanism malfunction and how to replace it if necessary?
Purpose and principle of operation of DPKV
This mechanism is entrusted with a simple but extremely important task - to read data about the position of the crankshaft and transmit the results obtained to the final link in the chain. Knowing the position of the crankshaft, you can easily and quickly calculate the points at which the pistons are located. It is simply not possible to determine the ideal time to supply a spark to the cylinders in any other way. This mechanism is quite reliable in operation, but sometimes unpleasant breakdowns and malfunctions occur in its operation. What happens if the sensor breaks down?
The following will happen: the motor will stop working, since the electronics will not be able to calculate the optimal moment to supply a spark. That is why it is so important when traveling on the “fourteenth” to always have a spare crankshaft sensor 2114 on hand.
It is also important to know the operating principle of the DPKV on the VAZ-2114 and its distinctive features.
The mechanism works according to the following principle: a special gear is installed on the crankshaft, which has a gap equal to two teeth in a certain place. The passage of the pass past the sensor located on the engine near the pulley coincides with the location of the TDC piston. An impulse arises, which is processed by the controller, after which it sends a signal to supply fuel.
Checking the crankshaft sensor for serviceability
To independently check the crankshaft position sensor, you need to remove it and inspect it for visible damage. If an accumulation of dirt or oil is detected in the gap, it is necessary to thoroughly clean the part.
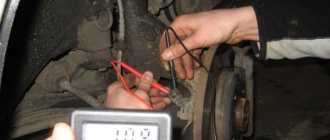
You can also check the serviceability of the sensor using an ohmmeter. The coil resistance of a working sensor will have its own readings, which are in the range of 500-700 Ohms. Using a multimeter, it’s time to check the inductance of the winding - you can find a video on the Internet with the test. However, even if all indicators coincide with the norm, you cannot be sure that the sensor is fully operational. In this case, it is recommended to use an oscilloscope to carry out diagnostics.
So, knowing the reasons for the breakdown of the crankshaft position sensor and where it is located, you can independently check its performance. But even after checking, it is best to replace this mechanism with a new one. The price of the sensors is low, and a spare part can be very useful on the road.
Types of DPKV on the VAZ-2114
The differences between the sensors are based on their design features and operating principle. On VAZ-2114 cars you can mainly find the following variants of this device:
- Inductive. They have a metal rod inside with a magnet at the outer end
- Frequency. Work on the principle of determining pulse frequency
The first sensor is the most widely used. Due to its practicality and efficiency. Copper wire is wound around the rod, the ends are used to connect the wires. Voltage is applied to the controller, and when the gear skips, the voltage stops. This is a signal to the control unit, which in turn gives the command for fuel injection.
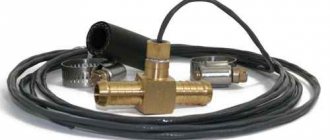
Repair of wiring connector of the Crankshaft Position Sensor (CPS) VAZ.
Quite often, the cause of the car jerking and its complete stop is an open circuit of the DPKV (error P0335 or P0336)
A wire break most often occurs at the base of the sensor connector. The connector needs to be replaced with a new one. In the article we will look at how to do this most correctly, and you will also learn how you can repair the old sensor connector if you suddenly cannot purchase a new one.
Everything was done indoors, so the part with attaching the restored connector to the car wiring is for demonstration, that is, you need to do everything the same, only not on the table, but on the car).
We cut off the connector from the car wiring at a distance of 3-5 cm from the connector. We remove the plastic wire retainer (to be honest, it doesn’t really prevent the wires from breaking at the root - so you don’t have to put it back if you’re too lazy...)
Using a wire with a diameter of 0.8 mm (we used a piece of welding wire from a Kempy semi-automatic machine) we press the fixing stops of the contacts through a special groove (it’s enough just to insert the wire until it stops).
Use the remaining wires to pull the contacts out of the connector. They come out quite tightly due to the rubber seals. We open the contact petals around the rubber seals and break off the old wires at the root.
We find a couple of pieces of wire 10-15 cm long, suitable in cross-section and color. Don't forget to put rubber seals on the wires.
We strip the ends of the wires by 3-4 mm and carefully solder them to the contacts. We used a 25-watt soldering iron, POS-61 solder and active flux based on zinc chloride.
We clamp the rubber seals with the contact petals, slightly bend the contact latches....
We insert the contacts with the wires into the connector until the latch lightly clicks. We put the plastic wire clamp on the back of the connector. The connector has been restored!
Next, let's move on to the car. We strip the DPKV wire - no more than 5 cm. We bend the screen back, strip the white and green wires by 15 mm.
We put heat-shrinkable tubes on the connector wires and twist the corresponding wires with electrical twist.
We stretch the heat shrink onto the twists and heat it with whatever comes to hand - we came across a lighter. But if you have a hairdryer on hand, it will be better... at least according to Feng Shui, that’s how it’s supposed to be.
We twist the restored wires slightly together and wrap them with electrical tape, starting from the connector. We wrap the electrical tape with an overlap of at least 50% over the previous layer. The result is in the picture below - the twisting area is quite well protected from moisture and looks neat. All that remains is to connect the connector to the sensor and ALWAYS fix the DPKV wire on a special bracket on the lower bolt of the timing belt cover.
Of course, the reliability is lower than that of solid wires - but such a connection has worked for years - it has been tested. Not a single return in 5 years.
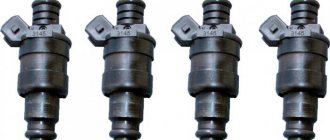
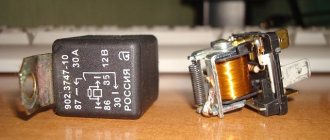
The crankshaft or crankshaft position sensor is an electromagnetic device that transmits data about the current position of the crankshaft to the electronic engine control unit. It is difficult to overestimate the importance of this device, since the correct operation of the injectors responsible for supplying fuel, as well as the entire ignition system as a whole, depends on its performance.
This is what the device looks like
Practice shows that the DC fails quite rarely. But experienced drivers note that such a malfunction can take you by surprise, at the most inopportune moment.
We advise you to always have a spare DC in your car. This is especially true for those who are going on a long trip.
Depending on the design and operating principle, there are three main types of crankshaft sensors. Let's look at the features of each of them in the table.
Sensor type
Design Feature
How does it work
Inside it is a metal rod with a magnet at the outer end. It magnetizes the rod. There is a copper winding around the rod, and its ends are connectors for connecting wiring
When a steel object is near the rod, signals appear on the terminals
With Hall sensor
Errors and main symptoms of DPKV malfunction
Often, novice car enthusiasts incorrectly interpret certain signals and errors of various vehicle systems that arise during the operation of the vehicle. Some symptoms that occur during a malfunction of the crankshaft sensor on a VAZ 2114 are also characteristic of other systems. Therefore, it is important to first check all related components and assemblies, and then move on to checking the mechanism itself
It is not uncommon for the sensor to stop functioning properly due to adhering dirt. The device must be thoroughly cleaned, which will solve the problem. After the work has been done, the crankshaft sensor will begin to correctly read incoming pulses
However, there are some common symptoms that in most cases are characteristic of DPKV.
This list should include:
- a sharp decrease in engine power;
- the appearance of “dips” during acceleration;
- unreasonable increase and decrease in the number of revolutions;
- Difficulty starting the engine.
Why do problems appear with the device? In addition to the already noted accumulated dirt, the cause of rapid failure of the mechanism can be a manufacturing defect or mechanical damage. At any time during operation of the vehicle, damage to the DPKV housing, short circuit of the winding turns, or damage to the pulley teeth may occur.
The sensor has a fairly long service life, so the device rarely fails for natural reasons. Often, dust, dirt, and various inclusions, which are often found in the space between the DPKV and the pulley, shorten the lifespan of the mechanism.
In most cases, the sensor must be replaced, but for accurate diagnosis, it is recommended to carry out computer diagnostics. If there are problems with DPKV, the computer may generate two errors: code 0335 and 0336. The first code is a characteristic of an incorrect signal, and the second indicates a signal error.
Crankshaft sensor (DPKV) VAZ 2114 signs of malfunction
The crankshaft position sensor plays an important role in engine stability. Perhaps this is the only sensor in the electrical engine control circuit, due to a malfunction of which the engine may not start.
Types of crankshaft sensors
According to their design features, crankshaft position sensors can be magnetic, based on the Hall effect, or optical.
A magnetic (magnetoresistive) type sensor operates under the influence of a magnetic field arising from a permanent magnet passing in close proximity. In a Hall sensor, the current strength varies depending on the magnitude of the magnetic flux - according to the principle of operation, this model resembles an ignition distributor. The optical sensor has a toothed disc built into it.
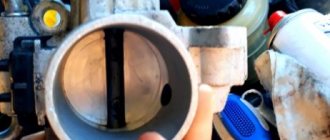
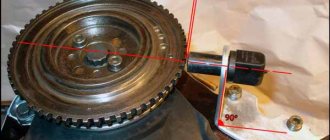
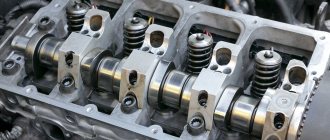
Gear
The gear is always present where there is a crankshaft position sensor (CPS). When teeth pass near the sensor, the direction of the magnetic flux changes, and the sensor transmits the changed signal to the engine control unit. The unit synchronizes the data received from the DPKV with the injectors, supplying a spark to the cylinder at the moment when the piston is at top dead center and the compression cycle is in progress.
The teeth are located around the circumference of the wheel every 6 degrees. If a circle of 360 degrees is divided by 6, then there should be 60 teeth. But in this circle there is a gap of 2 teeth, so there are only 58 of them. This is done so that the sensor can determine through the crankshaft when the top dead center of the first piston will be cylinder.
Structurally, the teeth can be made on the crankshaft pulley, on the crankshaft itself, on the flywheel, and even on the clutch basket. Accordingly, the DPKV is located next to the gear wheel. The distance between the sensor and the edge of the tooth should be approximately one millimeter. This gap is necessary to create a magnetic field.
Instructions for replacing the sensor on a VAZ-2114
Qualified specialists can best identify deviations in the operation of the VAZ 2114 DPKV and eliminate them. If you have the desire and free time, you can test and, if necessary, replace the mechanism yourself. The sensor is attached with a bolt to the oil pump cover, which should be released.
Once the mechanism is in your hands, it must be carefully inspected. Any cracks are direct evidence that the device needs to be replaced.
To replace the DPKV on a VAZ-2114, you need to do the following work:
- Turn off the ignition and open the hood.
- Remove the block and release the bolt.
- Check the sensor and pulley for damage.
- Before installing a new mechanism, first clean the area from dirt and dust.
- Install a new DPKV and tighten the bolt.
- Measure the gap between the pulley and the core.
- Make sure that the gap does not exceed 1 mm.
- Start the car engine and make sure that the power unit is running smoothly.
If the power unit starts up immediately and without any difficulties, its operation is stable, then you can be sure that the installation of the VAZ 2114 crankshaft sensor was carried out successfully.
Camshaft position sensor: what is important to know and be able to do?
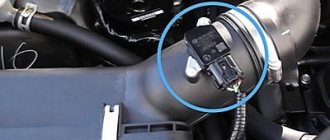
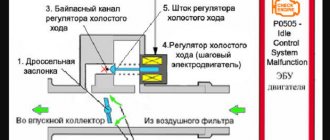
The camshaft position controller is a device used to ensure the correct functioning of the engine . The DPRV or phase sensor is responsible for the spark and is used to determine the position of the shaft at the current time. This device is installed in the engine compartment, directly on the engine, not far from the air filter, next to the cylinder head.
Principle of operation
As for the principle of operation, in this case it is similar to the operation of a Hall controller. During operation, the DPRV reads data from the shaft of the power unit through a gear that is missing two teeth. These teeth are located so that when they hit the sensor, the piston will be located either at top or bottom dead center. The pulse transmitted by the controller is sent to the module, and based on the data received, it controls and changes the ignition timing if necessary. The primary task of the controller is to adjust this parameter while the engine is running, which made the Four engines more efficient.
Possible malfunctions in the sensor
What are the signs that indicate a malfunction of this regulator:
- A Check Engine error appeared on the dashboard, and it came on after the power unit was started. With such a problem, the engine control module will wait for information to arrive from the controller, and if the DPRV still does not work, then it will work based on the operating parameters of the ignition system.
- You can also determine the failure of the camshaft sensor by increased fuel consumption.
- When attempting to perform self-diagnosis, the system may experience malfunctions and malfunctions. A breakdown can be reported by errors numbered 0340 and 0343.
- The power of the power unit has dropped significantly, as well as its dynamics, this can be seen especially clearly as a result of driving uphill.
How to determine a malfunction using visual diagnostics:
- First you need to check the body of the device - there should be no defects or signs of damage. If there are cracks on the body, then most likely it’s time to change the regulator.
- You also need to check the contacts on the device connector and make sure that there is no moisture on them. If water gets on the plug, the contacts may short out, which will prevent the sensor from transmitting the correct information to the control module. It is also necessary to check the contacts for oxidation. If the contacts have oxidized for some reason, which again may be due to humidity, this will lead to loss of signal. Accordingly, the control unit may regard this as a failure of the camshaft sensor.
- It would be a good idea to check the integrity of the connected electrical wiring; a multimeter is used for testing. If the chain is damaged, it must either be replaced or repaired (a video about the replacement was made by user Vitashka Ronin).
Instructions for replacing the device yourself
Let's consider the procedure for replacing the DPRV using the example of a 16-valve power unit:
- As we have already reported, the sensor is located under the air manifold, close to the camshaft. To make the replacement procedure less complicated, it is recommended to remove the engine radiator grille.
- Using a wrench or a socket with an extension, which will be more convenient, you need to unscrew the two screws that secure the device. Disconnect the wires connected to the controller, after which the controller must be dismantled, cleaned and tried to be installed in the seat again. Perhaps these actions will help get rid of the problem if it involves dirty contacts. If the DPRV still does not work, then it must be replaced.
- It is not recommended to use sealant to install a new regulator, since this sensor will in any case work under harsh conditions in an aggressive environment. This is due to temperature changes in the motor. Install the new DPRV and replace the radiator grille.