How to make a wheel alignment
You can adjust the wheel alignment angles of your car with your own hands using available tools and simple devices. In this material we will talk about how to do wheel alignment yourself at home, and what difficulties are most often encountered when adjusting wheel alignment angles.
Incorrect alignment adjustment can cause, for example, rapid wear of tires, or the fact that when driving in a straight line, the car will pull to the left or to the right.
At the end of this article you will find a video that explains and shows in detail everything you need to know about wheel alignment.
What is wheel alignment?
Car wheels have an installation angle. This concept has existed for a long time, and over time, due to the increase in automobile speeds, engineers were forced to pay more and more attention to the development of the suspension in order to improve driving safety, as well as create the necessary comfort for the driver.
The steering system and suspension parts contain levers and rods in their design, which are connected by hinge parts. As soon as these same hinges wear out, increased play (in other words, gaps) appears.
The result is that the inclination of the wheels relative to the vertical changes, which worsens handling, moves the car to the side when driving, and also reduces the service life of the tires.
Camber angle
The exact definition is the angle between the vertical plane and the straight line along which the wheel rotates.
Or, in other words , the angle of inclination of the wheel relative to the side of the car.
Toe angle
The exact definition is the angle between the trajectory of the car and the plane along which the wheel rotates.
Or, in other words , this is the difference in distances between wheels in one axle, measured at the two extreme points of the wheel.
Let's imagine two imaginary lines: one vertical, and the other directed along the rotation of the wheel.
Toe angles are also divided into positive and negative . Imagine the car from above and imagine two straight lines: one along the rotation of the wheel, the second parallel to the movement of the car. If the line along which the wheel rotates is located between the trajectory lines, then the angle is considered positive, and if vice versa, then negative.
DIY adjustment
Carrying out wheel alignment with your own hands is not easy. Not because alignment is very difficult to do, but because it requires purchasing an expensive tool. If you decide to carry out adjustment work on your own, then be prepared for some costs.
I would like to note that it is recommended to perform a wheel alignment after every twenty thousand kilometers.
Therefore, it is much more profitable to buy a tool and do everything yourself. From the tool you will need:
- Camber meter (digital). It is the most convenient and takes measurements quite quickly.
- Toe regulator. It measures the level of toe-in and uses it to select the required angle.
- A set of keys.
Considering all the above information, you can perform the wheel alignment yourself. So how is it done?
- The first thing you need to do is make sure that the set of necessary tools, without which it is not possible to complete this process, is ready.
- Before starting the main work, it is necessary to complete a number of mandatory activities. You need to measure the old location of each wheel. This must be done in order to put everything back as it was if your adjustment suddenly fails. Each wheel must be measured, and the data obtained must be written down on a piece of paper. You also need to check, or better yet, double-check the alignment that will appear after the new changes.
This is important, since when the camber changes, the toe-in will also change, and this also happens in the opposite case. You need to make sure that all the wheel nuts are tightened. You should also check the wheels for the number of atmospheres in them. If you notice that identity is not respected, then take all measures to change this situation. The difference between the wheels can have a maximum of 0.5 atmospheres. After the preparatory work, you can do the alignment and camber yourself.
- Do-it-yourself collapse. You need to jack up the vehicle and check the suspension geometry. You need to carefully inspect the suspension to identify any mechanical damage (wear, cracks). You don’t have to do this, but if you already have the opportunity to look under the car, why not look at other elements. If no defects are found, then you can continue further, and if there are any, you should immediately replace the damaged parts with new ones.
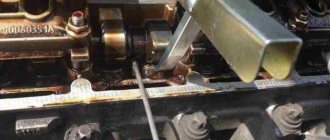
Elements such as a lock nut and an eccentric bolt secure the car's suspension arms. To adjust the camber angle, you need to loosen the nut a little in order to freely rotate the eccentric. By rotating it, you can change the angle, and you will also notice how the suspension rotates. Now you need to get a piece of paper with records of your old readings to determine how much you need to set the new position. Next, tighten the loosened nuts and remove the car from the jack. Roll it back a few meters and then return it to its original position. After this, re-measure the camber. If you achieve the required optimal performance the first time, great. If not, try again. This way you need to adjust each wheel.
- Do-it-yourself alignment. Place the car on the jack again and loosen the steering linkage locknuts you already know. Toe adjustment is adjusted by rotating the steering rod. So, by rotating the rod, we change its length. It's important to remember that your specification is only one inch of toe-in, which means you can only move the rods half an inch on each side. After this, tighten all loose fasteners and remove the car from the jack. After this, you also need to roll the vehicle back a few meters and then return it to its place. Now you need to measure new changes to make sure everything is done correctly. If everything is as expected, you need to complete the execution - thoroughly tighten the nut and eccentric. This completes the adjustment. After this, you can move to the second side of the car - to the other wheels. If the result is unsatisfactory, well, let's repeat everything, starting with the camber, checking each wheel.
Doing a wheel alignment yourself means doing something that only service technicians do. If you are happy with your work and the new parameters meet the requirements of the car, then you have really done an excellent job with this task.
DIY wheel alignment
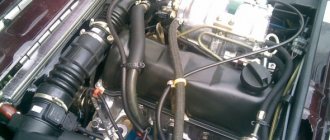
The sequence of actions is determined by the design of the suspension and steering system. Most often, modern cars are equipped with MacPherson strut front suspension and rack-and-pinion steering.
This option requires priority consideration. How to make a wheel alignment with your own hands - step-by-step instructions:
- Place the car in a special pit, providing yourself with unhindered access to the steering rods. During work, it is important to adhere to safety standards, and also take into account that you will repeatedly need to get out of the hole and then go down into it again.
- Make sure that every part of the chassis is in perfect working order. If faulty levers, rods, silent blocks, or ball joints are detected, they must initially be replaced. Otherwise, you will only waste your time and energy.
- Check and equalize the pressure in each car tire. Make sure that the wheel rims are intact and the tires are the same size.
- Unlock the steering column lock and turn each wheel from one extreme position to the other. Then set these wheels to the central position. This is necessary in order to put each component in its place.
- Find and mark the midpoint by measuring the distance from one ball joint to the other and dividing it by 2.
- Take measurements of the wheels on the inside. It is not the tires that need to be measured, but the rims. First, you should determine the distance from one leading edge to the other, then from one trailing edge to the other. The resulting difference allows you to calculate the camber angle. It is then checked against the information contained in the technical specification.
- If the parameter is violated, you need to loosen the locknuts of the steering rods, then, by twisting the couplings, adjust them. It is necessary that the installation angle of the right wheel coincides with the installation angle of the left one. Confirmation of this is possible by taking measurements from the point in the middle to each side and performing repeated calculations. The locknuts should then be tightened.
- If checking and adjusting the camber is required, measurements will need to be taken on the outer surfaces of the disks, since there are obstacles inside in the form of structural parts of the car. For this purpose, you should take a plumb line or a large triangle with a preliminary construction of a perpendicular to the wheel axle.
- The difference between the edges of the wheel rim - bottom and top - is measured and calculated. Based on the result, the angle is calculated.
- The most popular types of wheel alignment devices are rotating eccentrics and shim plates.
By rotating the eccentrics or inserting plates, the desired parameters should be achieved. To ensure unobstructed access to the eccentrics and plates, the wheels often have to be removed and reinstalled after measurements.
When and why do you need it
Manufacturers recommend that owners of foreign cars carry out the procedure every 30,000 km, and owners of domestic cars - every 15,000 km. The period may be reduced if the car is operated in difficult conditions and often drives on bad roads. In some cases, an unscheduled procedure may be required:
- if the disc is crushed when entering a hole at high speed;
- if the chassis was repaired;
- if shortened springs were installed on the car or the ground clearance was changed for other reasons, auto buffers were installed;
- if when driving you clearly feel the car “pulling” to the side;
- if the tires begin to wear out much faster;
- if the steering wheel does not return well after negotiating a turn.
What will you get from the wheel alignment results?
- The directional stability of the car will improve. When driving in a straight line, the vehicle will move only forward, without moving to the side.
- The car will become more maneuverable, strong drifts will disappear, and control will be simplified.
- Fuel consumption will be reduced and tire service life will increase.
Depending on the purpose, one or another type of wheel camber can be selected
Possible nuances
All of the above can also be applied to cars with other types of suspension. However, depending on the design features of a number of elements, there may be significant differences. For example:
- Cars where a gearbox and steering linkage are installed instead of a rack and pinion drive require special attention to the condition of the bushings and the pendulum hinge. Their wear affects the adjustment, and it can often be detected only with a certain position of the parts.
- On machines with a pivot suspension, when adjusting the camber produced by rotating the eccentric, the caster also changes. It will also have to be controlled.
- Some car models provide toe adjustment not only for the front, but also for the rear wheels. In most cases, this parameter changes when the coupling mounted on the transverse link connecting the rear wheels is rotated.
- If the car has all-wheel drive and a continuous front axle is installed, then the design does not provide for camber adjustment.
You can do the job efficiently only if you know all these features.
You will be interested in this article - Do-it-yourself steering rack repair for a VAZ2114 car
The master's work is afraid
Of course, your task will be greatly simplified if you decide to invest in professional equipment. It is not necessary to purchase a complex stand with laser sensors and a computer terminal that processes information, connected to a database that contains all the necessary parameters for hundreds of machine models.
A relatively inexpensive optical stand is quite sufficient. The domestic version of such a device, SKO-1M, can be found in stores at a very reasonable price, within 60,000 rubles. For a used one they ask for even less.
But here everyone must decide for himself whether such an investment is justified or whether it is still more profitable, when the need arises, to go to a service station.
It’s not easy to do a wheel alignment yourself. What looks easy in words, in practice requires serious expenditure of physical and nervous strength. You shouldn’t expect that everything will work out the first time. You'll have to be patient. Remember that the most advanced wheel alignment equipment will not make you an experienced specialist. But in the hands of a master, even an ordinary PSK-LG line can work wonders!
Wheel alignment. What is it and why?
If we mentally draw one line along the vertical plane of the wheel and a second along the plane of its rotation, then we can see the camber angle, which is responsible for the position of the wheels when the car moves in a turn, for the clarity of its passage.
Camber angle
| Positive | The imaginary vertical plane of the upper part of the wheel relative to the plane of rotation is located outside |
| Negative | The imaginary vertical plane of the upper part of the wheel relative to the plane of rotation is located on the inside |
Positive and negative camber angle values
Now let's play with our imagination, looking at the car from above. We draw the lines of the plane of rotation of the wheels and the lines of the direction of its movement. Here we can observe the toe angle of the wheels, which gives our car stability and further predictability.
Toe angle
| Positive | The plane of rotation of the wheels is inside the frame of the direction lines |
| Negative | The plane of rotation of the wheels is outside the frame of the direction lines |
Positive and negative toe angle values
To understand the full importance of the wheel alignment process, you need to understand that the correct installation of the car’s wheels determines its stability while driving (tendency to rollover and skids), directional stability (controllability and maneuverability), the economic component (increased tire life and fuel economy ).
How often should you adjust?
For domestic cars, the check is carried out once every 15,000 kilometers, for foreign-made cars - every 30,000. Unfortunately, it is often necessary to make unscheduled wheel alignment adjustments - for example, if:
- a motorist in a car fell into a deep pothole and the result was a deformation of the disc;
- the motorist carried out repair work related to the chassis of the front wheels of the car, or changed the tires;
- the motorist adjusted the ground clearance.
Kingpin angle, what is it?
The longitudinal angle of inclination of the king pin (caster or caster) makes it possible to stabilize the position of the wheels of the front axle of the car relative to the direction of its driving. When adjusted correctly, this parameter should be six degrees.
Caster is extremely important. It is worth noting that the difference in castor values for the right and left wheels above the permissible values may result in the vehicle being pulled towards the wheel that has a lower value.
Wheel alignment - what is it?
First, let's look at the theory: wheel alignment - what is it? What are the wheel alignment angles, and how does the car’s behavior on the road depend on them?
Camber is the angle between the vertical and the plane of the wheel. It ensures reliable contact of the tire with the road (see picture above).
Toe is the angle between the direction of travel and the plane of rotation of the wheel. The stability of the car in corners and tire wear depend on it.
- On rear-wheel drive cars, the wheels should be slightly turned towards each other - this is called positive toe. When moving, they move apart and become parallel.
- For front-wheel drive vehicles, on the contrary, the toe-in should be negative (see the diagram below).
Caster is the longitudinal inclination angle of the king pin. This parameter very rarely needs adjustment, only on a newly assembled front suspension from new parts, so we will not consider its adjustment.
Repairing the suspension or steering (replacing the same shock absorbers or steering joint) leads to a significant change in the wheel alignment angles. Daily use of the car also makes adjustments to these parameters over time, so the need to adjust the wheel alignment periodically arises.
It is best to adjust wheel alignment twice a year, during seasonal tire changes. During this time, you will fall into a hole more than once or run over a curb, causing the chassis to become loose and the angles to change. Timely alignment adjustment will cost much less than a set of new tires.
In 1955, American engineer Lee Hunter developed the first wheel alignment stand. Sensors mounted on the wheels sent focused beams of light and accurately measured angles. That's why the stand was called optical. But already in 1969 it was connected to a computer, and in 1995, 3D technology was first used to measure and adjust angles.
True, Soviet car enthusiasts managed without any stands or computers - using wrenches, calipers, thread and a plumb line, they adjusted the camber and toe angles with their own hands.
Wheel alignment parameters
And 20-30 years ago, on the “classics”, do-it-yourself alignment was the norm. Moreover, equipment for wheel alignment does not require special knowledge and skills. We are talking about a ruler for adjusting the toe angle of the wheels.
But suddenly the unexpected happens. There is mobile Internet, but there is no workshop in the area that has equipment for wheel alignment. This is where our advice will come in handy.
It would be absolutely useful to undergo virtual training, in which we will describe wheel alignment as a manual. In addition, a video specially filmed by our volunteer helpers will help you do your wheel alignment correctly.
Before you perform the wheel alignment procedure yourself, of course you need to know the basic parameters, which are the starting point for successful wheel alignment.
Replacing a shock absorber, tuning the suspension, or some other minor repair of the chassis requires mandatory control adjustment of the wheel alignment angles.
Parameters for all wheels
Wheel camber is the angle between the vertical and the immediate plane of rotation of the wheel. Negative camber is when the top side of the wheel is directed inward to the vertical, and positive camber is when the top side of the wheel is directed outward.
Wheel toe is the angle between the plane of rotation of the wheel and the direction of movement. Toe is measured in degrees/minutes and millimeters.
Parameters for steered wheels
The longitudinal angle of inclination of the wheel turning axis (casters) is the angle between the projection of the wheel turning axis on the longitudinal plane and the vertical. This angle, if the wheel alignment is properly adjusted, ensures self-alignment of the wheels due to speed. For standard auto casters, 6° is considered the norm
The lateral inclination angle is the angle between the projection of the rotation axis onto the transverse plane and the vertical. It ensures self-alignment of the wheels due to the weight of the car.
Expert opinion
Ruslan Konstantinov
Automotive expert. Graduated from Izhevsk State Technical University named after M.T. Kalashnikov, specializing in “Operation of transport and technological machines and complexes.” More than 10 years of professional car repair experience.
In general, it is recommended to check your wheel alignment at least once a year. Even if there are no prerequisites for this, another check will not hurt. It is not difficult to determine the need for this procedure, knowing the characteristic symptoms: • when driving on a flat road, the car pulls to the right or left if you let go of the steering wheel; • the hum of wheels at different speeds; • uneven tire tread wear.
Wheel alignment is also mandatory if the front suspension, steering and load-bearing elements of the body have been repaired. Under ideal conditions, a special stand is needed for such work, but it is not practical to buy such expensive equipment for servicing a personal car. To carry out a wheel alignment in a garage, you can do without a stand. For this you will need:
• inspection pit (the area must be perfectly level); • a large right triangle (the length of the leg should be greater than the distance from the floor surface to the top of the wheel rim); • plumb line with tripod; • a special ruler for adjusting wheel alignment (can be replaced with an accurate ruler with millimeter divisions); • good knowledge of geometry (you will need to calculate the angle based on the angles of the triangle); • suitable metalworking tools; • brush with metal bristles.
By the way, the ruler can be replaced with a laser rangefinder, but it is not recommended to use protractors and protractors due to the inaccuracy of their readings. And of course, you will need patience and free time. On the other hand, the same procedure at a stand in a car service takes a minimum of time and is inexpensive. Whether to do the wheel alignment yourself or save time is up to everyone to decide for themselves.
Signs of poor wheel alignment
To determine the condition of the wheel alignment angles, you should take a closer look at the following factors:
- the car tilts left and right when moving forward;
- displacement towards the steering crossbar when the wheels are directed forward;
- the car does not respond well to steering wheel rotation;
- hard to turn the steering wheel;
- the car pulls to the side when the brake pedal is pressed;
- the wheels touch the fender liner at the maximum angle of rotation;
- if you exit a turn, the steering wheel does not return to its previous position;
- loud noises from tires when driving;
- the rubber wears unevenly.
In rear-wheel drive cars, similar problems arise if the rear wheel alignment is disturbed.
What does it affect?
So, let's look at how important it is to carry out adjustment work, and how wheel alignment affects the capabilities of the car as a whole.
Driving a car largely depends on the adjusted, or vice versa, variable camber. When the wheels are in the correct position, steering the vehicle is much easier and more convenient. If each wheel is in the correct location, then the car behaves normally and no unauthorized changes in direction occur during steering, and the steering wheel does not twist to the side.
Safety while driving a car very much depends on how correctly the alignment is done. The stability of the vehicle also depends on it. And this is quite important, especially at high speeds and performing various maneuvers on the road. Correct wheel alignment will allow the car to avoid slipping and skidding on a slippery road, where the adhesion of the wheels to the road surface can be very poor.
Wheel alignment greatly affects fuel consumption, as well as tire wear. The fact is that if the camber is incorrect, the wheels of the car are therefore positioned incorrectly. Thus, their uneven wear occurs - if one side is still intact, then the other is thoroughly worn away. It is no longer possible to drive on such tires and as a result, the damaged tires can be thrown away.
Installing wheel alignment in a simple way
Setting the correct camber and toe angles is quite easy, even on your own. To do this, you only need a flat platform (of course, it is best if it also has an inspection hole, but this requirement is not necessary) and a set consisting of wrenches, a plumb line, chalk and a telescopic ruler. Next, if you have all the necessary tools, you can start working directly.
Both angles can be adjusted even on the road, with just a plumb line and a telescopic ruler. First of all, the camber angle is adjusted.
This is done as follows: the front wheels of the vehicle are aligned evenly, after which marks are drawn on them on the outside of the tire (bottom and top). Having attached the plumb line to the body, we measure the distance from it to the rim. In order not to get confused later, it is better to record all the data received. Then, having rolled our iron horse in such a way that its wheels make a turn of ninety, and then one hundred and eighty degrees, we carry out all the above actions in exactly the same sequence.
If the obtained values do not coincide, then you can be sure that it is the camber that is broken. To correct the situation, you need to dismantle the wheel, then you need to unscrew the mounting bolts with a 19mm wrench, through which the strut is fixed to the knuckle. Now you can freely adjust the camber angle by moving the steering knuckle. Please note that for front-wheel drive cars its value should be -1/+1 mm, and for rear-wheel drive cars the error should be up to 3 mm.
Let's start adjusting the toe angle; in principle, this procedure is not much different from the one described above. Marks are drawn in the same way with chalk, and then, placing a telescopic ruler on them in the position corresponding to “0”, we roll the car forward, while the ruler should go back. The most important thing in this matter is that neither immediately nor later it touches the elements of the body and suspension. Now it is necessary to evaluate the situation: if the distance has decreased, then the steering rods should be shortened (it is their length that is responsible for the magnitude of this angle), and if, on the contrary, it has increased, then lengthen them accordingly.
What is wheel alignment
Wheel camber is the angle between its central plane and the road surface. It directly affects the quality of the clutch and the accuracy of car control. If everything is set up correctly, the wheels will turn exactly where you point it.
Toe-in is the difference in the distances between the extreme front and rear points of the rims. It is measured in millimeters or degrees. Toe-in affects tire life. If it is incorrect, the tires will quickly become unusable.
Another important parameter of the wheel is caster, i.e. the longitudinal inclination of the kingpin. It affects the accuracy of car control and the ability of the wheels to self-balance. If the caster is not adjusted correctly, steering difficulties will occur.
Wheel alignment is the adjustment of the listed parameters to ensure controllability and reduce tire wear.
Wheel alignment adjustment on a stand in a car service center
Wheel alignment parameters
Wheel toe is represented by the level between the plane of rotation of the wheel rim and the longitudinal axis of the car.
The PSK LG line for adjusting wheel toe angles is used quite often. Particular attention should be paid to checking the car's response to steering, since deviation from the norm of the toe angle also affects this indicator. If the specified parameter is too large, this leads to a number of violations during the operation of the vehicle.
Adjusting wheel alignment on passenger cars
Let's start with the fact that wheel alignment angles on different brands of cars can differ significantly. This is due both to the design features of the car’s suspension and directly to its purpose. For example, racing cars for drifting have negative camber, which gives them a small contact patch on a straight line (reduces rolling resistance), but when cornering, the contact patch has a maximum value, which allows you to corner at maximum speed. And camber naturally changes the values of the toe angles.
This “geometry” is common for drifting
Due to the above, I suggest you get acquainted with the methodology for setting wheel alignment angles using the example of a VAZ 2110 car, and then, if you wish, you can successfully apply it directly on your car.
Tools and prerequisites
- Set of keys, heads;
- Construction plumb or level;
- A roll of wire or strong twine;
- Tape measure or telescopic ruler;
- Two even bars 60 centimeters long;
- Two sliding supports for adjustable wheels;
- Inspection pit with a flat platform.
Camber
Preparation
We install the car on sliding supports (pancakes), checking that they are on the same level, since the curvature of the floor greatly affects the accuracy of measurements.
Level check
I understand your dumb question about the presence of support “pancakes”; I propose to make them from four sheets of metal, having previously lubricated each pair with grease for better sliding.
Homemade example
I draw your attention to this, since when adjusting the wheel alignment angle of one of the wheels, the second one must be stationary.
Diagnostics
At this stage, we have a choice in the method of taking the wheel position values: using a plumb line or a building level.
- Plumb.
In order for all measurements to be correct, we need to align the wheels strictly along the line corresponding to linear movement;
Having attached a plumb line to the wing (for example, with a magnet with a cloth placed under it), measure the distance “A” and “B” on the left and right wheels (the reference point is the wheel rim!), and write down the result;
This is how a vertical plumb line is used
We roll the car so that the measurement line rotates 90°, and take new readings. We repeat the operation again and average the obtained values, thereby leveling out the measurement error associated with the runout of the wheel disk. For front-wheel drive cars, the average values of camber angles are considered to be 0 ± 1 mm; for rear-wheel drive, the norm is considered to be +1 ± 3 mm (by the way, for wheels of sizes 13 and 14 inches, 1 millimeter of camber is equal to approximately 10 angular minutes).
In our case, the manufacturer recommends setting the camber angle to 0 ± 30′, which is approximately 2…2.5 mm. Which type of camber is preferable to you depends on the load of your car - the greater the gross weight, the greater the negative camber angle in dynamics...
Example of weight distribution on MacPherson type suspension
...and depending on the driving style - the more aggressive the cornering, the more the wheel tends towards positive camber.
The camber angle is very high
We're a little distracted, let's continue.
- Level.
On the car in question, it was decided to install negative camber and, to facilitate the process, a plate 2.52 millimeters thick was pre-attached to the level.
The measuring plate will help in the work
Adjustment
After all the preparations, all we have to do is apply a level to the wheel rim and adjust its camber angle until the bubble takes a central position.
Use a building level to check
Repeat the above operation for the second wheel. The adjustment process itself consists of unscrewing the bolts.
Adjustment bolt
Eccentric bolt
Adjusting this value on your model may be slightly different, but the meaning of the actions remains the same: tilt the wheel axis perpendicular to the car body. For example, on front-wheel drive cars with the same type of MacPherson strut suspension, this parameter is also adjusted by the strut mounting bolts. In one design, the already mentioned upper bolt can play the role of an eccentric, while in another, the stand itself has an oval-shaped adjustment hole.
The photo shows an oval hole for adjustment
In the third case, the manufacturer’s default camber may not be adjustable at all and then, if necessary, you have to either make an oval groove on the strut mount yourself or bore/purchase the upper bolt to an adjustable size.
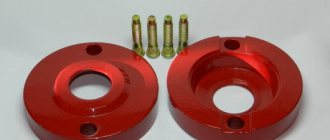
On rear-wheel drive vehicles, the camber angle is adjusted by adding and subtracting washers of a certain thickness between the lower/upper control arm and the beam.
Adjusting washers are marked in red
The methods may be different.
Adjusting washers are marked with triangles
On GAZ cars this is a completely separate process, as shown below.
1 — adjustment bolt, 2 — adjustment nut, 3 — adjustment plate
Setting toe angles
Preparatory work
So, the car is in its original position, the position of the wheels corresponds to linear motion. We attach pre-prepared bars just below the middle of the wheel rim parallel to the floor.
Installation of bars
In order to measure the distance between the wheels as accurately as possible, we secure the end of a tape measure to one edge of the block using a nail...
Reference point
...on the other wheel we leave the roulette tape free.
Measuring distance
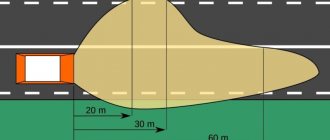
We stretch a strong string from both sides from the rear wheels to the front wheels (strictly in the middle), making sure that it does not touch the wheel (at this point we will check the straight position of the wheels).
Distance between rim and wheel
Since on domestic cars the rear axle is slightly narrower than the front, we need to place objects of the same size on both sides of the rear wheels, for example, plastic bottle caps.
Pull the string away from the wheel
It is necessary to ensure that the string along its entire length does not touch foreign objects: mudguards, tuning elements, etc.
How to check
We measure distances A, B, C and D with a tape measure:
Measurement locations
We get:
- A = 163.7 mm;
- B = 162.6 mm;
- C = 8 mm;
- D = 5 mm.
That is, the difference is 11 mm. We cannot be satisfied with such a result. First, you need to set the same gap C and D to 1...1.5 millimeters and adjust the distances A and B, and in our case (front-wheel drive car) the toe should be negative. For what? In the case when the drive wheels are steered, when moving, their front parts tend to move inward; in rear-wheel drive cars, everything happens exactly the opposite - when moving, the wheels tend to move apart, so they try to make the toe-in positive.
Compensation for opposing forces
And although these values are not so great, it is still worth listening to the manufacturer’s recommendations.
DIY adjustment
Adjusting the toe angle on all cars comes down to the fact that when the value is reduced, the steering rods must be tightened, and when the value is increased using a clutch, the length of the rods must be shortened. Changing the distance between the wheel points must be done using both rods. The average distance between measurements A and B is considered to be 1 mm.
MacPherson strut suspension
Using trial and error, we adjust the rods (both in turn, no need to turn just one!), making sure that the boot rotates freely and does not twist (if necessary, loosen the clamp).
Clamp
We get the values:
- A = 163.1 mm;
- B = 163 mm;
- C = 1 mm;
- D = 1 mm.
These figures are quite satisfactory to us. Adjustment of the wheel alignment angles on the VAZ 2110 is considered complete. To complete the picture, a video is provided for your viewing.
How to make adjustments at home using the example of a VAZ 2110: video
Since the issue is considered from a broad perspective, let’s go over the key points using the example of trucks to broaden our horizons.
Instructions for adjusting wheel alignment yourself
Before you begin adjusting the camber and toe angles, it is imperative to check the vehicle's chassis. If repairs are needed, then doing a wheel alignment is pointless. The steering and suspension must be in perfect order.
Pay attention to three points on which the wheel alignment angles on a car greatly depend:
Be sure to check the tire pressure before adjusting the wheel alignment and make sure that you haven’t accidentally forgotten a couple of bags of potatoes or cement in the trunk