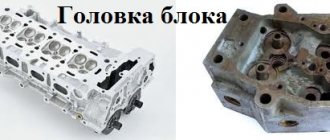
How to remove the head on a VAZ 2115 injector
If you detect a leak of engine oil or coolant at the junction of the head and the cylinder block, remove the head and replace its gasket.
A leak can also occur due to warping of the block head due to overheating. You will need: a torque wrench, keys “13”, “17”, “19”, socket heads “10”, “13”, “17”, “Togh”, screwdriver.
Warning! The head gasket is a one-time use unit, so the gasket must be replaced each time the head is removed.
1. Disconnect the wire from the “-” terminal of the battery.
2. Set the piston of the 1st cylinder to the TDC position of the compression stroke (see “Installing the piston of the 1st cylinder to the TDC position of the compression stroke”).
4. Reduce the pressure in the power system if the work is performed immediately after a trip (see “Reducing pressure in the power system.”
5. Disconnect the exhaust pipe of the muffler from the exhaust manifold (see “Replacing the exhaust pipe”.
6. Remove the cylinder head cover (see “Replacing the cylinder head cover gasket”).
7. Disconnect the wiring harness block from the mass air flow sensor, loosen the clamp securing the air supply pipe to the throttle body and remove the pipe with the air filter housing and the air intake hose from the throttle body (see “Removing and installing the air filter”).
8. Unscrew nut 1 securing the bracket for the water pump supply pipe. Loosen nut 2 securing the inlet pipe bracket to the exhaust manifold.
9. Move the bracket to the side.
11. ...and disconnect the inlet and outlet hoses of the cooling system from the throttle body.
12. Loosen the clamp securing the vacuum brake booster hose to the fitting on the receiver...
13. ...and remove the hose.
14. Turn the throttle drive sector all the way and disconnect the throttle drive rod from it.
15. Unscrew the two nuts securing the tips of the “mass” wires to the rear cover of the cylinder head...
16. ...and remove the wires from the studs.
17. Unscrew the nut of the lower fastening of the spacer 1 and remove the bolt of the lower fastening of the spacer 2...
18. ...unscrew the nuts of the upper fastenings of the intake manifold struts on the right...
19. ...and on the left side, remove the spacers.
20, Disconnect the wiring harness connectors from the crankcase oil level sensors...
21. ...from the throttle position sensor...
22. ...from the idle air control...
23. ...from the injector wiring harness...
24. ...from the coolant temperature sensor...
25. ...from the crankshaft position sensor and the knock sensor.
26. Disconnect the wire connectors from the coolant temperature gauge sensor...
27. ...and from the oil pressure sensor.
28. Disconnect the high-voltage wire tips from the spark plugs.
29. Pull the wiring harness out from under the receiver.
30. Remove the three screws securing the front camshaft drive belt cover, remove the cover...
Warning! It is forbidden to turn the crankshaft and camshaft before installing the camshaft belt.
32. Secure the camshaft toothed pulley from turning, remove the bolt securing the pulley to the camshaft...
33. ...and remove the bolt and washer.
34. Remove the pulley from the camshaft. Do not damage the camshaft oil seal.
Note. If the key does not sit tightly in the groove of the camshaft nose, remove it so as not to lose it.
35. Unscrew the nut securing the rear camshaft drive cover at the top of the cylinder head.
36. Remove four bolts (three of them also secure the water pump) and remove the rear cover (see “Engine repair (disassembly, troubleshooting, assembly)”).
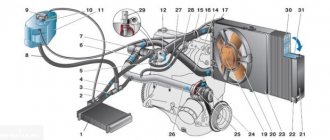
37. Unscrew the nut securing the “mass” wire...
38. ...and remove the wire from the stud securing the exhaust pipe of the cooling system to the cylinder head.
39. Loosen the clamps and remove the radiator inlet pipe 2, the inlet hoses of the throttle unit 4 and the heater 3 from the outlet pipe, disconnect the thermostat 5 along with hose 1.
40. Unscrew the fastening nuts and disconnect the fuel supply and drain hoses from the fuel pipes, holding the hoses from turning with a second wrench.
41. Please note that there are O-rings installed on the fuel pipes.
After disconnecting each hose, remove the O-ring from the tube. Replace heavily compressed or torn rings.
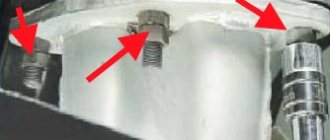
42. Loosen the ten bolts securing the head of the unit in the order shown, then completely unscrew the bolts securing the head, remove them along with the washers and remove the head.
Note. It is necessary to unscrew the cylinder head mounting bolts using a special socket head “Togh”.
Warning! Do not jam a screwdriver or other tools between the cylinder head and the cylinder block.
Helpful advice. To remove the cylinder head from the gasket, insert a screwdriver under the exhaust manifold. Using it as a lever, lift the head.
43. Remove the head gasket.
Note. The cylinder head bolts become stretched with repeated use. Replace with new bolts longer than 135.5 mm. Before installing the cylinder head, lubricate the bolts with a thin layer of engine oil.
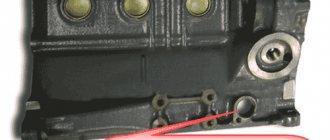
44. Clean the mating surfaces (they must be dry and clean) of the cylinder head and cylinder block and remove oil from the threaded holes in the block for the head mounting bolts.
Replacing the cylinder head gasket VAZ 2109 (21099)
On all carburetor cars of the 2108-09-099 family, replacing the head gasket is quite simple, first remove the cylinder head:
- disconnect the battery terminal (ground wire) and drain the antifreeze;
- remove the air filter housing;
- We pull off the crankcase ventilation hose from the valve cover, having first unscrewed the clamp;
- as on the “Classic”, we disconnect from the carburetor: the gas cable, the choke cable, the gasoline hose from the fuel pump;
- remove all pipes from the cylinder head - vacuum booster, radiator, stove hose;
- unscrew the nuts securing the exhaust pipe; you can get to them from above, from under the hood;
- remove the timing belt cover;
- dismantle the valve cover (2 nuts);
- unscrew the cam gear mounting bolt;
- loosen the tension roller, remove the belt and the gear itself;
- unscrew the bolt securing the iron timing case to the cylinder head;
- we unscrew ten cylinder head bolts, the rest need not be removed (the carburetor, distributor and intake manifold remain in place).
At this point, the removal of the cylinder head is completed, we change the gasket, thoroughly cleaning the surfaces of the cylinder head and block. Labels are set as follows:
- the camshaft marks are aligned along the left edge of the cylinder head (as in the picture);
- The crankshaft marks are aligned on the flywheel (in the gearbox housing window).
After replacing the VAZ 2109 cylinder head gasket, fill in antifreeze and start the engine; as the engine warms up, add coolant to the expansion tank and monitor the engine temperature.
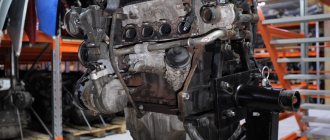
When is it time to change the block head?
The cylinder head is a fairly strong unit and its replacement and repair is infrequent. On domestically produced cars, as a rule, it has to be removed due to cylinder leakage or gasket wear.
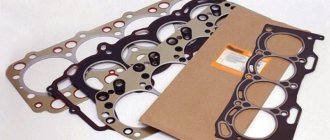
New gasket
Also removed for revision. Removing and replacing, on a car with any number of valves, the process itself is not difficult, but some skills and some experience are required. Therefore, if you are removing the cylinder head for the first time, it would be better to invite a more experienced car enthusiast as an assistant. One who has already dealt with this work, or better yet, if he has already completed modifications or repairs to this unit.
Functions of the cylinder head gasket
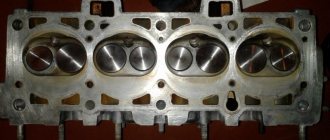
The VAZ-2114 cylinder head gasket is needed to maintain the tightness of three automotive systems: gas distribution, cooling and lubrication . In essence, this is a simple seal between the block head and its main part. If it breaks down, the above components and assemblies of the machine may fail. The part itself is a metal plate with wide round cutouts for the pistons. It is located directly under the “head” of the cylinder block.
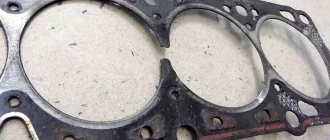
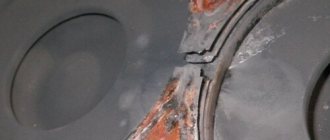
This is how new and unusable gaskets differ.
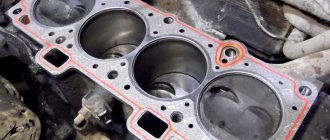
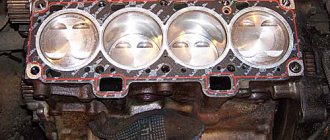
This is what a burnt gasket looks like
And this is a new cylinder head gasket
Video “Replacing the Gasket”
This video shows the process of replacing the cylinder head gasket on a VAZ 2114. To repair the valve system and modify the head, the head is removed in the same way.
Often a sign of such a problem is thick white smoke from the exhaust pipe. This occurrence indicates that the gasket has developed a blowout between one cylinder and the coolant leak hole. If the liquid is oily, this indicates the presence of a breakdown, as a result of which oil began to enter the channel with the coolant. If a sharp whistle is heard when the engine is running, and traces of oil are visible on the cylinder block, this indicates a gasket breakdown.
Also, a sign of gasket failure may be an increase in fuel consumption and a decrease in engine power. However, it is worth considering that some of these signs also occur with other damage to the car’s mechanism. For example, a white emulsion on the surface of the oil also indicates that the block has a crack. In any case, you must first make sure that the cause is a faulty cylinder head gasket.
If in doubt, it is better to entrust the diagnosis to a specialist.
Signs of gasket failure
Signs of a cylinder head gasket failure The main signs of a gasket failure are:
- the appearance of a white emulsion on the dipstick when checking the oil level. This deposit on the dipstick means that the gasket has ruptured between the holes through which oil and coolant pass;
- thick white smoke. Indicates that there is a breakthrough in the gasket between the hole through which the coolant flows and one of the cylinders. In this case, the white color of the exhaust gases is given by the evaporating liquid that has entered the cylinder. Additionally, placing your hand near the exhaust pipe while the engine is running will help you verify that the gasket is broken. The coating remaining on the hand should be tasted on the tongue - if it is sweet, then the liquid is getting into the cylinder;
- the presence of oil stains on the surface of the coolant in the expansion tank. Multi-colored oil spots will indicate that, as a result of a breakdown, oil began to enter the channel with the passing coolant;
- bubbles in the expansion tank when the engine is running. This sign will indicate that, as a result of a gust, exhaust gases penetrate into the coolant channel;
- a sharp whistle when the engine is running, accompanied by oil leaks on the cylinder block. This is the clearest sign that there has been a breakdown of the gasket with an outlet. It occurs rarely, often after the engine has been modified with preliminary removal of the head;
- the most hidden type is a breakdown between the cylinders. There are no particularly obvious signs, except for a drop in power and an increase in fuel consumption, which may be the result of a malfunction of other mechanisms. Only a compression test will help verify the presence of such a breakdown, and even then not always. The same misalignment of the valves can give such symptoms;
If such symptoms appear, the only option for eliminating this malfunction is to replace the cylinder head gasket of the VAZ 2114.
Instructions
Replacing the cylinder head gasket is a procedure consisting of several stages.
By following the step-by-step guide, you will be able to complete this job quickly and without any problems. To perform this work, prepare sets of open-end and socket wrenches, a set of heads of different sizes, screwdrivers, rags, and a container for draining coolant and fuel.
First, turn off the power to the car. Remove the negative terminal from the battery. Then set the 1st cylinder (its piston) to the TDC position. Drain the coolant.
After this, you need to make sure that the pressure level in the power system is low enough. To do this, unscrew the cap, which is located at the rear end of the fuel rail, press the spool and drain the fuel, then screw the cap back on. It is very important to consider that these actions can only be carried out a couple of hours after using the car. If you do this immediately after stopping the car, it is possible that you will get burned both from contact with the spool and from the fuel that will be sprayed under pressure. In this case, it will not be possible to safely drain it.
After you have drained the fuel, disconnect the muffler pipe from the manifold. To do this, unscrew the nuts securing the bracket under the bottom of the machine. Then remove the clamp and free the exhaust pipe.
Replacing the cylinder head gasket of a VAZ 2106
Replacing the cylinder head gasket of a VAZ classic on an engine with a chain drive is generally a fairly simple job; the main difficulty is aligning the crankshaft and camshaft marks during assembly. If the marks are set incorrectly, the engine will not work normally, or may not start at all.
You can change the cylinder head on a “Classic” without a pit or a lift; before performing work, you should prepare the necessary tools and a container for draining the coolant. From the tool you will need:
- a set of car keys;
- slotted and Phillips screwdrivers;
- pliers;
- knob with extension;
- head 19 (for old style bolts) or multi-faceted head 12 (for new type bolts);
- hammer;
- mount.
How to properly replace the cylinder head gasket on a VAZ 2114 with your own hands
A malfunction of the cylinder head will lead to incorrect operation of the car engine as a whole. This unit consists of many elements, but most often car owners are faced with the need to change the seal. In the article we will look at in what cases the cylinder head gasket of a VAZ 2114 is replaced and how to change this product yourself.
Where is the cylinder head gasket located on a VAZ 2114?
When should you change?
We change it with our own hands
Consequences of untimely replacement
Video “How the gasket replacement process occurs”
Comments and Reviews
Signs and symptoms of wear or burnout
Wear of the cylinder head gasket is determined by the presence of a so-called burnout or breakdown on the surface of the part . But, unfortunately, it is established not only by external signs. We said above that the gasket is responsible for the tightness of the cylinder block. So, the fact that it could burn out greatly affects the operation of the vehicle systems and causes the following problems:
- The liquid in the expansion tank or radiator begins to bubble, even when the engine is not warmed up. This means that exhaust gases enter the engine cooling jacket due to wear of the gasket.
- Thick white smoke comes out of the exhaust pipe. The situation is the opposite of the previous one: antifreeze got into the cylinders. This smoke is much thicker than the usual steam that can be observed from the rear of a car in winter.
- An incomprehensible yellow or white emulsion is detected on the oil dipstick. Another symptom of a gasket failure is that it may be punctured.
Video: how to recognize that a part has burned out
Where is the cylinder head gasket located on a VAZ 2114?
In a VAZ 2114 car, an injector with an engine of 8 or 16 valves, the seal is installed at the junction of the cylinder head with the block itself. Structurally, this element consists of several layers. High-quality sealing is ensured thanks to sheet steel, fiber, cardboard and other materials that are pressed together and covered with one layer of sealant.
Damaged cylinder head gasket VAZ 2114
What about replacing the cylinder head gasket on foreign cars?
The replacement process is similar to the above, but is complicated by the more advanced engine design and the number of threaded fasteners. In addition, the difference of 1,500 rubles may be due to the presence of various sensors amenable to computer diagnostics, which, in turn, will be dismantled. The cylinder head gasket itself for a foreign-made engine will be about 1,000 rubles more expensive.
Worth paying attention! A purchased cylinder head gasket, if we are talking about purchasing it yourself, should absolutely not be bent or left on an uneven surface. Oil will begin to leak through the resulting folds, which, by the way, are very difficult to fix with graphite. If deformation occurs near the block liner, then the likelihood of coolant getting into the oil becomes quite large.
We change it with our own hands
Replacing a gasket correctly with your own hands without experience is not so easy. But if checking the injection engine showed that the reason is a broken seal, then you can try to do everything yourself. To do this, follow the instructions below.
Required Tools
What you will need to complete the task:
The Jecos Presents channel published a video showing an overview of a damaged cylinder head gasket on a VAZ 2114.
Algorithm of actions
Instructions for replacing the gasket yourself:
Photo gallery
Photos of the replacement are shown below.
Consequences of untimely replacement
If the replacement is not done on time, it will lead to serious problems. Due to a broken gasket, engine oil will begin to enter the cooling system, which will disrupt its overall operation. Antifreeze will not be able to properly cool the power unit. The stove will work poorly, the engine power will decrease, and problems will arise in its operation. The engine will stall, in some cases it will be impossible to start it, and dips may be felt when you press the gas pedal.
Due to antifreeze entering the lubrication system, the oil will lose its properties. Lubrication of rubbing components and parts will be less effective, which will lead to their accelerated wear and damage. The engine will run rough and may overheat due to the loss of antifreeze properties. In the winter season, difficulties will arise with starting the engine. If you do not change the gasket and continue to use the car this way, this may lead to breakdown of the power unit and the need for major repairs.