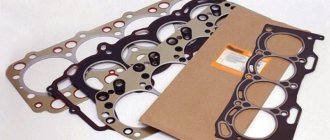
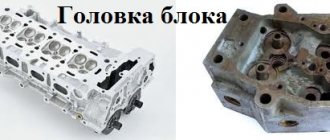
The head gasket is installed between the cylinder block (BC) and the cylinder head (cylinder head) of the car engine. The part serves to seal the combustion chambers, preventing gas leakage, as well as to seal the channels between the BC and the cylinder head in order to prevent the leakage of engine oil and coolant.
Failure of the cylinder head gasket of a VAZ 2114 (breakdown, burnout) will lead to problems and malfunctions in the operation of the vehicle’s internal combustion engine: engine overheating, the appearance of an emulsion in the engine oil, etc. To eliminate the malfunction, the gasket is changed. Next, we will look at what a cylinder head gasket 2114 is, when you need to change the head gasket and how the replacement is performed.
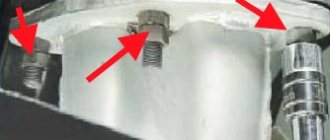
Working principle of brake caliper
Caliper diagram
is not complicated and is the same in most car models. Pressing the brake pedal causes pressure to build up in the brake line, acting on the caliper pistons. This pressure causes the caliper pistons to move, which in turn push the brake pads towards the brake disc mounted on the wheel, pressing them against it on both sides. The resulting friction causes the car to brake. In addition, the task of the caliper is to constantly hold the pads in a strictly parallel position relative to the brake disc.
Caliper device
is not difficult. In fact, it consists of pistons connected to a hydraulic system, to which the brake pads are attached. The location and number of brake pads, as well as the method of attaching the caliper to the hub, may vary depending on the vehicle model. The most common scheme is two pads per wheel and two-point mounting to the hub.
Brake caliper device
Consequences of untimely replacement
Replacing the timing belt of VAZ 2113, 2114 and 2115 with your own hands
If the replacement is not done on time, it will lead to serious problems. Due to a broken gasket, engine oil will begin to enter the cooling system, which will disrupt its overall operation. Antifreeze will not be able to properly cool the power unit. The stove will work poorly, the engine power will decrease, and problems will arise in its operation. The engine will stall, in some cases it will be impossible to start it, and dips may be felt when you press the gas pedal.
Due to antifreeze entering the lubrication system, the oil will lose its properties. Lubrication of rubbing components and parts will be less effective, which will lead to their accelerated wear and damage. The engine will run rough and may overheat due to the loss of antifreeze properties. In the winter season, difficulties will arise with starting the engine. If you do not change the gasket and continue to use the car this way, this may lead to breakdown of the power unit and the need for major repairs.
In what cases do you have to remove the engine block head?
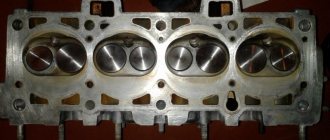
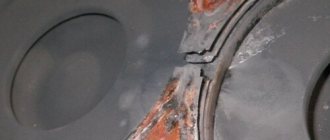
- The integrity of the gasket between the BC and the cylinder head is broken. This is the most common reason. The gasket burns out as a result of overheating of the car engine.
- Microcracks in the cylinder block or cylinder head. This becomes clear if, for example, coolant leaks somewhere, when no leaks are visible from the outside, and the liquid decreases, then either the gasket is burned out or the motor head is cracked.
- During the repair of parts of the gas distribution mechanism and the overhaul of the internal combustion engine, for example, replacing oil scraper rings and pistons, connecting rods, pins, valves, cylinder liners, etc.
- Also, it has become popular among fans of innovation to remove the cylinder head even if there are no breakdowns. They remove it in order to improve and modify it, in general, they do tuning.
Replacement process (for 8 valve cars)
It is better to carry out the procedure on an overpass or inspection hole. To work you should prepare:
- torque wrench;
- spanners;
- socket heads, including “Torx”;
- screwdriver;
- new gasket;
- container for draining coolant;
- clean rags.
The procedure for replacing the cylinder head gasket on a VAZ 2114 with your own hands consists of the following steps:
- First you need to turn off the power to the car. To do this, disconnect the negative terminal from the battery.
- Next, you should fix the piston of the first cylinder to the TDC position.
- Then drain the coolant into the prepared container.
- After this, you need to relieve the pressure in the fuel system if the car has recently been on a trip.
- The next step is to disconnect the exhaust pipe from the exhaust manifold.
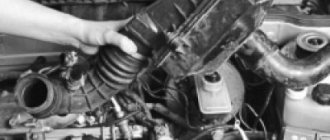
- Remove the cylinder head cover. Together with it, you can disconnect the receiver and throttle assembly, as well as the intake and exhaust manifolds.
- Having loosened the clamp holding the air supply pipe to the throttle assembly, remove it from the assembly along with the air intake hose and the air filter housing.
- At the left end of the VAZ 2114 head there are “mass wires” that need to be disconnected and the fuel frame with fuel system elements removed.
- After unscrewing the mounting screws that secure the front cover, remove it and the timing belt. Be sure to secure the crankshaft and camshaft from turning.
- Next, remove the tension roller and spacer washer.
- After unscrewing the mounting bolt, remove the camshaft toothed pulley.
- At the next stage, remove the back cover: first unscrew the nut holding the cover, and then the remaining fastening bolts.
- Using a Phillips screwdriver, unscrew the screws, loosening the clamps and sequentially disconnecting all the hoses from the outlet pipe of the VAZ 2114 cylinder head: the radiator inlet pipe, the thermostat with a hose, as well as the inlet hoses of the throttle unit and heating. Use a
Phillips screwdriver to loosen the clamps - After unscrewing the fastening nuts, you need to disconnect the drain and fuel supply hoses from the fuel pipes.
- Next, using a hexagon, you need to unscrew 10 mounting bolts.
It is advisable to turn them sequentially by half a turn according to a certain pattern. This relieves tension and prevents deformation of the lid. Then you should remove the screws along with washers. Unscrew the 10 bolts with a hexagon - At the next stage, the cylinder head is dismantled along with the gasket.
- Next, be sure to clean the contacting surfaces from dirt and metal shavings. In addition, you should check that there is no oil in the threaded holes of the head mounting bolts.
- We install a new gasket taking into account 2 centering bushings so that the hole with a copper edging, intended for the passage of oil, is located between the third and fourth cylinders.
We install a new consumable taking into account the guides - Before installing the cylinder head, you must check that both valves on cylinder 1 are closed.
- Next, insert the screws into the holes and tighten them in four stages according to the diagram below.
Scheme for tightening the head mounting bolts At the first stage, the screws should be tightened with a torque of 20 N.m, at the second - 69.4–85.7 N.m, at the third stage the screws should be tightened by 90 degrees, at the fourth stage the screws should be finally turned by 90 degrees. - After replacing the cylinder heads, reconnect all the hoses in reverse order and connect the wires and sensor connectors. When installing the camshaft pulley, make sure that the protruding part of the hub faces the engine.
- Next, you need to check and adjust, if necessary, the clearances in the valve drive. After installing the timing belt, check its tension.
Engine design features
Initially, the engine of the VAZ-2114 was 8 valve, had a volume of 1.5 liters, complied with Euro-2 standards, and was marked 2111. In 2005, these engines were boosted:
- to increase the volume to 1.6 liters, the block is increased in height by 2.3 mm;
- Several configurations have been created - for Euro-2 version 21114-00, for Euro-3 model 21114-20 and for Euro-4 modification 21114-70;
- The crankshaft, valve system, camshaft correspond to 11183;
- The cylinder head received an enlarged combustion chamber of 5 x 8.1 cm, which increased power.
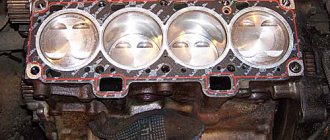
Combustion chamber of internal combustion engine 21114
An important feature of the 21114 internal combustion engine is phased rather than pairwise-parallel injection, which was used in the original 2111. The attachments have become more compact:
- catalytic collector instead of the neutralizer and exhaust pipe;
- injector ramp instead of the fuel return line.
Catcollector
At the same time, VAZ-2114 began to be equipped with engines from Kalina 11183, which have some differences from the previous version:
- the shape of the combustion chamber has been improved;
- The generator is secured with a bracket, the tensioner is modernized.
In 2008, the 2114 engine received a new M73 ECU, and in 20011, the M74 “brains” to achieve Euro-4 standards. The control became completely electronic, but for another whole year the designers corrected firmware defects until they created its final version I414DE07.
ECU M74
The next engine, 2114, was installed on the car by a subsidiary of the manufacturer AvtoVAZ, called Super-Auto, in 2009. It was the 16 valve engine 21124 of the “tenth” VAZ family with improved characteristics:
- “high” blue block (197.1 mm);
- injectors pressed into 2–5 main bearing supports, cooling the pistons with oil;
- The groove depth of the holes in the valves is 5.53 mm, which ensures the safety of the valves in the event of a timing belt break; major repairs are not required.
Blue block
The following year, the fourteenth models began to be equipped with 21126 engines from export Priors. After tuning the 21124 engine, the internal combustion engine device differs in the following nuances:
- honed cylinders, gray block;
- crankshaft pulley and timing belt with semicircular tooth;
- the weight of the connecting rod and piston group is reduced;
- there is no friction in the lower head of the connecting rod;
- candle glasses are built into the head.
Piston group 21126
The internal combustion engine uses the principle of hydraulic compensation of valve clearances; the 0.45 mm thick cylinder head gasket is made of multilayer metal. The motor is equipped for Euro-3 with a collector 11194-1203008-10 or Euro-4 with a collector 11194-1203008-00. The service life of the pump has been increased due to a new design of the oil seal and bearing, and changes to the toothed pulley.
Hydraulic compensators
Also check out
- When disassembling the valve mechanism, it is necessary to place a wooden block under the valve plate.
- Dry the valve. Remove it from the cylinder head guide bushing.
- Using a key “13”, unscrew the 2 nuts securing the inlet pipe.
- Remove the gasket and pipe.
Assemble and install the cylinder head in the reverse order.
Recommendations :
- Valve stems with engine oil. The same applies to guide bushings.
- Before installation, remove dirt, oil, and remnants of the old gasket from the surface of the cylinder block.
- The cylinder head gasket should be replaced using two special centering bushings.
- Install the mounting screws; the diagram below shows 4 steps on how to tighten them.
- The first tightening torque of the screws is 20 N.m (2 kgf.m);
- The second - with a moment of 69.4–85.7 N.m (7.1–8.7 kgf.m);
- The third - with an extension of 90°;
- The fourth is to turn the screws 90°.
How to use a torque wrench
To obtain the correct tightening torque, you need to understand how to use such a specific tool as a torque wrench.
Before starting work, it must be set to zero. After this, the tool is put on the bolt (or nut) and begins to rotate slowly, tracking the dynamics on the scale. When the force reaches the required torque, the key is removed.
Sometimes it happens that the tool does not show anything at first. In this case, continue rotating. The fact is that over time, its internal mechanisms stretch, but this practically does not affect the accuracy of determining the tightening torque.
The procedure for tightening bolts and assembling the VAZ 2114 engine
- We install a new head gasket on the block, along the installation sleeves so that the hole with a copper edging for the passage of oil in the gasket is located between the third and fourth cylinders, the gasket should be dry and clean.
- Then we install the head on the block, having first made sure that the crankshaft and camshaft are in the TDC position, and both valves of the 1st cylinder must be closed.
- We proceed to tighten the head bolts in the specified sequence, see photo 18 in four stages. Tighten the bolts from the center, gradually moving equidistantly towards the edges of the cylinder block, as shown in the diagram. The cylinder head bolts stretch out with repeated use. Replace with new bolts longer than 135.5 mm. Before installing the cylinder head, lubricate the bolts with a thin layer of engine oil. We do the first tightening cycle with a torque of 20 N•m (2 kgf•m), the second with a torque of 69.4–85.7 N•m (7.1–8.7 kgf•m), the second and third we finally bring the bolts to 90°.
- We install the parts on the cylinder head, and connect the hoses and wires to it in the reverse order of removal.
- We install the camshaft pulley with the protruding part of the hub facing the engine.
- If necessary, adjust the clearances in the valve drive.
- We adjust the tension of the timing belt.
Please note that there are O-rings installed on the fuel pipes. After disconnecting each hose, remove the O-ring from the tube
Replace heavily compressed or torn rings.
1
Remove the crankcase ventilation hoses and the supply hose from the valve cover fittings. Drain the coolant.
2
Using a 10mm wrench, unscrew the bolts of the front timing cover: two on the side and one in the center. Remove the timing cover. Using a 10mm wrench, unscrew the two nuts securing the throttle drive cable bracket to the receiver and remove it.
3
Set the piston of cylinder 1 to the TDC position on the compression stroke. Using a 17mm wrench, unscrew the camshaft pulley.
4
If the key does not sit tightly in the groove of the camshaft nose, remove it so as not to lose it.
5
We disconnect the hoses of the vacuum booster, electro-pneumatic valve and fuel pressure regulator in the fuel rail from the receiver.
6
Using a 17mm wrench, loosen the nut “B” securing the tension roller. Using a 10mm wrench, unscrew the nut “A” securing the protective casing and bend the casing. We also unscrew the spark plugs.
7
Using a 10mm wrench, unscrew the two nuts securing the valve cover and remove it.
9
Using a 10mm wrench, unscrew two nuts and one bolt securing the plug. We remove the plug.
10
Using a “13” wrench, evenly, in several approaches (until the pressure of the valve springs is relieved), unscrew the 6 nuts securing the camshaft bearing housing.
11
Remove the rear camshaft bearing housings from the studs.
12
Installing the “E14 Torx” head...
13
...and unscrew the 10 bolts on the cylinder block.
14
Loosen the clamps and remove the radiator inlet pipe “B” from the outlet pipe, the inlet hoses of the throttle body and heater “C”, and disconnect the thermostat.
We unscrew the fastening nuts and disconnect the fuel supply and drain hoses from the fuel pipes “A”.
15
Removing the cylinder head...
17
...and its gasket.
18
We replace the gasket with a new one, tighten the cylinder head bolts in the sequence according to the diagram.
19
We assemble everything in the reverse order, observing the tightening of the bolts.
Assembly Features
Before assembly, you should check the bolts securing the head to the hood; their length should not be more than 13.5 cm; if they are longer, they can no longer be used.
You should also check the flatness of the head. If it was overheated, it is possible that it was warped and will require repair in the form of trimming the plane.
During assembly, the head bolts are tightened in a certain sequence and with a strictly defined tightening torque. Next, everything is assembled in the reverse order of disassembly.
Disassembly is also carried out in the same sequence if the power plant is being modified.
Replacing the cylinder head gasket of a VAZ 2107 (engine 2105)
The 2105 engine has a timing belt drive, so replacing the cylinder head gasket differs only in removing and installing the gas distribution mechanism parts. The marks are set as shown in the figure below.
The cylinder head 2105 itself is slightly different, but the work is done in the same order as on other VAZ classic engines.
How Hyundai is assembled in Russia
Russian craftsmen make Hyundai cars using Korean components. They are introducing practically nothing new.
The interesting thing is that each employee tries to identify any shortcomings. This is probably due to the many awards and prizes that the company has received over several years of its operation. All tests of the model pass with a bang. And this applies not only to state tests, but also to national ones.
The team of selected employees is quite young. The age limit does not exceed 35 years. But that's not the main thing. It turns out that the plant operates around the clock, and one shift is eight hours. Employees periodically undergo internships in Korea, and foreign specialists come to us.
The plant has two workshops. One is staffed by people, and the other is staffed by robots. Body welding and painting are automated. Next, the finished body passes into human hands. On the control line, cars are started and tested. There is even a shower room that checks the car for leaks.
Replacing valve seats
If the seats burn out and are destroyed, as well as if the heads are strongly recessed into the body (“sucked”) or have been subjected to repeated countersinking, they need to be replaced. The seats are replaced on a milling machine. The defective seat is bored with a milling cutter and removed from the socket. Then, according to the technology, the head is placed in a thermal oven and heated to 120-150 degrees. Saddle blanks in the form of rings are placed in liquid nitrogen to reduce their temperature to minus 40 degrees. Using tongs, place the cooled rings of future saddles into the sockets and lightly tap them into the body of the head. Further operations for processing seat chamfers are performed on a special milling machine or manually with a set of cutters.
Sequence of repair work
Installing the Cylinder Head A new cylinder head gasket and valve cover gasket are also needed. Having all this, you can begin the renovation. The sequence of actions for repairs is as follows:
- The car is placed in the garage, the gearbox is set to neutral, and chocks are placed under the rear wheels. The first thing that is done after setting up the car is to de-energize the on-board network by disconnecting the “-” terminal from the battery.
- The pressure in the fuel system is relieved. For this purpose, there is a control valve on the fuel rail in the form of a regular tire valve. You need to place a container under this valve and clamp the spool. When the pressure is released, gasoline will leak out. You will also need to drain the coolant using drain plugs.
- On the engine, you need to set the piston of the 1st cylinder to the TDC position. To do this, remove the protective cover of the timing belt and rotate the crankshaft until the marks on the pulley, camshaft and flywheel match.
- The next step is to remove the valve covers. To do this, all pipes, the throttle drive rod, the accelerator drive bracket and the valve cover mounting nuts are disconnected from the cover fittings.
- The exhaust pipe of the exhaust gas removal system is disconnected from the exhaust manifold. These works are carried out under the car.
- The wiring is disconnected from the mass flow sensor, the air supply pipe to the throttle assembly is removed, after which it is completely dismantled along with the air filter housing.
- Then you need to disconnect from the head all the elements suitable for the head - pipes of the cooling system of the throttle assembly, vacuum booster, throttle drive linkage, ground wires, bracket for the exhaust manifold supply pipe.
- The intake manifold strut mounts are also loosened, and the struts themselves are removed. Next, the wiring is disconnected from - oil pressure sensors, coolant temperature and throttle position sensors, XX regulator, injectors, high-voltage wires from spark plugs.
- Then the timing belt is removed. Before this, you need to once again check the alignment of the marks on the crankshaft pulley and the timing gear. After this, the belt tension is loosened and it is removed from the timing gear.
- To remove the camshaft gear, you will need to fix it through the technological holes and unscrew the fastening bolt. You need to remove it from the shaft carefully so as not to lose the key. After this, you will need to remove the rear cover, located behind the removed gear, from the head and block.
- The cooling system pipes are removed from the head along with the thermostat from the head, as well as the rest of the wiring. The fuel supply and drain pipes are also disconnected.
- All that remains is to unscrew the head bolts. But to do this, they must first be weakened, and in a strictly defined order. And only after relaxation do they completely unscrew. If disassembly is done correctly, after removing the bolts, you can remove the head and remove the damaged gasket. At this point, the first part of the repair is considered complete.
Work order
Before tightening, you will have to get to the block head. This can be done no earlier than after disassembling a good half of the engine.
First, open the connectors, the connecting wires leading to the antifreeze temperature sensors and the oil level control sensors. Once done, drain the coolant
It is necessary to dwell on this important point separately. Be careful - the composition mentioned above is quite toxic, so it is better to work with gloves
To collect coolant, prepare a container with a volume of at least 9 liters.
Further:
- remove the thermostat, and behind it the air filter;
- disconnect the exhaust pipe from the manifold;
- Remove the protective housing and the belt from the VAZ camshaft;
- The throttle valve drive cables must be separated from the carburetor;
- remove all cables leading to the cylinder head, as well as tubes, hoses, etc. (be sure to loosen the clamps that secure them, otherwise you won’t be able to move them to the side).
You now have direct access to the head. Unscrew all the bolts holding it, and, using the help of a partner, remove the cylinder head. After this, tear off the old gasket.
Carefully clean the rear surface of the VAZ 8-valve engine block from dirt and adhered fragments of the sealing element material. Sand it with fine sandpaper - you should be left with a completely smooth, matte base.
At the same time, check all valves and seals.
Be sure to remove any oil or debris from the bolt holes. Lubrication helps reduce the friction force, which in this case is fraught with many troubles, and foreign fragments will not allow reliable fastening.
All that remains is to install a new gasket and reinstall the VAZ-2114 cylinder head. This is where the time comes to talk about what tightening torque is required.
VAZ-2114 engine structure diagram
In order to understand the process and principle of replacing engine gaskets, you need to know the structure and sequence of parts in the main power unit.
So, let's look at the design of the VAZ-2114 engine:
Replacement process
So, when the basic structure of the engine is clear, you can proceed directly to the process of replacing the gasket. But first you need to decide on the tools. So, what do you need to complete the procedure: a torque wrench, a set of open-end and socket wrenches, a set of sockets and a ratchet, bits from a Torx set, screwdrivers, coolant for topping up, a new gasket, rags, containers for draining liquids.
Now that you have everything, you can proceed directly to the replacement procedure:
- We remove the “minus terminal”.
- We dismantle the timing belt protective cover.
- We set the VTM labels.
- Drain the coolant completely from the car.
- Relieve pressure in the fuel system.
- Disconnect the intake pipe from the exhaust manifold.
- Remove the block head cover.
- Disconnect the throttle assembly.
- Remove the air filter.
- We dismantle the fuel rail assembly with injectors.
- We fix the camshaft and crankshaft.
- Remove the timing belt.
- We dismantle the tension roller.
- After unscrewing the fastenings of the camshaft gear, remove it.
- Unscrew the fastener and remove the back cover.
- We dismantle the cylinder head exhaust pipe.
- Turn off and remove the thermostat.
- Disconnect the fuel supply and drain pipes.
- Unscrew the block head fastening.
- We dismantle the cylinder head along with the gasket.
- We clean the surface of the block head from the old gasket, as well as other dirt and dust.
Note! Along the way, you can inspect the condition of the pistons and combustion chambers for the presence of soot and soot. If necessary, “throw in” the oil scraper rings.
- Install a new gasket.
- Before installing the head, check whether the valves on cylinder 1 are closed.
- We tighten the cylinder head mounting bolts according to the diagram. At the first stage, the screws should be tightened with a torque of 20 N.m, at the second - 69.4–85.7 N.m, at the third stage the screws should be tightened by 90 degrees, at the fourth stage the screws should be finally turned by 90 degrees.
- We carry out further assembly in reverse order.
Don’t forget that the timing belt must be tensioned with a certain force; this is discussed in detail in the material: “we correctly tighten the timing belt on a VAZ-2114 with our own hands.”
Gasket selection
In addition to the original spare part, there is a set of analogues that can be installed on the VAZ-2114. Some of them are of high quality and have a service life much longer than the original. So, let's look at what gasket options exist for the 14th series of Lada cars.
Original
21083-1003020 - catalog number of the original head gasket. It fits perfectly into the seats and is recommended for installation by the manufacturer. It is produced at the AvtoVAZ plant and the retail price is 600 rubles.
Analogs
In addition to the original part, there are a sufficient number of analogues that are certified and, as practice shows, are installed on cars. So, let's look at which cylinder head gaskets can be installed instead of the original:
Gasket requirements
When changing and choosing a cylinder head gasket, you must always look at the quality of the product. But not everyone knows what properties it should have. Let's consider the basic requirements for this spare part:
- Long service life.
- Elastic deformation.
- Resistant to hot gases.
- Water and oil resistant.
- Resistance to chemical reactions and influences.
If the selected head gasket meets all standards, then it can be installed on the car.
Symptoms of a problem
So, when all the points have been considered, it remains to list the signs of cylinder head gasket failure:
- A large amount of white smoke comes out of the muffler.
- Sufficient amount of emulsion on the filler cap.
- Antifreeze has an oil effect.
- The oil level in the pan has increased.
- The smell of antifreeze or exhaust gases can be traced in gasoline.
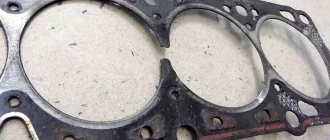
Signs of gasket failure
Signs of a cylinder head gasket failure
The main signs of gasket failure are:
- the appearance of a white emulsion on the dipstick when checking the oil level. This deposit on the dipstick means that the gasket has ruptured between the holes through which oil and coolant pass;
- thick white smoke. Indicates that there is a breakthrough in the gasket between the hole through which the coolant flows and one of the cylinders. In this case, the white color of the exhaust gases is given by the evaporating liquid that has entered the cylinder. Additionally, placing your hand near the exhaust pipe while the engine is running will help you verify that the gasket is broken. The coating remaining on the hand should be tasted on the tongue - if it is sweet, then the liquid is getting into the cylinder;
- the presence of oil stains on the surface of the coolant in the expansion tank. Multi-colored oil spots will indicate that, as a result of a breakdown, oil began to enter the channel with the passing coolant;
- bubbles in the expansion tank when the engine is running. This sign will indicate that, as a result of a gust, exhaust gases penetrate into the coolant channel;
- a sharp whistle when the engine is running, accompanied by oil leaks on the cylinder block. This is the clearest sign that there has been a breakdown of the gasket with an outlet. It occurs rarely, often after the engine has been modified with preliminary removal of the head;
- the most hidden type is a breakdown between the cylinders. There are no particularly obvious signs, except for a drop in power and an increase in fuel consumption, which may be the result of a malfunction of other mechanisms. Only a compression test will help verify the presence of such a breakdown, and even then not always. The same misalignment of the valves can give such symptoms;
If such symptoms appear, the only option for eliminating this malfunction is to replace the cylinder head gasket of the VAZ 2114.
It is noteworthy that this gasket is disposable and is replaced every time, so any modification to the engine associated with removing the head must be accompanied by a replacement.