I am a supporter of naturally aspirated engines, maximally boosted, but naturally aspirated) In order not to impair the durability characteristics of the internal combustion engine, but also to get maximum power...
1.For this purpose, the intake and exhaust channels in the cylinder head were bored, and the valve seats were also damaged in this sense. (I’ll write more about this) 2.Lightened the valves. (more on that soon too) 3.I completely welded from scratch a maximum direct-flow system with a pipe diameter of 60 mm, starting with the spider.4.The high-voltage wires were redone and received
zero resistance.
5.The piston rings were modernized, that is, they were made
solid rings,
from which the loss of compression is reduced to zero.6.Were delivered
oil - crankcase gas filters,
so that they do not contaminate the intake channels, thereby narrowing them due to soot build-up and without impairing the air flow in the intake.7.Were made
holes in the pistons for better lubrication of the pistons and clear down to the gram weight distribution of the pistons, pins and connecting rods.
8.And we can even mention
about this =) Which also extends the life of the internal combustion engine. ))))
After such modifications, we already seem to be flying... but something is missing, for me it’s “something”
gave me no rest for half a year, and this is
the Always Ultra “gasket”
, after which the compression ratio increases with a bang =) Moreover, I almost sowed this compression ratio when I changed the pistons, which do not bend the valves because they have deeper counters under the valves, but I compensated for it with rings like these, so the power didn’t go away, but it didn’t increase much either...
The compression remained the same as before replacing the pistons 13.9 - 14, well, roughly speaking 14 =)
And as luck would have it, they often started to come across me articles, who has already done this, that is, changed this ill-fated “gasket” to 21126, in short, he spat, although he put it off until spring, who does such repairs in the winter, and changed %)
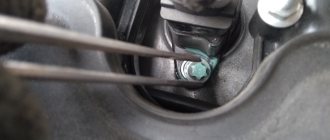
This is what our gaskets look like in real life, a friend here also asked me to take such a photo for comparison with our own gasket, by the way, I infected him with the same disease about replacing this unfortunate one...))))
But in order to install gasket 21126, it was necessary to carefully grind the planes of the cylinder head and cylinder block, this was done
here.
By the way, I’ll tell you about the thickness of the gaskets, this is precisely the MEANING of increasing the compression ratio...
Well, what can I tell you, my friends, after installing gasket 21126...
When I measured the compression, it showed 15.6 =) Even in one cylinder it was 15.9 =) That is, the compression went up by 1.5 - 2.0 points after replacing the gasket with 21126 =)
So this compression was not in vain, with all the modifications to the internal combustion engine, it, so to speak, multiplied the useful effect of all the multipliers and the engine just flew, in the sense that it did not break or stall.
Now comes the most interesting part!
Everyone is interested in the question: does the valve bend when installing gasket 21126 from the Priora?!
Not one “wise guy” wrote about this on the Internet, but they’re not good people))))
I have repeatedly measured how far the valves extend from the cylinder head, and this is 5.50 mm. I also measured how deep the counters in the pistons are, which is 5.50 mm. That is, the gasket gives us the necessary clearance so that they do not say hello when the timing belt breaks =)
But in fact, when I tightened the cylinder head with the required degree of tightening and raised the piston to TDC (top dead center), turning one of the camshafts, it rested at the very edge of the passage of full opening of the valves, which means that the valves rested against the piston at TDC, which is the same this means that if the timing belt breaks, they will still bend, those damn studs))))
But no one wrote about this on the Internet, and yet a million people changed these gaskets, which is probably why they didn’t answer, what kind of deception is that the valves don’t bend when changing the gasket, half the country just ordered them)))))
Here I told you everything in detail, and you will have to decide whether to change the gasket or not, choose between the power of the internal combustion engine, or so that it does not break somewhere within 500 km. from the house timing belt, and you didn’t have to order an expensive locomotive called a tow truck to get to House, in Russian HOME... Just don’t remember God in English, because he
I won’t like the way his name sounds in English translation... Anyone who knows English will understand me, but God definitely won’t like it if you call him a Gad)))))
Well, don’t be so scared, if you look after the car as if it were your own pedicure, check the condition of the timing belt, pump and rollers in a timely manner, then you won’t be in danger of the saying - Trust in God, but don’t make a mistake yourself! =)
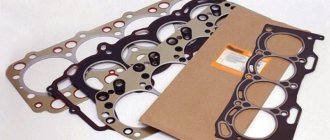
Cylinder head gasket VAZ 2112
Cylinder head gasket for VAZ 2112, 21124 engine.
Specifications:
Dimensions in packaging (LxWxH), mm
Saw under bolts 12 on dv 2111 1.5 something will work out
12 coupe turbo, the gasket blew out a second time, I don’t understand the reason, I drove for a month after the repair, everything was fine at the races, the tasol started through the expander, it was thrown out and it blew out again (((
DIY repair of VAZ 21124 16 valves
Gasket replacement process
In order to make the replacement faster and more convenient, you will need a pit, overpass or lift. As practice shows, such conveniences are not always at hand and you have to suffer in the garage. Let's consider the step-by-step process of replacing the cylinder head gasket:
Removing the battery terminal for repair
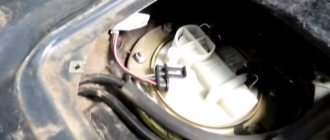
We relieve pressure in the fuel system through a special valve.
After unscrewing the mounting bolts, disconnect the exhaust manifold and exhaust pipe
When everything is disconnected, we dismantle the cylinder head
Removing the timing belt
Fixing the camshafts from turning so as not to disturb the valve timing
Now the gasket has been replaced and you can continue to use the car.
Selecting a cylinder head gasket
Before you start choosing a head gasket based on the catalog number, you need to consider what types of gasket materials there are. Let's look at the main types of cylinder head gaskets:
Metal cylinder head gasket
So, now you can consider the original gasket, as well as the substitutes that are used. Basically, all manufacturers label gaskets according to the original.
2112-1003020 is the original and analogue catalog number of the cylinder head gasket for the VAZ-2112. Also, the manufacturer Ajusa (10144200) produces a range of gaskets for the 2112 model.
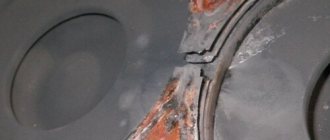
Reasons for failure
There are not many reasons why the cylinder head gasket failed, but every car owner must know them. So, let's look at the main ones:
Signs of replacement
To correctly diagnose and identify faults, it is necessary to diagnose correctly.
White steam from the exhaust is a reason to think!
When is it time to change?
The gasket serves to seal the connection between the head and the cylinder block. There are several types of it:
- Asbestos. Replacing the cylinder head gasket. Removal and installation of cylinder head. VAZ 2112 1.5. The main advantage: low shrinkage and good recoverability.
- Iron. These are some of the most reliable and high-quality consumables.
Brand new iron cylinder head gasket
Non-asbestos. Used as repair kits. Beginning of disassembling the VAZ 21124 engine, repairing the VAZ 2112 16 head (valve replacement of the belt. Main advantages: elasticity, heat resistance, elasticity.
The procedure for replacing the cylinder head gasket on a VAZ 2112 16 valves is indicated in the manual, but this is not the main prerequisite. There are a number of signs that determine the need for replacement:
- leakage of engine oil or antifreeze in the connection area;
- snow-white steam present in the exhaust gases indicates that antifreeze has entered the cylinders;
- when exhaust gases enter the cooling system, foam appears at the neck of the expansion tank;
- the presence of oil stains in the coolant indicates a leak in the connection;
- the presence of a snow-white coating on the oil dipstick indicates that there is antifreeze in the engine oil; this may be due to a damaged gasket.
Replacement intervals for the cylinder head gasket on the VAZ-2110
Repairing the cylinder head from “a” to “z”
It is very difficult to predict the exact service life of the gasket.
The most important thing that interests owners is the replacement interval for this part.
- Manufacturer of the part.
- The quality of the material from which the gasket is made.
- The conditions under which these parts were stored.
Since the gasket is made of rubber, storage conditions directly affect its service life. For example, a part purchased at the market, which was stored for a long time in a damp and unheated container, will be worse than the same spare part purchased in a store.
The main function is to ensure maximum sealing of the cylinder block with the cylinder head. If you do not monitor the condition, the engine life will be significantly reduced.
Signs of a broken gasket
Foam around the expansion tank cap is one of the signs of a cylinder head gasket failure.
You can find out that the seal of the connection is broken for the following reasons:
- White vapor appears in the exhaust gases.
- You may notice oil stains in the antifreeze.
- Leak in cylinder head connections.
- There is a large amount of oil in the pan.
- You may notice foam around the filler cap.
Although it seems that it is very difficult to notice the vapors in antifreeze, this can be done by placing a bag over the neck of the open expansion tank. If there are gases in the antifreeze, the bag will inflate.
Replacement process for a 16 valve car
The procedure for replacing the cylinder head gasket on a VAZ 2112 with engines that have 8 and 16 valves is similar. To carry it out you need to prepare:
- a set of spanners and wrenches;
- torque wrench;
- new consumables;
- container for draining coolant;
- unstained rags.
For the convenience of the procedure, it is better to use an overpass or inspection hole.
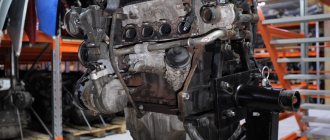
Engine VAZ 2112 16 valves
Stages
- First, you should de-energize the car by removing the negative terminal from the battery.
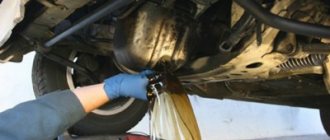
- Then you need to drain the antifreeze into the prepared container.
- If repairs are carried out after a trip, then the pressure in the fuel system must be relieved. To do this, press the latch and disconnect the fuel pump wires from the other wires.
- In the next step, you need to disconnect the exhaust pipe from the exhaust manifold.
- Next the thermostat is removed.
- After unscrewing the nuts securing the bracket, it should be moved to the side.
- Because only the gasket is changed, the head is dismantled together with the camshafts.
- The bearing housing and fuel frame are removed together with the cylinder head.
- Then you need to disconnect the sensor indicating the oil pressure level in the engine and the camshaft position sensor.
- Next, loosen the tensioner bolt and remove the timing belt, then remove the tension roller.
- The toothed pulley must be fixed so that it does not rotate. Then you should unscrew the mounting bolt and remove it with the washer.
- Next, using 2 screwdrivers, you need to remove the pulley from the camshaft.
- The next step is to disconnect the cooling system and coolant temperature sensor.
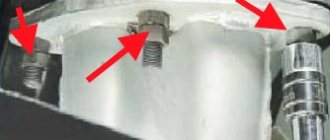
- For final dismantling on a power unit with 16 valves, it is necessary to unscrew the bolts according to the diagram and pull them out along with the washers.
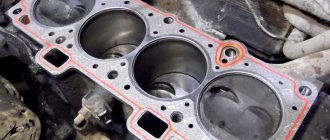
- Together with the cylinder head, the ancient gasket is removed.
We dismantle the cylinder head along with the gasket
- Before installing a new consumable, the surface at the connection point should be cleaned of remnants of the old gasket and dirt.
- Threaded holes must be clear of coolant and engine oil.
- The new consumable is installed along the guide bushings. The hole through which the oil enters must be positioned so that it is located as shown in the photo.
- Before installing the cylinder head in place, you should check all the marks on the shafts.
- The screws are tightened according to the diagram in the photo in 4 steps. The torque at which the bolts are tightened is indicated in the instruction manual for the VAZ 2112.
Hole with copper edging
Video “Visual aid to replacing the cylinder head gasket”
User Vyacheslav Kravchenko suggests familiarizing yourself with the process of replacing the cylinder head gasket using the example of a sixteen-valve “Ten”.
Many owners prefer to repair their cars themselves, so it will be useful for them to know how to replace the cylinder head gasket on a VAZ 2110 (2112) 8 and 16 valves. This part plays an important role in the overall design of the engine. It is possible to perform such an operation yourself, but you will need to use a special torque wrench to tighten the bolts securing the head to the cylinder block. It can be easily found in most garage cooperatives.
Replacing the cylinder head gasket on a VAZ 2110 (2112) 8 and 16 valves
performed each time the head is removed from the cylinder block. This is provided for in the conditions of maintenance, operation and repair of this vehicle. The replacement procedure itself is important, but approximately the same, with rare exceptions, for all car models. Therefore, we believe that the article will be useful for many car owners.
What is she?
This part of internal combustion engines serves as a seal to the place where the cylinder head is connected to the cylinder block. The engine has another gasket that seals the valve cover with the cylinder head. These parts cannot be confused with each other; these are completely different products, their design, purpose and application are different.
This part seals three separate but interconnected engine systems at once. These are lubrication, cooling and gas distribution systems. It is because of this that very high requirements are applied to it. During the compression of the fuel mixture, high pressure is created in the combustion chamber, therefore, after each removal of the cylinder head, the gasket must be replaced.
If it is reused, it may burn out, causing the engine oil to mix with the coolant. This means that you will also have to change the engine oil with filter and antifreeze in the cooling system. Several types of such products are produced:
- Gaskets made on a non-asbestos basis
are characterized as products that are easily restored and have minimal shrinkage; - Products made from asbestos
. Their high heat resistance, elasticity and elasticity are noted. They are recommended for use as repair kits; - Metal gaskets
. Today they are considered products that have high efficiency and quality, allowing the created pressure to be evenly distributed over the entire sealed surface.
Reason for replacing it
There can be many reasons for this, both for used cars and for new cars. In most cases, it is impossible to predict the timing of its replacement. There are certain signs by which one can judge the need for such an operation, but this often occurs suddenly.
Let's look at a few of the most common signs:
- Noticed the appearance of drops of engine oil or coolant at the sealing area of the head and block;
- The presence of whitish exhaust from the exhaust pipe is evidence of the penetration of coolant due to burnout of the gasket;
- When checking the oil level on the dipstick, it was noticed that this is a sign of coolant entering the lubrication system;
- The presence of oil stains in the coolant, which can be seen in the expansion tank or radiator;
- Bubbling of the coolant is evidence of exhaust gases breaking through the burnt gasket into the engine cooling system.
Installation of cylinder head VAZ 2112 -16 valves
The Auto_Repair channel will help you fix car problems with your own hands.
When replacing camshafts with tuned ones, with a larger phase and lift, all these rules do not apply. When installing them, you need to follow the manufacturer's advice on installing such shafts. There are usually degrees before TDC, after TDC and all that. Cylinder head 16 valves VAZ 21124 engine repair part 1. More on this next time.
Now let's move on to describing the labeling process:
Scheme for placing marks on the camshaft pulley and crankshaft. Replacing the cylinder head gasket of a VAZ-2112 16 valves: photo, video. Combine points A, B, C, D, E, F.
We combine the marks on the camshafts and the marks on the plastic timing belt casing. They are clearly defined, so you can't confuse them.
To control the position of the crankshaft, remove the rubber plug on the box, located almost under the thermostat. There you will see a flywheel. If you are replacing the belt with a new one and have set the camshaft pulleys according to the marks in advance, then looking through the hole you will see a notch on the flywheel and a mark (slot) on the iron casing.
If you haven’t coordinated anything in advance, then you need to turn the flywheel to find this notch (remember what I wrote earlier, on engines where there is a possibility of pistons and valves meeting, turn everything very carefully). And this is where the fun begins. Personally, on my 2108, the notch was so unclear that I didn’t even realize if it was it. The flywheel was damaged in places and there were 3 such notches, but one was really deep, albeit crooked. It's been a while since we've had any interesting cars come to us, and it's finally happened. Meet the renault megane ii with a 1.6 16 valve engine; timing belt replacement at 145,000 km. If you doubt that this is it, then we select the one that is most similar and move on to the camshaft pulley.
We look to see if the marks on the crankshaft pulley and on the oil pump are aligned (on the oil pump the mark can be a slot, or it can just be a vertical edge, in the same place where the mark is drawn in the figure). I don't think you can go wrong.
In general, when setting marks on the crankshaft, you need to achieve convergence of marks on the pulley and oil pump, as well as on the flywheel and iron casing. Replacing valves for Lada Priora 16 valves. Replacing the valve cover gasket on a Ford Fusion. After final installation of the mark on the flywheel, secure it. How to remove the cylinder head on a VAZ 2109. Replacing the Lada Kalina gearbox gasket with your own hands;. Personally, I insert a screwdriver into the hole in the box so that the flywheel becomes motionless. Then install the belt, rollers, tighten the whole thing and start it.
For example, the difference between tuning shafts with huge lift and wide phases from the stock shaft
Thank you for your attention. If you have any questions, please leave them in the comments.
What else to read on the topic:
Work order
We put the car in the repair bay. We clean the engine using a sprayer and washing liquid. We carry out work to replace the VAZ-21124 engine gasket:
- We remove the protective covers, disconnect the pipelines and equipment power cables.
- Disconnect the battery, drain the antifreeze and oil.
- We fix the 1st piston of the engine at TDC (top dead center).
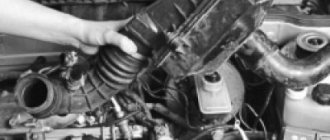
- Remove the air filter.
- We remove the valve system protection cover by disconnecting the supply systems and unscrewing the fastening nuts.
- Disconnect the exhaust gas system.
- Remove the internal manifold spacers. We disconnect the temperature sensors, oil pressure, injectors, and current supply wires from the spark plugs.
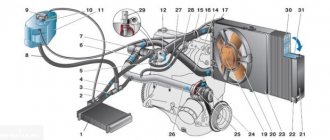
- Remove the timing belt. The timing parts have several marks that serve to tune and adjust the VAZ-21124 engine: on the timing pulley the crankshaft TDC mark is mark A, on the oil pump cover there is control mark B, on the rear protective cover of the toothed belt there are control marks C and F, on on the exhaust camshaft pulley - mark D, on the intake camshaft pulley - mark E.
- To do this, carefully remove the camshaft gear, fix the shaft and unscrew the fastening bolt. All actions are carried out with care so as not to lose the key.
- Remove the thermostat and pipes and disconnect them from the system.
- Loosen and unscrew the block head bolts. We remove the block head and remove the damaged gasket.
- We install a new gasket, having first removed the oil with a rag. The procedure for installing and tightening the bolts should be carried out taking into account the following sequence: the first operation is carried out with a force of 20 Nm, the second - with a force of 65.4 - 85.7 Nm, the third - tightening is carried out by 90 *, the fourth - tightening by 90 *. The bolt tightening order should be done in the following sequence - top row (8, 6, 2, 5, 10), bottom row (7, 3, 1, 4, 9).
- We check the position of the crankshaft and camshaft, which should be at TDC (the valves should be closed). Install the head on the cylinder block.
- We carry out reverse operations on the installation of attachments, connecting hoses and electrical cables.
- We mount the exhaust and intake camshaft pulleys.
- We adjust the tension of the timing belt and generator. Check the condition of the tension rollers. To tension the belt, we use the tension roller (located under the exhaust camshaft pulley) by installing it in the desired position and tightening it to ensure the necessary belt tension.
- We install the valve cover and timing belt protection. We check all connections of power supply systems and electrical wiring. To seal individual components, we use Loctite-574 sealant, which, after application to the surface, hardens within one hour.
Meet the model
With the new engine, the unit was given the name VAZ 21124, this car intensively fights against the ecology of the external environment. In addition to everything, when the car starts, the traction at the bottom has become noticeable, and the engine now runs calmer, without large jumps. We often hear questions from owners of 16-valve engines: “What needs to be done to prevent the valves from bending in the piston?” In Veil 21124, this task will not exist for you, in the bottom of the piston there are holes and sports shafts that keep the rise of the piston under control, and don’t let the knocking and noise of the VAZ 21124 engine frighten you, this is its normal environment.
Tuning yellow iron
The VAZ 21124 includes “yellow iron” tuning, in which stabilizers (for agility), reinforcements and braces (for road stability) are installed. However, be careful with counterfeits of these parts; at worst, they will damage the car, and at best, you will be throwing away a lot of money.
Feel like a real circuit racing driver with the VAZ 21124 hatchback . All you need is to install additional parts: a nameplate (symbols) on the handle of the car, neon lighting under the bottom of the car, an air intake on the hood and roof. The installation of front and rear bumpers with an aerodynamic body kit will add power to the car.
Let's get inside the car
Tuning VAZ 21124 includes changes to the internal world of the car. Replacing the pump and timing belt for VAZ 2110, 2111, 2112, Lada Priora, Lada Granta, Lada Kalina. (16 valves) is the pump leaking? How to change the pump on a 16 valve engine? Additional devices are installed in the VAZ interior and the old ones are improved; sports seats, a steering wheel and airbags are installed. For a chic look, the VAZ 21124 lacks door trim, new armrests, interior handles and wooden pockets.
In the world of car tuning design, there is a wide range of PVC fabrics for ceiling upholstery, many options for door cards and leatherettes, which differ in color and design.
beautiful in the new VAZ 21124 , especially in yellow, red or blue. Replacing the timing belt on an 8-valve Lada Granta engine directly with your own hands is almost no different from that performed on the 16-valve version of the domestic Lada Granta. Don't forget about podiums for speakers and columns; they come in different diameters, colors and models.
If desired, corner covers, door inserts, sun visors, decorative floor coverings can be installed in the interior; it all depends only on your imagination.
Tuning VAZ 21124 photo
Tuning the VAZ 21124 changes most of the car’s system, so this car can rightfully be classified as a high-speed car. It’s so nice when on the road, your car easily bypasses other cars, moves easily and does not make noise when accelerating quickly. Installation of a turbine on a VAZ 21124 . high-quality braking system, steering, improved suspension for maneuverability and easy handling - all this is called car chip tuning.