Excellent service - the specialists are all Russian, the prices are very reasonable, I am satisfied.
It was November 8, 2021, a diagnostic of the spar was required, they checked it quickly, found a little rust, sanded it down, treated it with a converter, coated it with anti-corrosive and painted it on top in body color, the quality was excellent, the price was great.
A disregard for clients, in general, this is more a problem of the administration than of the craftsmen. In general, be prepared for rudeness
They don’t know how to serve what is stated here
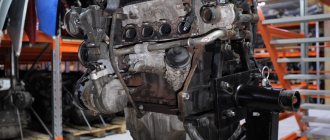
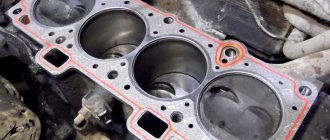
UAZ Patriot cylinder head gasket replacement
We must pay tribute to the masters of the previous service - after fumbling around looking for the cause of the antifreeze leak for an hour, they did not charge me a penny for it. True, it would now be more correct to write the word “masters” in quotation marks, since the first diagnosis that immediately came to mind for almost everyone who read my previous entry on two Internet resources was the same: cylinder head gasket, and as a method of treatment it was suggested “ gotcha" for money and time - its replacement. The situation was further aggravated by the fact that after three days of bleeding from the nose I had to go to Vologda.
Thanks to an old friend, a Patriots specialist: not having the opportunity to repair my car himself, he at least took the time to personally assess its condition. Unfortunately, the diagnosis was confirmed, and along with it, the hope of traveling to Vologda in this condition disappeared - a friend strongly did not recommend a trip with a range of more than 1000 km.
The next morning, the search began for a contractor ready to urgently take on the replacement of the gasket. The situation with UAZ services in Tver is very deplorable. However, it is no secret that this is not only in Tver. I didn’t want to trust such a responsible operation to random services under any circumstances. The off-road clubs that could take on the repairs were ready to accept me only the next week.
As usual, the theory of three handshakes worked. The wife went to the neighbors for milk and it turned out that their son could easily perform this “trivial” operation, having extensive experience working with ZMZ engines!
That same day I drove the car to a nearby street in our village. By evening, everything that was needed had been taken apart, and after assessing the condition of the insides, we compiled a list of what was needed:
— cylinder head gasket (of course, EURO-3) — exhaust manifold gasket — 4 pcs. — intake manifold gasket — set of valve cover seals — valve cover gasket — chain cover gasket — antifreeze for topping up — oil for topping up.
It was also noticed that the belt began to wear out - without waiting for the “X” hour, it was decided to replace it too. Accordingly, a belt was added to the list.
Since the antifreeze was constantly being updated (about a liter and a half was added every two weeks), completely replacing it did not make sense. The oil was changed one and a half thousand kilometers ago, so after discovering that there was no emulsion in it, it was also decided not to change it. This, of course, significantly reduced the cost of work.
There were no plans to change any chains, tensioners, etc., since there was no reason for this. The list does not include sealant for the cylinder head gasket - we had it.
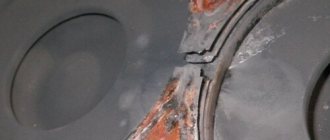
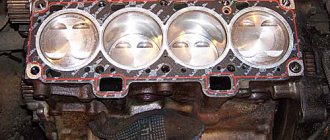
After opening the engine, I was surprised to see these strange notches. They couldn’t have cast it like that at the factory!
It has been suggested that they were formed during an attempt to obtain the valves using some artisanal method. I am glad, of course, that “this does not affect the speed,” but such barbaric treatment of the heart of the “Patriot” is absolutely outraged - I am preparing a protest at the UN.
The head gasket felt great. I mean, it didn’t burn out at all. However, the block head moved quite strongly due to overheating - 0.2 mm was removed during milling. The previous owner had already sanded it, but, as they said, very little was removed. Fortunately, nothing criminal happened to the cylinder block itself.
In the morning, on the day of departure, I picked up the car and decided to drive about fifty kilometers along the highway, just in case. Antifreeze does not leave, there are no splashes or leaks, and there is no detonation promised by some precedents after reducing the volume. Phew!
After lunch I set off for Vologda. At the same time, I finally decided to calibrate the gas consumption of the on-board computer (after 2.5 years!). After calibration, something strange began to happen to it. The computer began to show some strange average consumption, which by the time we arrived in Vologda reached a criminal figure - 9.8 liters per hundred with a mileage of 600 km! After refueling to a full tank, the calculated result coincided with the computer reading to within a tenth - the same 9.8! Before the repair, the actual consumption (based on the filled volume) on the same route was 11-12 liters per hundred.
It must be said that at a distance of 200 km along the route Vologda - Yaroslavl (ideal road surface, but with frequent descents, ascents and populated areas, 5 people in the cabin and 100 kg of cargo in the trunk), the average consumption according to the computer reached 9.1 liters /100 km! However, on the route Yaroslavl - Tver, consumption returned to 9.8 l/100 km - the hills became steeper, “rally” turns appeared and the quality of the road sharply deteriorated. In general, these consequences of increasing the compression ratio were very pleasing.
Of course, the antifreeze no longer left. Over the course of a week, its level neither in the tank nor in the radiator has changed even a millimeter.
The beginning of the problem Yesterday, together with a friend, we changed the cylinder head gasket. I set the Euro 3. We started at 10 in the morning and finished at 2 at night. We drove for about three hours during the day, bought consumables, took the cylinder head for grinding. They removed a little 0.12mm. After the replacement everything is fine), it started right up, it runs quietly smoothly. It's a little faster) it starts up faster, almost immediately.
The compression ratio has increased, but not by much. Was 9.0 became 9.6. Increasing the compression ratio requires the use of fuel with a higher octane number (for gasoline internal combustion engines) to avoid detonation. Increasing the compression ratio in the general case increases its power, in addition, it increases the efficiency of the engine as a heat engine, that is, it helps reduce fuel consumption. There is no detonation, even though you’ll only be able to drive at 95 meters now. There is no visible wear, everything is normal. The oil is ok. It doesn’t suit the gaskets (take Liqui Molly sealant in a syringe, it’s really better and more reliable) everything is dry. Lukoil synthetic oil is crap, the engine has a slight varnish coating from the previous oil, you can wipe it off with your finger, Lukoil should wash the whole thing and turn it black, but it doesn’t clean it fresh and young. Now the head gasket has not burned out, but the metal has cracked. the edging in the area of cylinder 1 was there and sucked in the antifreeze when it cooled down. I think the broach on the ZMZ is bad, plus the gasket is defective. Half the bolts were over tightened. I coated the gasket and block with sealant in the area of the timing chain and where the phase sensor was located before installation. We pulled in four passes. First 4kg, second 7kg, third 11kg, fourth final 14.3kg. I bought a German electronic torque wrench, it will come in handy more than once or twice, it’s a fairy tale to turn it) The camshafts were shifted by one tooth, they were opened before. Today I drove both in the city and in the normal pompas, turned it up to 4500. On the sands near the river, it knocked out once even lowered (I'll do it soon) The tests were successful) There is no detonation. 92-95 gasoline did not notice much difference.
PS I used Silicone sealant (black) Silicon-Dichtmasse schwarz, where it used to sweat and get wet with oil, now everything is dry!
Replacing the cylinder head gasket in a UAZ Patriot
At the 66th thousand mileage the cylinder head gasket burned out. Somewhere a week before, and perhaps 2 weeks before, in the morning, after the engine had warmed up, the temperature gauge needle began to desperately move towards the red zone. After two or three gas changes everything returned to normal and the temperature gauge stayed on like a glove and you could ride it all day long. As soon as I left it for a few hours or overnight, the same thing happened again, but it re-gassed and everything was fine. The temperature sensor started to fail. I was going to replace it, for starters. I also thought about a thermos, but I didn’t intend to change it yet. I wanted everything related to tempo piece by piece. change. I go to the store and buy only the two-pin sensor that goes to the brain, and not the one that goes to the arrow of the instrument panel, but I found out about this later (it was not needed in the end). I leave the store, start the engine, but the starter doesn’t even turn. The second time I try it, it started up, as if the tractor was working, a plume of white smoke from the exhaust pipe, like when a torpedo is launched. I opened the hood, and there, in the expansion tank, there was a bubbling jacuzzi. The color was no longer antifreeze, but a mixture of the same thing that is formed when the cylinder head burns out.
Replacing the cylinder head gasket ZMZ-409
The cylinder head gasket is replaced if it is damaged.
The main signs of damage to the head gasket:
– insufficient compression - below 1 MPa (10 kgf/cm2) in one or more cylinders;
– breakthrough of gases into the cooling system (seething, foaming of liquid in the radiator, rapid drop in the liquid level in the expansion tank in the absence of external leaks);
– coolant entering the lubrication system (emulsion on the oil level indicator, stratification of oil drained from the crankcase, especially noticeable in a transparent container);
– oil getting into the cooling system (oil film on the surface of the liquid in the expansion tank).
To replace the gasket, you need to remove the cylinder head with the receiver and exhaust manifold.
If the cylinder head is removed from an engine installed on a car, you must first drain the coolant (see “How to replace the engine coolant of a UAZ Patriot”).
You will need: keys “12”, “13”, “17”, hexagons “6”, “12”, a screwdriver.
Disconnect the wire from the negative terminal of the battery.
Drain the cooling system.
Remove the generator.
Unscrew the nuts securing the exhaust pipe to the exhaust manifold (Fig. 1).
Unscrew the bolt securing the exhaust pipe to the bracket on the gearbox (Fig. 2) and move the exhaust pipe away from the exhaust manifold.
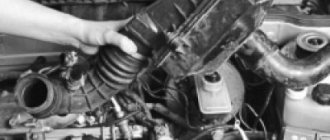
Disconnect the wiring harness connector from the mass air flow sensor (Fig. 3).
Disconnect the throttle position sensor harness connector (Fig. 4).
Disconnect the crankshaft position sensor harness connector (Fig. 5).
Loosen the clamp securing the air supply pipe, remove the pipe and move it to the side.
Disconnect the end of the cable from the throttle valve drive sector (Fig. 7).
Loosen the fastening of the end of the cable braid to the bracket (Fig. 8).
Remove the end of the cable braid from the bracket and move the cable to the side (Fig. 9).
Remove the cylinder head cover (see “Replacing the ZMZ-409 cylinder head cover gasket”).
Remove the upper chain hydraulic tensioner
Remove the camshafts (see “Removing and installing ZMZ-409 camshafts”).
Disconnect the engine harness blocks from the injectors (Fig. 10).
Unscrew the front nut securing the receiver (Fig. 11) and remove the ground wires from the studs.
Disconnect the wiring harness connector from the idle speed control (Fig. 12).
Unscrew the rear nut securing the receiver (Fig. 13), remove the holder 2 of the fuel supply hose and the second “mass” wire 1 of the harness from the stud, and then move the wiring harness aside.
Loosen hose clamps 1 on the throttle assembly and disconnect hoses 2 and 3 (Fig. 14).
Unscrew the nuts of the fuel supply and drain lines (Fig. 15) and move the lines to the side.
Unscrew the bolts securing the upper chain damper (Fig. 16) and remove the damper.
Remove the oil level indicator (dipstick).
Unscrew the rightmost nut securing the exhaust manifold (Fig. 17).
Remove the cooling system pipe holder from the stud (Fig. 18).
Sequence of tightening the cylinder head bolts (Fig. 19).
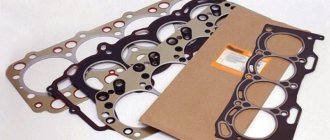
Unscrew bolts 1 (Fig. 20) securing the cylinder head in the reverse tightening sequence, remove the cylinder head and remove the gasket.
Thoroughly clean the mating surfaces of the head and cylinder block from carbon deposits, remnants of old gaskets and sealant.
Lubricate the new gasket on both sides with a thin layer of graphite grease, and at the point of contact with the front cover of the unit with heat-resistant glue-sealant.
Place the gasket on the cylinder block, making sure that the block mounting sleeves fit into the corresponding holes in the gasket.
Install the cylinder head in the reverse order of removal. Tighten the cylinder head bolts in the order shown in Fig. 19.
Tighten the cylinder head mounting bolts in two stages:
Stage 1 – 40–60 Nm (4.0–6.0 kgf m);
Stage 2 – 130–145 Nm (13.0–14.5 kgf m)
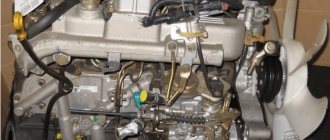
UAZ Patriot cylinder head: replacement of gasket and front cover, UAZ Patriot engine
Replacing the cylinder head gasket in a UAZ Patriot
At the 66th thousand mileage the cylinder head gasket burned out. Somewhere a week before, and perhaps 2 weeks before, in the morning, after the engine had warmed up, the temperature gauge needle began to desperately move towards the red zone. After two or three gas changes everything returned to normal and the temperature gauge stayed on like a glove and you could ride it all day long. As soon as I left it for a few hours or overnight, the same thing happened again, but it re-gassed and everything was fine. The temperature sensor started to fail. I was going to replace it, for starters. I also thought about a thermos, but I didn’t intend to change it yet. I wanted everything related to tempo piece by piece. change. I go to the store and buy only the two-pin sensor that goes to the brain, and not the one that goes to the arrow of the instrument panel, but I found out about this later (it was not needed in the end). I leave the store, start the engine, but the starter doesn’t even turn. The second time I try it, it started up, as if the tractor was working, a plume of white smoke from the exhaust pipe, like when a torpedo is launched. I opened the hood, and there, in the expansion tank, there was a bubbling jacuzzi. The color was no longer antifreeze, but a mixture of the same thing that is formed when the cylinder head burns out.
I didn’t want to do any service work, and I didn’t have much money. At the same time, from 3160 rub. I ordered an E3 gasket. I took off the cylinder head. The second cylinder was washed as if from scratch. There was a breakdown in the gasket in that place. When he decided to install the gasket, E3 also considered the option of replacing the pistons with E3, so that the E2 pistons would not hit the valves after replacing the gasket, but still decided to leave his pistons, while noticing the piston rings and connecting rod liners, since he had already figured out why would not take advantage of the chance, which was, in fact, done. The honing was still clearly visible on the liners, and the pistons without rings were not hanging out in the liner, but there was still a little wear. I changed the rings and assembled the liners, sent the cylinder head for milling, at the same time ground in the valves and changed the valve seals, or valve seals, whoever calls it that.
I take the cylinder head, everything is decided, I put one curse. E3. I also replaced the bolts securing the cylinder head to the block. We are slowly turning everything around and putting it together. It came to setting the timing phases, I threw the camshafts in their places, I didn’t change the chains, I only replaced the hydraulic chain tensioners, of course there is no protractor for setting the phases, I wanted to buy it for 3160 rubles, but it wasn’t in stock, and I didn’t look for it from us. With the chain tensioned, I place the exhaust shaft according to the marks slightly above the plane of the cylinder head, and the intake shaft, on the contrary, below. I steamed and steamed, and left it like that. I collected everything in a heap. At the same time I replaced my coils with one from Bosch, along with the procl. E3 arrived, I also turned off the oil valve that goes to oil (and it is constantly in oil). I did everything I could with it: I installed a thermal valve under the oil filter, like on Patriots of subsequent years of production.
First engine start after repair. I decided to slowly drag it on a cord when it was cold, so that I could spray everything inside the engine with oil, so to speak, and only then start it. It started up happily, but it works like a tractor and doesn’t idle at all. I drive it into the garage. I took off the valve covers and moved the chain one tooth back on the intake camshaft. That is, the chain now between the camshafts, in the upper damper, sagged a little, but was tense. I'm putting everything back together. The key is to start and win! It works great - no problems, there are idle ones. That's how I ride to this day.
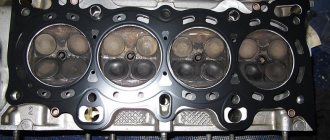
This is what I saw after opening it: soot, like flakes
I also brought rings from Russia. I wanted to find an analogue of Ikhnemarov’s, but at that time I couldn’t find it and took what I had - SM. Although, whether they really are or not, I don’t know for sure. I did not change the crankshaft oil seal on the front cover, I left the old one. Rubenovsky stood. There was already a little bit of wear on the pulley
I started to unscrew the connecting rods with a 15 head. Well, I think, like on Volgars there are 24s, but no, the 15 is big, it won’t fit on the 14. I took this one, for 14, - it’s the best. They are also called disruptive. Also, by the way, it helped not only with connecting rods
UAZ Patriot cylinder head: replacing the gasket and front cover
Replacing the cylinder head gasket in a UAZ Patriot
At the 66th thousand mileage the cylinder head gasket burned out. Somewhere a week before, and perhaps 2 weeks before, in the morning, after the engine had warmed up, the temperature gauge needle began to desperately move towards the red zone. After two or three gas changes everything returned to normal and the temperature gauge stayed on like a glove and you could ride it all day long. As soon as I left it for a few hours or overnight, the same thing happened again, but it re-gassed and everything was fine. The temperature sensor started to fail. I was going to replace it, for starters. I also thought about a thermos, but I didn’t intend to change it yet. I wanted everything related to tempo piece by piece. change. I go to the store and buy only the two-pin sensor that goes to the brain, and not the one that goes to the arrow of the instrument panel, but I found out about this later (it was not needed in the end). I leave the store, start the engine, but the starter doesn’t even turn. The second time I try it, it started up, as if the tractor was working, a plume of white smoke from the exhaust pipe, like when a torpedo is launched. I opened the hood, and there, in the expansion tank, there was a bubbling jacuzzi. The color was no longer antifreeze, but a mixture of the same thing that is formed when the cylinder head burns out.
0:2307
I didn’t want to do any service work, and I didn’t have much money. At the same time, from 3160 rub. I ordered an E3 gasket. I took off the cylinder head. The second cylinder was washed as if from scratch. There was a breakdown in the gasket in that place. When he decided to install the gasket, E3 also considered the option of replacing the pistons with E3, so that the E2 pistons would not hit the valves after replacing the gasket, but still decided to leave his pistons, while noticing the piston rings and connecting rod liners, since he had already figured out why would not take advantage of the chance, which was, in fact, done. The honing was still clearly visible on the liners, and the pistons without rings were not hanging out in the liner, but there was still a little wear. I changed the rings and assembled the liners, sent the cylinder head for milling, at the same time ground in the valves and changed the valve seals, or valve seals, whoever calls it that.
0:1459
I take the cylinder head, everything is decided, I put one curse. E3. I also replaced the bolts securing the cylinder head to the block. We are slowly turning everything around and putting it together. It came to setting the timing phases, I threw the camshafts in their places, I didn’t change the chains, I only replaced the hydraulic chain tensioners, of course there is no protractor for setting the phases, I wanted to buy it for 3160 rubles, but it wasn’t in stock, and I didn’t look for it from us. With the chain tensioned, I place the exhaust shaft according to the marks slightly above the plane of the cylinder head, and the intake shaft, on the contrary, below. I steamed and steamed, and left it like that. I collected everything in a heap. At the same time I replaced my coils with one from Bosch, along with the procl. E3 arrived, I also turned off the oil valve that goes to oil (and it is constantly in oil). I did everything I could with it: I installed a thermal valve under the oil filter, like on Patriots of subsequent years of production.
0:2878
First engine start after repair. I decided to slowly drag it on a cord when it was cold, so that I could spray everything inside the engine with oil, so to speak, and only then start it. It started up happily, but it works like a tractor and doesn’t idle at all. I drive it into the garage. I took off the valve covers and moved the chain one tooth back on the intake camshaft. That is, the chain now between the camshafts, in the upper damper, sagged a little, but was tense. I'm putting everything back together. The key is to start and win! It works great - no problems, there are idle ones. That's how I ride to this day.
0:1011 1:1516
This is what I saw after opening it: soot, like flakes
1:1608 2:2113
here it is E3
2:23 3:528
I also brought rings from Russia. I wanted to find an analogue of Ikhnemarov’s, but at that time I couldn’t find it and took what I had - SM. Although, whether they really are or not, I don’t know for sure. I did not change the crankshaft oil seal on the front cover, I left the old one. Rubenovsky stood. There was already a little bit of wear on the pulley
3:1063 4:1568
I started to unscrew the connecting rods with a 15 head. Well, I think, like on Volgars there are 24s, but no, the 15 is big, it won’t fit on the 14. I took this one, for 14, - it’s the best. They are also called disruptive. Also, by the way, it helped not only with connecting rods
4:1939
5:2444
Boshevskaya reel.
5:37
6:542
The roller is self-sharpening, but I haven’t installed it yet, they recently made the current
6:660
7:1165
8:1670
9:2175
Replacing the front cylinder head cover in a UAZ Patriot
Finally, I put the final touch on getting rid of the appendage - I replaced the front cylinder head cover with a 405. I liked the look, now there’s nothing superfluous under the hood. Difficulties: 1. Remove the cover carefully, it is advisable to pry off the gasket with a knife, as it may split in half. 2. It is better to take the upper bolts the same as the lower ones from this cover without the body, I took the upper ones, I had to saw off the thread somewhere in half. 3. It’s better to look for a belt 2030, I took 2050, although when I ordered 2040 it was in exist, but on the belt itself it says 2050, I had to move the power steering a little. Actually the photo, I apologize for the dirty engine compartment, over the weekend I fiddled around a little in search of lingonberries.
9:1257
10:1762
11:2267
https://www.drive2.ru/l/962399/, https://www.drive2.ru/l/7665784/
11:68 next article:
Refinement of the UAZ Patriot cooling circuit
Tuning the UAZ Patriot cooling system
Winter has arrived and the temperature began to fluctuate around 0. Engine temperature
12:898
Rating 0.00 [0 Vote(s)]
21759
Comments
Alexey Shishkanov:
Don't you check the valves for tightness?
Seryoga's dad:
When replacing, grinding the head is inevitable?
Sergey Kadikov:
everything is naturally brightly painted and shown, except for one person - naturally a pro but not a practitioner - didn’t say how much was removed on the head after grinding, if more than 0.1 mm the head can be thrown away - it won’t last long, it won’t help and installing 2 gaskets is a tedious job with drilling out the gears under the marks and installing them more than once, the only thing he can do is simply remove the welding and grind it a little
Sasha Dishlyuk:
then piiiiii. How many robots have already traveled 35 thousand km. And there are already the first signs that the truth has burned out again on Izdzhu gas.
Not local:
try removing the head without removing the manifold. it's much easier that way. I don’t shoot either the inlet or the outlet. less hassle
Alexey Vinogradov:
Hello Sasha ! Tell me where to get such templates for camshafts. Thank you for the video. Replacing the cylinder head gasket (part 1) - UAZ 3909 logbook. Replacing the gasket You can replace the cylinder head gasket on a viburnum with your own hands. Eliminating the problem of the presence of oil on the cylinder head valve cover and the intake manifold, replacing the intake manifold gaskets, replacing the breather gasket, replacing the valve seal. Replacement: 2 300: engine cross member 409 sensor tee on the UAZ cylinder head. Shoot some more
serega833:
Show the mandrel for charging the hydraulic tensioner in more detail
Press CTRLD to add the page to the bookmarks. Press CTRLD to bookmark the page.
Replacing the Cylinder Head Gasket of the UAZ 409 Engine
ZMZ-409 Replacement of cylinder head gasket (UAZ Patriot)
Write in the comments
Comments
Alexey Shishkanov:
Are you checking the valve for tightness?
When does head replacement not reduce?
Sergey Kadikov:
everything is naturally brightly colored and shown, except for one person, people are naturally professionals, but did not say how much they took off on the head after sanding, if more than 0.1mm, the head can be thrown away, it will not take a long time and installation is 2- x spacers will do the painstaking work of unwinding the gears under the marks and installing them more than once, the only thing is that you can simply remove the welding and sharpen it a little.
Sashka Dishlyuk:
then he drinks. Skilly works, even taking into account 35,000 km. And even at the first signs, the truth is that the truth about gas has burned out again.
Try removing the head without removing the manifold. much easier I don't remove the intake not final. less hassle
Alexey Vinogradov:
Hello Sasha! Please tell me where to get the following camshaft templates. Thank you for the video. Replacing the cylinder head gasket (part 1). UAZ 3909. Replacing the cylinder head gasket can be done by Kalina herself. Eliminate the problem of oil on the valve cover of the cylinder head and intake manifold, replace the intake manifold gaskets, replace the breather gasket, replace the valve seals. Replacement: 2300: Engine tee sensor 409 on the UAZ head. Shoot more
READ Toyota Corolla Rear Silent Block Replacement
mandrel for charging hydraulic tensioner
Press CTRLD to bookmark the page. Press CTRLD to bookmark the page.
Video on this topic
replacing cylinder head gasket 405.22
ZMZ-409 Replacement of cylinder head gasket (UAZ Patriot)
Write in the comments.
replacing engine gasket 405 406 409
This video shows replacing the cylinder head gasket
on UAZ
loaf on a completely new engine.
replaced
.
This video is about someone who has had trouble replacing the head gasket on a 405.22 engine.
How the UAZ Patriot engine burns when the head gasket is on fire
Blown cylinder head gasket.
Cylinder head configuration for UAZ Patriot ZMZ 409
UAZ Patriot: replacing the pan gasket (ZMZ-409)
Be careful when replacing gasket ZMZ-409 (Euro-3), for example, UAZ Patriot. Replace the cylinder head gasket for DIY replacement. Instructions, tips for car repairs. Replacing the cylinder head gasket ZMZ-409. The cylinder head gasket is replaced if it is damaged. Replacing the cylinder head gasket of a VAZ-2112 (16 valves) with your own hands. When replacing the cylinder head gasket with 1.6. UAZ Hunter. Remember that replacing the cylinder head gasket in the ZMZ-409 engine. not the easiest or fastest task, so if you don't have experience, it's best to ask a competent assistant or your end goal. Replacement of cylinder head gasket for ZMZ-409 engine. Replacement of cylinder head gasket, VAZ 2112, 16 valves
vivauto.ru. I thought it was leaking. it turned out.
READ Galvanized Lee Body Volkswagen Polo Sedan
ICE theory: cylinder head of the ZMZ-409 engine is a new attraction (design review)
Video of the ZMZ-406 cylinder head: https://www.youtube.com/watch?v=1tjksY-9czY Video reg. Stars: https://www.youtube.com/watch?v=HJVbgOBPL0k Discuss
overhaul of the ZMZ 409 head, replacement of valve seals, grinding of valves
In this video I explain when the head is capitalized. engine , how to replace valve seals.
replacing engine gasket 405 406 409
ZMZ-409: replacing the valve cover gasket (example UAZ Patriot)
Replacing the cylinder head gasket for UAZ 31519
The cylinder head gasket is replaced if damaged.
The main signs of damage to the head gasket:
– breakthrough of gases into the cooling system (seething, foaming of liquid in the radiator, rapid drop in the liquid level in the expansion tank in the absence of external leaks);
– coolant entering the lubrication system (emulsion on the oil level indicator, stratification of oil drained from the crankcase, which is especially noticeable in a transparent container);
– oil getting into the cooling system (oil film on the surface of the liquid in the expansion tank).
To replace the gasket, you need to remove the cylinder head with the receiver and exhaust manifold. If the cylinder head is removed from an engine installed on a vehicle, the coolant must first be drained (see “Replacing the coolant”).
You will need: keys “12”, “13”, “17”, hexagons “6”, “12”, a screwdriver.
1. Disconnect the wire from the negative terminal of the battery.
2. Drain the coolant from the cooling system (see “Replacing the coolant”).
3. Remove the generator (see “Removing and installing the generator on cars with a gasoline engine”).
4. Unscrew the four pairs of nuts securing the exhaust pipe to the exhaust manifold.
5. Remove the bolt securing the exhaust pipe to the bracket on the gearbox and move the exhaust pipe away from the exhaust manifold.
6. Disconnect the wiring harness connectors from the mass air flow sensors.
9. Loosen the clamp securing the air supply pipe, remove the pipe and move it to the side.
10. Disconnect the end of the cable from the throttle drive sector.
11. Loosen the fastening of the end of the cable braid to the bracket.
12. ...remove the end of the cable braid from the bracket and move the cable to the side.
13. Remove the cylinder head cover (see “Replacing the cylinder head cover gasket”).
14. Remove the upper chain hydraulic tensioner (see “Removing and disassembling hydraulic chain tensioners”).
15. Remove the camshafts (see “Removing, troubleshooting and installing camshafts”).
16. Disconnect the engine harness blocks from the injectors.
17. Unscrew the front nut securing the receiver and remove the ground wires from the studs.
18. Disconnect the wiring harness connector from the idle speed control.
19. Unscrew the rear nut securing the receiver, remove the holder 2 of the fuel supply hose and the second “mass” wire 1 of the harness from the stud, and then move the wiring harness to the side.
Comments
Alexey Shishkanov:
Don't you check the valves for tightness?
Seryoga's dad:
When replacing, grinding the head is inevitable?
Sergey Kadikov:
everything is naturally brightly painted and shown, except for one person - naturally a pro but not a practitioner - didn’t say how much was removed on the head after grinding, if more than 0.1 mm the head can be thrown away - it won’t last long, it won’t help and installing 2 gaskets is a tedious job with drilling out the gears under the marks and installing them more than once, the only thing he can do is simply remove the welding and grind it a little
Sasha Dishlyuk:
then piiiiii. How many robots have already traveled 35 thousand km. And there are already the first signs that the truth has burned out again on Izdzhu gas.
Not local:
try removing the head without removing the manifold. it's much easier that way. I don’t shoot either the inlet or the outlet. less hassle
Alexey Vinogradov:
Hello Sasha ! Tell me where to get such templates for camshafts. Thank you for the video. Replacing the cylinder head gasket (part 1) - UAZ 3909 logbook. Replacing the gasket You can replace the cylinder head gasket on a viburnum with your own hands. Eliminating the problem of the presence of oil on the cylinder head valve cover and the intake manifold, replacing the intake manifold gaskets, replacing the breather gasket, replacing the valve seal. Replacement: 2 300: engine cross member 409 sensor tee on the UAZ cylinder head. Shoot some more
serega833:
Show the mandrel for charging the hydraulic tensioner in more detail
Press CTRLD to add the page to the bookmarks. Press CTRLD to bookmark the page.
How does the Patriot timing belt work?
In fact, the ZMZ 409 is the twin brother of the injection 406 engine, which was installed in the Volga and Gazelle. Structurally, they are very similar, and accordingly, the 409 engine inherited the same problems (more on this below). ZMZ 409 has two camshafts made of cast iron. These camshafts rotate on bearings, which are obtained by connecting the cylinder head plane to removable aluminum covers.
These covers are processed together with the cylinder head, so it will not be possible to install them from another car without changing the cylinder head.
The timing drive here consists of a pair of single-row leaf-link chains. This option is less reliable than one double-row chain; moreover, plate-link chains tend to break unexpectedly, without any preliminary “sound warning”, by which you can understand that it is about to break. If it is not possible to supply a more reliable double-row chain, then a roller-link chain, which is also more reliable, would be a good option.
The timing belt of a Patriot with a ZMZ 409 engine includes the following elements:
- Crankshaft gear;
- Plastic chain tension shoe;
- Hydraulic tensioner;
- The so-called “top” chain;
- The large driven gear was washed out;
- The small drive gear was washed out;
- Shoe bolt support;
- Another shoe for chain tensioning;
- Another hydraulic tensioner;
- Noise reduction washer;
- "Bottom" chain;
- Special mark on the gear housing;
- Pin;
- Intake camshaft star;
- Upper chain damper;
- Exhaust camshaft star;
- Pin;
- Another mark on the gear housing;
- Upper plane of the cylinder head;
- Middle chain “pacifier”;
- Lower chain damper;
- M1, M2 - marks on the cylinder block body.
Practice
Why can’t the mark on the crankshaft pulley be considered true? For two reasons.
- When we look at the marks on the crankshaft pulley and on the front chain cover, we do so at a minimum of a 45 degree angle. Let's assume that these marks are quite clearly visible on the Volga. But if in front of us is a UAZ “loaf” or “patriot”, then the marks can be seen, practically from one point, and only if you know where to look. There is no need to talk about the accuracy of their combination.
- The crankshaft pulley has a damper. That is, it consists of two parts, between which there is a rubber layer. I can’t say how the pulleys are assembled at the factory, I haven’t seen it. But from experience working with these engines, I can say that if the displacement of the virtual mark relative to the true one is half a tooth, you just got the perfect pulley.
labavto.com
The cylinder head gasket must be replaced as soon as signs of its burnout are detected. Otherwise, it will negatively affect the operation of the engine. Changing the cylinder head gasket on a Lada Priora is not difficult. To do this, it is enough to have the necessary tools and follow the instructions for performing the replacement.
Why and when is the seal replaced?
The gasket acts as a seal, sealing the connection between the cylinder head and the cylinder block. It prevents mixing of working fluids. Therefore, high demands are placed on it. This is a disposable part that must be replaced in two cases:
- during any repair work accompanied by dismantling the cylinder head;
- if signs of burning or deformation are detected.
Replacing the Cylinder Head Gasket UAZ
Content
How long does it take to replace a gasket
cylinder heads ?
gasket replacement
The cylinder head should be carried out during its dismantling, regardless of the reasons that might require surgery. Replacing the cylinder head gasket. As. The gasket is disposable and should not be reused as it may cause serious damage to the engine.
Basic requirements for the cylinder head gasket:
- Oil resistance
- Ability to withstand hot gases
- Waterproof
- Elastic deformation capacity
- Even slight distortion when tightening bolts is unacceptable
- Chemical resistance to lubricants, coolants and hot gases
- Long term stability
Cylinder head packing cannot be reused
Uniform principles for replacing the cylinder cover gasket
Compliance with the manufacturer's general instructions for a specific engine is a necessary but not sufficient condition for a quality replacement. gaskets
.
The following operations must be performed without fail:
>
- The sealed areas of the head
and cylinder block must be thoroughly cleaned and degreased.
Any residue, previously used gaskets or materials that cover it must be removed - All bolt holes must be cleaned of dirt and threaded for ease of movement. The presence of oil in blind threaded holes is strictly unacceptable
- The sealed surfaces of the block
of balloons and
heads
should not have irregularities in the longitudinal direction of more than 0.05 mm, and in the transverse direction. 0.03 mm. If there are metal build-ups, they must be removed with a donkey, and if this is not possible or there are deep defects, the part should be sent. - During installation, the gasket must be carefully focused on the guide elements. The slightest deviation will make it impossible to operate the engine for a long time
- Particular care must be taken when installing the cylinder head. Do not scratch the gasket or connecting surfaces. The presence of foreign particles on parts, especially metal shavings, is absolutely unacceptable Video tutorial on how to replace the cylinder head gasket
READ How to Open Opel Astra J Without a Key
The fundamental difference between the gasket
on the ZMZ 406 engine of the Zavolsky Motor Plant, which has 16 valves and is installed on the GAZelle and a little Volga, or on the Lada Kalina, which has 16 or 8 valves, no. It is enough to follow the instructions and not damage the polished surfaces. Lancer 9 cylinder head, gasket replacement is described in the removal and removal process. It is very important not to change gears to avoid damaging the assembled engine.
Replacing the cylinder head gasket for Lada Kalina
Gaskets
blocks of domestic cars do not differ from each other
Lada Kalina. a very popular model, so let's take a closer look at the procedure for replacing the cylinder head gasket:
- merging coolant with engine
- Freeing spark plugs from high-voltage wires
- Remove the head
, removable complete with exhaust manifold and receiver - Remove the camshaft pulley from
- Remove the thermostat
- Remove the rear timing belt cover from the bolt and nut.
- In a few steps, loosen all the bolts holding the cylinder . It is advisable to turn them half a turn in the sequence indicated for tightening them. This will allow you to smoothly relieve tension and avoid deformation of the lid.
- Pull the timing belt cover to the side and remove the head.
ZMZ-409 replacement of cylinder head gasket (UAZ Patriot)
Write in the comments.
UAZ loaf, 1985 Next. replacing the cylinder cover gasket
This video shows replacing the cylinder head gasket
on
a UAZ
baton on a new engine.
The gasket is replaced
.
All further work is carried out according to a single scheme, and assembly is carried out in the reverse order. Minor design differences in the VAZ 2110, 2109, 2106 engines require a slight change in the order of extension of the cylinder head , but do not affect the gasket
Cylinder cover. The same applies to the VAZ 2112, 2114, 2115 models.
If the gaskets of the blocks of domestic cars do not differ much in characteristics, then almost every modification of the Mercedes engine produces its own gasket. When you order this item for Mercedes photo, gaskets or full model name and engine modifications are made to help avoid mistakes.
READ How to Check Your Car's Air Conditioning in Winter
Types of modern cylinder head gaskets
The greatest demand in the world market today is the multi-layer metal gasket Metaloflex™ cylinder head, which is an elastomeric-coated spring steel plate with structural grooves located on the surface. Replacing the cylinder head gasket ZMZ-409. UAZ cylinder head gasket. Depending on their volume, they have a multi-layer or single-layer design. Their use in diesel engines is most effective.
Next in popularity and use are metal-elastomeric gaskets . The cylinder head consists of a metal plate with a cured elastomeric profile. Typically they are used in engines with four valves per cylinder, high cycle pressure and high power. The material for the manufacture of such gaskets is selected individually for each engine model.
Gaskets Metaloflex cylinder head. the most popular
For low power engines they are most often used. gaskets
The cylinder head is a Ferroflex™/Ferrolastic™ metal soft material, which is a perforated carrier plate with soft material pumped onto it on each side. The openings of the combustion chambers are equipped with a metal edge that protects the soft material from hot gases.
The main advantages of metal gaskets made of soft material are:
- The block
and covers adjacent to the surface - Processing of metals through the openings of the combustion chamber eliminates the interaction of hot gases with soft material
- Micro-sealing thanks to the application of an ultra-thin special surface layer 10-20 microns thick
- Screen-printed silicone provides an extra level of sealing
Gaskets come first
The third type is used to repair vehicles manufactured in previous periods.
In modern engines they have confidently replaced gaskets
and metal elastomer.
Gaskets
Ferroflex cylinder heads are used for low power engines
How long does it take to replace a gasket?
The cylinder head directly depends on the design of the engine and the complexity of its disassembly. Whereas the price of a gasket depends on the material from which it is made and the brand. Unfortunately, today many semi-legal manufacturers have flooded the market with low-quality gaskets, the use of which often leads to serious engine failures due to impaired coolant circulation.
READ Replacement of Ball Joint VAZ 2110 Without Puller
Gasket repair
Often in-line engines with a large number of cylinders require not only grinding, but also milling of planes. block and heads . Replacing the cylinder head gasket on a Mitsubishi Lancer 9 If a leak of engine oil or coolant is detected at the junction of the cylinder head with the cylinder block, remove the head and. This leads to a change in the volume of the combustion chambers, which can be slightly compensated by installing larger gaskets. Almost all engine manufacturers make gasket with an increase in thickness of 0.2-0.4 mm. Their use is especially effective on diesel engines.
Rules for tightening bolts on the cylinder block:
- The procedure and timing of tightening the cylinder head bolts must strictly comply with the manufacturer's instructions
- To prevent under- or over-tightening, use a proven wrench. Both options are equally undesirable
- A prerequisite is the use of intact bolts. In this article we will talk about replacing the cylinder head gasket and the cost of this procedure. Ideally, it is advisable to use new bolts every time you open them on the cylinder block . The use of screws with threads or with broken geometry is absolutely unacceptable
- Particular care should be taken when tightening aluminum cylinder heads using TTY screws. One thing to keep in mind is that they are not tightened when tightened, but to the recommended degree. This information is always given in the manual, but many people do not pay attention to it.
- When purchasing a gasket, you should familiarize yourself with the manufacturer's specifications, which will allow you to avoid fundamental differences in the tightening torque of the gasket and the engine.
Cost of installing a cylinder head gasket
If you learn how to change the cylinder head gasket yourself, ensuring the system is tight, you can save a decent amount. For those who do not know how much it costs to replace a cylinder head gasket, let us tell you that the amount of work itself can range from $170 to $400, depending on the make of the car. A simple replacement of the cylinder head cover gasket will also be expensive.
Service station
vote
Article rating
Page 1 of 2
The cylinder head gasket is replaced if it is damaged.
The main signs of damage to the head gasket:
– insufficient compression - below 1 MPa (10 kgf/cm2) in one or more cylinders;
– breakthrough of gases into the cooling system (seething, foaming of liquid in the radiator, rapid drop in the liquid level in the expansion tank in the absence of external leaks);
– coolant entering the lubrication system (emulsion on the oil level indicator, stratification of oil drained from the crankcase, especially noticeable in a transparent container);
– oil getting into the cooling system (oil film on the surface of the liquid in the expansion tank).
To replace the gasket, you need to remove the cylinder head with the receiver and exhaust manifold. If the cylinder head is removed from an engine installed on a vehicle, the coolant must first be drained.
You will need: keys “12”, “13”, “17”, hexagons “6”, “12”, a screwdriver.
1. Disconnect the wire from the negative terminal of the battery.
2. Drain the coolant from the cooling system (see “Replacing the coolant”).
| rice. 1 |
4. Unscrew the four pairs of nuts securing the exhaust pipe to the exhaust manifold.
| 5. Remove the bolt securing the exhaust pipe to the bracket on the gearbox and move the exhaust pipe away from the exhaust manifold. | 6. Disconnect the wiring harness connectors from the mass air flow sensor. |
| 7. ...throttle position sensor... | 8. ...and the crankshaft position sensor. |
| 9. Loosen the clamp securing the air supply pipe, remove the pipe and move it to the side. | 10. Disconnect the end of the cable from the throttle drive sector. |
Page 2 of 2
13. Remove the cylinder head cover (see “Replacing the cylinder head cover gasket”).
14. Remove the upper chain hydraulic tensioner (see “UAZ Patriot hydraulic chain tensioner”).
15. Remove the camshafts (see “Removing, troubleshooting and installing camshafts”).
| 16. Disconnect the engine harness blocks from the injectors. | 17. Unscrew the front nut securing the receiver and remove the ground wires from the studs. |
| 18. Disconnect the wiring harness connector from the idle speed control. | 19. Unscrew the rear nut securing the receiver, remove the holder 2 of the fuel supply hose and the second “mass” wire 1 of the harness from the stud, and then move the wiring harness to the side. |
| 20. Loosen the hose clamps on the throttle assembly and disconnect the hoses. | 21. Unscrew the nuts of the fuel supply and drain lines and move the lines to the side. |
| 22. Unscrew the bolts securing the upper chain damper and remove the damper. | 23. Remove the oil level indicator (dipstick). 24. Unscrew the rightmost nut securing the exhaust manifold... |
| 25 ...and remove the coolant pipe holder from the stud. | Tightening sequence for cylinder head bolts |
26. Remove the cylinder head bolts in the reverse tightening sequence (tightening diagram), remove the cylinder head and remove the gasket.
27. Thoroughly clean the mating surfaces of the head and cylinder block from carbon deposits, remnants of the old gasket and sealant.
28. Lubricate the new gasket on both sides with a thin layer of graphite grease, and at the point of contact with the front cover of the unit with heat-resistant adhesive-sealant.
29. Place the gasket on the cylinder block, making sure that the block mounting sleeves fit into the corresponding holes in the gasket.
30. Install the cylinder head in the reverse order of removal.
Tighten the cylinder head bolts in the order shown in the figure.
Tighten the cylinder head mounting bolts in two stages:
Stage 1 – 40–60 Nm (4.0–6.0 kgf m);
Stage 2 – 130–145 Nm (13.0–14.5 kgf m).
The cylinder head gasket is replaced if it is damaged.
The main signs of damage to the head gasket:
– insufficient compression - below 1 MPa (10 kgf/cm2) in one or more cylinders;
– breakthrough of gases into the cooling system (seething, foaming of liquid in the radiator, rapid drop in the liquid level in the expansion tank in the absence of external leaks);
– coolant entering the lubrication system (emulsion on the oil level indicator, stratification of oil drained from the crankcase, especially noticeable in a transparent container);
– oil getting into the cooling system (oil film on the surface of the liquid in the expansion tank).
To replace the gasket, you need to remove the cylinder head with the receiver and exhaust manifold. If the cylinder head is removed from an engine installed on a vehicle, the coolant must first be drained (see “Replacing the coolant”).
You will need: keys “12”, “13”, “17”, hexagons “6”, “12”, a screwdriver.
1. Disconnect the wire from the negative terminal of the battery.
2. Drain the coolant from the cooling system (see “Replacing the coolant”).
12. ...remove the end of the cable braid from the bracket and move the cable to the side.
13. Remove the cylinder head cover (see “Replacing the cylinder head cover gasket”).
14. Remove the upper chain hydraulic tensioner (see “Removing and disassembling hydraulic chain tensioners”).
15. Remove the camshafts (see “Removing, troubleshooting and installing camshafts”).
| 20. Loosen the hose clamps on the throttle assembly and disconnect the hoses. | 21. Unscrew the nuts of the fuel supply and drain lines and move the lines to the side. rice. 5.7), remove the cylinder head and remove the gasket. 27. Thoroughly clean the mating surfaces of the head and cylinder block from carbon deposits, remnants of the old gasket and sealant. 28. Lubricate the new gasket on both sides with a thin layer of graphite grease, and at the point of contact with the front cover of the unit with heat-resistant adhesive-sealant. 29. Place the gasket on the cylinder block, making sure that the block mounting sleeves fit into the corresponding holes in the gasket. 30. Install the cylinder head in the reverse order of removal. Tighten the cylinder head bolts in the order shown in Fig. 5.7. Tighten the cylinder head mounting bolts in two stages: Stage 1 – 40–60 N m (4.0–6.0 kgf m); Stage 2 – 130–145 N m (13.0–14.5 kgf m). |