Error codes for VAZ 2110 and VAZ 2112 with interpretation
Domestic cars are extremely in demand among Russian car enthusiasts due to their low cost and good maintainability. The disadvantage of the model is the frequent errors of the VAZ 2110 associated with the control and operation of the main instruments of the car. As a result, there are many complaints about the vehicle electronics, but this is a kind of payment for the simplicity of the design. Some mechanisms and units “suffer” from insufficient reliability.
Diagnostics
There are two ways to diagnose the condition of car systems. Let's start with the first one, which does not involve the use of additional equipment.
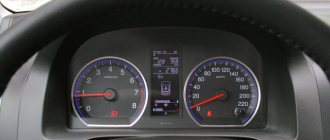
To start the self-diagnosis function, you need to press a button that resets the mileage for the day. Turn on the ignition. You will see how the arrows on the instruments begin to move from one position to another. This means that the diagnostics of the VAZ 2110 has been launched and information has begun to flow from the phase sensors to the ECU. After the process is completed, the RAM will transmit numbers to the display that will show the state of the car’s systems.
VAZ 2110 car
Decoding combinations
When the self-diagnosis is completed and the number 0 is displayed, this means that everything is in order with the vehicle and all systems are working as expected:
- if 1 is displayed, this indicates that there are problems with the microprocessor or the RAM is failing;
- 4 — high voltage in the network, more than 16 V;
- if 8, then low.
If there is not one fault, but several, then a figure equal to the sum of faults will be displayed. If 6 lights up, then this will mean the sum of the numbers 2 and 4. If 14, then most likely there are three malfunctions at once, namely 2, 4 and 8.
The simplest diagnostics that is available to the driver without the use of additional equipment. It will, of course, help identify some faults, as well as show the condition of the components and systems of the VAZ 2110 as a whole. But to specifically identify all faults and decipher information coming from phase sensors, additional tools are needed. For example, the on-board computer STATE, which provides more data.
Daily mileage reset button
Errors on the VAZ 2110 on-board computer: note to owners of “Ten”
VAZ 2110 error codes are presented numerically on the display, and they are transmitted from phase sensors to the on-board computer. This is convenient, but a novice driver will not understand much and will not be able to figure out how to use this equipment. But you need to know and be able to do this, since the system, thanks to the built-in self-diagnosis function, will help to identify a malfunction in the early stages, which means it is possible to eliminate it in a timely manner.
Diagnostics
There are two ways to diagnose the condition of car systems. Let's start with the first one, which does not involve the use of additional equipment.
To start the self-diagnosis function, you need to press a button that resets the mileage for the day. Turn on the ignition. You will see how the arrows on the instruments begin to move from one position to another. This means that the diagnostics of the VAZ 2110 has been launched and information has begun to flow from the phase sensors to the ECU. After the process is completed, the RAM will transmit numbers to the display that will show the state of the car’s systems.
VAZ 2110 car
Decoding combinations
When the self-diagnosis is completed and the number 0 is displayed, this means that everything is in order with the vehicle and all systems are working as expected:
If there is not one fault, but several, then a figure equal to the sum of faults will be displayed. If 6 lights up, then this will mean the sum of the numbers 2 and 4. If 14, then most likely there are three malfunctions at once, namely 2, 4 and 8.
The simplest diagnostics that is available to the driver without the use of additional equipment. It will, of course, help identify some faults, as well as show the condition of the components and systems of the VAZ 2110 as a whole. But to specifically identify all faults and decipher information coming from phase sensors, additional tools are needed. For example, the on-board computer STATE, which provides more data.
Daily mileage reset button
Diagnostics using additional tools
To diagnose cars, including the VAZ 2110, various equipment is used, which is connected to a special connector. Thanks to this equipment, which is not particularly complicated or expensive, you can get a complete picture of the condition of the car.
The service station uses a personal computer to which data from phase sensors is transmitted via a special cable.
Adapter for car diagnostics
Bluetooth devices have appeared on the market that allow diagnostics using a smartphone, tablet or laptop.
They work according to the scheme. The device is connected to the connector, the ignition is turned on and the diagnostic process begins. The data comes from phase sensors to the ECU. From it to a mobile device on which specialized software must first be installed.
This makes it possible not only to obtain more data, but also to present it in a more visual form. This method allows a driver, even with little experience in operating a car (in our case, a VAZ 2110), to obtain all the data about his car.
But most drivers prefer to carry out diagnostics at a service station. So that you are aware of the data that the on-board computer produces through RAM from the phase sensors, we will present the transcripts of common errors.
Decoding combinations
If problems arise with electrical equipment, they must be corrected immediately. Error code 1602 will indicate that not everything is in order in this matter.
Sometimes error 1602 can simply be reset and does not appear in the future. Socialists call such data “good.”
Error 1602 sometimes appears if:
- the battery was disconnected for some time;
- there was a voltage surge when starting the engine, for example, in cold weather.
But if error code 1602 appears all the time, you need to check the entire network. Perhaps there is a break. If error code 1602 constantly appears, you can try cleaning the battery terminals. Check if they are securely fastened. Didn't help, error 1602 still appears? Check the circuit. You need to start from the positive terminal of the battery. Start with the electrical fuse and fuse link.
Check the ground of the ECU, TPS. Sometimes it happens that the cause of error code 1602 is an alarm that can block the controller circuit and affect the readings of the phase sensors. In such a situation, you need to file a claim with the company that installed the alarm.
Error 0102 indicates a low signal level, which is reported from the mass air flow phase sensor.
Code 0102 will be stored in RAM memory in the following situations:
- low air consumption, which depends on the speed of rotation of the crankshaft;
- how open the throttle is;
- Several cycles have passed since the problem appeared.
If the error appears periodically, then you need to:
- check the condition of the air barrier;
- fastening the wiring block to the ECU;
- check IAC;
- clean the throttle pipe.
Another error that may occur is 0300. 0300 appears in cases where the RAM detects frequent misfires.
If error code 0300 is displayed constantly, then you need to check the following components:
- spark plug;
- nozzles;
- ignition system;
- increased or decreased compression levels may be the cause of code 0300;
- Also, code 0300 may appear in case of wiring failure.
You cannot ignore the appearance of error 0300. In the future, this may lead to deterioration in the performance of other nodes.
It is not difficult to master car diagnostics, in particular the VAZ 2110. It will extend the service life due to timely detection of faults detected by phase sensors.
Video “How to reset Check error”
How to diagnose the error?
There are two options for diagnosing a VAZ car - testing using the instrument panel and using a computer. The second option is considered more accurate, but its implementation will require a special program and a cable for connecting to the diagnostic connector.
Checking using a computer is done like this:
- The diagnostic wire is connected to the laptop. Its second end must be connected to the OBD2 connector in the Lada car. The location of this block differs depending on the car model; this nuance must be clarified in the service manual.
- A diagnostic program is launched on the computer, which allows you to decipher error codes. To start the test, press the corresponding button.
- The diagnostic process begins. Depending on the utility, the program can separately check the operation of the engine, transmission or electronics.
- After the test is completed, combinations of faults will appear on the computer screen that need to be deciphered. Depending on the program, a description of the error may also be displayed immediately.
Diagnostics using the dashboard is performed as follows:
- The car owner sits in the driver's seat and presses the daily mileage reset button on the odometer.
- The key is inserted into the lock and scrolled to the “ACC” position.
- The daily mileage reset button is released. The arrows on the speedometer, tachometer, and sensors will begin to quickly move from the minimum position to the maximum.
- The odometer key is pressed and released. An inscription with the software version will be displayed on the instrument cluster screen.
- After the third press of the odometer key, combinations of faults will appear on the screen.
Video: diagnosing a VAZ using the dashboard
The CarFance channel in its video showed in detail the process of testing a Lada car using a control combination.
On-board computer codes and their meaning
Now let's talk about common error codes that can be identified by diagnosing the on-board computer of your VAZ 2114. It should be borne in mind that we are talking about electronics, which can also sometimes work incorrectly. But, as practice shows, in the vast majority of cases, error codes on the on-board computer correspond to real problems on the car.
BC connection diagram
It takes an incredibly long time to study each error. Therefore, in this table we have collected the most common ones that VAZ 2114 owners encounter regularly.
| Codes | Description of the problem |
| 0102, 0103 | Incorrect signal level of the mass air flow sensor. |
| 0112, 0113 | Incorrect signal from the intake air temperature sensor. It needs to be replaced |
| 0115 – 0118 | Incorrect coolant temperature sensor signal. It needs to be replaced |
| 0122, 0123 | Interference or incorrect signal from the throttle position sensor. It is recommended to replace the sensor |
| 0130, 0131 | Oxygen sensor not working |
| 0135 – 0138 | The oxygen sensor heating device does not work. Replacement required |
| 0030 | Failures in operation or a break in the control circuit of the oxygen sensor heater to the converter were detected. |
| 0201 – 0204 | An open circuit was detected in the injector control circuit. |
| 0300 | Random or persistent misfire detected. The car may not start immediately |
| 0301 – 0304 | Misfire detected in engine cylinders |
| 0325 | There was a malfunction in the detonation device circuit |
| 0327, 0328 | The knock sensor has failed. It needs to be replaced |
| 0335, 0336 | A malfunction of the crankshaft position sensor has been detected. The device needs to be replaced |
| 0342, 0343 | The phase sensor has failed. Device needs replacement |
| 0422 | The neutralizer is faulty |
| 0443 – 0445 | The canister purge valve does not work. Device replacement required |
| 0480 | The cooling fan is not working. Device replacement required |
| 0500, 0501 , 0503, 0504 | The speed sensor has failed. The device needs to be replaced |
| 0505 – 0507 | The idle air control malfunctions, which affects the number of revolutions (lower or higher). Detection of such an error indicates the need to replace the regulator. |
| 0560, 0562, 0563 | There are failures in the supply of mains voltage. A more thorough diagnosis is needed that will identify the exact areas in the circuit that need to be replaced. |
| 0607 | The detonation channel does not work |
| 1115 | Oxygen sensor heating circuit is intermittent |
| 1135 | An open circuit was noticed in the heating circuit of the oxygen sensor; a short circuit may have occurred. The sensor must be replaced |
| 1171, 1172 | Potentiometer gas level is not correct |
| 1500 | An open circuit was detected in the control circuit of the fuel pump device |
| 1509 | The electrical control circuit for the idle control element is overloaded. |
| 1513, 1514 | The on-board computer detected an open circuit in the idle speed device. |
| 1541 | There is an open circuit in the fuel pump relay control circuit |
| 1570 | Traction control system has an open circuit |
| 1600 | Traction control data is not sent to the on-board computer |
| 1602 | It is one of the most common codes when diagnosing fault codes. Indicates a loss of on-board power supply voltage on the electronic control unit |
| 1606, 1616, 1617 | A breakdown of the uneven road surface detection sensor has been detected. |
| 1612 | Electronic control unit reset fault detected |
| 1620 | Problems with the persistent storage device |
| 1621 | Failure of the random access memory device. |
| 1689 | If this combination of numbers appears during diagnostics, the on-board computer may show incorrect error codes. |
| 0337, 0338 | Errors in the functioning of the crankshaft position control element or an open circuit. |
| 0481 | The second fan of the cooling system has broken. The device requires replacement |
| 0615 – 0617 | Open or short circuit detected in starter relay circuit |
| 1141 | The heating device for the first oxygen sensor after the neutralizer has failed |
| 230 | The fuel pump relay is faulty and cannot be repaired. The device needs to be replaced soon |
| 263, 266, 269, 272 | These codes indicate a breakdown of the driver of the first, second, third or fourth injectors - the elements need to be replaced. |
| 640 | This combination indicates an open circuit in the CheckEngine lamp circuit. |
ECU diagnostics
In modern times, many methods have become available for conducting self-diagnosis or diagnosing a power plant malfunction with your own hands. Without any problems, you can purchase various diagnostic equipment, and you don’t have to go to a car service center. So, you can connect to the ECU using a standard OBD II cable and a tablet, or purchase an ELM 327.
Also, some errors can be diagnosed using the instrument cluster. First you need to enable test mode:
- The ignition is turned off. Battery included.
- Press the “Reset” control button and, holding it pressed, turn on the ignition. All positions of the familiar areas (segments) should light up on the LCD – LCD control.
- Press any of the control buttons. The LCD should display the program version (Ver 1.0).
- Press any of the control buttons. The following error codes (if any) should be displayed on the positions of the first and second lines of the LCD.
- Press the “Reset” control button and hold it for no more than 3 seconds. (maybe a typo, I need more than 3c). Error codes should clear to zero.
- Press any of the control buttons. All positions of symbols (segments) should light up on the LCD – LCD control.
Error codes: 2-overvoltage of on-board network;
3-fuel level sensor error (if a break in the sensor circuit is detected within 20s);
4-error of the coolant temperature sensor (if an open circuit of the sensor is detected within 20s);
5-outside temperature sensor error (if there are no sensor readings within 20s, indication on the LCD is “-C”);
6-engine overheating (the criterion for triggering the acoustic alarm is met);
7-emergency oil pressure (the criterion for triggering the acoustic alarm is met);
8-defect of the brake system (the criterion for triggering the acoustic alarm is met);
The 9-battery is discharged (the criterion for triggering the acoustic alarm has been met);
E-determination of an error in a data packet stored in EEPROM.
SELF-DIAGNOSTICS OF THE KALINA/PRIORA INSTRUMENT COMBINATION
- With the ignition off, press the “Reset” button (reset daily mileage). While holding the button, turn on the ignition.
- The instrument panel will go into self-diagnosis mode, all segment positions will light up on the display, all indicators will light up, and the arrows will travel the full path.
- Using the control button on the right steering column switch, we switch between modes (self-diagnosis, firmware version, error codes).
- To reset errors, you need to be in error mode and press and hold the “Reset” button for more than 3s.
- The diagnostic mode exits automatically after inactivity for 20-30 seconds.
Decoding error codes in the dashboard:
- 2-increased voltage of the on-board network;
- 3-fuel level sensor error (if a break in the sensor circuit is detected within 20s);
- 4-error of the coolant temperature sensor (if an open circuit of the sensor is detected within 20s);
- 5-outside temperature sensor error (if there are no sensor readings within 20s, indication on the LCD is “-C”);
- 6-engine overheating (the criterion for triggering the acoustic alarm has been met);
- 7-emergency oil pressure (the criterion for triggering the acoustic alarm is met);
- 8-defect of the brake system (the criterion for triggering the acoustic alarm is met);
- The 9-battery is discharged (the criterion for triggering the acoustic alarm is met);
- E-determination of an error in a data packet stored in EEPROM.
Possible mistakes
VAZ 2110 injector error
Errors can relate to various parts of the car:
- Sensors. Temperature sensors are most often affected.
- Injectors (see VAZ 2110 injectors and their cleaning). Mostly, problems are observed due to an open circuit, as a result of which the injectors cannot light up in time.
- Engine. Engine problems usually appear after driving a car for a long time. The most common mistake is overheating.
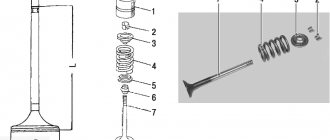
- Valves.
- Fans. If they do not work with all their strength, the machine overheats. Therefore, errors of incorrect fan operation lead to errors with engine overheating.
- Relay.
- Controller.
Decoding codes
Let's look at the most common VAZ 2110 injector error codes that the system produces:
- P0101. In this case, there is a problem with the air sensor. When such a code appears on the on-board computer screen, you should check whether the sensor is really damaged.
Note: during the test, air must not be consumed more than the permissible norm.
- P0113. This means that the intake air temperature sensor is faulty. It is important to check whether the temperature exceeds the norm.
- P0116. If this code appears on the ECU screen, then there is a problem with the antifreeze temperature control sensor. First of all, you need to check whether the sensor is actually working poorly, and only after that take the car to a car service center.
Note: if the temperature is below the required value, then this defect must be eliminated urgently, otherwise it can lead to harmful consequences.
- P2135. In this case, the error indicates an incorrect throttle position. The signal between the sensors may have weakened, so they cannot correctly indicate its location. If after diagnostics it is discovered that the voltage of one sensor is higher by a threshold compared to the other, then repair cannot be avoided.
- P2122. One of the accelerator pedal sensors shows too low values. At the same time, it also exhibits extremely low voltage. You need to check the voltage in the sensor using a voltmeter. If necessary, replace the faulty sensor.
- P0201. In this case, there may be a break in the injector control circuit. It is necessary to diagnose the drivers, as it is possible that the error is generated due to them.
- P0130. It is necessary to check whether the signal circuit is intact.
Note: some action must be taken if the voltage in the circuit is lower or higher than normal.
- P0133. If for some reason the signal lasts longer than necessary, the on-board computer will display this exact error. The cause of this malfunction is the response from the alarm system is too slow.
- P0030. You need to check if there is an open circuit in the heater circuit. If necessary, perform driver diagnostics.
- P0171. Perhaps the heating mixture has become too lean. Therefore, the driver must check whether its contents are too lean. If the heat transfer is higher than normal, then this needs to be corrected and the defects eliminated.
- P0172. It is necessary to check the leanness of the mixture.
- P0217. The engine has overheated. It is necessary to monitor the increase in temperature in it.
Note: if the temperature here is above the threshold value, then repairs are urgently needed, otherwise the engine may soon boil right on the road.
- P0300. When ignited, toxic gases may be released. In fact, they are always emitted, but they are successfully removed through the exhaust pipe. Moreover, if for some reason there are gaps in the system, then toxic substances can get directly into the car’s interior.
- P0326. The knock sensor may not always work. You should check whether its signal level is too low. If necessary, regulate and normalize this level.
- P0335. The crankshaft position sensor is faulty. You need to check if there is a signal coming from the sensor. If the signal is low, the air flow should be changed if it is above the maximum value.
- P0340. The camshaft position sensor is faulty. You should check if there is a signal.
Note: Problems generally occur when the sensor signal does not change while the engine is running.
- Z0351. There may be a break in the circuit. In the primary circuit, the current does not reach the optimal level.
VAZ 2110: injector errors and code decoding
Injection engine VAZ 2110
In a VAZ 2110 car, injector errors that are issued through the on-board computer can be deciphered using special tables. As a rule, the ECU produces errors in the form of codes consisting of the letter P and four numbers. You can solve problems in various ways, but first you need to find out what kind of problems are observed in the car. You can recognize injector errors on a VAZ 2110 yourself if you know the decoding.
Possible mistakes
VAZ 2110 injector error
Errors can relate to various parts of the car:
- Sensors. Temperature sensors are most often affected.
- Injectors (see VAZ 2110 injectors and their cleaning). Mostly, problems are observed due to an open circuit, as a result of which the injectors cannot light up in time.
- Engine. Engine problems usually appear after driving a car for a long time. The most common mistake is overheating.
- Valves.
- Fans. If they do not work with all their strength, the machine overheats. Therefore, errors of incorrect fan operation lead to errors with engine overheating.
- Relay.
- Controller.
Decoding codes
Let's look at the most common VAZ 2110 injector error codes that the system produces:
- P0101. In this case, there is a problem with the air sensor. When such a code appears on the on-board computer screen, you should check whether the sensor is really damaged.
Note: during the test, air must not be consumed more than the permissible norm.
- P0113. This means that the intake air temperature sensor is faulty. It is important to check whether the temperature exceeds the norm.
- P0116. If this code appears on the ECU screen, then there is a problem with the antifreeze temperature control sensor. First of all, you need to check whether the sensor is actually working poorly, and only after that take the car to a car service center.
Note: if the temperature is below the required value, then this defect must be eliminated urgently, otherwise it can lead to harmful consequences.
- P2135. In this case, the error indicates an incorrect throttle position. The signal between the sensors may have weakened, so they cannot correctly indicate its location. If after diagnostics it is discovered that the voltage of one sensor is higher by a threshold compared to the other, then repair cannot be avoided.
- P2122. One of the accelerator pedal sensors shows too low values. At the same time, it also exhibits extremely low voltage. You need to check the voltage in the sensor using a voltmeter. If necessary, replace the faulty sensor.
- P0201. In this case, there may be a break in the injector control circuit. It is necessary to diagnose the drivers, as it is possible that the error is generated due to them.
- P0130. It is necessary to check whether the signal circuit is intact.
Note: some action must be taken if the voltage in the circuit is lower or higher than normal.
- P0133. If for some reason the signal lasts longer than necessary, the on-board computer will display this exact error. The cause of this malfunction is the response from the alarm system is too slow.
- P0030. You need to check if there is an open circuit in the heater circuit. If necessary, perform driver diagnostics.
- P0171. Perhaps the heating mixture has become too lean. Therefore, the driver must check whether its contents are too lean. If the heat transfer is higher than normal, then this needs to be corrected and the defects eliminated.
- P0172. It is necessary to check the leanness of the mixture.
- P0217. The engine has overheated. It is necessary to monitor the increase in temperature in it.
Note: if the temperature here is above the threshold value, then repairs are urgently needed, otherwise the engine may soon boil right on the road.
- P0300. When ignited, toxic gases may be released. In fact, they are always emitted, but they are successfully removed through the exhaust pipe. Moreover, if for some reason there are gaps in the system, then toxic substances can get directly into the car’s interior.
- P0326. The knock sensor may not always work. You should check whether its signal level is too low. If necessary, regulate and normalize this level.
- P0335. The crankshaft position sensor is faulty. You need to check if there is a signal coming from the sensor. If the signal is low, the air flow should be changed if it is above the maximum value.
- P0340. The camshaft position sensor is faulty. You should check if there is a signal.
Note: Problems generally occur when the sensor signal does not change while the engine is running.
- Z0351. There may be a break in the circuit. In the primary circuit, the current does not reach the optimal level.
Video about self-diagnosis through the tidy (instrument panel) on a VAZ-2112
It is recommended to carry out diagnostics and flashing of the ECU with the on-board PC removed.
Now let's decipher the codes of all ECU error codes that can pop up when connecting the car's on-board computer to a laptop or tablet PC: 0102 - Low signal level of the mass air flow sensor 0103 - High signal level of the mass air flow sensor 0112 - Low level of the intake air temperature sensor 0113 - High Intake air temperature sensor level 0115 - Incorrect coolant temperature sensor signal 0116 - Incorrect coolant temperature sensor signal
Electrical equipment and error codes VAZ 2110 2111 2112
| Location of relays and fuses in the mounting block K1 - lamp health monitoring relay; K2 - windshield wiper relay; KZ - relay-interrupter for direction indicators and hazard warning lights; K4 - relay for low beam headlights; K5 - headlight high beam relay; KB - additional relay; K7 — relay for turning on the heated rear window; K8 - backup relay; F1 - F20 - fuses. |
To view error codes for VAZ 2110 2111 2112, scroll down the page.
The electrical equipment is made according to a single-wire circuit: the negative terminals of sources and consumers of electricity are connected to the “ground” - the body and main components of the car, which serve as the second wire. The on-board network is DC, with a rated voltage of 12 V. When the engine is not running, all consumers are powered by the battery, and after the engine is started, by an alternator with a built-in rectifier and voltage regulator. When the generator is running, the battery is charged.
Most electrical circuits are protected by fuses. Electric motors of gear motors - wipers of the windshield, rear window (VAZ-2111, -2112), headlights (if installed) - are protected by automatic reusable bimetallic fuses.
The power supply circuit of the fuel injection system (VAZ-2111, -2112 engines) is protected by a fuse-link made of a wire with a conductor of reduced cross-section (1 mm2}. The battery charging, ignition (VAZ-2110 engine), engine starting, and generator-switch circuits are not protected ignition - mounting block."
Powerful consumers (headlights, cooling system fan motor, electric fuel pump, etc.) are connected via a relay.
Most fuses and relays are located in the mounting block located in the vehicle interior to the left and above the pedal assembly. The rated current of the fuses and the circuits they protect are indicated in the table. If the mounting block fails, it is possible to replace the printed circuit board or solder wires to replace the burned-out current-carrying tracks.
To switch the main circuits of the car, a combined ignition switch (lock) is used, consisting of a contact part and a mechanical anti-theft device.
On vehicles with the 2111 and 2112 engines, there is a fuel injection harness that replaces the 2110 engine's ignition harness (see 2111 and 2112 Engine Management System). The injection system relays and fuses are located near the controller, under the instrument panel console on the right.
| Connection diagram of the mounting block (the outer number in the designation of the wire tip is the block number, and the inner number is the conventional number of the plug) K1 - short circuit - relay (see above). |
The order of conventional numbering of plugs in the connecting blocks of the mounting block and the wires connected to them.
ACCUMULATOR BATTERY
Cars are equipped with a 6ST-55A lead starter battery or its imported analogues. The battery case is made of translucent plastic with marks of the maximum and minimum electrolyte levels permissible for operation. The battery is low maintenance, i.e.
is equipped with a device for collecting evaporating water, however, during prolonged use, especially in hot climates, the electrolyte level may decrease. If there have been no cases of electrolyte splashing out, only distilled water should be added.
When working with a battery, strictly follow the safety regulations (see “Safety precautions”).
Error codes VAZ 2110, VAZ 2111, VAZ 2112
| Code | Malfunction |
| 12 | Indicator lamp diagnostic circuit fault |
| 14 | High signal level of the coolant temperature sensor |
| 15 | Coolant temperature sensor signal low |
| 16 | Increased voltage of the on-board network |
| 17 | Reduced voltage on-board network |
| 19 | Incorrect crankshaft position sensor signal |
| 21 | Throttle position sensor signal voltage too high |
| 22 | Insufficient throttle position sensor signal voltage |
| 24 | There is no signal from the vehicle speed sensor |
| 27 | High signal level of the CO potentiometer |
| 28 | Low signal level of the CO potentiometer |
| 33 | Incorrect signal from the mass air flow sensor (high frequency signal at the sensor output) |
| 34 | Incorrect signal from the mass air flow sensor (low signal frequency at the sensor output) |
| 35 | Idle speed deviation |
| 43 | Invalid knock sensor signal |
| 51 | Programmable read only memory (PROM) error |
| 52 | Controller error (RAM error) |
| 53 | Electrically programmable memory (EPROM) error |
| 80 | Communication error with immobilizer |
Circuits protected by fuses.
Fuse No. Circuits protected (rated current)
- F1 (5 A)
License plate lamps.Instrument lighting lamps.
Side light indicator lamp.
Trunk light.
Left side marker lamp.
- F2 (7.5 A)
Left headlight (low beam). - FZ (10 A)
Left headlight (high beam). - F4 (10 A)
Right fog lamp. - F5 (30 A)
Electric door window motors. - F6 (15 A)
Portable lamp. - F7 (20 A)
Engine cooling fan electric motor.Sound signal.
- F8 (20 A)
Rear window heating element. - F9 (20 A)
Recirculation valve.Cleaners and washers for the rear windshield and headlights.
Coil of the rear window heating relay.
- F10 (20 A)
Reserved. - F11 (5 A)
Right side side light lamps. - F12 (7.5 A)
Right headlight (low beam). - F13 (10 A)
Right headlight (high beam).Indicator lamp for turning on the high beam headlights.
- F14 (10 A)
Left fog lamp. - F15 (20A)
Electrically heated seats.Locking the trunk lock.
- F16 (10 A)
Relay-breaker for direction indicators and hazard warning lights (in hazard warning mode).Hazard warning lamp.
- F17 (7.5 A)
Interior lighting lamp.Individual backlight lamp.
Ignition switch illumination lamp.
Brake light bulbs.
Clock or trip computer.
- F18 (25 A)
Glove box lighting lamp.Heater controller.
Cigarette lighter.
- F19 (10 A)
Locking door locks.Relay for monitoring the health of brake light lamps and side lights.
Direction indicators with warning lamps.
Reversing lamps.
Generator excitation winding.
On-board control system display unit.
Instrument cluster.
Clock (or trip computer).
- F20 (7.5 A) Rear fog lamps.
Attention! When repairing the electrical system, disconnect the terminal » — » of the battery (with the engine off). Before installing a new fuse to replace the blown one, find out and eliminate the cause of the burnout.
Do not use oversized fuses or homemade fuses - this can lead to burnt out traces of the printed circuit board, and possibly a fire.
Due to the risk of short circuits, do not pry open fuses with metal tools (screwdrivers) unless the corresponding circuits are de-energized.
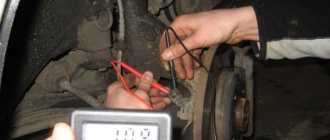
Replacing the DPRV
If there is no wire break, and the power supply is not in place, then most likely the problem is in the DPRV itself. It needs to be changed. To work, you will need a 10 mm socket wrench (head). The sensor is located in a visible place, on the right side of the head. Attached with only 2 bolts. But despite the close and convenient location, getting to the distant bolt is very inconvenient. There have been cases in practice when owners removed the intake manifold and the ramp with injectors. Other owners simply broke the sensor housing and then removed the bolt. In general, the process of replacing the DPRV looks like this:
- Disconnect the negative terminal from the battery.
- Disconnect the DPRV plug.
- Unscrew the 2 sensor mounting bolts.
- Install a new DPRV.
- Connect the power plug.
- Place the negative terminal on the battery.
There is no need to start the car right away. First, turn the ignition on and off 2-3 times. Let the ECU see the working sensor. Then you can start the car and check the quality of the engine. If the Check Engine icon is still on, you need to connect the controller and erase error P0340.