Features of work
The crankshaft position sensor of the VAZ 2110 operates on the inductive principle. The crankshaft pulley is a gear with 58 total teeth. The place of two teeth on the control disk is occupied by a recess, which makes it possible to synchronize the rotation of the crankshaft with the control point of the piston stroke of the first cylinder of the internal combustion engine. As the pulley rotates, the sensor reads the passage of the teeth and at the point where the notch passes, the controller transmits a signal to the ECU.
The ECU, receiving numbers about the location of the crankshaft, issues a signal regarding the order of fuel supply to each cylinder and the formation of a spark.
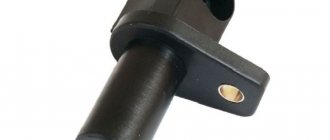
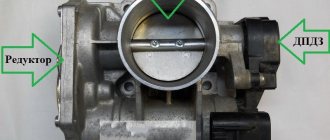
The crankshaft sensor is installed on a VAZ 2110, with a motor of 8 and 16 valves, on the cover of the oil supply pump near the crankshaft drive disc. Structurally, tracking devices have different layouts, but the principle of operation of the element is based on the design of the Hall element, which reacts to the passage of a permanent magnet.
Signs of breakdown
Any malfunction of the VAZ 2110 crankshaft sensor will cause the engine to be unable to start after a long period of parking. If the controller starts to malfunction while operating the car, in 90% of cases the engine will stall, since the ECU will not generate a signal to the ignition system, and the internal combustion engine safety function will work. Signs of a sensor malfunction when the unit begins to break down:
- Check Engine is activated on the dashboard;
- engine speed becomes unstable, traction decreases by 50%;
- The VAZ 2110 crankshaft sensor must be urgently changed if the following sign of a malfunction appears: when the speed increases, a hum is felt in the engine area and knocking;
- An injection engine is characterized by the appearance of popping noises in the exhaust tract area.
When the VAZ 2110 dpkv is completely faulty, the engine stalls because the computer does not send signals to form a spark.
These symptoms do not always indicate that a complete replacement of the VAZ 2110 crankshaft sensor is necessary, since all faults of the element are conditionally divided into four groups:
- surface clogging;
- damage to the winding of the device and violation of its integrity;
- manufacturing defects;
- open circuit or short circuit in the circuit.
Checking the sensor begins with cleaning the part. The cleanliness of the contacts, their security, the cleanliness of the connector are checked, and oil stains are eliminated. The design of the sensor is quite simple, but 20 percent of device failures are factory defects. The wiring break is repaired after ringing the circuit. The VAZ 2110 crankshaft sensor is not repaired, since the cost of the consumable does not exceed 100 rubles; the unit is replaced with a similar one after a short diagnosis.
How to repair DPKV?
Unfortunately, DPKV cannot be repaired, BUT! Most often, the fault occurs not in the sensor itself, but in the sensor circuit. In other words, if the DPKV is broken, then it needs to be replaced with a new one, but before replacing it, you need to check the wiring suitable for the sensor.
If the sensor is faulty, the on-board computer or diagnostics generates the following errors:
- Error 0335 - incorrect DPKV signal.
- Error 0336 - Crankshaft position sensor signal error.
- Most often, wires break in the connector area. Moreover, the insulation remains unharmed, so it will not be possible to determine a wire break by eye. In this case, we do the following: remove the wiring block from the sensor, and try to pull out the wires one by one, applying a little force. If a break occurs, you will tear the insulation and pull out a piece of the broken wire.
- DMRV malfunction. Yes, Yes, That's it! If the mass air flow sensor is faulty, error (0335) of the crankshaft position sensor appears when the ignition is turned on. The fact is that when we turn the ignition key, the DPKV diagnostic process starts using the air flow signal.
- Also, error 0335 can occur as a result of pulse noise created by the generator wiring.
- The damper rubber on the pulley, or the pulley itself, has worn out. In this case, the pulley will rotate in a figure eight.
- The teeth on the pulley have broken, so the sensor receives an impulse that is incompatible with engine operation.
- Malfunction of the sensor itself - check the DPKV (How to check and replace the DPKV?).
Today we will talk about the engine crankshaft position sensor, where it is located, signs of its malfunctions, ways to check it on various cars using instruments.
Controller diagnostics
Diagnostics of the crankshaft position sensor is carried out on the dismantled controller. It is recommended to set a timing mark on the crankcase before removing it so that when installing a new element, the correct gap between the tracking device and the timing disk will be maintained. The permissible gap is 0.6–1.5 mm.
We remove the element with a 10mm wrench and carry out a visual inspection. Before checking the crankshaft sensor, the battery is disconnected and the contact points are checked. During a visual inspection, the integrity of the housing, wires, connectors, and the absence of cracks and dents on the housing are checked. If there are no signs of mechanical damage, the DPKV is checked with a multimeter.
Testing of the node can be carried out both by resistance and voltage parameters. Testing for resistance is much simpler, so it is used in most diagnostic options.
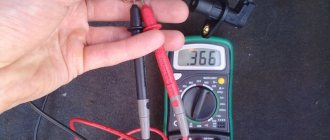
The resistance on the working controller winding should be in the range of 550–750 Ohms. Measurements are taken on two contacts of the part. For a 16-valve injector engine, a resistance deviation of 5% is considered acceptable.
Drivers rarely use the second testing option, although diagnostics with a voltmeter are considered more reliable. To check, you will need a transformer and an inductance meter, for example, the MY-6243 multimeter model is often used to measure capacitance and inductance. Checking step by step.
- Calculate the inductance dpkv. The working element at a voltage of at least 500 mV will show an inductance in the range of 200–4000 iH.
- Check the resistance; a working sensor shows a parameter of 20 mOhm.
How to check the VAZ-2114 DPKV for serviceability
To check the crankshaft position sensor, it must be removed and inspected for mechanical damage. If dirt is found on the sensor, the part should be thoroughly cleaned.
You can check the DPKV using an ohmmeter. A working sensor has a coil resistance of 550-750 Ohms. A multimeter is used to check the inductance of the winding, but you cannot be sure that the DPKV is working properly, even if all the readings coincide with the permissible parameters. In this case, the state of the magnetic core is not taken into account in any way, so an oscilloscope is best suited for diagnostics.
You can check the DPKV in any way, but it would be more logical to simply replace it immediately with a new one. If the cause is not in the sensor, you need to look further for the cause of the malfunction. The old DPKV can be put into storage; it will come in handy. The crankshaft sensor on a VAZ is quite inexpensive, so is it worth the hassle of measuring resistance and inductance? The price of DPKV ranges from 250-350 rubles, and on the road a spare sensor can be very helpful.
0 0 vote
Article rating
Replacement
If signs of a malfunction of the DPKV are associated with damage to the device, it is replaced without repair. The controllers are located in an inconvenient place; they are attached to the oil pump cover with a single bolt. How to remove an element step by step.
- The ignition is turned off, the negative terminal of the battery is removed.
- The oil pump where the sensor is located is determined, and the connector is removed. There is an 80 cm wire from the controller to the block; you can determine the location of the connector by the wire.
- Use a 10mm wrench to unscrew the only screw.
- The device is removed.
VAZ 2110 how to check the crankshaft position sensor
It is no secret that the engine control of the “tenth” model of the domestic automaker AvtoVAZ is carried out through the operation of a computer. Various sensors take data and send it to the main computer, which distributes the operation of the systems.
It is noteworthy that only this element is capable of keeping the engine running if the regulator fails. The task of this sensor is to synchronize the ignition system and the fuel supply system.
If the device breaks down, synchronization is disrupted. Consequently, the entire system malfunctions. There is no spark, no fuel is supplied. The engine may behave strangely for a while, but then it will still stall.
How to check the performance of the crankshaft sensor
Before replacing an electromagnetic sensor, it would be wise to check its functionality - a fairly popular reason is rotten wiring supplying current from the part itself. To check the serviceability of the crankshaft sensor, you need to dismantle the element, and then check the part with an ohmmeter.
It is necessary to measure the resistance of the sensor on its conductive winding by connecting an ohmmeter. According to the manufacturer's standards, the resistance of a functional sensor is between 550 and 750 Ohms. If the indicator deviations differ greatly from the factory parameters, then it is advisable to replace the indicator with a properly functioning element.
It is important to know! To be fair, it would not be out of place to note the high service life of this element. The crankshaft position sensor on the VAZ 2110 lasts quite a long time and fails as a result of the accumulation of dirt or small abrasive elements that interfere with stable current transmission.
In most cases, to restore the functionality of this element, it is enough to disassemble the sensor, clean the electromagnetic mechanism and clean the contact terminals from traces of corrosion.
How does he work
Let's figure out how this element works. The regulator reads data on the crankshaft speed and also reports its current position using magnetic pulses.
Since the engines installed on the VAZ 2110 differ from each other, different PCV sensors are used. Therefore, when replacing, be sure to choose a similar device, since a regulator with other characteristics simply will not work, so the system will still not work even if you have a high-quality, serviceable sensor.
Device and classification
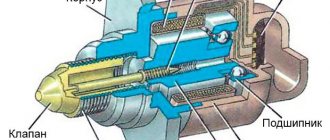
Despite the fact that the VAZ crankshaft sensor may have a different design, its operating principle is based on a single electromagnetic effect. That is, the signal is generated without direct contact with the crankshaft.
The most common type of DPKV is induction. Such a part consists of two main elements - a magnetized rod and a special winding. Induction sensors read information from the crankshaft toothed pulley. When a metal tooth passes near the DPKV, an EMF is formed in the latter, which is captured by the electronics. On the VAZ-2110, the crankshaft sensor is installed of the induction type.
DPKV can also be based on the Hall effect. Such a sensor is constructed in approximately the same way as an induction sensor, however, when a metal shaft passes near it in the winding of the device, the resistance changes. Structurally, it consists of a permanent magnet.
It should be noted that both the first and second types of sensors are used to read data from the crankshaft pulley. It can be toothed or all-metal. In the latter version, there is a special recess that passes by the sensor and generates a signal that is sent to the vehicle’s electronic engine control unit.
Symptoms of a problem
If you have a multimeter and a regular screwdriver at your disposal, you can independently check the operation of the device without any problems.
Signs of a faulty crankshaft sensor include:
- A warning light comes on on the dashboard, recommending that you check the engine;
- When idling, the engine behaves unstable;
- Thrust drops;
- Engine speed drops and rises;
- Detonation occurs, that is, shots from the intake or exhaust manifold;
- The engine cannot be started.
Article on the topic: The procedure for connecting high-voltage wires on a VAZ 2109 (carburetor, injector)
Crankshaft sensor "VAZ-2110": malfunctions and signs of breakdowns
Can this part break? Typically, on a VAZ-2110, the crankshaft sensor rarely fails. However, if it malfunctions (or the generator pulley does not work correctly), the red “CHECK ENGINE” lamp lights up on the instrument panel, which literally translates as “check engine.” In this case, code 19 or 35 appears in the controller error memory.
Of course, the most severe case when the crankshaft sensor fails is the inability to start the engine normally. In this case, we can say that DPKV does not work at all. The solution to this problem can only be its complete replacement.
Very often the crankshaft position sensor fails gradually. At the same time, the driver feels a significant drop in engine power, “dips” and even detonation begin at high speeds. Also, a symptom of malfunctions of such a device can be floating (unstable) engine speed at idle. On the VAZ-2110, the crankshaft injector sensor sometimes causes increased fuel consumption. Although it is possible that the problem is hidden in a weak connection or broken wires, in any case this part must be checked.
Examination
Before you can check it, you first need to get to it. And the device is located in a not very convenient place on the engine. So be prepared to spend some time on this.
In general, the sensor we are looking for is located on the oil pump cover. You need to look for it directly near the generator pulley.
Now to the question of how to check it. Let's look at the two most common situations, but first, let's remove the element.
- The sensor is removed with a 10 mm wrench;
- Be sure to make special marks on the crankcase and sensor before removing. This will allow you to return it to its original place, or install a new regulator in the correct position;
- If there is no external, visible damage to the crankshaft sensor, then you need to use a multimeter;
- Don't forget to measure the distance between the sensor and the timing disk. In the normal position, the gap ranges from 0.6 to 1.5 millimeters.
First way to check
In this case, you will need an ohmmeter with which you will replace the resistance on the winding. According to the manufacturer's standards, the indicator ranges from 550 to 750 Ohms.
It's okay if your numbers are slightly different from the norm. If the deviations are serious, you will definitely have to replace the sensor.
It should be noted in fairness that the crankshaft position sensor on VAZ 2110 models rarely breaks down. Among the main reasons for its failure to function normally is the accumulation of dirt, mechanical damage, as well as banal factory defects.
Second method
Here you will need a voltmeter, a transformer and an inductance meter. It is advisable to measure resistance under compact temperature conditions.
Article on the topic: Cigarette lighter fuse on VAZ 2109
Once the ohmmeter readings are obtained, arm yourself with an inductance measuring device. Normally, the device should show from 200 to 4000 units (millihenry).
A megger measures the resistance when the crankshaft position sensor winding is powered at 500 volts. Under normal conditions, the readings will be no more than 20 MΩ.
What is the gap on the VAZ crankshaft sensor
The ECU installed on injection cars, controlling sensors and actuators, for correct and efficient operation must know exactly what position the engine crankshaft is in at every moment of time - in other words, have clear synchronization between the digital and the hardware.
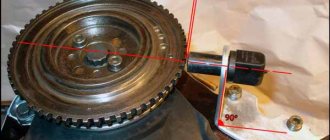
This is necessary, first of all, for calculating and timely supplying the injection pulse to the injectors and the explosive discharge to the spark plugs. The power, durability and efficiency of the engine depend on the timeliness of these events, so the need for the control unit to accurately determine the crankshaft position at any time is beyond doubt. Synchronization is carried out using a crankshaft sensor (CPS) and a toothed drive disk mounted on the crankshaft in a certain position. There are 60 teeth placed on the circumference of the disk, each tooth accounts for (360:60) = 6 degrees of crankshaft rotation angle. But there are deliberately no two teeth in a row in one place; their absence creates a gap. Total 58. The master disk is installed in such a way that after skipping two teeth by the DPKV core, as the crankshaft rotates, 114 degrees remain before TDC. Each tooth is 6 degrees. Total 114_6=19 whole teeth. In other words, when the crankshaft is in the TDC position of the first cylinder on the compression stroke, when all the marks (on the flywheel, camshafts) are combined, the crankshaft sensor should look at the beginning of the twentieth tooth after the skip, as the disk rotates. 7.jpg (30.92K) Number of downloads:: 926 Unfortunately, in practice this is not always the case. It happens that the key on the crankshaft gear is cut off, 5.jpg (32.12K) Number of downloads:: 871 Most often, not even the one that the arrow points to, but on the gear itself there is a cylindrical protrusion, which determines the position of the disk on the crankshaft gear. It happens that the thread in the CV itself is not completely cut, or is clogged at the end, and the fastening bolt does not press the disk with the required force to the crankshaft gear; sometimes the rubber damper of the pulley itself rotates, and the ring gear rotates relative to the CV. There is only one result: If the master disk moves at least 1 tooth relative to the HF, the ignition timing shifts by 6 degrees in all operating modes and the injection phase with all that it implies. If you look at the drive disk from the side of the head of the fastening bolt, and set the marks, the teeth will skip (if on a clock dial) by about 10 minutes. (Rotate the disk clockwise) 6.jpg (33.78K) Number of downloads:: 727Roughly speaking, at this moment he looks at the inspector under the hood. We check the accuracy of the marks and count the teeth from the skip around the circle counterclockwise. The crankshaft sensor core should look at the beginning of the 20th tooth. If so, the check is over.
1 – battery; 2 – ignition switch; 3 – ignition relay; 4 – spark plugs; 5 – ignition module; 6 – controller; 7 – crankshaft position sensor; 7 – crankshaft position sensor; 8 – master disk; A – matching devices
Operating range The resistance of the DPKV in an injection engine should be between 550-750 Ohms.
The crankshaft position sensor plays an important role in engine stability. Perhaps this is the only sensor in the electrical engine control circuit, due to a malfunction of which the engine may not start.
Types of crankshaft sensors
According to their design features, crankshaft position sensors can be magnetic, based on the Hall effect, or optical.
A magnetic (magnetoresistive) type sensor operates under the influence of a magnetic field arising from a permanent magnet passing in close proximity. In a Hall sensor, the current strength varies depending on the magnitude of the magnetic flux - according to the principle of operation, this model resembles an ignition distributor. The optical sensor has a toothed disc built into it.
Gear
The gear is always present where there is a crankshaft position sensor (CPS). When teeth pass near the sensor, the direction of the magnetic flux changes, and the sensor transmits the changed signal to the engine control unit. The unit synchronizes the data received from the DPKV with the injectors, supplying a spark to the cylinder at the moment when the piston is at top dead center and the compression cycle is in progress.
The teeth are located around the circumference of the wheel every 6 degrees. If a circle of 360 degrees is divided by 6, then there should be 60 teeth. But in this circle there is a gap of 2 teeth, so there are only 58 of them. This is done so that the sensor can determine through the crankshaft when the top dead center of the first piston will be cylinder.
Structurally, the teeth can be made on the crankshaft pulley, on the crankshaft itself, on the flywheel, and even on the clutch basket. Accordingly, the DPKV is located next to the gear wheel. The distance between the sensor and the edge of the tooth should be approximately one millimeter. This gap is necessary to create a magnetic field.
Crankshaft position sensor VAZ-2114
The VAZ-2114 is equipped with a magnetic-type DPKV. The sensor is suitable for many front-wheel drive VAZ models with an injection 8-valve or 16-valve engine: VAZ-2108-09, VAZ-2110-12, Kalina, Priora. A widely used type of sensor is labeled VAZ-2112.
The DPKV is mounted on the engine oil pump bracket, and the toothed disk is located on the crankshaft pulley. It turns out that the sensor is located in the front right corner of the car under the hood. The DPKV is not difficult to access and can be replaced quite easily even by a novice. Changing the part is very simple: disconnect the plug with wires, unscrew the fastening screw - that’s it, the sensor is removed. It is installed in reverse order. It is necessary to ensure that no dirt gets under the DPKV mounting point. After installing the part, check the gap between the sensor and the toothed disk - it should be approximately 1 mm, a deviation of ± 0.5 mm is acceptable.
Signs of malfunction of the VAZ-2114 DPKV
As a rule, DPKV on VAZ cars is reliable and rarely fails. Very often, the cause of the malfunction lies not in the part itself, but in broken wires or dirt and oil getting between the sensor and the gear disk. DPKV burns to suffer from an impact as a result of hitting an obstacle or in an accident.
The likelihood of a faulty state of the PCV sensor can be determined by the following signs:
- — engine idle speed “floats”;
- — the engine does not have enough power;
- — detonation knocks occur in the cylinders;
- — the engine picks up and slows down on its own;
- — the engine does not start at all;
- — the “Check Ingine” warning light in the cabin lights up.
It is impossible to start the engine if the sensor is completely faulty. Based on all other signs, we can only assume that the DCPV is faulty; more precisely, it can be determined using computer diagnostics. You need to look at the error codes. For example, code 0335 means an incorrect crankshaft sensor signal, and code 0336 means an error in the DPKV signal.
How to check the VAZ-2114 DPKV for serviceability
To check the crankshaft position sensor, it must be removed and inspected for mechanical damage. If dirt is found on the sensor, the part should be thoroughly cleaned.
You can check the DPKV using an ohmmeter. A working sensor has a coil resistance of 550-750 Ohms. A multimeter is used to check the inductance of the winding, but you cannot be sure that the DPKV is working properly, even if all the readings coincide with the permissible parameters. In this case, the state of the magnetic core is not taken into account in any way, so an oscilloscope is best suited for diagnostics.
Where is the sensor located?
In order to understand exactly where the crankshaft sensor is located, you need to know how it works. This device is designed to read the number of revolutions of the teeth of the generator pulley, passing near its core while moving, which create special impulses, and then, using this sensor, are processed and transferred to the ECU (electronic control unit - approx.).
This is necessary to synchronize the fuel injection phases and supply an impulse to ignite the combustible mixture into the combustion chambers. In other words, based on the readings of this sensor, the engine control unit determines in what quantity and to which cylinder the fuel mixture should be supplied.
Top view of the crankshaft sensor and drive pulleys.
Thus, it is not difficult to understand that this sensor is located only near the generator pulley and is secured to a special bracket with a bolt. A block and a fairly long power wire are connected to the sensor.
Signs of sensor malfunction
If the crankshaft sensor fails completely, you will not be able to start the engine, but there are a number of reasons why you can determine its malfunction in advance:
- Reduced engine power.
- Engine operation is unstable.
- When the engine is under load, detonation occurs.
- Starting the engine is difficult.
Checking the crankshaft sensor
In order to check the operation of the crankshaft sensor, you only need to measure the resistance of its windings. The data on the multimeter should be in the range of 550-570 Ohms, and if they are, then the issue may be in corroded wiring.
Remember that this sensor cannot be repaired and only needs replacement.
Causes of malfunction
One of them includes the crankshaft sensor, after which the entire system as a whole will cease to function. There is no need to be disappointed in this case, because you can easily replace it with your own hands, and our article will help with this.
Replacing and checking the crankshaft position sensor on LADA
DPKV (crankshaft position sensor), also known as TDC sensor (top dead center sensor) is the only sensor of the engine management system, if which breaks down, the engine will definitely not start. This sensor has no mechanical moving parts, so it rarely fails. Most often, corrosion-damaged wiring is to blame for its failure.
Signs of a faulty crankshaft sensor
A completely faulty DPKV will not allow the engine to start. In other cases, sensor malfunctions can be identified by:
- poor engine starting;
- unstable motor operation;
- reduction in engine power;
- detonation with increasing load.
Replacing the crankshaft sensor
Where is the crankshaft sensor located? On all LADA cars, the DPKV is attached to the engine crankcase (to its lower part) using one bolt. On the diagram it is number 2.
To change the crankshaft sensor, disconnect the block with wires from it and unscrew the mounting bolt (10mm wrench). On Renault-Nissan engines (for example, H4M), you will first have to remove (move aside) the protective casing.
Installation of the DPKV is carried out in the reverse order. Using a set of feeler gauges, we check the gap between the end of the sensor and the teeth of the crankshaft pulley. The gap should be 1±0.41 mm; it is specified by the design of the sensor and is not adjustable.
How to check DPKV with a multimeter
Set the multimeter to ohmmeter mode and connect the probes to the DPKV contacts. The resistance should be between 550-750 Ohms.
Set the multimeter to voltmeter mode (with a measurement limit of up to 200 mV). Connect the probes to the sensor contacts and bring a steel object to the sensor core several times. If the sensor is working properly, the device should detect voltage surges. You can more accurately check the DPKV without removing it from the engine. Rotate the crankshaft pulley and monitor the voltmeter readings. In a working DPKV, the voltage at the terminals reaches 0.3 V.
If the DPKV turns out to be serviceable, and the error (for example, p0335) in the engine control system has not disappeared, then you should clean the sensor of dirt and check the integrity of the wire and the quality of the connections in the circuit.
Let us remind you that the engine control system includes a number of other sensors that we talked about earlier.
Replacing the crankshaft sensor on a VAZ 2110
Determining the malfunction of the crankshaft sensor in the VAZ 2110 8 valves and their elimination are interconnected with the replacement of the device. Easy to make. It is necessary to remove it and replace it with a new one.
To change the crankshaft sensor on a VAZ 2110, it is important to take into account a number of nuances:
- Spare parts should be purchased from specialized stores.
- When installing a new sensor, the original position must be respected. The corresponding labels will help you remember it. It is also necessary to observe the pinout of the VAZ 2110 crankshaft sensor.
- There should be a gap between the sensor and the timing disk.
- Bolts should be tightened to a torque not exceeding 8 - 12 nm.
If the VAZ 2110 8-valve crankshaft position sensor does not pass the tests and checks, you can judge that it is broken. When purchasing and installing a new attribute, it should be tested. You need to at least measure the resistance. If the check shows that it is in working order, then the sensor can be installed on the car. Do not forget that there must be space between the pulley teeth and the sensor. How correctly the control system will work depends on this factor.
A breakdown of the VAZ 2110 8-valve crankshaft sensor is reported when it has not passed the test.
Why do you need a crankshaft sensor?
Content
The sensor is the only device without which the engine will not be able to perform functions.
The sensor operates using the principle of electromagnetic induction. The necessary information will be read from the generator drive toothed pulley.
There are two types of faults with the crankshaft sensor:
- Damage to parts and windings of the device.
- Violation of the integrity of the wire and connections in the circuit.
The design of the crankshaft position sensor is not complicated. It breaks down extremely rarely. Errors or malfunctions of the crankshaft sensor in the VAZ 2110 8 valves are usually associated with manufacturing defects, mechanical damage and contamination. The first two points do not depend on the driver himself, but you can control the cleanliness under the hood yourself.
The engine compartment is exposed to various destructive factors. Dust flying from the roadway, stones, and temperature changes cause a number of problems in the area of oil leakage. If an engine oil leak is detected, it must be repaired without fail. Timely action is especially important at the location where the sensor is installed. You should ensure that the contacts are clean and protected. It is important to ensure that the insulated wires do not have exposed wires or damage. It is better to entrust the repair of the VAZ 2110 crankshaft sensor wiring to specialists.