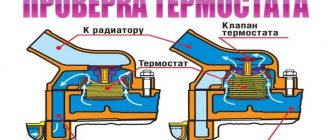
Performance check on VAZ 2108-VAZ 21099
Note! Having an assistant will make the task much easier!
1) First, remove the fuel rail with the injectors installed on it from the vehicle. (the article will help you remove it correctly: “Replacing the fuel rail”)
2) Remove the ramp from the awkward position, connect the wire block and the ramp harness together.
Note! After connecting the block and the wiring harness, place the “-” terminal on the battery if it was previously removed.
3) Next, connect both fuel pipes and tighten the mounting fittings using a wrench.
4) Now place four measuring cups or any container with a measuring scale under each nozzle.
Note! At this time, let the second person crank the engine with the starter.
5) You make sure that the injectors work well. The fuel should flow smoothly without deviations and in four jets, as shown in the figure below:
Note! After filling the glasses to the required level, ask an assistant to turn off the ignition and evaluate the measuring glasses. Make sure the amount of fuel in them matches. If not, then one of the four injectors is faulty and requires replacement (for details, see the article: “Replacing fuel injectors”). Sometimes the cleaning procedure helps (the article: “Cleaning injectors” will help to clean the nozzle from dirt).
6) When the ignition is turned off, carefully inspect all four injectors for defects.
Note! There should be no noticeable leaks of fuel from the spray part of the injectors. Any smudges are a sign that the injector is leaking and needs to be replaced with a new one.
Checking the power supply to the injectors:
The check must be carried out when any injector does not work at all after turning on the ignition.
1) First, disconnect the wire block from the injector you need.
2) After disconnecting the block, connect the two ends of the wires to the battery, and touch the injector contacts with the other end of the wires, and then turn on the ignition.
Note! If the injector starts spraying fuel, then you have a malfunction in the electrical circuit of this injector.
Checking the resistance of the injector windings:
1) To do this, first remove the “-” terminal from the battery and disconnect the block with wires from the injector itself.
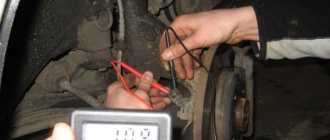
2) Next, connect the contacts of the “ohmmeter” to the electrical connector of the injector and check what resistance it shows.
Note! For the injector to work correctly, the “ohmmeter” should show a resistance of 11–15 ohms. Readings higher or lower are a signal for replacement.
Additional video materials: Below we have prepared a short video especially for you
Source vaz-russia.com
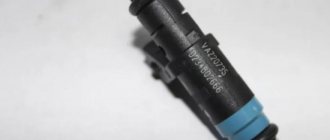
If, while driving, your car lost its dynamics, began to accelerate more slowly, and in general there were interruptions in its stable operation due to difficult starting and increased fuel consumption, one of the injectors installed on the engine may have failed. In this article we will tell you in detail how to check them, and what are the nuances in such work.
How to check the ignition module on a VAZ-2110 injector 16 valves
VAZ-2110 engines with a two-shaft head with 16 valves are built on the basis of the old one and a half liter VAZ 21083 engine. Changes affected only the cylinder head and air supply system. Twin-shaft 16-valve engines were installed in two types - a 1.5-liter engine (VAZ-2112) and a 1.6-liter engine (VAZ-21124). The ignition system on these engines is different. Today we will look at the ignition module for the injection 16-valve engine 2112 and find out its differences from the 1.6-liter engine 21124.
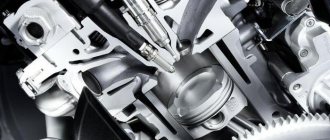
Design of the ignition module of a 16-valve engine on a VAZ-2110
Despite the similarity in engine design, the ignition system of the 1.5-liter injection 16-valve engine differs from the 1.6 16-valve engine. The 1.6 liter engine uses an electronic contactless ignition system with individual coils on each spark plug. Therefore, there was no need for an ignition module. Such a system is more reliable and cheaper to operate, since if one coil fails, there is no need to replace the entire module.
This is the coil that sits on each spark plug of a 1.6 liter engine.
Features and articles
The 16-valve 1.5-liter VAZ 2112 injection engine used the same non-contact ignition system as the eight-valve engine, but a different ignition module was installed.
Its catalog number is 2112-3705010, and it sells for 2000-3000 rubles, depending on the manufacturer. The design of the module remains the same - two ignition coils (for cylinders 1-4 and 2-3) plus switch keys in a single block. The spark is supplied to the cylinders in pairs using the idle spark method. This means that sparking occurs in two cylinders simultaneously - in one on the compression stroke (working spark), in the second on the exhaust stroke (idle spark).
Ignition module for 16-valve 1.5 liter engine.
Symptoms of module malfunction
Signs of a faulty ignition module on a VAZ-2110 are always acutely felt:
- hesitant engine starting or failure to start;
- failures during sudden changes in speed;
- high fuel consumption;
- two cylinders do not work, the engine is feverish;
- lack of dynamics;
- a sharp drop in power;
- drop in power and thrust after warming up.
Other faults
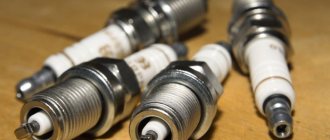
These symptoms may not only be caused by the ignition module. To determine the malfunction, it is enough to spend a few minutes diagnosing spark plugs, high-voltage wires and caps. This will eliminate the remaining elements of the ignition system and make sure that it is the ignition module that is faulty.
- Checking the spark plugs. To do this, unscrew them, put on the caps, place them on the cylinder head and crank the engine with the starter. The spark should be stable on all spark plugs. We replace non-working spark plugs and repeat the test. Under no circumstances should you crank the engine with the starter with the high-voltage wires removed. This will lead to a breakdown in the ignition module cover.
- Checking the high voltage wires. We remove the caps and, through the insulator, hold the wire contact at a distance of 10-15 mm from the head. With good wires, the spark should pierce this distance vigorously and confidently. Next we check the wires for resistance. A working wire should have a nominal resistance of 7-10 kOhm. Any deviation from this value indicates the need to replace the entire set of high-voltage wires.
- We check the caps for breakdown.
We also look at the block and especially the wires included in it.
If all these elements are in good condition, the ignition module must be checked.
In addition, it is better to check the spark plugs and wires on a warm engine, since a half-dead ignition module can operate cold for some time and fail when heated. You also need to be sure that all sensors are working properly. This can be indicated by an error code or Check Engine light.
Algorithm for checking the ignition module on a VAZ-2110
We begin the test with the block connected to the module.
To check the module, we only need a multimeter and it will take 15-20 minutes. This is quite simple to do, the main thing is to adhere to the algorithm and know the nominal values of the working module:
- We check the power supply and the presence of pulses supplied from the ECU. We check the power between the central terminal (15) of the wire block connected to the module and the engine ground. When the ignition is on, the voltage should not be less than 12 V. Otherwise, either the battery is dead or the ECU does not work.
- We check the pulses from the ECU on the wiring block. We install one tester probe on connector 15, the second on the far right, then on the far left. The assistant cranks the engine with the starter, and at this time we record short-term voltage surges with a tester. If there are no impulses from the ECU, it is he who is to blame.
- We check the resistance on the secondary windings of the coils. We put the tester in resistance measurement mode and measure it at the high-voltage terminals of the module cover. Between pins 1 and 4 and pins 2-3, the resistance should be 5.4 kOhm. Otherwise, the module must be replaced.
- We check the resistance of the primary windings between contacts 15 and the rightmost, then the leftmost terminals. Nominal - 0.5 Ohm. Deviation is not allowed.
- Check the module for a short circuit. In ohmmeter mode, install one multimeter probe on the central terminal, the second on the metal body. There shouldn't be any resistance. If the device detects at least some resistance (other than unity or infinity), the module must be replaced.
conclusions
Repairing the VAZ-2110 ignition module with your own hands is possible, and upgrading it is also possible.
However, for this you need to have some knowledge in the field of radio engineering, and no one can guarantee long-term operation of the module after repair, knowing the quality of our radio components. Therefore, the best option would be to replace the device. Good luck to everyone, stable spark, smooth and sunny roads!
Video about checking the ignition module
Step-by-step procedure for dismantling injectors
Despite the fact that many advise carrying out such work in the company of an assistant, it is difficult, but it is quite possible to do it alone, with your own hands.
- First of all, put the car on a flat surface and turn on the handbrake.
- We relieve the pressure in the fuel system: to do this, disconnect the terminal from the fuel pump and start the engine. When it has used up all the remaining gasoline, crank the engine with the starter a couple more times, thereby finally relieving the pressure in the fuel line.
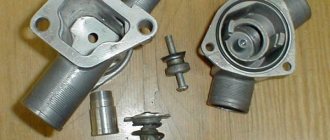
Unscrew the gasoline supply pipes
Use a screwdriver to unscrew the bracket on which the fuel pipes are attached.
Removing the fuel rail
Removing the injector from the VAZ-2114 fuel rail
Depending on which of the injectors has failed, the replacement process is absolutely identical.
- When the injector is on the ramp, press the spring retainer and remove the block.
As a rule, nothing prevents you from removing the lock.
The bracket will come out of place if you pry it with a screwdriver.
Dismantling
Before replacing or cleaning the injectors, they will need to be removed from the fuel rail. To achieve this, the following activities are carried out:
- Make sure the engine has cooled down properly. It is not safe to work on a hot engine;
- Disconnect the power wires from the fuel pump to de-energize the device;
- Try to reduce the pressure in the engine power system as much as possible. To do this, the engine starts, and then you need to wait until it stalls at idle speed;
- Repeat this procedure several times until the car simply stops responding to turns of the ignition key;
- That's it, now our goal is the fuel rail. To remove it, you must first remove the terminals from the battery, turn off the power to the ramp itself, disconnect the fuel supply hoses, and also disconnect all electrical appliances going to it. These are pressure, idle, throttle position sensors;
- If you have an 8-valve engine, then you do not need to remove the receiver. This step is relevant for engines with 16 valves;
- Experts do not recommend removing the intake manifold without dismantling the throttle valve and the hose going to it. It is better to unscrew and disconnect everything at once, which will allow you to continue working more conveniently;
- Cover the exhaust manifold openings with something to protect them from foreign objects;
- Using a hex wrench, you can unscrew a couple of bolts and remove the fuel rail along with the injectors;
- Make sure that there are no distortions when removing the ramp, otherwise problems may arise with the dismantling processes;
- We remove the injectors. To do this, remove the mounting brackets that hold the electrical connector. You also need to remove the bracket that holds the injector in its seat.
After dismantling the elements, be sure to close the seats to prevent debris and other objects from getting in, and place the nozzles themselves on a table or floor, after laying down a dry rag.
Here you can decide whether to change or clean the elements of the fuel system. If replacement is required, install new injectors in place of the old ones and follow the assembly procedure.
Cleaning
Here proceed as follows.
- Remove the rubber rings from the injectors, and when cleaning is finished, replace them with new seals.
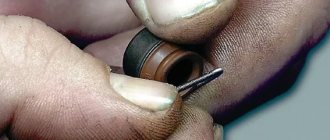
- The cleaning process should begin with the nozzles, on which various deposits form as the car is used.
- Be sure to thoroughly clean the funnel-shaped surfaces where tar deposits accumulate.
- The next step is the fuel mixture supply channels.
- To open the solenoid valve to supply fuel, you will have to trick the device with a 5-7 V power supply.
- Some use stabilized voltage sources, phone chargers, or even a car battery. If using a battery, the voltage should be supplied through the light bulb. It will play the role of a current damper. Otherwise you risk burning the winding.
- Electricity is supplied through two wires, in the gap of one of which a button is installed. It will close and open the network. This creates an imitation of the operation of an injector in an engine due to the influence of a pulsed electric charge.
- You can supply the cleaning liquid to clean the injectors through a can of carburetor cleaner. Inexpensive and effective, even better than specialized chemicals.
- Be sure to tightly connect the cylinder and nozzle with a rubber tube, clamps and any other means.
- All is ready? You can then apply electricity to open the injector. At the same time, press the button on the cleaning agent canister.
- Soon the torch of the liquid jet, which will exit through the fuel atomizer of the injector, will change its “clumsy” direction and will begin to uniformly exit the nozzle. This indicates that you have removed all carbon deposits.
Homemade cleaning device Before putting the cleaned nozzle back in place, check its actual condition.
Examination
To check you need:
- Measure the injector resistance using a multimeter. If the readings are within 10-15 ohms, the injector is working;
- If you deviate from these limits, cleaning is pointless. You only need to change the injectors;
- Check devices for leaks;
- To do this, when cleaning, do not turn on the electrical pulse so that the nozzle does not open;
- Under pressure, a device with a broken seal will begin to show signs of leakage. Therefore, the element must be replaced.
Step-by-step procedure for checking injectors
When nothing interferes with the operation of the dismantled ramp, we reconnect the power supply and gasoline supply pipes to it. Don't forget about the negative terminal of the battery.
- When everything is connected and ready for testing, we fix the ramp with the injectors so that four measuring containers of the same volume can be placed under them. This is necessary to ensure that the measurements are made as accurately as possible.
- Next, it is best to ask an assistant to sit in the driver’s seat, and if this is not possible, secure the ramp motionless and start the engine yourself.
- While the starter is “spinning” the engine, make sure that the injectors work in the same rhythm and the fuel is sprayed evenly. When carrying out such diagnostics, it is very clearly visible which of the four injectors is “snotty” or does not work at all.
It is noticeable how one of the injectors works differently than the other.
The check ends some time after the injectors are turned off.
The latter should be given special attention if any of the pads does not work at all, because damage to the wiring becomes the reason for this. If damage is present, then it is necessary to replace the nozzle with a new one (see “more about choosing nozzles”).
Procedure for checking injector power supply
- First of all, disconnect all the pads from the injectors.
- Then, we connect two wires to the pre-working block, the other end of which we bring to the “non-working” injector.
- Next, turn on the ignition and if the injector starts working, this means it is necessary to replace the non-working element of the electrical circuit - the block, and if not, then only the injector needs to be replaced.
Resistance faults
- In order to diagnose the injector windings, you must disconnect the negative terminal from the battery and all injector power connectors.
- Next, we connect the multimeter probes to the injector contacts and measure their resistance.
Values are within normal limits.
Checking the voltage supply to the fuel injectors
Location of the electrical connector (1) supplying voltage to the fuel injector and connector (2) on the fuel injector
PERFORMANCE ORDER 1. Disconnect the electrical connector from the fuel injector of the first cylinder, see fig. Location of the electrical connector (1) supplying voltage to the fuel injector and connector (2) on the fuel injector. 2. Connect the control LED to the connector contacts (1) (see Fig. Location of the electrical connector (1) supplying voltage to the fuel injector and connector (2) on the fuel injector). When the engine cranks with the starter, the LED should flash. 3. Check the voltage supply to the remaining fuel injectors in the same way.
conclusions
As you can see for yourself, in order to check the condition of the injectors on a VAZ-2114 with your own hands, there is nothing difficult. You just need to carefully read our article and strictly follow the order of actions.
Source carfrance.ru
Every driver would like to know how to check the injectors without removing them from the engine. After all, all modern cars are equipped with injection systems. And given the low quality of fuel that is often found at our gas stations, it is not surprising that every driver has encountered problems with the car’s power system. In this regard, the skill of determining the exact location of a breakdown is extremely important.
This will significantly save time on service visits and diagnostics. Once you have identified the problem, you can immediately begin to fix it. The sooner the breakdown is repaired, the better.
We check the ignition module of the 16-valve VAZ-2112 with a multimeter
The situation is as follows: for no apparent reason the engine began to “trouble”, the thrust was lost, and the idle now does not even reach 500. I removed the high-voltage wires one by one, and so, there was no spark at all in cylinders 2 and 3. The engine is 16-valve, but without “individual coils”. The question is how to check the ignition module on a VAZ-2112 engine, and it is advisable not to remove it. Inside the module, in addition to the coils, electronics are installed. How can I check if it's working properly?
Checking the VAZ-2112 ignition module with your own hands
Inside the ignition module there is such a board
It is clear that we are talking about the 21120 engine and the ignition module 2112-3705010. By the way, there will be two more numbers in the article numbers - they indicate the manufacturer.
All elements of the ignition system
Four wires are connected to the module connector:
- Blue-red – nutrition +12;
- Brown – “mass”;
- White-blue – signal for candles 1 and 4;
- Gray-red – candles 2 and 3.
First check that all voltages are supplied to the module:
- Turn off the ignition, disconnect the connector;
- Turn the key to position I;
- We connect the probe voltmeter probe to the battery negative;
- Using the second probe (positive) we find the “+12V” contact in the connector;
- At each control contact the arrow will show “almost 0”;
- With the starter running, the values should increase while remaining less than 0.7 V.
The voltage on both control contacts must be the same.
Let's say that checking the connector did not reveal any errors. Next we will look for the reason in the module itself.
Tester CNT-SPMZ
According to the recommendation of the plant, on VAZ-2112 cars the ignition module should be checked for the need for repair with a tester called TsNT-SPMZ. The kit consists of a generator and a arrester module.
CNT-SPMZ, version 3
If we don’t have a tester at hand, we’ll try to make one ourselves. Only the ignition module will still have to be removed by unscrewing three nuts “10”. First, disconnect the battery, then the spark plug wires and connector. By the way, the wires have numbers corresponding to the numbers on the module (see video).
Homemade test bench
As a spark gap, car enthusiasts use a block of spark plugs with a remote “zero” contact. It is better, however, to buy a spark gap TsNT-RK-2 or RK-1.
Control pulses are supplied to the module through a resistor whose resistance is 1-2 kOhm. If the control input is connected without a resistor, the electronics will fail. You can even assemble a generator consisting of two NE555 chips. But this is for those who like to solder.
It is not recommended to check ignition coils with an ohmmeter. However, if you follow safety measures, everything should work out.
When using the TsNT-RK block, one double spark gap is connected to pins 2-3, and the second to pins 1-4. The “zero” tap of the arrester is connected to the “total ground”.
Checking the module with a multimeter
The resistance of the coils in the module can be measured with a pointer, but not with a digital ohmmeter. We turn on the ohmmeter between pins 1-4, then between 2-3, and we get the same result. Please note that the resistance varies from manufacturer to manufacturer:
- 2112-3705010-02 (ATE-2 plant, Moscow) – 5-6 kOhm;
- 2112-3705010-12 (SOATE) – 12 kOhm.
There is a nuance: the inductance of the coils is large, and when you connect an ohmmeter, sometimes a spark jumps. Do not touch the leads of two probes at the same time. Otherwise, killing will not kill, but it will be unpleasant.
Dismantling the module, video example
Operating principle
How to check injectors without removing them from the engine? Before starting diagnostics, you should study the operating features of the injectors on an injection engine. Then it will become clear how this structural element should be checked. Modern cars use electromagnetic injectors. They are a solenoid valve that is regulated by a control unit.
When a signal is received, the valve opens and injects a certain dose of fuel into the cylinder. There are 2 ways to supply fuel in this way:
- Central injection, with this method there is only 1 nozzle. It is installed in front of the throttle valve;
- Distributed injection, an injector is located in each cylinder.
Central injection can only be found on fairly old cars. On newer models, a distributed injection system is widely used.
Symptoms of a problem
If there are problems with the injectors, a small amount of fuel enters the cylinders. In some cases, powering the engine becomes completely impossible. There are several signs by which you can determine that the problem is in the injectors:
- Problems starting the engine. This is due to insufficient fuel entering the cylinders;
- The engine is unstable at idle and low speed;
- Significant reduction in power and failures in operation;
- Increased fuel consumption;
- The engine may trip.
Some of these reasons may also occur with other malfunctions. Therefore, it is advisable to conduct computer diagnostics, it will help determine the reason. If the problem is in the injectors, then you should check their operation more carefully.
Symptoms of a faulty injector
To begin with, it should be noted that such a complex mechanism as a car engine (especially in modern models) requires accuracy in definition. It often turns out that with absolutely similar symptoms characteristic of malfunctioning injectors, for example, difficult starting of the engine on “cold traction” or increased fuel consumption, the reason is not in them, but in the spark plugs that need to be replaced. Before establishing the exact cause and taking any action to eliminate them, you should very carefully check and make sure that the “diagnosis” is correct.
The following factors are the most common symptoms of faulty engine injectors:
- there are jerks when driving;
- loss of dynamics during acceleration;
- the engine vibrates and trembles when switching, or when decelerating;
- fuel consumption increases;
- Due to uneven fuel consumption on diesel engines, black smoke may be observed from the exhaust pipe
If you notice any of the problems just mentioned, you need to do a spot check of the injectors as soon as possible. Otherwise, the car may fail at the most unnecessary moment (for example, when overtaking, or in other situations).
Diagnostics
Almost every car enthusiast can check the injectors on their own. Some work can be carried out without removing these parts from the engine. For a more detailed examination of the reasons, it is better to remove the problematic injector from the engine. Self-diagnosis should occur in the following order:
- The integrity of the wires supplying power to the injector is checked. To do this, you can measure the resistance on them;
- Find out which injector has the problem. They do this as follows: start the engine and take turns removing the wires from the injector terminals. If it works in this cylinder, then you can hear changes in the operation of the engine; a broken injector does not cause changes;
- Check the winding resistance. To do this, multimeter probes are connected to the terminals. For serviceable injectors, the resistance should be in the range of 11-16 ohms. If the indicator is higher, then the part must be replaced;
- For the next check, the fuel rail must be removed. Cups are placed under the injectors and the starter is turned for 10-15 seconds (longer operation can damage it). At the same time, observe the fuel spray cone. The amount of gasoline collected in the cups is also compared. This way you can definitely identify the faulty injector.
If after all the steps you have not decided on the cause of the malfunction. That is, the injectors are working properly. Pay attention to the gasket on it. If it is deformed or damaged, then it is likely that the problem is air leakage through it.
Debugg
There are several main reasons for injector failure; in each case, the repair methods are slightly different:
- No current;
- Winding fault;
- Blockage.
The first reason can be eliminated by replacing the wires or bringing the contacts into working condition. If the winding is broken, the only option is to replace the faulty injector. If clogged, you should rinse it. You can do this yourself or in a service. When cleaning yourself, you should not pour solvent into the car tank; this can lead to complete failure of the fuel system. It is much easier to make a temporary tank from any bottle and power the injector from it.
Conclusion
. Self-diagnosis of the engine is quite a feasible task even for a novice driver. In this regard, many people ask how to check the injectors without removing them from the engine. It's actually quite easy to do. To diagnose problems with motor power supply, you do not need a special stand. Most of the actions can be performed directly on the car.
Source autoflit.ru