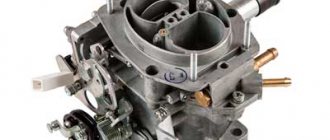
Solex carburetor design
The Solex carburetor has several models, namely:
The main modification of this brand of carburetors is SOLEX 21083. This model has the smallest diffuser cross-section. In terms of structure, all Solex models are the same, there are only some differences (different brands and models of cars have their own modification). Therefore, the Solex settings for all models are the same.
The Solex carburetor type is emulsion. It is installed only on cars with engines with contactless ignition.
Solex device:
- two chambers with throttle valves;
- chamber dosing system;
- transition systems for both chambers;
- idle speed system only for the first chamber.
Classification of Solex carburetors by configuration:
- Semi-automatic starting system.
- Carburetor accelerator pump.
- Power mode economizer.
Have you heard about a car device that can reduce fuel consumption, the FuelFree fuel saver?
Carburetor clogged
When adjusting the fuel level in a VAZ 2108 carburetor, be sure to clean the system before doing so. Despite the fact that the G8 carburetor has many positive qualities, it is still capable of catching the smallest particles of dirt, dust, and carbon deposits that come from the air filter. In this case, the main fuel jet in the primary chamber becomes clogged. It is also worth paying attention to the fact that with severe wear of the cylinders and pistons, a lot of dirty gas passes into the intake manifold through the breather pipe. At the same time, it contains carbon deposits, which will subsequently enter the carburetor along with clean air. Look at the cover, namely at the balancing holes in the float chamber. Most likely, there will be a lot of dirt present there.
How to set up a Solex carburetor
The best carburetor is SOLEKS. Therefore, many drivers replace their standard carburetors with devices of this type. Solex works clearly even if there was a strong overflow of fuel. As it turned out, many people have difficulties in correctly setting up the Solex carburetor. It must be configured so that fuel consumption is minimal and power is maximum, so you need to look for the “golden mean”. Therefore, those who do not want to learn the subtleties and nuances of setting up give this job to a professional.
But, for those who want to learn how to adjust and configure a Solex carburetor, we will describe the correct procedure:
- It is necessary to set the level in the float chambers. The manual (instructions) states that the level can be set using a special template. This is difficult if there is no factory setting. If there is no factory setting, you need to do it yourself. How to do it? To do this, start the internal combustion engine and warm it up for about 10 minutes. Next, turn off the engine and disconnect the fuel supply hose. When the hose is disconnected, gasoline flows out normally, but fuel must not be poured into the chamber, otherwise the readings will be spoiled. Next, unscrew the carburetor cover bolts and remove the choke cable. After disconnecting the cable, you must very carefully and horizontally remove the Solex carburetor cover. If you do this carelessly, the floats may be damaged. Now you need to measure the distance from the Solex cap to the surface of the gasoline. It is necessary to measure in each chamber; the fuel level in them may be different. To determine whether the level is normal or not, you need to add the two resulting distances and divide by 2, that is (distance of camera 1 + distance of camera 2)/2. If the measured distance is between 25 and 35 mm, then everything is normal. If the level goes beyond the limits up or down, then you need to adjust the level. To do this, bend the float in the desired direction and drain some of the fuel.
- We adjust the idle speed of the internal combustion engine. It often happens that when you press the clutch pedal, the engine speed immediately drops - this indicates that the idle speed has disappeared. To do this, warm up the car engine to normal operating temperature. Next, turn off the engine. In the hole in the Solex sole we look for the mixture quality screw and turn it to the right until it stops. Now you need to start the internal combustion engine and push in (remove) the choke. This screw is used to set the permissible minimum speed. This number of revolutions should ensure stable, stable operation of the motor, while the vacuum should be minimal. A well-tuned Solex carburetor should allow the engine to idle at speeds from 500 to 1200 rpm. After the engine begins to operate stably, we continue to rotate the mixture quality screw until the internal combustion engine begins to operate unstably, after which we turn it back 1-2 turns. Next, we proceed to setting the engine speed to normal; we need to make sure that the speed is in the range from 800 to 900 rpm. Turn the screw until the engine starts running stably.
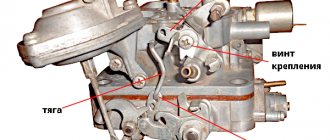
- When adjusting the idle speed, beginners often have difficulties. It happens when you turn the quality screw, the engine operation does not change, but the quality of the internal combustion engine must change. When the engine is unstable, the mixture quality screw can be adjusted. If the engine does not respond to changes in the adjustment of this screw, then fuel continues to flow into the idle channel, the screw cannot close it. This may be due to an enlarged nozzle (hole for metered fuel supply) or due to a poorly screwed plug, as well as a deformed nozzle. This can be done by carrying out a simple diagnostic procedure: with the engine running, you need to unscrew the valve - here the engine should stall. If the problem is in the enlarged nozzle, then the internal combustion engine will suddenly turn off, and if the internal combustion engine does not stall at all, then gasoline is not supplied through the nozzle. In this case, when the engine does not stall with the carburetor valve removed, then we check the stopper screw of the second chamber. The locking screw is used to smoothly open the throttle valve.
Idle speed adjustment
The second setting of the VAZ-2109 carburetor is idle speed, it can be partial or full. The first is for minor speed adjustments, the second is for adjusting the amount of air (setting CO emissions in the exhaust gases).
Partial adjustment is performed using the air-fuel mixture “amount” screw. This screw sets the opening angle of the throttle valves, which ensures that the air-fuel mixture enters the cylinders when the accelerator pedal is released. The “quantity” screw rests on the throttle valve control lever and when screwed in, it pushes the lever, causing the valves to open slightly.
Partial idle adjustment is performed with a warm engine and creating a load on the vehicle's on-board network by turning on the high beam headlights and the interior heater at full power.
The adjustment is carried out with the engine running by screwing in/unscrewing the “quantity” screw until the optimal idle speed is established, which for the VAZ-2109 is 800-900 rpm (this can be tracked using a standard or plug-in tachometer).
If it is not possible to set the required speed or the motor operates unstably at it, a complete adjustment is made, which is made by two screws - “quantity” and “quality”.
The algorithm for this adjustment consists of the following stages:
- Warm up the engine and then turn it off;
- We find the quality screw (it may be closed with a plug that will have to be removed), screw it in until it stops, and then unscrew it 3-4 full turns;
- We start the engine, turn on electrical consumers (lighting and stove) to create a load in the on-board network;
- By rotating the “quantity” screw, we achieve 700-800 rpm on the tachometer;
- By turning the “quality” screw, we set the maximum possible speed (they will increase to a certain level, and then stop. The moment the speed increase stops is considered the maximum);
- We set the “quantity” screw to 900 rpm;
- Using the “quality” screw we lower them to 800 rpm;
- We slowly tighten the “quality” screw until interruptions appear in the operation of the power plant, after which we unscrew it back 1 turn;
- We adjust the speed with the “quantity” screw, bringing it to a normal value - 800-900 rpm;
How to check Solex
To ensure high-quality work on adjusting and tuning the carburetor, you should ensure that sand particles, etc. do not get on the throttle valves. If solid particles get into the carburetor, this can lead to an expensive overhaul of the internal combustion engine (due to some small thing).
After you have adjusted the carburetor correctly, you need to check the accelerator pump. When the throttle valve is opened slightly, the nozzle should spray gasoline. Here is the answer to the question: why does the car jerk when driving? If a stream of gasoline from the sprayer appears late, then this precisely leads to braking when you press on the gas and the car jerking.
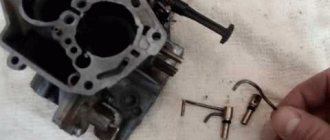
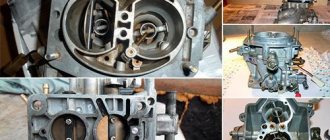
To clean the carburetor, it must be disassembled. First, we unscrew the fuel and air jets, as well as the emulsion tubes. If it is difficult to remember what is where in the carburetor device, then it is most convenient to photograph each step.
To determine whether the diaphragm is intact, unscrew the cap of the power mode economizer.
Signs of a broken carburetor diaphragm:
- The internal combustion engine does not stall when the screw is tightened.
- If you turn off the ignition, the engine continues to run for some time, that is, self-ignition occurs.
- Unstable operation of the internal combustion engine.
- Increased gas mileage during normal, moderate driving.
ECTO or EURO? What brand of fuel is best to fill in? ECTO fuel is not recommended for use in cars with high mileage.
After checking the integrity of the diaphragm, we clean the SOLEKS. For cleaning we use air pressure (a compressor or pump is needed). If the dirt is hard and does not fly off with a stream of air, then carefully clean the stuck dirt with copper wire. I use air pressure cleaning without damaging the surfaces of carburetor parts. After this, close the lid and now you need to lubricate all the rubbing surfaces of the carburetor parts. It should be lubricated after washing the outer part.
Solex carburetor tuning
Tuning, that is, improvement, modification of the carburetor is carried out to increase engine power and improve driving dynamics.
Important! In order to achieve maximum power, there must be a minimum of resistance at the carburetor inlet. With high resistance, the quality of the mixture is not always “at its best” (sometimes “poor”, sometimes “rich”).
If you sharply open the throttle valve with the Solex carburetor set at the factory, the air flow speed decreases, as a result of which less gasoline is supplied to the carburetor. Because of this, power drops significantly at low speeds.
The procedure for increasing engine power by tuning the Solex carburetor:
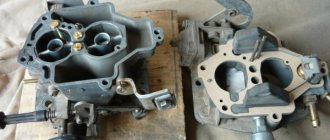
- We carefully disassemble the carburetor.
- We wash and blow, and divide into two halves.
- Pay attention to the air damper axis. There are protruding screws on this axis, which creates additional resistance while the car is moving. Any little things are important when tuning, so these protruding screws need to be smoothed out.
- Remove the axle and air damper from the top. The axle needs to be sharpened.
- From the lower part you need to pull out the throttle valves with their axles. At this stage, using a file we make the flaps larger. We hide the screw caps inside the axle. There are screws with conical heads, you can use them. The throttle valve needs to be assembled.
- Now we are tuning the diffusers. To improve the aerodynamics of the diffusers, it is necessary to make the legs in the shape of wings. We also check the protrusions of the factory casting; if there are any, they need to be ground off.
- The accelerator pump must have 2 tubes installed in one chamber. There is an opinion among some that when I use two tubes for each camera, “dips” may appear, that is, you press on the gas, but the car does not move.
In general, the basis of tuning is smoothing, erasing protrusions and irregularities. Any unevenness in the fuel and air mixing chamber creates resistance.
Why is carburetor tuning done on a VAZ 2109?
The answer is obvious. This gives a serious increase in the dynamics of the car and its power. Typically, not everyone does tuning a VAZ 2109 carburetor with their own hands. For this, there are special workshops that seriously engage in tuning the VAZ 2109.
Work on the carburetor is carried out as part of a set of measures to improve the power unit and ignition system. But not everyone has the means to do this.
Let's describe the simplest methods. So, you have started tuning the VAZ 2109 whose carburetor you are planning to “pump”. What is needed first for this?
Of course, setting up a VAZ 2109 carburetor is not the easiest task in the world. But the simplest actions to increase power are available to everyone.
- We get to the second chamber of your carburetor. There you need to remove the spring from the throttle valve vacuum drive. What will it give? With a slight increase in fuel consumption, you get a guaranteed “plus” in the car’s dynamics. Cheap and cheerful.
- The second thing that can be done to improve it is to slightly modify the same vacuum drive. To do this, you will need to insert a ring of wire under the nut that secures the damper drive levers in the second chamber. What is the result? And this is what we get - we now have a protrusion located between the wire and the other lever. After this, you just need to tighten the nut. Again, we get an increase in dynamics, and an increase in consumption to a minimum.
In general, when it comes to tuning, always expect higher fuel consumption. And the more you modify the carburetor, the higher the final figure will be. If this doesn’t scare you, then let’s continue.
The following are the methods:
- Replacing the diffuser. If the standard diffuser of the primary chamber is marked 3.5, then, without hesitation, set it to 4.5. You will be happy. Or rather, growth.
- Further more. You need to change the pump nozzle. The usual one costs 30. Throw it away and set it to 40. Progress will be noticeable.
A separate conversation is tuning the VAZ 2109 Solex carburetor. Precise adjustment of the Solex VAZ 2109 carburetor in workshops is quite expensive, but it will pay off with interest.
Here, some fans of “pumping” even manage to install two carburetors at once. Experts, taking a repair kit and an adapter manifold, manage to quite successfully synchronize the opening of the dampers. I think there is no need to explain what kind of increase you will get with two carburetors.
You can also read on this topic:
Full test drive of the Lada Vesta car
Tuning the VAZ 2109 engine on your own
Tuning Volkswagen Golf 2: optics, bumpers, skirts and radiator grille
The VAZ 21074 injector can easily be called an “updated seven”
UAZ Patriot Devolro may receive Mercedes and Toyota engines
Alex S December 2nd, 2013
Published in: Russian cars
Tags: Our cars, Tuning, Tuning VAZ
Video
This video shows how to clean a Solex carburetor
This video is about tuning the small diffuser of a Solex carburetor
This is a general video on improving the SOLEX carburetor.
With the development of the automotive industry, older models of carburetors were replaced by carburetors with the Solex brand. Unlike their counterparts, Solex delivers more accurately and helps the car develop more power. Such carburetors are installed on engines with a displacement of 1.5 liters, front-wheel drive VAZ cars, the Samara family: VAZ 2108; 2109, 21099, 2110.
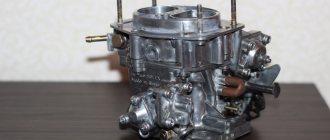
Solex carburetor design VAZ 21083
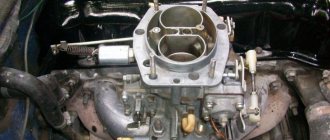
The Solex VAZ 21083 two-chamber carburetor is installed on naturally aspirated engines of VAZ 21083 cars. It consists of a cover and a main body, which includes:
- Float chamber.
- Starting system.
- Idle system with solenoid valve.
- Main dosing system.
- Transitional system.
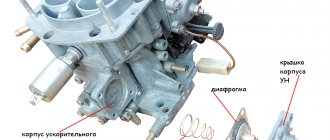
- Economizer with accelerator pump.
- Econostat.
Fuel is supplied from the float chamber through special channels through fuel nozzles, where gasoline is mixed with air, which enters through air nozzles. The combustible mixture then flows through the carburetor diffusers directly into the engine. The throttle valve drive on this carburetor is mechanical and varies depending on the force of pressing the accelerator pedal. The carburetor provides for adjustment of the combustible mixture using quantity and quality screws.
How to adjust the VAZ 2108 carburetor with your own hands
- The hood of the car is opened, all contaminants are removed from the surface of the carburetor, and the air filter is removed.
The VAZ 2108 air filter and sensor are removed - After cleaning, check the tension of the throttle cable. The tension should not be too strong. At the same time, sagging should not be observed either. To adjust the tension, the tip nut, located on the protective jacket of the cable, is clamped with an open-end wrench to 13, and the lock nut is loosened with another wrench.
- After loosening the cable, the required distance between the tip and the nut is established. The rule is this: when the gas pedal is not pressed, the throttle closes completely. When the pedal is fully pressed, the damper opens completely.
Adjusting the throttle cable of the VAZ 2108 carburetor - After setting the required distance, the locknut is tightened, and the length of the damper cable is securely fixed.
- Now the free play length of the air damper rod is checked. When the drive handle is pressed fully, the damper is in the “open” position. If this is not observed, adjustment is required.
- The bolt that secures the rod to the lever is loosened with a 10-mm open-end wrench.
- Next, the damper lever is rotated, after which the drive handle is recessed into the housing.
- The choke cable is clamped with pliers, pulled out of the protective jacket to the required length, after which the fastening bolt is tightened.
- The drive handle is pulled out, and the closing angle of the air damper is controlled. If it turns out that the closure is incomplete, the fastening bolt is unscrewed again and the protective jacket on the cable moves slightly. These manipulations are carried out until the damper closes completely with the drive lever extended.
The length of the choke cable is adjustable with two open-end wrenches - The carburetor trigger is now adjusted. To do this, the air damper drive handle is pulled completely out of the housing.
- The car engine starts.
- The damper is opened approximately one third using a screwdriver.
The throttle valve is opened a third with a screwdriver - After this, use an open-end wrench to tighten the screw that regulates the volume of the supplied fuel mixture. It is tightened until the engine speed reaches 3300 rpm (readings during adjustment are taken using a tachometer).
- Once the above figure is reached, the damper is carefully closed, after which the lock nut begins to gradually loosen. It must be loosened until the speed reaches 2900 rpm.
- Once this figure is reached, the nut is fixed and the air filter is put in place.
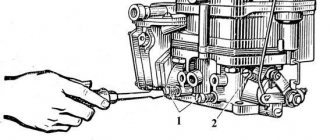
- To regulate the idle speed, the number of crankshaft revolutions is increased to the maximum. This is done using a screw that regulates the quality of the fuel mixture.
Screws for adjusting the idle speed system of the VAZ 2108–2109 carburetor: 1 — mixture quantity adjusting screw; 2 — adjusting screw for the quality (composition) of the mixture; 3 - sealing ring; 4 — adjusting screw plug - Then, using a screw that regulates the volume of the supplied mixture, the number of crankshaft revolutions is reduced until a level is reached that exceeds the optimal idle speed by 100 rpm.
- After this, using a screw to adjust the quality of the mixture, the crankshaft speed is again reduced to the normal value (this is indicated in the car’s operating instructions). This completes the idle speed adjustment.
Adjustment video
Jet markings
For each carburetor system, jets of different cross-sections are provided, so during repairs it is important to know what cross-section the fuel or air jet is needed. When purchasing a car, it comes with a service book, which outlines the main characteristics and its structure, as well as a jet marking scheme depending on the carburetor model.
The main metering system has fuel jets marked 80 or 95 for the primary chamber and 100 for the secondary. There are also air jets 150, 155, 165 for the primary chamber and jet 125 for the secondary. The idle system includes fuel nozzles marked 38-44 and 50, and air nozzles 170 and 160. In the secondary chamber of the transition system, fuel nozzles 50 and 80, and air nozzles 120 and 150. For the main metering system, a fuel nozzle 85 is provided.
"Vulnerable spots" of the carburetor
Unfortunately, there are a lot of vulnerable spots in the G8 carburetor. In particular, this is the idle system. At the very edge of the solenoid valve there is a small jet in which there is a hole with a diameter of 0.4 millimeters. In other words, even the smallest speck of dust can significantly impede the passage of gasoline through the system channels to ensure idling. In this case, symptoms such as engine stopping while idling, as well as sudden jerking while changing from one gear to another, will appear. Therefore, it is necessary to know what elements the VAZ 2108 carburetor consists of. Adjusting it without knowledge of the device is impossible. And to get rid of this problem, you need to unscrew the solenoid valve, and then carefully remove the bronze tip. Blow this tip thoroughly so that there are no specks left in the holes. Please note that the solenoid valve must be tightened until it stops, but do not apply too much force, as the entire thread may be destroyed.
Adjusting the carburetor Solex VAZ 21083
For the carburetor to work properly, it must be properly adjusted and configured. This kind of work is not difficult to do with your own hands, you just need to be careful and don’t be afraid to make adjustments yourself.
To adjust the quality of the fuel mixture, you need to first warm up the engine to its operating temperature, then turn the fuel mixture quantity screw to set it to 800-900 rpm. Now, using a flat screwdriver, you need to gradually unscrew the quality screw until the motor starts up. Afterwards, the quality screw is very carefully tightened until the engine runs smoothly.
There are cases when, with such an adjustment, the engine operation remains the same and does not change. This is possible for several reasons:
- contamination of the quality screw channel;
- contamination of the fuel jet of the solenoid valve;
- Solenoid valve malfunction.
The solenoid valve may not work due to a broken chip or wires going to the valve, or due to a malfunction of the core itself. In this case, the valve is replaced with a new one, the dirty channels and jets are cleaned with compressed air.
Adjustment of the fuel level in the float chamber is carried out on the removed top cover of the carburetor, by bending the plate that holds the floats. Each float is measured with a special probe so that the gap between the float itself and the surface of the cover is within 1-1.5 mm. Precise adjustment of the floats will ensure constant maintenance of the fuel level and its uninterrupted supply. In addition, it is worth adjusting the tension of the air and throttle cables so that the engine can start in winter and run without interruptions.
Adjusting the tension of the air damper cable is carried out with the air choke pulled out from inside the car, tensioning and fixing the position of the cable on the damper drive. The tension of the throttle cable is also adjusted, that is, when the gas pedal is released, it should be closed.
Correct setting of the Solex VAZ 21083 carburetor will ensure a rational dosage of the combustible mixture at any engine speed, without excessive fuel consumption.
There are many different modifications of Solex carburetors, while the 21083 series is the basic version with a minimal diffuser cross-section. This model is usually installed on 1.5-liter engines of VAZ cars. We previously wrote about the “Ozone” setting on models 2106 and 2107.
The enormous popularity of this series is due to the possibility of grooving diffusers. Thus, almost any modification to the carburetor can be made. Experts do not recommend installing Solex on engines with a volume of more than 1.5 liters, as in this case the engine will be “choked” at high speeds. If you intend to configure this carburetor for the UZAM power unit, it is necessary to replace the jets due to the fact that a richer fuel mixture must be provided.
Setting up Solex
Adjusting the fuel level . Setting up a Solex carburetor usually begins with setting the required level in the float chamber. To do this, you must first start the engine and warm it up for 5 minutes. After this, turn off the engine and perform the following operations:
- Carefully disconnect the fuel supply hose.
- Unscrew the 5 screws that secure the carburetor cover.
- Disconnect the choke system cable.
- Carefully lift the lid to avoid damaging the floats.
- Using a ruler, or better yet a caliper, measure the fuel level in the chamber.
Adjusting the fuel level of carburetors VAZ 2108, 2109, 21099, 2110
Remove the air filter housing. Using two “8” wrenches, we loosen the fastening of the drive rod to the air damper control lever.
Using a screwdriver, unscrew the screw and remove the bracket for fastening the rod shell together with the drive rod.
Having loosened the clamps, remove the fuel supply and fuel discharge hoses the carburetor
A small amount of fuel may remain in the hoses.
Remove the wire tip from the terminal of the EPHH solenoid valve.
Using a screwdriver, unscrew the five screws securing the carburetor cover.
Carefully, trying not to damage the floats and gasket, remove the cover.
To avoid losing the fastening screws, turn the cover upside down above the table or air filter housing cover.
It is unacceptable to place the cover with the floats down to avoid damage to the float bracket.
Before adjusting the fuel level, you should check the relative position of the floats, as well as their position relative to the walls of the float chamber.
the position of the floats by the imprint of the mating plane of the carburetor body on the cover gasket.
The floats should be located at the centers of the prints, and the side surfaces of the floats should be parallel to the walls of the float chamber. We change the position of the floats by bending their holders. If the gasket is damaged, then prints on a new one can be obtained by painting the mating surface of the float chamber with a thin layer of used oil, a marker or felt-tip pen and pressing the cover with screws to the carburetor body. Holding the cover horizontally with the floats up, we check that the supporting surface of the float bracket tongue is perpendicular to the axis of the needle valve. If necessary, use pliers or a screwdriver to bend the tongue. If the bearing surface of the tongue is deformed or has burrs, for example after careless repairs, the floats should be removed. You can level the surface using pliers and a file. If the tongue is severely damaged, replace the floats with the bracket. To adjust the fuel level, turn the lid over with the floats up and place it on a horizontal surface. The damper ball must be recessed into the valve needle under the weight of the floats. Using the shank of a drill or a piece of wire with a diameter of 1 mm, we check the gap between the protrusion of each float and the cover gasket.
The gaps must be the same and equal to 1±0.25 mm. The size of the gap is adjusted by bending the float holders. The position of the floats can be more accurately adjusted using a depth gauge. To do this, measure 5.7 mm from the outer edge of the gasket on the side of the air damper control lever and make a mark with a sharpened pencil.
We set the caliper scale to 70.6 mm. By placing one jaw of the caliper on the mark, we check the position of the floats. There should be a gap of no more than 1 mm between the jaws and the side surfaces of the floats.
To adjust the fuel level using a caliper, set its scale to 34 mm. Using a depth gauge ruler, we check the distance from the cover gasket to the top edge of each float.
By bending the holder, we ensure that the edges of the floats are at the level of the end of the caliper. Lifting the floats by the bracket, we check their stroke, which, when measured along the lower corner of the float, should be 15 mm.
To adjust the stroke, bend the limiting protrusion on the bracket.
Having adjusted the position of the floats, turn the cover vertically (the damper ball should not be recessed into the valve needle) and make sure that the line from the mold on the side surface of the floats is parallel to the mating plane of the cover.
A significant deviation from parallelism when correctly adjusting the fuel level indicates a malfunction of the float mechanism: most often due to a stuck damper ball.
Possible problems when setting up XX
When the quantity screw is tightened, the engine does not react at all . This problem can occur when a large amount of fuel enters the idle diffuser. There may be several reasons for this:
- an XX jet of a larger size than necessary is installed;
- the plug or solenoid valve is not tightened properly, so gasoline is sucked in, bypassing the XX jet;
- The jet or its seat is deformed.
To identify the specific cause of the above problem, it is necessary to disconnect the wire from the valve while the engine is running, and the motor should immediately turn off. If this happens, most likely the wrong size XX jet is installed. When the engine does not stall when the power supply to the valve is turned off, it means that fuel is supplied bypassing the exhaust system, including the nozzle itself.
To eliminate the malfunction, first remove the plug or solenoid valve and check the condition of the nozzle and seat for any deformations. If the seat is damaged, you will have to replace the carburetor cover. If no damage or deformation is detected, put the jet on the solenoid valve and lubricate the o-ring with oil. Then we tighten the nozzle with a wrench, holding it with one finger without much effort.
How to choose jets?
The selection of jets for Solex 21083 is made taking into account the engine size. Experts recommend starting the selection with a fuel nozzle for the first chamber. Having selected the desired sample, we select the corresponding air analogue for it. And then in the same order we select the jets for the second chamber. First you need to look for a factory carburetor designed for the size of your engine, remove the jets from it and take them as a reference point. Further selection of jets is made according to this principle. If you need to lean the mixture a little, choose a larger jet by one pitch. If you want to enrich it, use a smaller jet.
Emulsion hoses are assembled along with the jets. These tubes are designed to adjust the composition of the fuel mixture in accordance with engine speed. There are three types of tubes: 23, ZC and ZD. The first are used for Solex 21083 carburetors installed on transverse chisel engines. For the first chamber of carburetors of UZAM power units, ZD tubes are used, and for the second - ZC.