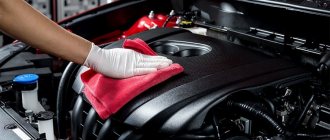
With the help of an additional pump for the VAZ stove, you can solve the problem with the low performance of the cooling system. This can be done on almost any domestic car. The stove functions normally under average operating conditions, but it may fail at extremely low or very high ambient temperatures. If the outside temperature is very high, the engine will begin to overheat. If the temperature is too low, the cabin will be very cold. This happens due to the fact that the heater does not work well and cannot provide normal air temperature in the car.
Step-by-step installation of an additional pump on a VAZ-2114
Many VAZ-2114 owners are dissatisfied with the performance of the standard heating system; this issue becomes especially relevant with the onset of severe cold weather, which is constantly observed in our region. Solving this issue is quite simple if you install an electric pump as an addition to the standard heating system. You can choose another option - install an additional radiator, but reviews from experienced drivers indicate that the best solution to this issue would be to install an additional pump. Many people are interested in the question: what advantages can you really get by making this decision? First of all, quick and simple installation, because for this event you will need to allocate at most 15 minutes, and ease of purchasing all the necessary components, which are sold by the domestic manufacturing plant AvtoVAZ. Of course, it should be noted that installing an additional pump on a VAZ-2114 is so simple that every car enthusiast can handle it, if, of course, when working, he adheres to the recommendations that are further provided in this article.
Installing an additional pump on a VAZ 2114 - step-by-step instructions
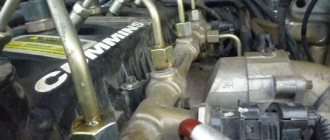
- The first step is to disassemble our add-on. pump, this is done in order to improve the tightness of the connections. Remove the rubber gasket and coat it generously with sealant. As many who have done this procedure write, over time the rubber gasket begins to leak, so it is necessary to “seat” everything with sealant. Instead of standard fasteners, I decided to use studs with nuts of suitable diameter.
- Installation of an additional pump. In most cases, everyone recommends draining the antifreeze, but I was able to complete the installation without the need to drain the coolant. The connection looks like this: we take the “original” pipe that goes from the stove to the pump and connect it. The L-shaped part of the hose that goes to the block had to be cut off, and the pump outlet was connected with another hose. All hoses are secured with clamps, and the pump itself is conveniently located on one of the gearbox fasteners; all that was required was a curved bracket. You can see more clearly what it looks like in the photo.
What components need to be purchased in advance?
Before you begin installing an additional pump, you should prepare several necessary components:
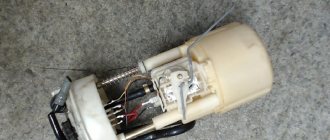
- Additional electric pump. Ideally, you need to buy a pump, which is recommended for installation on the Gazelle. It is this design that will perfectly cope with its main purpose, and it is most convenient to install it on the VAZ-2114.
- Ignition or starter relay, since the contacts in these components open perfectly.
- A small piece of aluminum or reinforced hose.
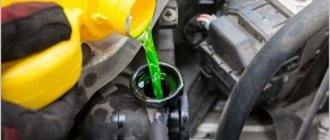
- Cooling liquid, at least 2 liters.
- Connecting clamps 6-8 pieces.
Once all the components have been assembled, you can begin installing the additional pump.
Step-by-step installation of a pump in a VAZ-2114
Before you begin installing an additional pump yourself, you must first wait until the engine has completely cooled down and drain the coolant. Since antifreeze or antifreeze will still be needed in the future, you need to prepare a clean container of the appropriate size to drain the liquid. Next, installation is performed according to the following scheme:
- You need to unscrew the screws from the new pump and securely treat the rubber gasket in place of the clamps with sealant. Reassemble everything in the reverse order, but instead of self-tapping screws, use bolts and nuts of the appropriate size for better and more reliable fixation.
- Next, you need to determine the most suitable place to install the new equipment. According to experts, the pump can be installed:
- on the washer reservoir retainer;
- on a pin located near the battery;
- on the fastener located on the engine shield.
When installing an additional pump, it is necessary to pay attention to the location of the horizontal pipe, the front side of which should be directed towards the block.
- Hoses. To install the hoses in the additional pump, you need to disconnect them from the standard stove and the pipe that comes out from under the manifold. Using a reinforced or aluminum hose of the required length, the hoses are connected to the stove and additional pump. And to connect the hose to the manifold, you will need a small adapter to prevent bending. It is imperative to secure the connections with special clamps and carefully check the reliability of the fixation.
- To put a new pump into action, you need to install a button to activate it. You can get complete information on this issue and study the connection diagram from a video tutorial conducted by experts in their field on the web resource.
- The operation of the new device is checked. To check how the additional pump works, you need to fill in the coolant and, if necessary, add more antifreeze. Next, you should start the car’s engine, wait a few minutes for it to warm up, and activate the button to start the new pump.
If warm air enters the cabin, it means that the car owner has successfully installed an additional pump, and now the interior of his car will be warm even on the coldest frosty day.
It is quite easy to install an additional heating device in a VAZ-2114 yourself, and in case of any difficulties, car enthusiasts can watch a video on the Internet, in which they can easily find the answer to any question regarding the installation of an additional heating device.
Installing an additional pump on a VAZ 2114 at home
Hi all. Today I’ll tell you about a useful modification to the stove, which will improve the efficiency of the stove, and at the same time the interior climate. You will learn how to install an additional pump on a VAZ 2114 at home.
Owners of “fourteenth and fifteenth” are well aware of how there is not enough warmth in cold times, and we are not talking about global seasonal cooling, but about the climate inside the beloved swallow. While driving, the stove’s performance is quite sufficient, but as soon as you stop somewhere at a traffic light or in a traffic jam, the stove immediately begins to heat poorly, a lukewarm stream of air comes out of the air ducts, which makes it difficult to warm up. It was experimentally determined that the pump does not have enough power or speed to disperse hot antifreeze.
In fact, not many people know that the “jamb” with the stove and pump, which is observed in all “our” cars, can be eliminated quite easily, the main thing is to know the sequence of actions. As an option, some install an additional radiator, but a more effective option is to install an additional electric pump, which increases the performance of the stove and accelerates heat transfer.
For our “experiments” it was decided to use an additional pump from the “Gazelle”; it was decided to install it on the “return” of the stove. In addition, we needed:
- A button (in my case “recirculation”) plus a connector;
- Four-pin relay, plus a connector for it;
- Several pipes plus clamps for them;
- Wiring;
- Fuse socket;
- Sealant;
- A bracket in the form of a metal corner plus a couple of bolts;
- Well, as I already said, the pump itself, in my case from a Gazelle.
When everything is available, you can transgress!
Additional pump for the VAZ 2114 stove: insulating yourself for winter
Let's be honest, the standard heating in the VAZ 2114 is not the best. In really cold weather, the car begins to resemble a refrigerator, and in order for it to warm up, you just need to spend a lot of gasoline warming up. Some car enthusiasts solve the problem by installing a second radiator, but it seems to us that a more effective solution would be an additional pump for the VAZ 2114 stove.
Being additional, it pumps and circulates liquid in a small circle, and its installation will take the car enthusiast only 5 minutes. The only inconvenience is that it is necessary to drain the coolant, so it is better to time the upgrade to coincide with the replacement period.
Replacement is extremely simple and does not introduce undesirable structural changes to the car, because parts for such an “operation” are even produced by AvtoVAZ itself.
What machines might have problems?
Very often such problems can be found in cars of the 9th family, as well as the 14th, “tens”, as well as “Gazelles” and “Volgas”. The only exception is the GAZ-31105 model. On this car, the listed malfunctions can manifest themselves even at normal temperatures. The problem is that there is a lot of liquid in the system, and the pump power is simply not enough.
Please note that there is no need to install an additional pump on the Gazelle stove if the engine is overheated or the stove fails to operate at normal temperatures. If the temperature ranges from -25 to 25 degrees, then a standard working cooling system will function normally in this case. If a failure occurs, then you need to look for a breakdown, which, as a rule, lies in the standard pump or thermostat. Sometimes radiators become clogged.
Cooling system
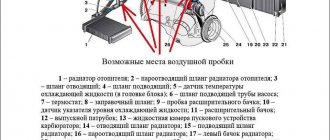
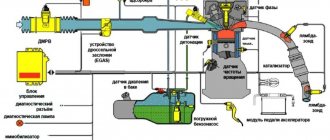
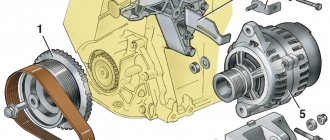
According to the standard cooling system diagram, we will embed our additional pump into hose No. 19, which is connected to part No. 20 (supply pipe).
Please note that we are not interested in supply hose No. 21, although it is closest to the thermostat (No. 29). If you look under the car and look at the partition, we will see two hoses; we need the right one (more precisely, the one closest to the right wheel). It will need to be replaced with a prefabricated part consisting of this hose (article 21083-8101010-01), a hose connecting to pipe No. 20 (article 2101-8101204) and the electric pump itself (additional pump for VAZ 2114), which you will purchase.
Additional pump for the stove in a VAZ
With the help of an additional pump for the VAZ stove, you can solve the problem with the low performance of the cooling system. This can be done on almost any domestic car. The stove functions normally under average operating conditions, but it may fail at extremely low or very high ambient temperatures. If the outside temperature is very high, the engine will begin to overheat. If the temperature is too low, the cabin will be very cold. This happens due to the fact that the heater does not work well and cannot provide normal air temperature in the car.
Pump installation
The gazelle pump will still have to be modernized, so initially we will consider a simpler option, namely, how to install an additional pump on a VAZ 2114 from a German brand.
When all the necessary spare parts have been purchased, the algorithm of actions is as follows:
- We assemble the above-mentioned structure from two hoses and the pump itself.
- In fact, our unit will have to act as a drain for antifreeze, so it must be assembled with high quality.
- We put the car on the handbrake and drain the coolant (it’s also better to disconnect the battery).
- We find two hoses from the stove according to the diagram, remove the right hose.
- Instead of the removed hose, we mount the structure we assembled, and attach the pump itself to the manual transmission housing. It is best to use a screw that secures the ground wire.
- We fill the system with antifreeze, after which the car can be used.
The version with the Gazelle pump is somewhat different from the previous one, but the principles are similar. First, such a pump must be upgraded. It is disassembled and coated with sealant; if this is not done, antifreeze will ooze out of all the holes. When reassembling, it is better to replace standard screws with high-quality screws. After good treatment, the mechanism is left for two days, during which it will dry and be ready for installation.
By the way, you can connect the knock sensor plug to the pump connector.
The indisputable advantage of the Gazelle pump is that it does not need to be connected, you can simply assemble it and everything will work as before, unless of course you want to install a control button. In addition to the need for modernization, you will have to work extra hard during installation. It needs to be installed in the upper corner of the manual transmission, therefore without additional. parts from the VAZ 2101 are indispensable.
How to install a pump
It is best to install an additional pump for the stove either in the engine compartment or under the dashboard. It is best, of course, to install it under the hood, since excess sound during operation will not penetrate into the cabin. In addition, you completely eliminate the risk of antifreeze getting inside the cabin if a leak suddenly occurs. The unit can be mounted using additional brackets. For all VAZ and GAZ cars, an additional pump is installed in the supply pipe of the stove. Consequently, you will be able to achieve the injection of coolant into the radiator, which significantly increases heat transfer.
Please note that in this case, during operation, the pressure in the cooling system will increase significantly. This can lead to loose pipes breaking off or the radiator breaking through. Therefore, before installing additional equipment, it is necessary to fully diagnose the cooling system, and be sure to eliminate all faults.
Installing a button
If you decide to acquire additional control for this modification, you will have to fool yourself further.
Voltage + can be taken directly from the battery, but we must not forget about the fuse on the wire where the sealed holder hangs.
In short, the installation is simple:
- remove the panel;
- disassemble it and remove the backlight button;
- we replace its contents with what we need and collect it back.
But in practice, everything is not so simple and this algorithm requires several clarifications:
- We remove the rheostat (in principle, you can throw it away, it is no longer needed).
- The wiring is heat-shrinkable and attached for convenience to the rest of the wire bundle.
- We prepare the negative (we look for it in the area of the dashboard) and positive (you can take it from the ignition) terminals.
- We find a vacuum booster, install a relay in its area, and then pull the wire from it into the interior to the button.
- The electrics are connected, we connect everything on the button, and then we put the dashboard back together.
There are examples of craftsmen who do not drain the antifreeze, they simply plug the pipe during the work, the latter’s costs are only 1.5-2 liters.
What does it give
An additional VAZ 2114 pump provides warmth and comfort in your favorite car. You can save a lot on warming up your car if you like comfort. In practice, the car will noticeably heat up within 5 minutes after turning on the heating system, which cannot be achieved using a standard heating system.
Speaking of pros and cons: firstly, the domestic pump has only a plus, and the minus is the unit housing itself, and secondly, it is better not to leave a plus on the battery, despite the fuse, it is better to look for another point to connect it.
Useful video You can find an example of installing an additional pump below: https://www.youtube.com/watch?v=hy-JZsd5vt4
What is a pump?
You may be interested in: ERP system for small businesses: what it will do and how to implement it
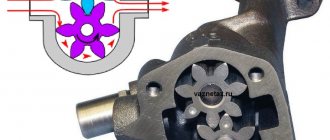
A pump is a liquid pump that creates excess pressure in the cooling system. Using this pressure, the liquid circulates through all pipes of the system, evenly taking heat from all heated elements. On most vehicles, pumps are mechanically driven by timing belts or a generator.
As for the additional pumps, their design is approximately the same as the standard ones, except that they are driven by an electric motor. This is much better, since even at low crankshaft speeds (i.e., at idle), effective cooling can be achieved. All liquid will circulate through the channels at maximum speed, which will improve the operation of the entire system.
Please note that to this speed you still need to add the pressure that is created by the standard pump - no one removes it during modernization. After all, the task is not to replace the pump with another, but to improve performance.
Do-it-yourself installation of an additional pump on the VAZ-2114 stove
If standard heating is not enough, the problem must be solved somehow. You can try installing a second radiator, but a more obvious solution would be to install an electric pump. It is additional and pumps liquid along a small circuit. An additional pump can be installed on the VAZ-2114 stove in 5 minutes. The problem is that the coolant needs to be drained. Otherwise, there will be no difficulties: all parts are standard and are produced by AvtoVAZ itself.
The result of our efforts is what is shown in the video. Let's see.
When should you consider installing a second pump?
An additional pump for the VAZ-2114 stove can significantly improve comfort in the car in winter. It is often necessary to install an additional pump in the cooling system in the following cases:
- If the air temperature is more than 30 degrees, and the engine in such conditions overheats to critically high values. But only if the entire cooling system is in good condition. Therefore, before installing an additional pump, you need to make sure that the cooling system is working correctly.
- In the event that in cold weather the heater blows cold at idle, and the engine temperature, according to the dashboard indicator, is in the operating range.
But such problems do not always arise and not on all cars. The main criterion is the complete serviceability of all cooling elements. If the thermostat is faulty, then no additional pump will help in this case. First, you need to completely overhaul the system, install new pipes and clamps, and treat the joints with sealant. And only after that carry out the modernization.
Cooling system and its features
From thermostat 29 to tap 21 there is a “supply hose”. We are not interested in him! The pump is inserted into hose 19. It is connected to the pump supply pipe (part 20).
Everything here is trivial
If we look from under the bottom, we will see two hoses near the partition. We need the one that is fixed closer to the right wheel. And now, instead of hose 19, an assembly is installed: the same hose “21083-8101010-01”, an electric pump, hose “2101-8101204” (to pipe 20). That's all, actually.
Each hose is attached to the nozzles with two clamps. The article number of one clamp is “2108-1300080-10”.
Purchase parts in advance:
- BOSCH pump 0 392 020 034 or pump 32.3780-01 for Gazelle with 18 mm pipes (important);
- Electrical parts;
- All hoses and clamps;
- The BOSCH pump requires VAZ fasteners: a intake pipe clamp, as well as a bracket for this clamp (all from LADA-2101).
The pump from the Gazelle will have to be modified: the body is disassembled, degreased, the rubber gasket is lubricated with sealant...
GAZ pump after modification
When assembling, use screws with nuts instead of standard self-tapping screws (see photo).
By installing an additional pump on the VAZ-2114, you don’t even have to connect it. Everything will work as before. The main thing is that the pump does not leak, and we have already indicated the solution.
How to install a pump on a VAZ 2114. Do-it-yourself replacement
VAZ 2114 and VAZ 2115 are considered a kind of “star” of AVTOVAZ in the early 2000s.
These models are truly distinguished by their unpretentiousness and durability. Every owner who closely monitors his four-wheeled friend understands how important it is to provide timely care for the mechanisms. To maintain engine operation in normal mode, it is enough to change the oil on time and monitor the cooling system. However, if changing the oil usually does not present any difficulties for drivers, working with the cooling system and, in particular, with the pump can cause some difficulties. Why do you need a pump in a car?
Speaking about engine operation, one cannot help but appreciate the functionality of the cooling system. After all, it is thanks to its high-quality work that it becomes possible to operate the engine in any weather and in any mode.
The engine is a very complex component of any car. Constant friction of the pistons leads to the fact that the engine parts quickly heat up, this can lead to their “jamming”. There is only one way to prevent engine overheating - by constantly maintaining the standard temperature. It is for this purpose that the cooling system was created in the machine.
Coolant is poured into the expansion tank (on VAZ 2114, VAZ 2115 cars, both antifreeze and antifreeze can be used with the same success). From the tank, the liquid flows through tubes into the water pump (its second name is a pump), and from there into the radiator and to the cylinder block. It is the circulation of liquids that ensures high-quality and timely cooling of the engine.
The water pump is set in motion after the power unit is started. On VAZ 2114, 2115 it is located in the timing system, that is, the pump impeller is driven by the timing belt. The impeller rotates the blades, due to which the antifreeze begins to circulate throughout the system. If there were no pump, then there would be no point in the entire cooling system.
The pump serves one single purpose - to create the necessary pressure in the system for uninterrupted circulation of antifreeze.
Replacing the pump on a VAZ 2114 (8 valves)
Replacing the water pump is a rare procedure that any car will need sooner or later. The design of the pump is a very simple device, which is why it breaks down infrequently. However, over time or due to aggressive driving style, any unit can fail.
How to check the pump
On VAZ 2114,2115 it is very easy to identify a faulty water pump. You do not need to have any special knowledge, since there are only three signs that you need to pay attention to.
Engine overheating
If even in the winter, when driving short distances, the fan cannot cope with cooling, then this sign may indicate that not everything is in order with the pump. If the gauge needle at the engine temperature is constantly above the operating mark of 90 degrees, then it’s time to carry out checking work:
- Start the engine and warm it up to operating temperature.
- Turn on the stove.
- If cold air immediately begins to flow from the stove, then the circulation in the cooling system does not work normally.
- It is necessary to replace the pump, as the malfunction is associated with damage to the impeller.
Timing belt wears unevenly
When examining the hydraulic distribution mechanism of a VAZ 2114, VAZ 2115, you may notice uneven wear on the belt. Indeed, due to the fact that the pump is directly driven by the timing belt, it wears unevenly (for example, only on one side) - this symptom also indicates a breakdown of the water pump.
You will need to remove the belt to verify the reality of your guesses. Due to wear of the pump bearings, it can become loose and therefore quickly break. While the pump itself can still perform its function normally for some time.
Pump leaking
If the water pump sits on the car for a very long time, then sooner or later the oil seal will wear out so much that it will begin to leak. An antifreeze leak in the timing belt under the pump is one of the signs of a pump malfunction. When a few drops are released per day, the situation cannot be considered critical: the pump generally copes with its job, providing high-quality cooling of the engine. However, if a large amount of antifreeze leaks from under the pump, you need to change the pump urgently.
In some cases, leaks can occur both due to wear of the oil seal, and due to improper installation of the gasket when replacing the pump.
Preparing the tools
Regardless of what specific problem arose on your car, the only solution to fix it is to replace the pump. This work on a VAZ 2114, VAZ 2115 can be done independently, since the convenient design of the machine makes it possible to carry out all stages of work without special skills.
First you will need to prepare a simple tool:
- wrenches 10, 17 and 19;
- socket head 10;
- flat screwdriver with a thin blade.
How to change the pump
The procedure for working on a VAZ 2114, 2115 with an 8-valve engine is determined as follows:
- Remove the protective cover from the timing belt.
- Slightly loosen the tensioner roller.
- Slightly reduce the tension on the alternator belt, and then remove the alternator belt and timing belt.
- Disconnect all hoses from the pump (antifreeze may leak out, so it is recommended to place a container under the pump in advance or cover the area with a rag).
- Drain the antifreeze from the system (just unscrew the cap from the radiator so that the liquid flows out in 10 minutes).
- Disconnect the pump protective cover and pull out the pump.
- After dismantling, be sure to clean the flange surfaces from smudges and dirt, and also remove the remnants of the old rubber gasket.
- Next, you will need to perform all work on installing the new pump in reverse order.
Approximate procedure for installing an additional pump
If all the necessary parts have been purchased, do the following:
- A “unit” consisting of three parts is assembled. The short hose is the “outlet”. Below is an example with a BOSCH pump.
Antifreeze drainage unit
External outlet hose
BOSCH pump mounting method
Be aware that the plug from the knock sensor will fit into the pump connector (you need to buy it). The connection diagram is discussed below.
Example with a GAZ pump
Clarifications for the domestic pump:
- Do the “assembly” as in step 1 (see above);
- The “assembly” is assembled;
- The pump mounting location is the upper corner of the manual transmission housing (see photo). Without the details of an iron constructor about here .
GAZ pump mounting method
Variant of the scheme for the VAZ-2114
We connect the motor through a fuse and a relay rated at 10 Amps. The relay will be turned on by a button attached to the device.
Scheme (simple version)
The “+” voltage was taken directly from the battery, but this can be done - a sealed holder “hangs” on the wire, where the fuse (5A) is located. Installing a button looks simple:
- Remove all the handles;
- Move the plastic panel towards you;
- We install a new button and connect the wires.
As a result, you can see what is shown in the photo.
Cooling system and its features
From thermostat 29 to tap 21 there is a “supply hose”. We are not interested in him! The pump is inserted into hose 19. It is connected to the pump supply pipe (part 20).
Everything here is trivial
If we look from under the bottom, we will see two hoses near the partition. We need the one that is fixed closer to the right wheel. And now, instead of hose 19, an assembly is installed: the same hose “21083-8101010-01”, an electric pump, hose “2101-8101204” (to pipe 20). That's all, actually.
Each hose is attached to the nozzles with two clamps. The article number of one clamp is “2108-1300080-10”.
Purchase parts in advance:
- BOSCH pump 0 392 020 034 or pump 32.3780-01 for Gazelle with 18 mm pipes (important);
- Electrical parts;
- All hoses and clamps;
- The BOSCH pump requires VAZ fasteners: a intake pipe clamp, as well as a bracket for this clamp (all from LADA-2101).
The pump from the Gazelle will have to be modified: the body is disassembled, degreased, the rubber gasket is lubricated with sealant...
GAZ pump after modification
When assembling, use screws with nuts instead of standard self-tapping screws (see photo).
By installing an additional pump on the VAZ-2114, you don’t even have to connect it. Everything will work as before. The main thing is that the pump does not leak, and we have already indicated the solution.
Another pump
An additional pump for the VAZ-2107 stove can also improve heating in the car. The pump is usually installed next to the battery and hoses. When installing, you need to remove one hose that comes directly from the unit. Connect this hose to the additional pump. The hose should go from the block to the bow of the pump, and the outlet hose should go to the stove.
Power for the additional pump is taken from the heated rear window button. There is only one positive wire coming from the additional pump motor, and the housing itself is ground.
Powering the pump is simple:
- The very first plug with wires is removed, and the second gray wire, responsible for heating the rear window, will be our basis.
- We wind the power from the pump to it and bring it under the hood.
- To keep the wire more secure, you can solder it.
- After installing the plug back, you can say that the pump is ready for use.
Sometimes an additional pump is installed on the VAZ-2107 stove due to poor air circulation. In addition, at low idle speeds there may be no circulation at all, and the flow of antifreeze to the stove is poor.
Based on the results of operation, the additional heater on the VAZ-2107 will turn on every time the rear window heating is turned on.
But you can connect the pump in another way. To do this, you will need a connector from the injectors/knock sensor from the VAZ. It can be purchased at any auto parts store.
It is necessary to solder two wires to the ends of the connector of the part, after which everything is hidden in the corrugation and sealed with electrical tape.
Separately we bring out the wire for connecting the ground. We find it on a bracket nearby. We carry the harness up, connect the heater resistors to the block, where the plus was taken from.
As a result, when the heating is turned on, another pump is turned on, consuming only 1.5 A in operating mode. In this case, you can not install a relay and connect directly to the positive wire in the block.
What to expect in the end?
When all the elements are installed and connected according to the diagram, it is necessary to perform operational tests. It is imperative to fill the system with antifreeze - starting the pump without it is strictly prohibited, as this will lead to its failure. The minimum operating time of the pump during testing is 1 hour. At the same time, be sure to inspect all joints and connections to identify leaks. If they are not detected, it is necessary to check the operation of the system on the fly. After all, it may be that the pump operates stably in idle mode, but when the pressure increases, it simply fails. If all work is done correctly, warmer air will enter the cabin. In addition, even under increased load, the motor will be cooled efficiently.
Let's be honest, the standard heating in the VAZ 2114 is not the best. In really cold weather, the car begins to resemble a refrigerator, and in order for it to warm up, you just need to spend a lot of gasoline warming up. Some car enthusiasts solve the problem by installing a second radiator, but it seems to us that a more effective solution would be an additional pump for the VAZ 2114 stove.
Being additional, it pumps and circulates liquid in a small circle, and its installation will take the car enthusiast only 5 minutes. The only inconvenience is that it is necessary to drain the coolant, so it is better to time the upgrade to coincide with the replacement period.
Replacement is extremely simple and does not introduce undesirable structural changes to the car, because parts for such an “operation” are even produced by AvtoVAZ itself.
Tools for installing an additional pump
Modernization of the VAZ-2115 heater consists of installing an electric pump, which will save passengers and drivers from the cold, especially when the vehicle is idling.
Before starting installation, prepare the following tools and materials:
- Electric pump suitable for a gazelle. Experts recommend this type of pump; it pumps heat into the cabin in the most efficient way. Externally, the device resembles a centrifugal pump, where the fluid flow is rejected from the center of the periphery using blades.
- Relay. Ideally, a starter or ignition device would be suitable; here the open contacts are more convenient.
- Small pieces of hose made of aluminum and reinforced material.
- Coolant with a volume of 2 liters or more. You can take antifreeze, antifreeze or, in extreme cases, ordinary water.
- 6 clamps.
Installing an additional pump on a VAZ 2109
In this article we will learn how to install an additional pump on a car like a real auto electrician. The VAZ 2109 is a car that allows you to constantly modernize and improve something, however, like all models of this family. Let us present to the reader two algorithms on how to mount a pump from Gazelle and from Bosh.
Installing a Gazelle pump
As mentioned above, this is the most common option for installing an additional pump. Tools and materials:
- The Gazelle pump is standard. Costs about 1000 Russian rubles.
- Relay with normally open contacts. Standard relays from the starter or ignition will do, where you just need to bridge the necessary contacts.
- Some reinforced hose.
- 2 liters of coolant (regular antifreeze).
- Medium-sized clamps in the amount of 5 pieces.
- We wait until the coolant in the system cools down. The antifreeze is drained from the tank into some clean container if its reuse is intended. If you intend to use new antifreeze, then you can drain it for recycling.
- On top of the pump we see 4 screws. They will need to be unscrewed to get to the rubber seal of the impeller. We lubricate this gasket with a sealing compound.
- We assemble the pump, but instead of standard self-tapping screws we install long thin bolts, on the advice of an auto electrician. The VAZ 2109, by the way, is a car in which the Gazelle pump is quite successfully installed.
Advice. Some motorists who are installing an electric pump for the first time are wondering: where is it better to install the pump, in the gap in the heater supply pipe or in the outlet pipe? In fact, there is no difference in this, as long as the pump is installed downstream of the coolant flow.
- We attach the electric pump.
Auto electrics for VAZ 2109 – electric pump
Note. You can mount the additional pump on the VAZ 2109 directly to the stud of the washer reservoir or to the stud near the battery. In addition, some craftsmen advise installing it on the factory Shumka mount, which, as you know, is located on the engine shield. It is most rational to place it near the battery, which is what we will do.
- Unclench the iron clamp.
- We install the pump with a horizontal pipe towards the block.
Variant of the scheme for the VAZ-2114
We connect the motor through a fuse and a relay rated at 10 Amps. The relay will be turned on by a button attached to the device.
Scheme (simple version)
The “+” voltage was taken directly from the battery, but this can be done - a sealed holder “hangs” on the wire, where the fuse (5A) is located. Installing a button looks simple:
- Remove all the handles;
- Move the plastic panel towards you;
- We install a new button and connect the wires.
As a result, you can see what is shown in the photo.
Circulation button
What can be improved
- A diode is connected in parallel with the relay winding in the “back to front” direction, thereby extending the service life of the button;
- Connecting to the battery directly is bad. It’s better to find another point with a “plus”;
What we got
- The engine drive of the faucet is used on many cars, including the VAZ-2114, and it is this (the engine itself) that must turn on the additional pump. If anyone can implement something like this, it would be nice to leave your answer in the comments. By the way, a regular limit switch will not help here.
Connection diagrams
Please note that almost any electrical connection scheme can be used. It depends on what goals you set for yourself. If you are installing a pump to cool the engine more, it is recommended to connect it so that it always functions when the ignition is turned on. The pump can be powered directly from the battery. But you need to make sure that the circuit is closed only with the help of an electromagnetic relay, which will be activated only after turning the key in the ignition switch.
Working with a resistor
In order to be able to regulate the rate of heat entering the cabin, you can install an additional resistor for the VAZ-2107 heater. Typically the resistor has two spirals with a resistance of 0.23 and 0.82 Ohms.
The new resistor is installed under the gas pedal so that access to it is free. When the stove is turned on at first speed, the current will flow through 2 spirals. At the second speed, the current will flow through a spiral with a resistance of 0.23 Ohms. Current flows past the resistor when the third speed is turned on.
The resistor is located to the right of the accelerator pedal and is mounted on the rear of the air conditioning control unit.
Thus, the car will warm up much faster and better. An additional advantage is the reduction of glass fogging and air circulation in the cabin. In general, the heating of the air in the car will be more uniform.