July 27, 2020 Lada.Online 254 971 29
Have you noticed that the heater in your car is blowing cold air? There may be several reasons for the problem, but most often this occurs due to the formation of an air lock in the engine cooling system. Next, we will tell you how to remove air from the cooling system of Lada cars (Granta, Kalina, Priora, Largus, Niva, Vesta or XRAY) in several ways.
Let us remind you that AVTOVAZ installs the same type of power units on its models, so the instructions are similar for all Lada cars.
Solving the problem of airing the engine cooling system on Lada cars
Have you noticed that the heater in your car is blowing cold air? There may be several reasons for the problem, but most often this occurs due to the formation of an air lock in the engine cooling system. Next, we will tell you how to remove air from the cooling system of Lada cars (Granta, Kalina, Priora, Largus, Niva, Vesta or XRAY) in several ways.
Let us remind you that AVTOVAZ installs the same type of power units on its models, so the instructions are similar for all Lada cars.
How to expel air, method No. 1
- Remove the hose from the throttle body heating.
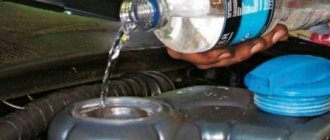
- Open the cap of the expansion tank, cover the neck with a clean rag and blow into the tank.
- When antifreeze starts flowing from the removed tube, quickly put the hose back in place and tighten it with a clamp.
Attention! Coolant is a toxic substance, so we recommend that you use other methods to solve the problem.
How to expel air, with method No. 2
- Warm up the engine until pressure builds up in the engine cooling system.
- Stop the engine and remove the hose from the throttle body heating. We do not open the expansion tank cap.
- As soon as antifreeze runs out of the hose, quickly put it back on and tighten it with a clamp.
Attention! Antifreeze can be very hot, be careful.
How to “drive out” a traffic jam?
There are several ways to eliminate a blockage in the cooling circuit of the Lada Kalina power plant. Next, let's look at their features and how to remove air.
Method one
The location of the throttle assembly appears as a design convenience for the LADA Kalina cooling circuit. It is located at the highest point of the system. The procedure for eliminating a traffic jam is as follows.
- We set the heater temperature switch (knob in the cabin) to maximum.
- Under the hood, remove the valve cover protective panel.
- Use a screwdriver (cross-shaped) to loosen the clamp and remove the rubber inlet pipe from the throttle body fitting (you can also resort to removing the outlet hose).
- Unscrew the cap on the expansion tank.
- Now we use our own mouth. With its help and through a sterile cloth, we pump the air accumulated in the lungs into the expansion tank. We do this until antifreeze appears from the specified fitting.
- If this is successful, then return the hose to its place, secure it and screw the cap onto the tank.
However, this is not the only method of removing air.
Method two
Its principle closely echoes the manipulations in the first method. There is no need to get your mouth dirty or even open the tank lid. All actions boil down to:
- warm up the engine to operating temperature and turn it off;
- carefully removes the same hose from the throttle assembly;
- We observe liquid flowing out of the fitting: if it appears, then return the hose and tighten the clamp;
- a one-time manipulation may not be successful, so we repeat the procedure again until the liquid appears.
Method three
Let's look at another option for pumping air. Let us immediately note that this method is not particularly effective. The actions do not involve disassembling the system.
- Here you will need to drive your front wheels onto an embankment so that the highest point of the contour is the air plug in the cooling system on the radiator housing.
- It must be removed, as well as the cap on the expansion tank.
- We start the engine and bring the temperature in the circuit to the operating parameter.
- We observe a decrease in the volume of antifreeze in the LADA Kalina tank and immediately replenish it to the required level. During the process, air bubbles will be released from the liquid.
- We carry out the action until the release of air stops, as evidenced by the absence of “foaming” of the liquid inside the tank.
- We return the previously removed plug and cover to their original places.
How to expel air, with method No. 3
- With the engine cooled down, remove the upper hose from the expansion tank coming from the radiator of the cooling system.
- Fill the reservoir to the maximum with coolant and tighten the cap.
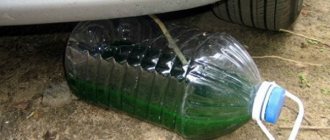
- We place the hose in an empty canister, and put a hose from the air pump (for inflating tires) on the tank nozzle.
- We pump up the pressure in the tank with a pump, and at the same time the antifreeze will pour into the canister.
- We monitor the level of coolant in the expansion tank and add it if necessary.
- After 2-3 additions of liquid, we restore all connections.
Refinement of SOD from airing
Owners of LADA Kalina (1.6l, 8kl) cars are offering a simple modification that will solve the problem of constant airing of the engine cooling system. If the antifreeze leaves, then you should look for a leak. If the antifreeze stands still and an air lock appears periodically, you should extend the hose from the radiator so that its end is immersed in the coolant in the expansion tank:
If this modification does not help and airing of the cooling system occurs periodically, then the car’s cooling system is not sealed. Check the connections of all system hoses for leaks, as well as the expansion tank cap.
Source
Solving the problem of airing the engine cooling system on Lada cars
Have you noticed that the heater in your car is blowing cold air? There may be several reasons for the problem, but most often this occurs due to the formation of an air lock in the engine cooling system. Next, we will tell you how to remove air from the cooling system of Lada cars (Granta, Kalina, Priora, Largus, Niva, Vesta or XRAY) in several ways.
Let us remind you that AVTOVAZ installs the same type of power units on its models, so the instructions are similar for all Lada cars.
How to expel air, method No. 1
- Remove the hose from the throttle body heating.
- Open the cap of the expansion tank, cover the neck with a clean rag and blow into the tank.
- When antifreeze starts flowing from the removed tube, quickly put the hose back in place and tighten it with a clamp.
Attention! Coolant is a toxic substance, so we recommend that you use other methods to solve the problem.
Three different methods for removing air from the cooling system
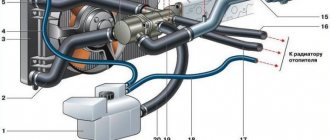
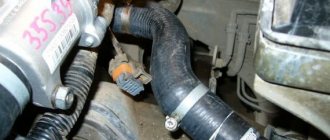
Let's see how the throttle assembly on the 11183 engine is arranged. Antifreeze flows through hoses 1 and 3, and hose 2 is a tube with air (do not touch).
Pipes on the throttle assembly VAZ-11183
Method 1 (remove the hoses on the throttle body)
If the engine has been warmed up, remove either of the two hoses by placing a container under it. 100-200 ml of liquid may leak out . The hose is immediately returned to its place, the fastener is tightened, and antifreeze is added through the neck of the tank. “Method 1” is discussed here.
When working according to “method 1”, the tank is not opened at first. To loosen the fastening clamp, you will need a Phillips screwdriver. All manipulations with hot antifreeze are carried out with caution.
The first time the air usually comes out. But, if the procedure is repeated, the plug can be completely removed.
Method 2 (tank cap off)
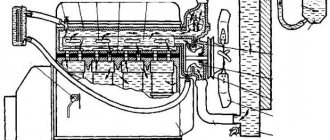
The engine remains cold. Open the tank cap. Then we do it as in “method 1” (see photo).
Pipes on the throttle assembly of the VAZ-2111
As you can see, antifreeze does not leak. Let's help him a little:
- We take the tube, bring it to the tank and create an airtight seal with our fingers;
The tank is ready for use
This method is universal. It is used on any car, including the VAZ-2114, and it is possible to expel air from the system immediately.
Method 3 (remove air without disassembling parts)
Let's consider the simplest method. You don't have to disassemble anything:
- We place the car on an overpass or hill so that the upper part of the radiator is higher than other parts;
- Open the cap on the expansion tank;
- We start the engine. The system will warm up;
- The antifreeze level may drop abruptly. The liquid is then added.
The point is that a steam exhaust hose is connected to the radiator. Air will escape through it into the tank.
Steam outlet on the tank (do not remove!)
It will be possible to increase the engine speed, but then make sure that the antifreeze does not boil . With the cover removed, this option is not excluded!
How to expel air, with method No. 2
- Warm up the engine until pressure builds up in the engine cooling system.
- Stop the engine and remove the hose from the throttle body heating. We do not open the expansion tank cap.
- As soon as antifreeze runs out of the hose, quickly put it back on and tighten it with a clamp.
Attention! Antifreeze can be very hot, be careful.
How to “drive out” a traffic jam?
There are several ways to eliminate a blockage in the cooling circuit of the Lada Kalina power plant. Next, let's look at their features and how to remove air.
Method one
The location of the throttle assembly appears as a design convenience for the LADA Kalina cooling circuit. It is located at the highest point of the system. The procedure for eliminating a traffic jam is as follows.
- We set the heater temperature switch (knob in the cabin) to maximum.
- Under the hood, remove the valve cover protective panel.
- Use a screwdriver (cross-shaped) to loosen the clamp and remove the rubber inlet pipe from the throttle body fitting (you can also resort to removing the outlet hose).
- Unscrew the cap on the expansion tank.
- Now we use our own mouth. With its help and through a sterile cloth, we pump the air accumulated in the lungs into the expansion tank. We do this until antifreeze appears from the specified fitting.
- If this is successful, then return the hose to its place, secure it and screw the cap onto the tank.
However, this is not the only method of removing air.
Method two
Its principle closely echoes the manipulations in the first method. There is no need to get your mouth dirty or even open the tank lid. All actions boil down to:
- warm up the engine to operating temperature and turn it off;
- carefully removes the same hose from the throttle assembly;
- We observe liquid flowing out of the fitting: if it appears, then return the hose and tighten the clamp;
- a one-time manipulation may not be successful, so we repeat the procedure again until the liquid appears.
Method three
Let's look at another option for pumping air. Let us immediately note that this method is not particularly effective. The actions do not involve disassembling the system.
- Here you will need to drive your front wheels onto an embankment so that the highest point of the contour is the air plug in the cooling system on the radiator housing.
- It must be removed, as well as the cap on the expansion tank.
- We start the engine and bring the temperature in the circuit to the operating parameter.
- We observe a decrease in the volume of antifreeze in the LADA Kalina tank and immediately replenish it to the required level. During the process, air bubbles will be released from the liquid.
- We carry out the action until the release of air stops, as evidenced by the absence of “foaming” of the liquid inside the tank.
- We return the previously removed plug and cover to their original places.
How to expel air, with method No. 3
- With the engine cooled down, remove the upper hose from the expansion tank coming from the radiator of the cooling system.
- Fill the reservoir to the maximum with coolant and tighten the cap.
- We place the hose in an empty canister, and put a hose from the air pump (for inflating tires) on the tank nozzle.
- We pump up the pressure in the tank with a pump, and at the same time the antifreeze will pour into the canister.
- We monitor the level of coolant in the expansion tank and add it if necessary.
- After 2-3 additions of liquid, we restore all connections.
Refinement of SOD from airing
Owners of LADA Kalina (1.6l, 8kl) cars are offering a simple modification that will solve the problem of constant airing of the engine cooling system. If the antifreeze leaves, then you should look for a leak. If the antifreeze stands still and an air lock appears periodically, you should extend the hose from the radiator so that its end is immersed in the coolant in the expansion tank:
If this modification does not help and airing of the cooling system occurs periodically, then the car’s cooling system is not sealed. Check the connections of all system hoses for leaks, as well as the expansion tank cap.
Source
How to understand that air has entered the cooling system
If your coolant level drops, air is getting into the system somewhere.
The main sign of a malfunction is a decrease in the efficiency of the stove. gurgling may be heard from under the panel , which indicates a fairly large air lock.
Similar sounds occur when the circulation of antifreeze is disrupted due to airiness in the system.
A plug may also form in the thermostat housing. This is evidenced by the increased engine warm-up time. Because of the air, the thermostat valve is constantly open, and therefore the liquid circulates only in a large cooling circle.
Why does air get into the system?
A malfunction of the valve installed in the expansion tank plug is the most common problem.
There are three main factors that cause air to enter the cooling circuit:
- Inaccurate addition of antifreeze.
- Partial depressurization of the system.
Regardless of the reason, air must be removed from the system, and the sooner this is done, the better.
How to bleed air using the VAZ model range as an example
The cooling fan turns on on a cold engine: the main reasons and solution to the problem.
VAZ models have a design advantage in the arrangement of the cooling system components - a convenient position of the cooled throttle assembly (carburetor), which is the highest place in the cooling system. The procedure for a Lada Kalina car is as follows (the only tool you need is a Phillips screwdriver).
Fully open the heater switch (to the highest temperature);
Remove the valve cover protective screen;
Disconnected heating outlet hose from the throttle fitting
Remove the cap from the expansion tank
Video: How to remove air from the expansion tank
The second method of releasing air differs from the first only in that you do not need to force air masses into the neck of the expansion tank with your mouth. All operations are performed with the engine normally warmed up and turned off. This method does not involve any manipulations with the expansion tank cap. Immediately remove one of the two heating hoses from the throttle fittings. If coolant leaks, the hose is inserted into place and tightened. It may not work out the first time, then the operation must be done again
This method requires care and caution, since the antifreeze is heated to a temperature of 90 degrees and is under increased pressure
The third method does not require any disassembly of the cooling system. True, its effectiveness is not very high. The car drives its front wheels onto an embankment so that the radiator cap becomes the highest point in the cooling system. The radiator and expansion tank caps are removed. The engine starts, the antifreeze temperature is brought to operating parameters. When reducing the volume of coolant, it must be constantly added to the amount recommended by the manufacturer. It is necessary to expel the air lock until bubbles stop coming out of the neck of the radiator or expansion tank.
Removing an air lock from the Lada Kalina cooling system
According to reviews of many car owners, the Lada Kalina car is recognized as one of the warmest cars of domestic production. It is very warm in the car in winter, the interior is evenly heated and the rear passengers in the car are comfortable, since the hot air from the stove is supplied to the feet of the rear passengers in full and is not “lost” in the air tunnels of the ventilation system as in cars 2109 and 2110.
If one day it became cool inside the Lada Kalina car, and instead of the usual hot air, cold air began to blow from the stove, then there was a problem in the car’s engine cooling system. Malfunction of the cooling system can cause the engine to overheat to critical temperatures and lead to serious engine damage. An air lock can cause many problems in the cooling system of a Lada Kalina car. Before removing the plug, it is first recommended to check the entire car engine cooling system (SOD), since the cause of ineffective operation of the SOD and a cold stove can be not only an air lock in the system, but also a breakdown or deformation of the pump impeller, kinks in the pipes, or incomplete opening of the thermostat . Only after checking the entire cooling system should you begin to remove the air lock.
Signs of an air lock in the engine cooling system
An air lock creates an obstacle in the cooling system, due to which antifreeze or antifreeze cannot circulate and evenly cool a running engine.
Let's sum it up
As you can see, an air lock in the cooling system is a significant obstacle to the normal functioning of the cooling system in the LADA Kalina car. It can not only cause the stove to become ineffective, but also cause more significant damage to the engine. Eliminating this negative phenomenon is not difficult, especially since now you know how to pump air, but the best measure would be timely and periodic diagnosis of the engine cooling system. It consists of checking the refrigerant level, the tightness of the circuit (reliability of clamps) and the functionality of the thermostat (control of heating of the lower radiator pipe).
The Lada Granta passenger car, which is considered one of the most affordable in the world, is equipped with a “stove” (or simply a heater) that is standard for VAZ cars. Typically this unit works very well, but problems can still occur. Therefore, if the Lada Granta stove does not heat well, then there must be reasons for this that simply need to be discovered.
The stove does not heat well and blows cold air Lada Granta: reasons
The Lada Granta passenger car, which is considered one of the most affordable in the world, is equipped with a “stove” (or simply a heater) that is standard for VAZ cars. Typically this unit works very well, but problems can still occur. Therefore, if the Lada Granta stove does not heat well, then there must be reasons for this that simply need to be discovered.
We carry out diagnostics
If it is cold outside and the interior cannot warm up properly, then you need to check the operation of the cooling system, which has a direct effect on heating the interior.
Coolant level
To do this, you need to open the hood and, with the engine not warmed up, check where the coolant is located.
If its level in the tank is between the minimum and maximum marks, then everything is in order. But, when this level decreases, problems with the tightness of the cooling system are possible, and this leads to a decrease in pressure inside the system. If the problem is not corrected, the stove will not be able to warm the air in the cabin effectively enough.
Thermostat
This is a native Luzar thermostat
We are talking about the possible sticking of the thermostat valves in a position where the coolant circulates only in a larger circle. So, during the cold period, the coolant will not warm up to normal temperature, and therefore the interior will not become warmer.
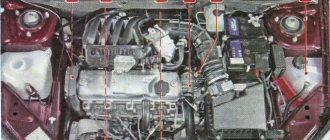
Thermostat location under the hood
You can verify the presence of this particular breakdown by the fact that the car, while stuck in traffic jams, begins to overheat very quickly. In addition, when moving along the highway at a stable speed, the engine loses its temperature too quickly, if we talk about the cold season. However, even if these “symptoms” are not observed in your car, this does not mean that the thermostat is working properly. It is quite possible that its defect lies only in tangible problems with the interior heater.
For even more complex cases, you can check the pipes that connect to the heater radiator. Normally, one should be hot and the other just slightly warm. If the second of the pipes is very cold, this will indicate that the stove radiator in your car is clogged. It won't be easy to clean it. Most likely, you will have to completely remove the entire stove.
And for the most extreme situations, when none of the above helps, and there is very severe frost outside, you can simply block the radiator’s air supply with any dense object, such as cardboard or plastic.
If the thermostat is faulty during the cold period, the coolant will not warm up to normal temperature, and therefore the interior will not become warmer.
Air temperature regulator damper
If the cooling system of the Lada Granta is working properly, then the reason for the poor operation of the stove may lie in the functioning of the air temperature regulator damper.
The fact is that the position of this damper directly determines which air flow will follow through the heater radiator, and which flow will enter the car interior without reaching the radiator itself.
Blown-out air temperature regulator (either the slider or the cable with the mechanism to which the regulator transmits tension may be faulty)
The malfunction may relate to the heater control panel or poor operation of the gearbox through which the damper moves. Depending on its position before the breakdown, cool air can enter the cabin in the cold season or hot air in the summer.
Heater fan and fuse
The fuse box is indicated by an arrow
Also check whether the heater fan turns on. If it remains motionless, then you need to check the condition of the 30A fuse. It can be recognized by its green color and F4 index (in the picture above). It is located in the additional concentration of power fuses. It is located under the hood, near the expansion tank of the cooling system.
If everything is fine with this fuse, then most likely the problem lies in the electric fan motor itself . You can get to it only through a special hole, which will become accessible after removing the glove compartment lid.
If the fan operates at maximum speed and the air does not flow well into the cabin, then the problem is a clogged cabin filter; it needs to be cleaned, or better yet, replaced.
Resistor block
If your problem with the stove is that the fan remains operational only at the fourth speed, while the first three do not turn on at all, then the reason for this lies in the failure of the resistor unit. It will not be possible to repair it, so you can only count on its complete replacement. This unit can be accessed in the same way as an electric fan motor.
Fan of the “large” cooling radiator
There are cases when the cooling fan is constantly running, thereby preventing the coolant temperature from reaching operating limits. In other words, the coolant that should heat the heater radiator is cold, and the radiator cannot give off heat.
The engine does not have time to warm up
This problem arises due to the fact that the first Grant models were not equipped with an engine temperature indicator, and the driver started driving with an engine that was not warmed up. This is especially noticeable when trips are short.
Additional Tips
However, it also happens that the problem with heating the interior consists only of some small mistakes. Therefore, before you start disturbing the service center workers, check whether all the dampers on the stove are set in the required position. It wouldn’t hurt to tug the hot air damper a little.
There is a possibility that it is simply stuck. And, with a significant push, it will be moved from its place.
Source: https://carfrance.ru/pochemu-v-lada-granta-pechka-ploxo-greet-i-duet-xolodnym-vozduxom/
Dependence of the appearance of an air lock in the cooling system on the expansion tank cap
When the liquid in the cooling system is heated, it expands and pressure in the system increases. In order to prevent the system from rupturing, the cap of the expansion tank must release excess air when the pressure rises to 1.3 atmospheres. When cooling, the liquid and air compress and a vacuum appears in the system. To prevent air from being sucked in from under the pipes, the cover must freely allow air into the expansion tank.
Often these covers are of poor quality or simply oxidize and stop normally letting air in and out from outside, which causes air to be sucked in at weak points and, accordingly, the system is re-aired. It also happens that the cover valves freeze when the engine cools down.
To troubleshoot the lid, try sucking air out of it from the back side; if air does not flow in or it comes in with obvious force, then it’s time to change the cover. The presence of freezing is checked in the following way: leave the heated car until it cools completely, then unscrew the lid and look at the valves; if they are completely covered in ice, then the problem is condensation. In case of freezing, you can try treating the lid with silicone grease or VD-shkoy.
The last cover I took and it was the most successful:
Here's the other side:
There is also another option for dealing with bad caps - unscrewing them in winter to allow free air access in both directions through the threads. But keep in mind that in this case the maximum boiling point of the coolant will decrease.
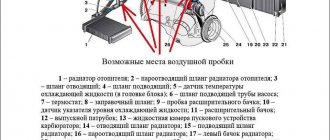
VAZ 2110 how to remove an air lock in the engine cooling system: 3 correct methods
The main reason for the appearance of an air lock is that when changing the cooled liquid, it is poured into the tank too abruptly. In this case, the air does not have time to escape outside, and a plug of air appears. Below we will look at the three most effective ways to remove air lock from the cooling system. You can choose any of them. If none of them helps you, then the cause of your car’s malfunction is not the presence of an air lock.
Method 1
- Open and remove the cap that covers the cooling expansion tank.
- Under the hood we find hoses supplying and discharging fluid, which are connected to the radiator. One is located higher, and the second is slightly lower.
- Press firmly on both of these hoses.
- You need to make sure that the air lock is gone.
Important! Before starting the car, make sure to close the expansion tank cap.
Method 2
This is the easiest, most practical and effective method.
- Place the car on a hill with its face up. Moreover, the higher the slide, the better.
- Put the car in neutral and let it run for about three minutes.
- If nothing has changed, repeat the procedure by pressing the gas pedal several times.
- After removing the plug, fill the reservoir with liquid to the required level.
- Tighten the plug that closes the expansion tank until it stops. However, if the plug begins to tighten with difficulty, you should stop.
Method 3
This method is probably the most effective.
- Slightly loosen the tightening of the clamp attached to the antifreeze drain hose.
- Slowly disconnect it from the fitting.
- If there is an air lock, liquid will not flow out of the hose or fitting.
- Close the hole where the liquid is pouring out with your finger.
- As soon as the hose is disconnected, pour liquid into the tank.
Note! Liquid should flow out of the hose that you cover with your finger. This means removing the plug.
- With the utmost care, install the hose in its place.
- Warm up the engine to the required temperature.
- Turn on the stove to maximum temperature. Note! If the air blows hot, then everything is normal - the plug has been removed. If the air is slightly warm, then you need to follow the steps described below.
- Someone needs to start the car.
- As soon as the engine starts, close the hose with your finger and wait until moisture flows out of it.
Attention! If liquid flows from the fitting and not from the hose, close it with your finger until liquid flows from the hose.
- We install the hose on the fitting and check the system for plugs.
If nothing has changed and you cannot get rid of the plug, repeat the entire procedure with the coolant supply hose, which is located opposite the outlet hose.
In conclusion, I would like to say that failure to remove the airlock can lead to serious consequences.
- Firstly, this leads to disruption of the circulation of antifreeze, which in turn leads to disruption of the cooling system. In other words, there is an uneven distribution of heat from the engine, since excess air does not allow antifreeze to enter the radiator, and this leads to overheating of the engine.
- Secondly, the stove itself in the car stops heating normally. The situation is similar - the antifreeze does not pass through, neither the liquid nor the air heats up. If everything is left as is, the engine can overheat so much that it will eventually fail and will have to be repaired, and this is a large financial expense.
After reading this information, you can remove the air lock from the VAZ 2110 injector cooling system without any problems. As you can see, there is nothing particularly difficult about this and you can completely cope with this procedure on your own. However, if you are not confident in your abilities, then in this case you should contact a specialist. Of course, you will have to pay for this, but you can be sure that you will not have any more problems with this for a long time.
Let's sum it up
As you can see, an air lock in the cooling system is a significant obstacle to the normal functioning of the cooling system in the LADA Kalina car. It can not only cause the stove to become ineffective, but also cause more significant damage to the engine. Eliminating this negative phenomenon is not difficult, especially since now you know how to pump air, but the best measure would be timely and periodic diagnosis of the engine cooling system. It consists of checking the refrigerant level, the tightness of the circuit (reliability of clamps) and the functionality of the thermostat (control of heating of the lower radiator pipe).
Hi all! From time to time, in many cars it happens that an air lock forms in the cooling system. It would seem that there is nothing wrong. But in fact, this phenomenon can lead to quite serious negative consequences. That is why I propose to talk about how to remove an air lock from the cooling system.
Reasons for air getting into the system
There are enough reasons why air pockets form inside the cooling circuit of the Lada Kalina engine. Among them we will highlight the main ones.
- Loss of system tightness, which is manifested by an intensively decreasing level of refrigerant (can be observed by the marks of the expansion tank).
- A valve in the tank cap breaks down, causing the antifreeze to begin to boil at a lower pressure, which inevitably causes plugs to appear. Now the question remains: how to remove the air.
Troubleshooting
Before we begin removing the plug, let's find out the reasons for its appearance.
We carry out a visual inspection and check:
- tightness of the connections of the pipes (if leaks are found, tighten the clamps, and if necessary, change them).
- antifreeze level in the expansion tank (for Lada Kalina it is preferable to keep the maximum possible fluid level);
- serviceability of the expansion tank (if the plug does not allow air to pass through or works with obvious difficulty, then it should be replaced);
- the tightness of the heater radiator itself.
There are two effective ways to solve the problem.
Method 1
- put the front of the car on a slope;
- unscrew the cap on the expansion tank and start the engine;
- warm up the car until the fan starts;
- after the radiator warms up, antifreeze will flow from it (add speed if necessary);
- if gurgling antifreeze pours out, we continue to expel it until it flows in an even stream;
How to remove an air lock in the stove on a Lada Kalina car
An air lock in the cooling system leads to disruption of heat removal from areas of increased heat generation: pistons, cylinders, intake and exhaust manifolds. Such unstable operation of the engine cooling system can cause overheating. Prolonged operation of a car with an air lock can result in serious repair costs.
The presence of air in the coolant leads to many unpleasant consequences. The normal circulation of antifreeze (antifreeze) is immediately disrupted and the main purpose of the cooling system begins to suffer:
- heat removal from the components of a running engine occurs unevenly;
- heating the air in the cabin does not provide the necessary comfort.
An experienced driver will immediately notice the twitching of the coolant temperature gauge needle and its boiling in the cooling system. An air lock in the coolant causes:
- overheating of engine parts and components at idle speed, which leads to temperature jumps;
- incorrect operation of the sensors - this causes malfunctions in the temperature indicator readings;
- inaccuracies in the operation of the thermostat, which can cause engine overheating;
- insufficient heating of the stove will cause fogging of the windshield and side windows, which will lead to limited visibility and the creation of an emergency situation on the road.
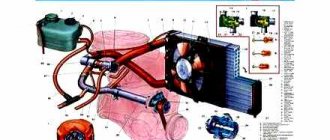
General diagram of a liquid cooling system
Closed liquid cooling systems are designed to maintain constant excess pressure (up to 100 kPa). The increased pressure made it possible to raise the boiling point of the liquid to 120 degrees.
Since cars are used all year round, a concentrated, special non-freezing coolant was specially developed for them - antifreeze (antifreeze is the most popular). It consists of ethylene glycol, distilled water and anti-corrosion, anti-foaming, antioxidant additives.
Antifreeze provides optimal thermal operating conditions for the engine of 80–100 degrees in any weather. The main causes of air locks are as follows:
- Air suction through insufficiently tight connections of pipes, hoses, fittings, tubes. This happens because when antifreeze moves through the system, a reduced pressure is created near the walls of the tubes, which draws in outside air in places with loose connections.
- Air is trapped in the cooling system when a wide mouth funnel is used to add or change coolant. A powerful flow of antifreeze blocks the path of air to the top. Antifreeze is always poured into the expansion tank or radiator in a thin stream.
Antifreeze circulation diagram in the engine cooling system Modern cars use a forced closed cooling system. Its main task is to ensure stable operation of the engine during the transition from cooling mode to heating mode and vice versa.
This is not easy to achieve, since when the antifreeze is heated, its volume increases and excess pressure arises, and when it cools, the volume and pressure in the system decreases. The increased pressure compresses the air at the highest point of the system - the expansion tank.
There is an air valve in the filler plug of the tank that operates in two directions. When the pressure increases, it bleeds excess air out; when the pressure decreases, it lets outside air into the system. It is the air valve that maintains constant excess pressure under any thermal conditions.
If this device does not work correctly, excess air will begin to constantly accumulate in the cooling system.
- When the sealing fiber and seal at the booster pump wear out, outside air may begin to leak into the coolant.
- Leakage of antifreeze in hoses, pipes, cooling and heating radiators leads to a decrease in its volume and an increase in the volume of air in the expansion tank. Clogging of the core of radiators with debris and defects in their outer shells create the preconditions for engine overheating due to poor cooling of antifreeze. All these reasons, taken together and individually, lead to the formation of an air lock in the cooling system.
- A burnt-out cylinder head gasket often leads to antifreeze leaking into the engine crankcase (the oil level on the dipstick will be above the maximum permissible level) or into the exhaust system (smoke from the exhaust pipe will be white). Reducing the volume of antifreeze leads to its boiling due to the formation of air accumulations in the cooling system.
- The interior heater does not work or heats up poorly. This is a consequence of the fact that, due to an air lock in the system, antifreeze or other coolant does not enter the radiator.
- Engine overheating. If this is a modern car, then an indicator on the dashboard will indicate the increased temperature. However, a quickly creeping upward engine temperature arrow is also an indicator of overheating. Antifreeze, antifreeze and others cannot move freely through the cooling system, which means they cannot properly cool the engine.
Any car is a set of fairly complex components and assemblies that are closely interconnected. The laws of physics have not been repealed, and therefore heating of the car during operation is inevitable.
In order to prevent excessively high temperatures, a car cooling system was invented.
However, periodically occurring air pockets in this system can lead to the failure of many machine components, including the engine.
First of all, this concerns the engine itself. As you know, liquids and materials tend to expand when heated. Reaching a certain temperature, the rings, valves and pistons of the internal combustion engine begin to change and lose their shape, which leads to the death of the engine itself.
In addition, the occurrence of an air lock in the cooling system also leads to the failure of various sensors, which is why the driver receives incorrect information about the condition of the car and its parameters.
A malfunction of the cooling system also affects comfort: as a rule, when an airlock occurs, the interior heats up very little.
The engine can overheat not only due to the presence of air locks
Often, more significant reasons can be expressed by such symptoms. Therefore, before carrying out diagnostics, you need to inspect all components and parts of the cooling system for leaks and mechanical damage. It is necessary to carefully examine the pipes and impeller, pump, and check the thermostat.
So, when the cause is determined to be an air lock in the cooling system, action should be taken to expel it. In order to fix the problem, essentially little is required - an overpass and skillful hands.
If we are talking about an old car, then you just need to drive it onto the overpass so that the hood is raised, unscrew the special screw plug on the radiator and start the engine.
Signs and causes of malfunctions of ODS Grants
There are not many elements involved in the cooling system, and therefore the list of faults is small. Signs of ODS problems:
- The engine gets very hot. Since the coolant temperature indicator on the Lada Grant was removed to reduce the cost, the driver will be able to track the temperature increase only after reaching a critical point. In this case, the warning indicator on the instrument panel will light up. Overheating is indicated by constant operation of the electric fan. Another reason is the failure of the temperature sensor, which transmits inflated readings to the ECU. Systematic overheating of the engine can also be determined by white carbon deposits on the spark plugs.
- The engine cannot warm up or takes a long time to warm up. In this case, the stove will blow cool air, the radiator pipe from below will be warm, but not as the engine warms up, but almost immediately after starting. A faulty thermostat is to blame. If the engine is in a constant state of insufficient heating, operation for a long time is prohibited, since it cannot be subjected to loads.
- Antifreeze leak. The problem can be determined by inspecting the elements of the ODS. On a hot engine, you can see fumes from antifreeze, and traces of coolant will also be visible under the engine. The most dangerous internal leak occurs when antifreeze enters the combustion chambers. Visually there are no leaks on the engine, but the coolant level in the tank is still decreasing.
Another characteristic sign of ODS problems is an increase in the oil level and white smoke from the exhaust pipe. This situation is dangerous due to the complete failure of the internal combustion engine, since the entry of antifreeze into the cylinders deprives the elements of the lubrication system.
Motor oil mixed with coolant completely loses its properties. Operating a vehicle with such a malfunction is prohibited.
Engine repair will be required, as the problem is related to a broken cylinder head gasket, a damaged water jacket, or a crack in the block.
The most common reasons are:
- natural wear and tear of parts;
- mechanical damage;
- violation by the owner of engine operation requirements.
The use of low-quality antifreeze, mixing different types of coolant, and installation of low-quality parts are also causes of malfunctions of the elements of the power plant cooling system. Repairs carried out without the appropriate knowledge, skills and experience lead to breakdowns. SOD problems require an early solution, as they affect the resource of the power plant.
No less dangerous are hidden problems, for example, engine detonation caused by overheating. Clogged radiator honeycombs prevent normal cooling, and the antifreeze temperature does not have time to decrease, causing the engine to overheat. Fuel detonates in the combustion chambers, the cylinder head gasket burns out, the plane of the cylinder head is disrupted, and the engine subsequently “jams”—there is a need for major repairs or replacement. The cooling system requires constant monitoring - you need to monitor the level of antifreeze in the expansion tank and periodically change the working fluid.
A pump malfunction is characterized by coolant leaks at the pump installation location, disruption or cessation of antifreeze circulation through the system. In this case, the engine overheats, but jamming of the pump bearing is even more dangerous, since on the Grant this leads to a broken timing belt and damage to the valves. Engine repair will be required. Malfunctions of the electric fan in most cases are associated with a violation in the electrical circuit, malfunctions of the thermal relay and the electric motor. Lack of forced cooling of the motor by a fan leads to overheating.
The most unpleasant malfunction for car owners is damage to the cylinder head gasket or a defect in the surface of the head at the point of contact with the cylinder block. Cracks in the cylinder head and cylinder head are less common. This causes coolant to leak into the oil sump. The tightness of the cooling system is also compromised if there are problems with the connecting pipes - cracks, blockages and loose connections.
Failures of the SOD can also include electronic malfunctions. In the case of Granta, this is a malfunction of the warning light warning of overheating and failure of the engine temperature sensor. As a result, the electric fan does not turn on at the right time, and the engine temperature exceeds critical values - overheating occurs.
Removal methods
Now let’s move on directly to how to remove the formed air plug from the cooling system without resorting to the help of specialists.
I can offer 3 methods in total. Each of them has its own characteristics and can be used for certain cars. Therefore, think carefully before settling on one of the methods.
First method
This option is suitable for owners of VAZ cars, including:
- VAZ 2107;
- 2110;
- VAZ 2114;
- 2109;
- VAZ 2115;
- Lada Kalina;
- Priora;
- Lada Granta;
- VAZ 2111;
- VAZ 2108, etc.
If you have just such machines, then you can safely get to work.
The procedure looks like this:
- Access to the tank where the coolant is located opens. It is necessary to remove the security elements;
- Now one of the 2 pipes that go to heating the throttle is turned off. It doesn’t matter which pipe to disconnect;
- Remove the lid from the tank and cover the hole with a low-density rag;
- Blow into the reservoir to create excess pressure. You should blow until air comes out of the nozzle;
- Coolant should leak out soon. At this moment you need to secure the pipe with a clamp. Here it is worth turning to a friend for help;
- If the pipe is not secured, a new plug may appear;
- Return all elements to their place;
- Start the engine and you can drive for a couple of kilometers.
In theory, the symptoms of malfunctions should disappear. Just keep in mind that the method is suitable specifically for domestic cars, since it is possible to disconnect the pipe on them.
Second method
If the first option for removing air pollution does not suit you, I suggest using the second method.
Here the procedure is carried out like this:
- Start the engine at idle;
- Let it run for 10-15 minutes;
- Turn off the engine;
- As in the previous instructions, remove the protective elements;
- Open access to the tank;
- Remove only 1 pipe;
- The coolant will circulate throughout the system;
- The air will begin to escape without your participation;
- When the antifreeze starts to come out, the pipe returns to its place.
The method is frankly not bad. But there is one drawback. It consists in the high temperature of the pipes. It is strongly not recommended to handle them with bare hands.
Turn on the heater and check whether the proper volume of hot air begins to flow into the cabin. If yes, everything went well, and therefore you can enjoy the result of your own repair. The job is no more difficult than bleeding the clutch.
Troubleshooting methods
Coolant hoses
There are three possible options for removing an air lock from the cooling system:
- Through the expansion tank with removal of the pipe.
- Without disassembling, by tilting the car and adding fluid.
- Using heat.
Let's take a closer look.
First option
The first option on how to remove an air lock from the cooling system is suitable for most owners of domestically produced vehicles. In these cars, it is possible to disconnect the carburetor heating hose or throttle assembly. To remove the hose, you will need to remove all parts that interfere with this procedure. Then you need to get this hose and remove it from the fitting. After this, unscrew the cap on the expansion tank and start blowing into it. As soon as the coolant begins to flow out of the hose, you must quickly return it to its place and secure the pipe with a clamp. We return all the parts to their place and enjoy the working stove.
Second option
Filling with coolant
To implement the following method of self-bleeding, you will need to drive into the inspection hole and set the car to the handbrake. Using a jack or other suitable tool, raise the front of the vehicle at a slight angle. You can achieve the same effect without a jack by placing the car on a steep incline. How to break through an air lock in the cooling system using this method? It's simple. Unscrew the caps on the expansion tank and on the radiator (if equipped). We start the engine and bring it to the optimal operating temperature. We wait for the valve to open and the liquid to move in a large circle. The switches on the stove should be set to the maximum heating level.
While the engine is warming up, it is important to monitor the fluid level in the reservoir - it should drop. Gradually add the leaving antifreeze (antifreeze). To increase circulation and outflow of antifreeze, it may be necessary to increase engine speed
A sharp drop in the fluid level may occur, and here it is important to very quickly add it to the required level. The procedure must be continued until the air bubbles escape. After completion, you will need to lower the car and add antifreeze to the required level.
To increase circulation and outflow of antifreeze, it may be necessary to increase engine speed
A sharp drop in the fluid level may occur, and here it is important to very quickly add it to the required level. The procedure must be continued until the air bubbles are released.
After completion, you will need to lower the car and add antifreeze to the required level.
Third way
The third method will also tell you how to remove an air lock from the cooling system. For its successful implementation, you will need to start the engine and not turn it off until the optimal operating temperature is reached. After turning off the engine, remove the protective parts from it to get to the heating hose of the fitting assembly. The coolant is very hot, as are the hoses through which it flows, so protect your hands to avoid burns. You can wear two pairs of gloves - work gloves and rubber ones on top. We disconnect the hose and wait for liquid (antifreeze, antifreeze) to flow out of it. When this happens, we return everything to its place. It may happen that the antifreeze never began to flow out. In this case, return the hose to its place, unscrew the cap on the expansion tank and screw it back on. Then we try again with disconnecting the hose.
Having considered three possible options for eliminating an air lock from a vehicle’s cooling system, you only need to choose the appropriate one. One thing is for sure - it is better not to delay solving this breakdown, because the air in the system causes malfunction of the stove and serious problems with the engine, up to its complete failure.