Sambar, Libero, Domingo. Engine ⇒ AUTOPHROX in the carburetor
Moderator: Sanchez 84
Post by Oleg Dymnich » 06 Dec 2021, 22:12
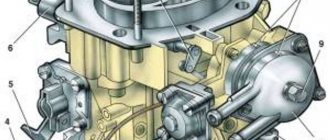
Automatic suction Let's take a closer look at its structure: Inside the auto-suction housing (bottle) there is a capsule with a wax-like substance, which expands greatly when heated, and when cooled returns to its original volume. The capsule acts on the rod, which actually moves out of the body as it warms up. The rod acts on a special cam through an adjusting screw screwed into the bend of the cam. The cam sits on its own axis and is connected by a rod system to the air damper drive. As the rod protrudes, the cam rotates and turns the air intake through the rods until it opens completely and becomes in a position parallel to the axis of the diffuser or simply parallel to the air flow in the carb. There is also a powerful spring on the axis; it is responsible for pushing the rod back into the auto-choke body while cooling the auto-choke body and the engine itself. The cam has an adjusting risk, a roller, and a hole. at the top. The roller acts on a lever that sits on the throttle valve drive axis (this is not a choke valve.). This is necessary to ensure increased warm-up speeds, by simply opening another damper. To adjust the number of warm-up revolutions, a screw is used; it is located to the right of the XX speed screw, the cap sticks out vertically. As it warms up, the cam rotates on the axis, its profile acts on the roller, as if releasing it; accordingly, the lever turns the DS axis, closing the damper itself, and returning it to the XX mode. Adjustment - the mark on the cam should be opposite the middle of the roller at a temperature of 20 ... 25 degrees Celsius. I found this information in the manual of another Japanese. The operating algorithm for Japanese carbs is the same. Adjustment is provided by the adjusting screw at the bottom. It is also useful to check the operation this way - warm up the engine, remove the air pipe to the carb (it is better to turn off the engine), and use a mirror to determine in what position the air damper is located. The normal position is parallel to the air flow, the diffuser axis, or simply the ground, if you like.))) Also, when the engine is warmed up, the hole in the cam is aligned with the hole made in the housing mount, this is an additional check to see if the cam has rotated sufficiently. Easy to control with a wire. There is a caveat from the auto suction device - the coolant level should be normal. If the coolant level is low, insufficient coolant may flow through the auto suction housing (theoretically), and accordingly the air intake does not open completely and the fuel consumption when driving is low. Sometimes the warm-up speed is turned up so high that XX is completely absent, the engine is constantly in the mode of excessive warm-up speed! The consumption, accordingly, is again high.
Adjustment - the mark on the cam should be opposite the middle of the roller at a temperature of 20 ... 25 degrees Celsius. I found this information in the manual of another Japanese. The operating algorithm for Japanese carbs is the same. Adjustment is provided by the adjusting screw at the bottom. Thanks to Subaru forum member for the information.
Instructions “Install the auto choke on the carburetor” MPSZ SECU-3
So, what is needed to install an auto choke on a carburetor besides the SECU-3T MPSZ itself:
– air damper control unit (availability and price on the Products page),
– stepper motor 2170-8127100 (Air flow distribution gearmotor).
The SECU-STEP block has been discontinued and has been replaced by the SECU-DRV8825 driver. The connection is made in the same way.
This stepper motor was chosen because of its availability and relatively easy installation on popular carburetors such as Solex and Ozone.
Correct installation of the auto choke drive on the carburetor must satisfy the following requirements:
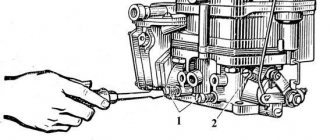
1. Maintain the alignment of the damper drive and the gearmotor rod. In other words, the axis of the gearmotor rod must be parallel to the plane of the air damper drive flag.
2. At the maximum exit of the rod from the engine, in the area marked in the figure below with a circle with the number two, the thread (worm) of the rod should not be visible. If visible, move the engine closer to the damper drive.
3. The mounting of the gear motor must be rigid.
In the plastic tip of the gearmotor rod, it is necessary to drill a hole for a screw for fastening to the flag. Washers are used to ensure the requirement of paragraph 1.
The gearmotor has 4 wires of different colors for connection to the air damper control unit.
They must be connected in the following order:
- green – 1 (SM_OUT1)
- red – 2 (SM_OUT2)
- black – 3 (SM_OUT3)
- white – 4 (SM_OUT4)
Before connecting to the MPSZ SECU-3 block, you must first reassign two outputs as:
SM_DIR and SM_STEP and connect them to the DIR and STEP contacts of the air damper control unit, respectively. Take the power supply for the air damper control unit and the ground from the same contacts of the MPSZ SECU-3 unit.
To save pins, the SECU-STEP block can be connected to the contacts of jumpers BL, DE on the board of the SECU-3T block. Recommended only for experienced users (since you need to open the block, solder and bring out the wires).
Users of SECU-3 Lite units can also connect an auto-suction unit; to do this, they need to solder resistor R3 in the SECU-STEP unit as shown in the photo. Reassign the IE output as SM_DIR and check the inversion box, reassign the ST_BLOCK output as SM_STP.
For the OZONE carburetor, check the inversion box at the DIR output (if inversion is already set, then it must be removed, if not, then check it). For Solex there should be no inversion.
(Read about reassigning outputs through the manager in the Manager Instructions)
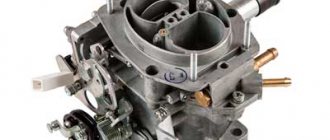
A few more photos of the installed auto choke on the carburetor from other angles:
Automatic choke on the carburetor video of work:
The video shows that the thread (worm) of the rod in the extreme position comes out of the gearmotor. It is not right. It is necessary to install the drive so that the threads are not visible.
After installation and connection, we check the operation:
On the Manager tab “VZ Management”, click the “Test” button.
The air damper will begin to open and close by the specified number of steps in the settings. We check that there is no wedging of the gearmotor rod or other interference with its movement, as well as the thread (worm) leaving the body of the gearmotor.
Read more about setting up auto suction in the first post of this topic on the forum.
DIY air swirler for a carburetor engine
The manufacturing process of such a device is quite simple and inexpensive. A textolite spacer for the carburetor is used as the basis for the homemade product. Additional air is taken in to create swirl through a separate channel through a homemade filter.
Materials and tools for making the swirler: – textolite spacer for the carburetor (can be bought at a car store); – gasket under the carburetor; – a compass (with two needles at the end); – drill and drills (one drill for 0.5-0.8 mm and one for 5 mm); – 6 mm tap and holder for it; – fitting with 6 mm thread; – 44 mm core drill (you can buy one, not a set); – an ordinary gasoline filter; – a piece of hose and two clamps to connect the fitting to the filter; – a template for working with a cutter (was ordered from a turner); – sealant; – screwdriver.
The swirler manufacturing process:
Step one. We make two grooves in the textolite
A textolite spacer for the carburetor is used as the basis for the homemade product; all the necessary channels are made in it so that the air can form a turbulence. First of all, you need to take a cutter and use a drill to machine two grooves in the spacer, as shown in the photo. The grooves must be clearly centered; in order to achieve such accuracy, the author uses a special template.
If there is no such template, the spacer can be installed on a piece of board, and then a hole can be drilled clearly in the center. The drill bit of the cutter will then be inserted into this hole, and it will stand clearly in the center. The depth of the grooves can be arbitrary, but there is no need to make them too deep; a couple of millimeters will be enough for this. It is important that the cartridge does not have runout, otherwise it will not be possible to make high-quality grooves.
How to adjust the clutch on a VAZ 2107 carburetor
Clutch adjustment is usually carried out after installation work to replace the clutch mechanism. Correct adjustments will make it possible to continue operating the unit components without failure. Before starting these technological operations, it is necessary to test the hydraulic drive system of the unit for the presence of air in it. If there is an “air lock” in the system, it must be removed. In this case, it is better to replace the vehicle's hydraulic fluid.
The principle of carrying out such adjustment measures is to create the required dimensions between the rod and the piston of the mechanism cylinders, as well as the required dimensions between the release bearing and the friction ring on the drive disk of the unit.
Replacement
So, a description of the sequence of actions when replacing the clutch.
— First, disconnect the terminals from the battery. This will help you avoid short circuit when working.
Do-it-yourself auto suction
Almost all owners of carburetor cars are familiar with the problem of starting the engine on a frosty morning. The whole reason is the suction, or more precisely, the need to manually move the valve. Many people dream of installing a mechanism that would do all this automatically. In this article we will look at how to make an automatic choke for a carburetor with your own hands.
Search data for your request:
Wait for the search to complete in all databases. Upon completion, a link will appear to access the found materials.
Go to search results >>>
WATCH THE VIDEO ON THE TOPIC: automatic suction operation
How to install an auto choke on a carburetor with a manual choke
It is very easy to install an auto choke on a carburetor with your own hands. To do this, you should buy a device, select the bolts of the required size and install the automatic control system in accordance with the instructions. The kit includes a digital temperature sensor, which is soldered into the wiring and attached with a clamp to the engine cooling system pipe.
The SAUVZ gearmotor is installed on the carburetor body and is connected instead of the throttle control cable. Auto suction system for carburetor. The semi-automatic air damper drive is most widely used as it is simple and effective. The damper is closed manually by the driver, and is opened slightly by a diaphragm that operates from the vacuum that occurs in the intake manifold during the first intake strokes. This prevents over-richness of the mixture and possible engine stalling immediately after starting.
Today Nail will tell you what you need to pay attention to. There is one problem with them - the cleanliness of the carburetor during the operation of the car, you need to make sure that there is no dirt and other things, since over time even such a machine may simply not pull the valve or return it to its original position, I already have experience using a similar headset on another car.
The GDS of a modern carburetor, as a rule, has pneumatic compensation for the mixture composition. Such a system has one main fuel jet and one air jet exiting into an emulsion well located vertically or obliquely for Zennith carburetors and their modifications.
Air enters from the hot liquid into the emulsion tube, which has vertical rows of holes. Solex works without MPSZ. To install this auto-suction pump on the carburetor with your own hands, you need to buy a thermostat for 8 and 9 and install it in a 0.5-inch tee.
In addition, you will need fittings, a plug, a tee, a lever and a bracket. You don’t have to buy the last two elements, but make them yourself. A subscriber asked to send a carburetor for a front-wheel drive car, and here is a video for your consideration: Rework An intermediate position is occupied by horizontal carburetors with spool throttle, often used on motorcycles. At the same time, a special profiled needle changes the flow area of the main fuel nozzle, which, just like a carburetor with constant vacuum, significantly simplifies the design of the unit.
Automatic throttle control of carburetor engine
The purpose of modifying the auto choke for the carburetor will be that the choke should move independently. In other words, a person should not take part in this process. In the modern world, SAUVZ have been on sale for a long time. This abbreviation stands for automatic air damper control system. They come in various types. One of the most popular systems is “Sadko”.
Also, do not forget about its no less famous modification “Sadko-2”. The essence of how these devices work is quite simple. A specialized electronic unit controls a stepper drive, which in turn moves the damper. The algorithm of operation of the mechanisms is based on the dependence of the speed of the power unit and temperature. Basically, these modifications have two operating modes: Warming up the car and driving with a cold engine.
Let's try to understand each of the operating modes in more detail:
- Engine warming up process.
The electronic unit can be programmed to maintain a certain number of revolutions. In this operating mode, it will be possible to program the temperature to which the car will need to warm up by maintaining engine speed. This process will be implemented by opening and closing a special air damper. This happens thanks to a stepper drive. If the choke is closed, the engine is cold. The higher the temperature, the more the damper will be open. At an engine temperature of approximately +55 degrees, the air damper will open completely.
- Driving with a cold engine.
If the car moves with the temperature of the power unit, whose value is lower than the programmed one, then the automation will remember how the air dampers were positioned when the vehicle started moving. After this, the damper will move as the engine temperature rises.
The process of programming the ECU (electronic control unit) will take place using a computer.
This block has a specific operating algorithm that can perform a number of different functions:
- Before starting the car engine, the fuel pump is pumped.
- When a specific temperature is reached, the stove will turn on.
- During the start the generator will be switched off.
The process of installing an auto choke on a carburetor with your own hands cannot be called very difficult. To do this, you need to perform a number of specific actions: you need to purchase a device; select bolts of the appropriate size; According to the instructions, install the SAUVZ. One of the components of the kit is a specialized digital sensor for measuring temperature. This device is installed in the wiring, and it is fastened to the pipe located in the cooling system; a clamp is used for this. The SAUVZ gearmotor is installed on the carburetor body. It will be connected instead of the cable that serves to control the damper. This system is fully suitable for Solex model carburetors; it can be installed in various standard places. If the car owner has an Ozone carburetor, then he needs to purchase special fasteners.
Automatic carburetor damper regulator (“auto-choke”)
At first I thought about making it entirely from electronics, but it seemed unreliable and expensive to me, so I decided to make a vacuum auto-suction pump! It turned out even better than I expected. Using this principle, you can make an auto choke on a VAZ; in short, you can make an auto choke on any carburetor! The most important thing, if you are going to make an auto choke, you need to take into account the stroke of the vacuum drive, its length, the gap of the closed air damper, the main thing in this matter is accuracy... otherwise it will not start or will flood! Be careful in sizes! Let me add, after a little googling I found this sensor www. Buy a car on Drome.
The clutch slips on the VAZ.
Your car has significantly lost traction and dynamics - most likely your clutch is slipping . There are also a number of other reasons for a slipping clutch, or more precisely: the normal movement of the clutch pedal has disappeared, wear of the friction linings, oil on the friction linings. The main signs that the clutch is slipping are of course a specific smell, also the car picks up speed very poorly, and on inclines it does not pull at all until the car stops. Usually the best solution to the problem is, of course, to replace the clutch with a new one, but you can try adjusting the clutch. There are cases where the clutch slips due to faulty rubber parts of the clutch hydraulic drive. In this case, of course, it is necessary to replace all the rubber parts of the hydraulic drive with new ones and check the condition of the working cylinders along with the main one.
How to adjust the clutch on a VAZ : - first you need to dismantle the air filter system - pull the tip to the full maximum tension of the clutch cable - use a caliper to measure the distance between the fork lever and the leash, it should be 2.7 cm. - after adjustment, press the clutch pedal and check the distance for displacement - if the slipping disappears, you managed to adjust the clutch
If you perform all of the above methods, your clutch also slips, then you need to change the clutch to a new one. Good luck on the roads!
How to make a car choke on a carburetor.
VAZ auto suction, does anyone have an opinion on this? Adjusting the carburetor of a VAZ with your own hands, how to make a Solex VAZ, how to. In order to prevent any malfunctions in the operation of the machine in a timely manner, you need to carefully monitor its technical condition. One of the main tasks of the driver is to control the operation of the carburetor device on the VAZ. The car owner can perform almost all types of repairs and adjustments with his own hands, since the carburetor design has a simple structure. The designs are intended for use with front-wheel drive VAZ vehicles, in which the engine unit is located transverse to the body. It works in tandem with a motor that has a volume of 1.
Auto Choke On Carburetor
So my mounting bracket is ready, fastened directly to 2 studs of the carb, the stroke of the small lever is about 1 cm, the stroke of the long lever is about 3.5 cm. The lever is made of plexiglass 4 mm, fasteners are made of a metal profile for plasterboard, I thought it would be a little weak, but pretty good everything sits tight. Today I was setting up the starting device, and apparently I tightened the bolt that is screwed in on the throttle, on which the choke lever presses and opens the first chamber a little, when starting it starts to work and stalls, I need to unscrew it back a little tomorrow. Well, that's how things are for now. Sorry for the quality, the digital camera died, so I had to take a photo. It’s a cool thing, of course, the main thing is to implement it correctly. I’m also looking at the electronic mechanism here. From the recording it’s hard to understand what and how, but what kind of carb? Buy a car on Drome. Baggahulnik last online 9 hours ago.
Do-it-yourself auto suction on the carburetor
I want to create a topic about the auto choke, I wrote about it earlier, there are a lot of problems in this regard, maybe there are still like-minded people in this direction who want to get rid of the auto choke handle, I don’t want to buy a finished product for two reasons, the first is too expensive, it’s expensive as a kit if buy the controller itself, the gearbox, the temperature sensor, and the second thing, if there is any malfunction of the controller or any other component, you can hardly fix it on your own, it’s easier to assemble the controller yourself and embed the program into the atmega, but you will know if one of the components flies, you can do the same buy it where you bought it, and also for pennies compared to the finished product. If there are like-minded people, I’ll throw out several options that may interest you, but you need help in working them out. Sincerely, Alexey. Cars Experience Communities Read most popular Cars for sale. Auto-Translated Original RU. Guys, good day to all. I want to create a topic about the auto choke, I wrote about it earlier, there are a lot of problems in this regard, maybe there are still like-minded people in this direction who want to get rid of the auto choke handle, I don’t want to buy a finished product for two reasons, the first is too expensive, expensive as a set if you buy the controller itself, the gearbox, temperature sensor, and secondly, if there is any malfunction of the controller or any other component, you can hardly fix it on your own, it’s easier to assemble the controller yourself and embed the program into the atmega, but you will know if one of the components it will fly, you can also buy it where you bought it, and also for pennies compared to the finished product. If there are like-minded people, I’ll throw out several options that may interest you very much, but you need help in working them out. Sincerely, Alexey. Prev Hello everyone again.
When you press the gas pedal, the VAZ engine should successfully increase the rotation speed of the operating crankshaft. At the same time, if the gas pedal is released, the engine should not stall. This aspect must be taken into account when adjusting a VAZ carburetor with auto-choke, because the device requires full adjustment, taking into account numerous aspects. If the engine stalls, further tuning or repair is required.
Diagnosis of clutch faults VAZ 2107
There are a number of breakdowns that indicate that the car requires urgent repairs.
Clutch slipping
This occurs during sudden acceleration. The engine steadily picks up speed, but the car is “late” in accelerating. The process may also be accompanied by jerking, jerking and extraneous noise.
The situation greatly wears out the friction disc and negatively affects fuel consumption.
Clutch leads
This is caused by improper adjustment or airing of the system. The friction linings do not move completely away from the basket and gears are difficult to engage.
Jerks when starting and changing gears
It requires pumping and adjustment of the mechanism, when the car jerks when you put it in gear. The disc may slip at the start or rapid acceleration due to its wear.
Noise when clutch is disengaged
When the car vibrates slightly and an extraneous sound comes out when the pedal is fully depressed, the clutch basket and clutch disc do not completely separate.
This occurs when the device settings fail.
Noise when clutch engaged
The cause and consequences are the same as above.
Pedal failure and lack of clutch
Here the matter is more serious. The pedal can only fail if the mechanism is severely damaged. In 90% of cases, the cause is hidden in the head cylinder or basket. Operating a car with such a problem is strictly prohibited.
The clutch disengages, but the pedal does not return to its original position
This malfunction is often solved in a trivially simple way - the return spring may fly off or burst. The hydraulic system in the VAZ 2107 is a design where there are no return devices, except for mechanical parts.
Everything is solved by replacing the damaged element.
Tight grip
Some car enthusiasts complain that the clutch pedal is pressed extremely hard. In addition to the hydraulic system, movement difficulties are caused by souring of the moving joints and jamming of the release bearing. To fix the problem, you must completely disassemble the entire system.
The clutch disengages at the beginning or end of the pedal stroke
In this case, everything is quite simple - the system requires adjustment. The procedure is primitive and is completed in 20-30 minutes. The only caveat is that you will need an assistant.