Reasons for generator failure
Without specialized equipment, it is not always possible to determine the exact cause of a unit failure. But most often the problem is caused by:
- Bearing jamming . Due to drying out of the lubricant and gradual wear, the bearings jam. First, the belt usually breaks, which necessitates rebuilding the assembly.
- Winding burnout . Most often, the winding burns out due to the penetration of chemicals and salts used to sprinkle the road in winter.
- Brush wear . Graphite brushes wear out gradually, so they need to be replaced periodically. If they are not replaced in time, the unit may fail completely.
- Relay malfunction . The device is designed to prevent battery overcharging. If it malfunctions, the generator does not start.
To prevent breakdowns, scheduled vehicle maintenance should be carried out in a timely manner.
Check Features
When checking the generator of a VAZ 2110, 2107 and others for serviceability, the following conditions must be met:
- An accurate multimeter should be used for diagnosis.
- The normal voltage is 12 V.
- If it is necessary to replace the wiring, you must use wires with the same cross-section as the original.
- Before checking, you should check that all fasteners are connected correctly and the belt tension is correct. If necessary, the connections should be adjusted to normal, the belt should be loosened or tightened.
During the verification process it is prohibited:
- short circuit the wires;
- connect terminals that differ in purpose and parameters, connect terminal 30 or B+ to ground;
- diagnose a generator without connected consumers.
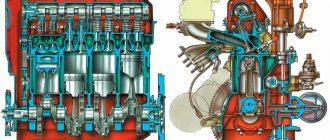
Generator design on the VAZ-2114
Before you begin directly carrying out repair operations on the generator, you need to know the structure of this spare part.
The generator for VAZ 2113-2115 cars is marked as 37.3701, and it is suitable not only for this family, but also for cars of the GAZ family. So, let's look at what parts this unit is made of.
VAZ generator device
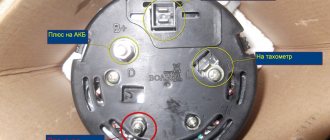
Generator 37.3701: 1 – cover on the side of the slip rings; 2 – rectifier block; 3 – rectifier block valve; 4 – screw for fastening the rectifier unit; 5 – contact ring; 6 – rear ball bearing; 7 – capacitor; 8 – rotor shaft; 9 – output “30” of the generator; 10 – output “61” of the generator; 11 – voltage regulator; 12 – terminal “B” of the voltage regulator; 13 – brush; 14 – stud securing the generator to the tension bar; 15 – pulley with fan; 16 – rotor pole piece; 17 – spacer sleeve; 18 – front ball bearing; 19 – drive side cover; 20 – rotor winding; 21 – stator; 22 – stator winding; 23 – rotor pole piece; 24 – buffer sleeve; 25 – bushing; 26 – clamping sleeve
Dismantling the generator
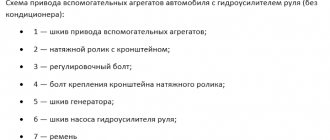
In order to dismantle the generator, you need to know its location. The diagram below shows not only the fastening device, but also the auxiliary fastening parts.
Layout of the generator and additional components
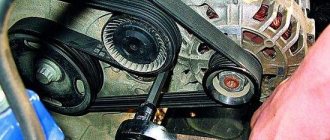
Removing the generator: 1 – tension bar; 2 – generator; 3 – generator mounting bracket; 4 – generator drive belt; 5 – generator drive pulley
Visual location of the generator on the engine
Also, before removing the generator, it is worth understanding the diagram for connecting the part to the rest of the electrical circuit components:
Connection diagram of the generator system 37.3701: 1 – battery; 2 – generator; 3 – mounting block; 4 – battery charge indicator lamp, located in the instrument cluster; 5 – ignition switch
Now that the basic circuits have been reviewed, you can proceed directly to the step-by-step process of removing the generator from the car. First of all, you will need tools, namely: keys for 8, 10 and 13; flat-head screwdriver. So, let's start the process:
- Disconnect the positive power cable of the generator.
Unscrew the generator power wires
Unscrew the bottom nut securing the generator
Unscrew the top nut securing the generator
Unscrew the tension bolt
Removing the clamping bar
Removing the generator from the car
Now that the unit has been dismantled, you can begin checking it.
Generator check
There are two ways to accurately test a generator: on a bench and using an oscilloscope. It is worth considering both methods using visual diagrams.
Stand
A special testing stand is equipped with a volt-ohmmeter and an ammeter, which display performance indicators in an artificially created on-board network. There is also an additional motor that, using a belt, drives the generator itself. So, it’s worth seeing what this stand looks like:
Checking the generator using a stand
Connection diagram for testing the generator on the stand: 1 – test lamp 12 V, 3 W; 2 – generator; 3 – voltmeter; 4 – rheostat; 5 – ammeter; 6 – switch; 7 – battery
Now the installed generator can be turned on by first setting the output voltage on the rheostat to 13V. In this case, the rotor speed should reach 5000 rpm. The stand should operate for 10-12 minutes, and then it is necessary to measure the current strength that is given out. If it is less than 55A, then the generator is faulty and requires repair.
Oscilloscope
An oscilloscope will immediately show a generator malfunction, so diagnostics using it is considered more accurate. Let's consider the verification principle:
Connection diagram of the generator to the oscilloscope for testing
Connection diagram for checking the generator with an oscilloscope: 1 – switch; 2 – generator; 3 – voltmeter; 4 – rheostat; 5 – ammeter; 6 – switch; 7 – battery
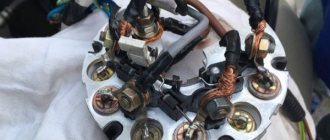
Disassembly process
The protective cover latches are marked with arrows
Let's consider what parts the generator as a whole consists of. This is necessary in order to understand how the process itself goes.
Generator disassembly diagram
Generator parts 37.3701: 1 – capacitor; 2 – voltage regulator assembled with brush holder; 3 – terminal block for additional diodes; 4 – insulating bushings; 5 – rectifier block; 6 – contact bolt; 7 – stator; 8 – rotor; 9 – spacer sleeve; 10 – inner bearing mounting washer; 11 – drive side cover; 12 – pulley; 13 – outer bearing mounting washer; 14 – coupling bolt; 15 – front rotor ball bearing; 16 – bushing; 17 – cover from the side of the slip rings; 18 – buffer sleeve; 19 – clamping sleeve.
Components of the VAZ-2114 generator
Signs of a diode bridge malfunction: diagnostics
Diode bridge on the generator
Generator problems directly depend on the health of the diode bridge. You can check the serviceability of this unit in three ways:
- By connecting a test lamp with a current of 12V to it.
- Visual inspection of the rectifier for broken contact wires.
- Diagnostic operations using a multimeter.
There can be two reasons for the failure of this unit:
- Passed the full resource of use.
- Ingress of foreign elements into the generator (water, dirt, etc.), which caused a short circuit and failure of the element.
Let's take a closer look at the process of diode bridge diagnostics.
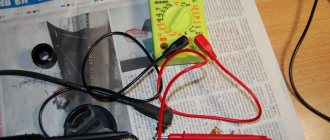
Diagnostics using a warning lamp
Diode bridge diagnostic diagram using a test lamp
For diagnostics you will need a battery and a warning light. So, you need to connect the rectifier plate to the minus terminal. Next, we connect the test lamp with the “plus” wire to the battery, and the “minus” wire to additional diodes. We connect the “plus terminal” to the bolt, which is located near the stator winding of the rectifier. If the lamp lights up, then the unit is faulty.
Rectifier inspection
Rectifier testing process
To perform this diagnosis, you will also need a battery. We connect the test lamp with the minus wire to the plus terminal of the battery. Then, “plus” the lamp to the “minus” battery. We connect the “plus terminal” to the bolt, which is located near the stator winding of the rectifier. If the lamp lights up, then the unit is faulty.
Diagnostics using a multimeter
Checking the diode bridge using a tester
Remove the rectifier from the housing. Set the multimeter to “ringing” mode. Now, one by one, you need to short-circuit the electrodes of the device to the diodes. If it makes a “squeaking” sound, then the rectifier is working; if not, then the part is “dead” and requires replacement.
Signs of brush failure
If you look at the brushes, their surface will be worn out, and the power supply control wires will be broken. This is the main sign of a malfunction, which may indicate that their natural depreciation has come. There are several signs that they are out of order:
- Voltage drop in the on-board network at idle speed.
- At dusk or at night, external lighting (headlights) dims.
- No battery charging.
Generator selection
If it is not possible to repair the old generator, it will need to be replaced. We have already written about which one to choose in the material: “Choosing which generator is best to install on the VAZ-2114.”
Diagnostics of the VAZ generator without removal and special tools
This is not the most reliable and reliable method, but it allows you to determine whether the generator is functioning or there are malfunctions. The use of any specialized tools, including a multimeter, is not required. There is no need to remove the generator.
To diagnose, start the engine and turn on the low beams. In operating condition, the negative terminal must be disconnected from the engine. The uniform light of the headlights and the stability of the engine stroke indicate normal operation of the generator. If malfunctions are observed or the brightness of the light changes, the VAZ generator is probably faulty; in-depth diagnostics need to be carried out.
Checking the VAZ-2114 generator: diode bridge and checking the brushes with a multimeter
Many motorists have encountered the fact that the voltage in the on-board network of a VAZ-2114 car has dropped. This is due to the fact that malfunctions appeared in the generator. Direct causes may be brushes and diode bridge . Of course, repairing this unit is usually expensive and the car enthusiast tries to either repair the part on his own or buy a used one. It is not a fact that the second option will last long, so it is recommended to repair the original one, which will certainly last longer.
The video below will tell you about checking the operation of the generator on the VAZ-2114 (+ its overhaul):
The video will tell you about the design of the generator, and also tell you about the repair, nuances and details of the process
Voltage Regulator Diagnostics
To check the voltage regulator on a VAZ 2114, 2106 car, you should perform the following steps:
- Start and warm up the engine by turning on the headlights. Warm up the engine for about 15 minutes. For diagnostics, a multimeter or voltmeter capable of taking measurements in the voltage range 0-15 V is used.
- Measure the voltage between ground and terminal 30. For most cars in normal condition, the reading will be within 13.5-14.6 V. A value less than 13 V means the unit needs to be replaced.
Checking and replacing the generator bridge
In any case, replacing the VAZ 2114 diode bridge should begin with dismantling work.
Therefore, it is worth figuring out how to remove the product:
- You will have to remove the negative terminal from the battery, and also remove the contacts that are responsible for connecting to the generator.
- The wiring system must be removed.
- The protection is removed from the ends of the contacts on the plus side, then you need to remove the fastening nut and remove everything from the ground.
- It is also necessary to remove the protection from the generator; for this, the springs that are responsible for fixing the protection are removed.
- You need to unscrew the voltage regulator, both it and its brushes are removed.
- Next, we take on the fasteners that the rectifier unit has.
- The capacitor fasteners can be unscrewed at the moment when the ends of the winding are removed.
- Now you can remove the freed block; to do this, you need to unscrew the remaining bolts; for this, the tenth key may be useful. You also need to remove the bushings from the bridge contact bolt with the engine.
Attention! After the device has been dismantled, you will need to prepare a set of keys, a screwdriver and pliers. Such tools are necessary for carrying out independent replacement work.
Checking the return current
Diagnostics is carried out with the engine running at high speeds. It is necessary to measure the current consumed by the vehicle components. The probe is pressed against the wire from terminal 30 or B+.
It is necessary to turn on the electrical appliances of the car one by one and record the indicators. The resulting values should be summed. Then you need to turn on all the devices and measure the current indicator. The resulting indicator should be compared with the summed value of previous measurements. The final value should be approximately 5 A below the summed value. A higher value confirms that the node is faulty.
Checking the windings
First you need to visually inspect the windings. If there are no visible defects, you should use a multimeter. First you need to do the following:
- Remove the brush holder.
- Disconnect the voltage regulator.
- Clean the slip rings.
- Diagnose the winding for defects.
The resistance measurement function on the multimeter should be activated. The measurement is taken between the slip rings and the stator. In normal mode, the value will be from 5 to 10 ohms.
Diagnostics of a removed generator
To check the generator removed from the VAZ 21, you should use a multimeter in ohmmeter mode. The probes are pressed against terminal 30 and the body of the unit. If there are contaminants and strong oxides on the case, they should be removed first, as they can affect the readings of the device.
You need to measure the resistance of each generator unit in turn. Parts that do not have the required resistance have become unusable. Most of them can be replaced at home using a minimal set of tools. To replace, you need to buy the same parts as those originally installed in the generator.
If you find an error, please select a piece of text and press Ctrl+Enter.
Source
How to check the diode bridge of a VAZ generator at home
Most motorists are comfortable with electronics, especially in modern cars; this is not surprising, given the complexity of modern engines. A large number of different sensors and wiring instills fear in “our brother.” However, there are things that at first glance look very complicated, but in fact their repair and diagnostics are a piece of cake.
Today we will talk about how to check a diode bridge with your own hands, while saving money and time on a trip to specialists at a car service center. I once wrote about how to repair a VAZ 2101 generator, this time we will talk specifically about the diode bridge, or more precisely about how to check it at home.
It’s probably not worth talking about the role of a generator in a car; everyone knows that this is a very important part, without which one cannot imagine an engine. The service life of the battery, which receives charging from the generator, largely depends on the performance of the generator.
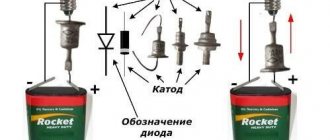
A diode bridge consists of four or six diodes that convert alternating current into direct current according to the principle of a bipolar rectification method. The rectifier diodes of the generator play the role of a gateway that allows current to flow in only one direction, preventing current from the vehicle’s on-board electrical network from passing to the stator windings. The diodes are located on the generator body and tend to burn out, there are several reasons for this.
Common causes of diode burnout
- Ingress of moisture (for example, during engine washing).
- Dust, oil and dirt that can get into the generator while driving.
- When “lighting the car” when the battery is completely discharged, in case you accidentally mixed up “+” and “-“.
In fact, there are a large number of situations in which the diode bridge burns out, but of course we will not describe them.
How to check the generator without removing it from the car
In connection with the successful elimination of the problem in the generator, I decided to summarize the experience and write separate articles on diagnostics and troubleshooting using the example of generator 9412.3701 from the VAZ-2107. If you have established for sure that it is the generator that is faulty, then we arm ourselves with a multimeter or a test light (screwdriver), connected to the battery.
First, remove the positive “ ” terminal from the battery to avoid accidental short circuit, then disconnect all contacts from the generator and, bending the latches, remove its back cover (the design of which provides for this). In this way we can carry out a general check of the diode bridge and stator winding, as well as the rotor. To check the voltage regulator, you need to remove it from the car's generator.
So, let's get started: switch the multimeter to the “diode continuity/circuit integrity check” mode.
1. First, check the generator for a short circuit to ground.
We press the positive “ ” probe of the multimeter to terminal “30” of the generator, and the negative “-” probe to its body. In good condition, the diode bridge does not pass current in this direction, there is no sound signal, and the light bulb does not light up.
| Fig. 4 “1” - Resistance tends to infinity - no current passes |
When an alarm occurs or the control lamp lights up, we have a short circuit of the diode bridge or stator winding to ground.) To exclude the stator in this case, it is necessary to remove the diode bridge from the generator.
2. Check the positive diodes for breakdown.
We press the positive “ ” probe of the multimeter to terminal “30” of the generator, the negative “-” to the terminals of the winding and diodes (generators type 9412.3701, where the bolts are insulated from the terminals with textolite washers and are connected to ground), or one of the bridge mounting bolts (generators type 37.3701, where the bolts are connected to the terminals, but isolated from the “ground” - Fig. 5).
CHECKING THE DIODE BRIDGE
A typical failure of the unit is the failure of the diodes due to burnout. The following reasons for this malfunction can be identified:
- Moisture, oil, dirt or dust getting on the diodes;
- Working out the operational resource.
There are several ways to inspect the generator diode bridge on a VAZ 2114, and the simplest of them is checking with a light bulb and does not require dismantling the device, but in order to repair the diode bridge or replace it, the rectifier will have to be removed.