Removing a faulty device
Carburetor repair is a simple procedure. When removing it, there is no need to replace the pump, fuel pump or battery. The device of the VAZ 21099 car allows you to quickly remove the faulty device. To do this, all you need is a standard set of keys and a little patience.
- First, remove the air filter along with the filter element.
- Then we disconnect the air damper rod. It is located on the right side of the carburetor, in the direction of travel of the car.
- There we also remove the return spring of the gas pedal drive.
- Use a screwdriver to pry up the spring clamp on the gas drive sector and remove it.
- Then we remove the throttle cable from the drive sector.
- We disconnect all the wiring connectors from the carburetor, having previously marked their connection points so as not to confuse them during assembly.
- Loosen the clamps and remove the fuel hoses.
- Unscrew the screw and remove the heating block of chamber 1.
- We remove the crankcase ventilation hose, and then the vacuum tube going to the breaker - the ignition distributor.
- Unscrew the 4 fastening nuts and carefully remove the carburetor.
- To top it off, cover the outlet hole with a clean rag to prevent dirt from getting into it.
Main unit VAZ 21099
Installation is carried out in the reverse order of removal. Now you can begin disassembling and cleaning the carburetor.
Return to contents
This is interesting: What is poured into a car radiator - antifreeze, antifreeze or water?
Disassembling the device
Maintenance of the VAZ 21099 carburetor involves removing, cleaning and adjusting this device after every 60,000 kilometers. When disassembling the carburetor, it is highly recommended not to unscrew the screws securing the air and throttle valves, as this can lead to jamming of the mechanism. In addition, it is prohibited to press out brass tubes that cannot be twisted out.
- First, unscrew the solenoid valve and remove the fuel nozzle from it.
- Then remove the carburetor cover by unscrewing 5 screws.
- After this, use a thin screwdriver to push the float axis out of the holders, take it out and remove the floats.
- Carefully, so as not to damage, remove the cover gaskets.
- Unscrew the needle valve.
- Unscrew the 4 screws of the starter cover and remove it.
- Carefully separate the diaphragm from the cover and remove the spring.
Adjustment in progress
Then unscrew the fuel filter plug and remove it along with the filter element.
- Carefully pry up the accelerator pump nozzles with a screwdriver and remove them.
- Unscrew the 4 screws of the accelerator pump cover and remove it.
- Carefully remove the accelerator pump diaphragm and spring.
- Unscrew the screws of the economizer cover and remove it along with the spring and diaphragm.
- We take out the plastic plug using a screwdriver or a corkscrew and unscrew the mixture quality screw.
- We unscrew 2 emulsion tubes combined with air jets.
- Then we unscrew the fuel jets 1 and 2 of the chamber, located under the emulsion tubes, and, turning the body over, shake them out.
- We unscrew the screw securing the wire and, carefully bending the tabs of the tip, remove the wire from the tip of the mixture quantity screw sensor.
- Unscrew the screw for the amount of mixture.
Return to contents
Idle speed setting
After setting the level in the float chamber, we assemble the carburetor and warm up the car engine to operating temperature. In this video, they will tell you and show you how to set the idle speed in a Solex carburetor, as well as the main reasons for its absence.
Next, we turn it off and carry out the following operations:
- Using a flat-head screwdriver, tighten the mixture quality screw until it stops (position 7).
- We turn it back from this position 4 - 5 turns.
When setting the idle speed, some problems may arise:
The engine does not slow down when the mixture screw is tightened (a lot of fuel gets into the idle channel and this screw cannot shut it off).
Causes:
- large jets installed;
- the solenoid valve is not tightly screwed in, and fuel is sucked past the nozzle;
- deformation of the nozzle seat or itself.
So, for example, if the engine stalls when removing the wire from the solenoid valve, this means that the jet is installed too large.
Carburetor repair for VAZ 21099
Carburetor repair on a VAZ 21099 car means work that includes cleaning the main systems and replacing failed elements. It is necessary to purchase a repair kit for the carburetor installed in the VAZ 21099 car. This includes: jets, seal gaskets, starting device, accelerator pump.
Advice: If there is no need to remove the air and throttle valves, it is better not to remove them; poor installation may later lead to their jamming during operation.
Carburetor disassembly procedure
On a VAZ 21099 car, carburetor repair begins with disassembling it:
- The solenoid valve is unscrewed from the carburetor and the fuel nozzle is removed from its body.
- The carburetor cover is removed and carefully, without damaging the float, set aside.
- The float is removed. Using an awl, the axis fixing it is squeezed out, and the part is freely removed.
The axle is removed and the float is removed
- The sealing gasket is removed.
- The fuel valve opens.
- The trigger cover is removed and the diaphragm is removed.
- The fuel filter is unscrewed from the side of the cover.
- If necessary, the drive sector is removed using the throttle valves . To do this, unscrew the fastening nut, remove the ball with the spring and remove the lever.
- Carefully pry up the accelerator pump nozzles with a screwdriver and pull them out.
- The accelerator pump is disassembled, the spring and diaphragm are removed.
Spring and diaphragm removed from the carburetor (arrows)
- The economizer of power modes is analyzed in the same way. If there is a plastic plug installed under the device cover, it is simply removed.
- The emulsion tubes are unscrewed. The carburetor body is turned over, and the previously unscrewed main fuel jets are shaken out.
- The sensor wire of the screw that regulates the amount of mixture is removed.
Trouble-shooting
If you perform all the work yourself, the price of repairing a VAZ 21 099 carburetor will be significantly lower than if a specialist will perform the same work. Car repair manuals contain instructions that make it easier to carry out repairs at home. So:
- The fuel nozzle is washed in acetone and purged with compressed air.
- Replace with a new sealing gasket if it is damaged.
- You should pay attention to the planes of connection between the housing and the cover. If the prints from the connection of parts are not continuous, this indicates wear of the mating surface. In this case, you need to grind the plane of the body or cover.
- The operation of the fuel valve is checked. The needle enters without jamming; large lateral play should not be allowed. The damping ball should move easily along its axis. If such malfunctions are detected, the fuel valve must be replaced.
- The operation of the starting device is checked. Mechanical damage to the diaphragm must not be allowed , and the material from which it is made must not lose elasticity. The spring should not be stretched too much.
- Soak in acetone, blow out the fuel filter with compressed air.
- The nozzle seals are inspected and replaced if necessary. Sprayers can be washed in acetone, blown with compressed air and reinstalled.
- The pump cover is washed with acetone.
Carburetor VAZ 21099 repair is completed, assembly is carried out in the reverse order of disassembly.
We advise you to read
VAZ 2109: tuning Solex carburetors
Anyone can replace the throttle valve of a VAZ 2112
VAZ 2109: how to make a carburetor economical without extra costs and outside help
VAZ 2109: cleaning carburetors on your own
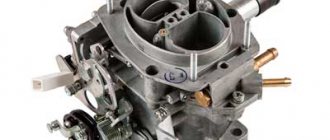
Solex 21083 carburetor design for VAZ cars
During the production of this brand, several modifications changed. The base model now is Solex 21083, so it makes sense to consider the design of a carburetor of this type using its example.
- the main body, which combines diffusers, a gas pump, a system for ensuring idle operation, a pump and an economizer;
- a cover containing an air damper, floats, an EM valve and a starting part for starting a cold internal combustion engine.
Now let’s look at the design of the Solex carburetor in more detail.
Starter and air damper
The task of the launch system is twofold:
- It should prepare a rich fuel mixture when starting a “cold” engine.
- But immediately after this, it must lean the mixture so that the candles do not get wet from fuel vapors (a phenomenon known to all motorists as “plug flooding”).
The device that contains the Solex carburetor 21083 operates as follows:
- The driver, starting the cooled engine after a long stop, pulls the “choke” handle - manual control of the starting device.
- The starting device is cocked under the influence of traction, turning counterclockwise.
- A specially shaped groove releases the control lever pin, and the air damper closes completely, cutting off the first chamber.
- The Solex throttle valve opens to the required angle (starting gap).
- The starting system begins to operate. Under the pressure of air after starting the engine, the damper begins to move, leaning the fuel mixture and saving the spark plugs from flooding.
Float mechanism diagram and fuel level
Another important part that the carburetor contains is the float mechanism. Its task is to maintain the required fuel level in the Solex 21083 carburetor
The level is maintained automatically by a valve, which is closed by a shut-off needle. When the level drops, the floats drop, the needle is released - and the hole in the valve opens, allowing a new portion of fuel to pass through.
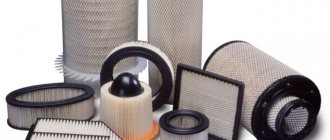
Jets, diffusers and other replacement parts
From the user's point of view, an important part of any carburetor are the parts that need to be changed regularly. In Solex carburetors these include:
- Jets are “plugs” with calibrated holes that allow strictly dosed portions of fuel to pass through per unit time. Their capacity determines whether the carburetor will provide the engine with the proper amount of fuel mixture. In this case, the fuel jets should have a small cross-section, and the air jets, on the contrary, should have a much larger cross-section. The factory set of jets is designed for economical fuel consumption, and therefore their cross-section is small. In the event that you need to increase engine power, even at the cost of excessive gasoline consumption, you can purchase another kit, increasing the throughput of the units. In addition, replacement and a new selection of jets is required if the Solex carburetor is used not on the “native” BAC engine, but on cars of the GAZ, UAZ, etc. brands.
- Diffusers are narrowings in the channel pipes of the carburetor. If large diffusers at Solex are usually a direct part of the housing of the mixing chambers, then small ones are replaceable parts of the carburetor GDS. The peculiarity of the operation of diffusers is the following: the larger their cross-section, the higher the engine power - but at the same time the fuel mixture is atomized less efficiently. Therefore, the selection of a diffuser must be based on these mutually exclusive rules, and setting up the Solex 21083 carburetor involves selecting a cross-section based on the expected operating mode. In particular, by choosing the right cross-section, you can increase engine power at high speeds and high vehicle speeds. Therefore, changing small diffusers is one of the important elements of car tuning.
- UN sprayers. This is not only a replaceable part, but also one of the elements that must be replaced during tuning. In particular, fans of fast driving replace the standard nozzles with those included in the carburetor repair kit 21073-1107010. With minimal modifications, it is possible to achieve that, at the cost of increased fuel consumption, acceleration increases noticeably.
- Pressure cam UN. Solex carburetors use two main types of this part, marked “4” and “7”. To increase the dynamics and acceleration of the car, throttle response at high speeds, they usually change “seventh” to “fourth”. In the same place where “4” is standard, you don’t need to touch anything.
This is interesting: Lighting candles on Shabbat today in Moscow
Solex design
The carburetor mechanism of all modifications on the VAZ 2108/2109 is emulsion and consists of two internal combustion chambers. At the top of the carburetor there is a cover that prevents dirt from entering the cavity of the device, and fittings - fuel lines are supplied to them. The middle part is the body itself, into which diffusers and cameras are mounted. At the bottom of the carburetor are the float chamber and throttle valves.
The key elements of the system are:
- accelerator pump;
- float;
- throttle thrust;
- forced idle economizer;
- main dosing system;
- trigger mechanism;
- econostat;
- vehicle idle system.
The principle of operation of the Solex carburetor is that gasoline is supplied through the inlet valve in the fitting. The fuel is directed directly into the float chamber. The fuel level in the cavity must always be at a certain level to avoid dips and jerks in engine operation. Level control is carried out through the movements of a needle valve mechanism.
After the chamber, gasoline is sent to emulsion wells, where it is supplied in strictly limited quantities through fuel nozzles. It is in the wells that air flows break up large drops of gasoline, forming a single air-fuel mixture with it.
The mixture is supplied to diffusers, and through them to the power unit device. Thus, the main task of the carburetor is to form the air-fuel mixture in the desired consistency and direct it to the engine.
The interaction of many elements ensures smooth operation of the motor
This is interesting: Air filter VAZ-2114 - what are they and how to change them?
Features of setting up the Solex carburetor
The fastest way to set up a Solex carburetor is to follow the instructions. Setting up a Solex carburetor begins with setting the correct level in the float chambers:
- Start the engine, turn it off after 3-4 minutes;
- You need to remove the air filter;
- Disconnect the fuel hose;
- Carefully unscrew the 5 bolts and remove the Solex carburetor cover;
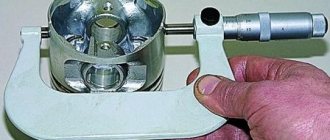
- Measure the distance from the edge of the housing to the fuel level, it should be 25.5 mm;
- If a discrepancy is found, bend the tongue of the float bracket;
- Check the parallelism of the edges of the floats on the mating surface of the cover;
- Adjust by exerting pressure on the float brackets.
Next, we adjust the starting device. To do this you will need to remove the carburetor. Check the trigger device's diaphragm. To access the diaphragm, you need to tighten 4 bolts and remove the cover. If the diaphragm is found to be faulty, it must be replaced. The adjustment is carried out in the following sequence:
- Close the choke by turning the lever;
- Press down the starter rod;
- Measure the gaps; if any discrepancies with the data are found, continue further;
- Loosen the lock nut, turn the adjusting screw;
- Measure the throttle valve clearance, it should match the data, achieve compliance using the adjusting screw.
Then you need to adjust the idle speed. A properly adjusted idle speed ensures stable engine operation. The adjustment is carried out provided that the carburetor and air filter are installed and the engine is warmed up to operating temperature. It will be more convenient to use a tachometer and a gas analyzer. So:
- Even before the engine warms up, tighten the quality screw all the way, then loosen it by 3-4 turns;
- Start the engine, remove the choke, turn on the headlights and fan;
- Use the quantity screw to set the speed to 750-800;
- Next, set the maximum speed with the quality screw;
- Then set the rpm to 900;
- Next 800;
- Turn the quality screw until you achieve unstable speed, then unscrew it one turn;
- Use the quantity screw to set the speed depending on the time of year. For summer it is best 800-900, for winter 900-1000.
A situation may occur that the engine does not respond in any way to adjusting the quantity screw. This indicates that the idle jet needs to be changed to a smaller one. The second option is to tighten the solenoid valve. Finding the right jet for a Solex carburetor is a difficult task. The engine displacement can be a reference point. A larger volume requires a smaller jet.
The reason that the Solex carburetor stalls is precisely the jet.
Proper tuning will reduce fuel consumption and increase engine power.
It is not recommended to replace Solex carburetor jets on your own, nor is it recommended to repair it. Installing the wrong one will cause the opposite result - fuel consumption will increase, power will decrease and dynamics will be reduced.
Adjusting the VAZ 2109 carburetor is the most common car maintenance procedure. Due to the complexity of the unit, it is considered the most subtle and sensitive setting of the car. It's time to find out how to adjust the VAZ 2109 carburetor and repair it.
Before cleaning and adjusting the carb, you need to study the carburetor data. This is a table that has content in the form of technical characteristics.
The secret of 99 - how is people's love justified?
The car, whose history goes back almost four decades, is still considered one of the most successful VAZ assemblies. Until 2004, all VAZ 21099 models had a carburetor engine type, and only after 2004 did manufacturers replace this device with an injector. So the carburetor 99, a symbol of the dashing 90s, is today found on the roads of post-Soviet countries no less often than modern cars.
The car has front-wheel drive, a 1.5 liter 4-cylinder engine. A VAZ car can accelerate to 160 km/h with its 70 hp. Some models have a 1.5i engine with 76 hp, although not many of these cars were produced. The carburetor of model 21099 is very economical, the average consumption of the VAZ 21099 reaches 7–7.5 l/100 km. Fuel consumption on the highway with high-quality fuel and average speed is 5.5 liters.
Carburetor adjustment
Tip: When doing work with your own hands, do not use open fire or smoke.
Adjusting the fuel level in the float chamber
The most complex and important adjustment work in a carburetor is the regulation of the fuel level in the float chamber. Before starting work, disconnect the “-” terminal of the battery and remove the air filter. To accurately and correctly adjust the device, it is best to make a template that is installed on the carburetor cover. The lid is placed in a horizontal position with the floats facing up. If the gap along the contour between the template and the floats is more than one millimeter, then it is necessary to adjust it by bending the tongue and the float levers. Work order:
- The carburetor cover is removed.
- The gap between the gasket and the protrusions located on the bottom of the floats is measured. It should be the same for two floats, and its value should not exceed one millimeter.
- If the gaps are different or greater than the permissible value, and the mold connectors relative to the carburetor cover are not parallel, it is necessary to adjust them by bending the floats and the tongue that rests on the valve shank.
- The fuel level is visually checked. The cover is installed and secured to the carburetor, the fuel supply and drain hoses are connected, the engine of the VAZ 21099 is started. The engine idles for one or two minutes, then it is turned off, the hoses are disconnected, and the cover is removed. The distance between the plane of the housing and the fuel level is measured. It should be 25.5 millimeters. If there is a deviation, the adjustment is repeated.
Adjusting the air damper drive
Work order:
- The bolt connecting the rod to the air damper drive lever is loosened.
- The lever rotates until the air damper is completely open.
- The air damper drive handle is completely recessed on the dashboard.
Recessed air flap knob on instrument panel
- The rod is fully extended and the bolt securing the rod to the air damper drive lever is tightened.
- The air damper drive handle is pulled out all the way, which should ensure the damper closes.
The air damper is completely closed
- If this is not the case, it is necessary to disconnect the rod casing, and by moving it, ensure that the throttle valve is completely closed and secure it with a bolt.
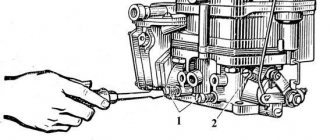
Adjusting the throttle valve drive
If the nut of position 1 is screwed in, the damper opens; if the nut of position 2 is screwed in, the damper closes.
Adjusting the throttle valve drive
Work order:
- The accelerator pedal is pressed all the way. In this case, the damper of the first throttle chamber opens completely. This is determined by moving the throttle valve control sector to the extreme position.
- The accelerator pedal is released, then the throttle valve of the first chamber should close, and the throttle valve control sector should move all the way to the other side. If this is not the case, the drive needs to be adjusted.
- One nut is loosened, the other is tightened until the throttle valve opens and closes completely. A nut that was previously loose is tightened.
More detailed carburetor adjustment can be seen in the video.
Adjusting the carburetor VAZ-2109 and 21099
The carburetor is very simple. There are no electronics in it, and all processes work based on the laws of physics and using mechanisms.
As for the power characteristics of the car, carburetor fuel systems are much better than injection systems in terms of dynamics.
But in order for the car to please with stable operation and consume a minimum amount of fuel, you need to spend some time adjusting the VAZ-2109 carburetor.
The carburetor prepares the fuel-air mixture, on which the engine actually runs. The device can maintain reliable operation of the power unit in all operating modes, at any engine speed and load.
"Solex 21083"
This carburetor consists of two parts. So, the first part is the main body of the device - there are diffusers, the main dosing system, a system for idling the engine, a power economizer and an accelerator pump.
The second part is the lid. It is equipped with an air damper, floats, a starting device, and a solenoid valve.
Device
Let's take a closer look at how this carburetor works. Before you start setting up the VAZ-2109 carburetor, you need to understand what and how it works. So, “Solex 21083” is an element consisting of two cameras. Jets for supplying fuel from the main metering system are installed in the middle of the chambers, deep in the main body.
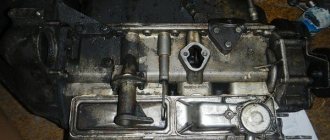
On top, the fuel jets are covered with air elements of the gas pumping station. In the design of this carburetor, the developers have provided a fuel mixture heating system.
Hoses through which hot coolant passes are connected to this block. Since there are two chambers in this carburetor, there are also two throttle valves.
They are mechanical, and opening and closing is carried out using cables and levers.
The lid has pipes for supplying fuel and returning it back to the tank. The presence of the so-called return line allows you to reduce the pressure that is formed in the fuel system of the car during operation.
Operating principle
There is no point in examining in detail how a carburetor works, so let's study the basic principle of operation. A carburetor is a special device whose main task is to supply the engine with a fuel mixture in different operating modes.
When starting an internal combustion engine, many drivers open the air damper of the first chamber - this allows the mixture to be supplied to the cylinders as rich as possible. The engine should start. Then, as the engine warms up, the air damper is closed and the carburetor returns to its main operating mode.
The fuel mixture is supplied from the pump to the float chambers, which feed the first and second chambers. The gasoline level here is adjusted using a needle valve.
Next, fuel is supplied from the chambers through special channels in the device body into the main jet and then into the first chamber. The mixture supply level is controlled by the accelerator pedal. The latter, in turn, regulates the throttle valve.
The second camera will be activated if you press the gas pedal more than halfway.
When the engine is idling, the device does not use the main metering system. These carburetors have a separate idle design. Fuel and air are supplied through separate channels in the housing. XX jets are also present. Many owners have problems with setting the idle speed on VAZ-2109 carburetors.
A well-maintained and properly tuned carb will not cause any problems to its owner. But often this does not happen. Elements break, and there are fewer and fewer carburetor specialists. Let's look at the main problems with these devices.
Most often, malfunctions occur with the accelerator pump. Its main function is to enrich the fuel mixture. During the operation of the car, as well as due to poor-quality fuel filters, the pump becomes clogged. As a result, dips appear and the car “does not move.” The situation can be corrected by disassembling and cleaning the carburetor (in particular, the accelerator pump).
Problems with idle speed also often occur. Usually the idle jet and solenoid valve are to blame. The EPHH unit also fails. The GDS jets also become clogged.
Dismantling
Before setting up the VAZ-2109 carburetor with your own hands, you need to blow it out and rinse it. This process begins with dismantling the device. It's very easy to do. Simply turn off the ignition and remove the air filter housing. Then remove the spring that is installed on the air damper actuator.
After this, disconnect the throttle cable. The next step is to unscrew the fastening that holds the choke cable. All that remains is to unscrew the nuts that hold the device body in place. After this, you can completely remove the device.
Adjustment
This carburetor has several options for adjusting different parameters.
Typically, setting up a VAZ-2109 Solex carburetor includes several operations. You can adjust the fuel level in the float chamber, idle speed and idle speed itself. The quality of the fuel mixture is also adjusted.
This carburetor adjustment on the VAZ-2109 can be done with your own hands and it is not necessary to visit specialists. The quality is very easy to set. To do this, the engine is thoroughly warmed up, and then using a screw to adjust the number of revolutions, the idle speed is set to about 900 per minute.
Next, the quality screw is tightened until the engine begins to operate intermittently. Then it is turned away again. It is recommended to unscrew until stable operation, namely until the speed stops increasing. In the position of the quality screw where the speed is highest, you need to stop and remove the high speed with the quantity screw.
One of the common problems with these carburetors is idle. Owners are faced with the fact that independently adjusting the VAZ-2109 carburetor does not lead to anything. XX cannot be adjusted. When turning or unscrewing the fuel mixture quality screw, the engine speed does not change in any way.
Everything is simple here. The reason for this operation is that the idle jet, which is installed in the solenoid valve, is clogged. It is also possible that the channel located under the quality screw is clogged. Often everything is solved by replacing a non-functioning solenoid valve.
Checking the solenoid valve is also easy. When the engine is not running, remove the wire from the valve, unscrew the valve itself, and remove the jet. Next, turn on the ignition and connect the wire to the solenoid valve. In this case, the latter should click, and the rod will sink inward. If this click does not occur, then the valve is not working. It needs to be replaced.
You should also immediately blow out and clean the idle jet. Even a small grain of sand is enough for the hole to become clogged. It may not even be visible. But this is enough for the idle speed to disappear. If the channel located under the quality screw is clogged, then it will not be possible to blow it out.
If the idle channels are dirty, the engine will operate unstably at a minimum number of revolutions. And when you let off the gas, it may even stall completely. If you don’t have time to do adjustments and purging, but you need to drive, then while the engine is running, you need to loosen the solenoid valve and find a position in which the engine will operate stably.
For stable and uninterrupted operation of the car, you need to adjust the float of the VAZ-2109 carburetor. This will ensure the correct fuel level in the float chamber. To do this, you need to remove the carburetor cover. Then, by bending the plate that holds the float, the position is adjusted.
How to exhibit? There are different opinions on this matter. Some argue that you need to achieve factory settings for the VAZ-2109 carburetor, while others prefer to configure it based on their own experience. It is better to measure the level with a caliper.
The distance is determined between the top of the housing and the fuel level. It should be within 24-26 millimeters. Measurements must be taken as soon as the cover is removed. In books on Solex carburetors, there is a template that allows you to configure the floats as correctly as possible.
This setting is carried out with the cover removed.
Ignition settings
In order for the car to drive as efficiently as possible, adjustments to one carburetor are not enough. You also need to adjust the ignition. The VAZ-2109 carburetor should work well. Do you know that an incorrectly set ignition angle affects engine performance for the worse?
On front-wheel drive VAZ models, this should be taken very carefully. The ignition angle allows you to obtain normal characteristics such as power, idle speed, fuel consumption, and engine response.
What if the ignition setting is incorrect (the VAZ-2109 carburetor works perfectly)? In this case, you can observe high fuel consumption, a decrease in power, failures when pressing the gas pedal, problems with starting the engine, as well as detonation and overheating.
It often shoots at the muffler and carburetor. These are not all possible symptoms. But before you start ignition, you need to make sure that no valve adjustment is required. You already know how to adjust the VAZ-2109 carburetor.
Many people recommend using a strobe light for these purposes. But this is true for new cars. If the motor is already worn out, this angle set by the strobe will be incorrect. It is best to rely on the hearing and behavior of the car.
So, how do you set up the ignition yourself on a VAZ-2109? By the way, we have already examined the carburetor in full. The first step is to start and warm up the engine. Then you need to loosen the nuts holding the distributor and turn it in one direction or the other until the speed begins to increase and the engine starts running stably. Next, the nuts are tightened.
After this, you need to drive the car and look at its reaction. If the car “does not drive,” then the ignition is too early.
Next, you need to accelerate to 50 kilometers per hour, engage fourth gear and press the accelerator pedal. If detonation sounds occur, then the ignition is set even later.
How to flush a carburetor assembly without disassembling it
Flushing the Solex carburetor is recommended by the manufacturer in cases where there are clearly any problems with its operation: increased gasoline consumption, jerks and jolts when driving, unstable idle speed, problems with starting.
The traditional method of washing carburetors is to completely disassemble them into individual components, which is not always possible for an inexperienced VAZ owner to do. To simplify the procedure, a technique was created for washing and cleaning the carburetor without disassembling it into components. This technique is based on the use of special aerosols in cans. The most affordable carburetor cleaners are considered to be aerosols produced by ABRO and Mannol - they can be bought at any auto store for 100–150 rubles.
These cleaners do an excellent job of cleaning carburetor mechanisms, and they are also very easy to use. To flush the Solex carburetor, it is recommended to turn off the engine, let it cool and begin the procedure:
- Remove the air filter box from the car and place it to the side.
- Unscrew the solenoid valve from the carburetor body.
- Place a special narrow nozzle on the aerosol can and spray the liquid on the nozzle channels, the first and second chambers, dampers and all visible elements of the carburetor.
- After this, spray the aerosol on the external parts of the mechanism.
- Wait 5–8 minutes (depending on the aerosol manufacturer’s recommendations). During this time, the liquid will be able to corrode accumulations of soot and dirt.
- Next, you can start the engine so that it removes all remaining dirt.
- If during one procedure the carburetor did not have time to be properly cleaned, then you can treat it again with the same aerosol.
After such cleaning, the VAZ 2108/2109 will significantly increase its dynamic characteristics, since the accumulation of dirt will not interfere with the normal operation of all parts of the carburetor.
Video: how to clean the carburetor on a VAZ with your own hands and without removing it from the car
How to replace carburetor parts
Replacing the float, accelerator pump diaphragm, and seals is not particularly difficult. Most often, during repairs, repair kits selected for the type of carburetor are used, which include everything necessary to replace the elements.
The replacement procedure is not regulated in any way: it is enough to remove the damaged part and install a new one in its place. The main criterion: the identity of the elements when replaced.
Review of VAZ 21099 (1999)
So I decided to write about my car.
So, VAZ 21099 1999. carburetor. Purchased in 2000 with low mileage. No winter use. The second owner was my father. We went mainly in the summer on weekends to the dacha and on vacation. That's why the mileage is so short. In winter it was kept in the garage. During my father's period of ownership (from 2000 to 2008) there were no major breakdowns. Immediately after purchase they washed it. So today the machine is well preserved. We took turns going.
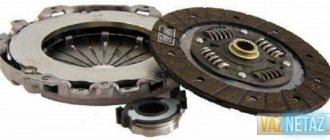
Here's a brief summary of what was replaced: steering rack, clutch assembly, water pump, fuel pump.
In the spring of 2008, the car came into my complete possession. My father bought another one and gave this one to me. Since then my independent automobile life began.
Of course, the car is not in its first youth, but it is still quite playful. I decided to finish the car and make it a little more customized for myself. I went to the station for diagnostics, they said everything was normal except for the left ball joint and rear wheel bearing. Immediately everything changed. Next I decided to replace the windshield; the old one had a small crack. To be sure, I changed the front and rear brake pads. I pulled up the handbrake. I did a wheel alignment plus balancing of the front wheels.
After driving for a couple of weeks, problems began. The battery was draining quickly. It lasted for a week. There was no charging, I changed several relay regulators until I got a normal one, the problem with charging seemed to disappear. Then the diode bridge in the generator closed. I removed the generator, changed the diode bridge, the wire on the plate on the old one burned out. Then the temperature sensor stopped working, I went to an electrician - replacing the sensor did not solve the problem, the needle did not move. They removed the tidy, rang the circuit, but did not find the cause. The sensor lived its life, then suddenly started working.
Replaced the antifreeze and flushed the system. The next thing that leaked was the crankshaft oil seal, I went to the station and replaced the oil seals and the timing belt roller. Then there were problems with the carburetor, the car refused to start. Then I found out that the jet was clogged. For this reason, several times during the season I had to remove and clean the carburetor. I got tired of this and went to the carburetor. Replaced: repair kit of gaskets, solenoid valve, explosive wires, installed silicone ones, changed spark plugs (before that everything was factory). Then I had to buy a new battery, the old one died (the plates in two banks fell off). I took Mutlu white 60 am.h. The flight is normal.
I didn't do anything else with the car. I rode for fun. I put it in the garage in the fall (I don’t drive it in the winter).
In the spring I’m planning to: change tires, wheels (forged VSMPO wheels are in the garage), install electric windows, change the radio, install with MP3, work on the body (paint over chips). Thank God, no rust is visible yet. But after frequent washes there was almost no varnish left on the paint, no shine. I think I'll have to polish it, because... There are some surface scratches. And I'll probably have to do the front fenders, there are some small dents.
In general, I think that I got a pretty good device, a little polishing and it will be a sweetie. If possible, I will install an injector.
How to adjust Solex DAAZ 2108–1107–10
It is advisable to start the process of setting up and adjusting the performance of the carburetor mechanism from the float compartment. This is due to the fact that there is fuel here, the level of which must be strictly fixed. If the gasoline level is below or above normal, then adjusting other components becomes pointless.
Float adjustment
The adjustment procedure includes several steps:
- First start the engine and let it run for 3 minutes, then turn it off.
- Remove the air filter box and put it aside, as it prevents free access to the carburetor.
- The first step is to disconnect the pipe through which gasoline is supplied from the Solex body.
- Use a flathead screwdriver to unscrew the five screws on the cover to remove it.
- Measure the distance from the edge of the float chamber to the fuel level. It should be equal to 25.5 mm. If there are differences, you will need to set the desired parameter by bending the float bracket.
- You will also need to set the axis of the float so that it can move freely.
- The adjustment of the float chamber and float is now considered complete.
Adjusting the starter
You can adjust the carburetor on the VAZ 2108 and 2109, as well as repair it yourself. This work should be performed on the carburetor, which has been removed from the engine and installed on a flat surface. If the trigger diaphragm was damaged, then it is necessary to initially replace it and only then begin adjustment work:
- Turn the air damper adjustment lever and close it completely.
- Lower the trigger rod with the blade of a screwdriver and hold it in this position.
- Measure the width of the gap between the damper and the chamber wall. The existing indicator should be 1 mm. If this is not the case, then adjustments will be required.
- You will need to loosen the lock nut, which is located on the surface of the accelerator pump, and at the same time turn the quality screw with a screwdriver. If you turn the screw in one direction, the gap will increase, and if you turn it in the other direction, it will decrease.
- Measure the gap thickness again.
- The air damper on the second chamber is adjusted using the same principle.
You can measure the gap width using a drill with a diameter of 1 mm
How to adjust idle speed
This procedure can only be carried out on a carburetor installed in the car, after the engine has warmed up well. In this case, the air filter will no longer impede access, so it remains in its place under the hood:
- Turn off the engine.
- Tighten the air-fuel mixture quality screw all the way, and then unscrew it no more than four turns.
- Start the engine again, simultaneously turn on all the lighting, acoustics and heater to increase energy consumption.
- Working with the quantity screw, you need to set the number of revolutions of the running motor to 750–800 per minute.
- The quality screw sets the maximum idle speed - 900 rpm (in winter, this parameter can be increased to 1000 rpm).
- After this, you will need to tighten the quality screw back until interruptions in engine operation are felt. At this moment you will need to stop and make one revolution back.
Adjusting the idle speed on the VAZ 2108/2109 is necessary to ensure that the car exhibits stable operation in the set mode without high consumption of the air-fuel mixture.
How to adjust the fuel level in the carburetor on a VAZ 2108-VAZ 21099?
- Adjusting the fuel in the carburetor by adjusting the floats.
- Checking the relative position of the floats and their longitudinal installation.
- Checking the gaps between the floats and the metal gasket.
- More precise adjustment of the fuel level by adjusting the floats.
- Video material on setting up floats:
Adjusting fuel in the carburetor by adjusting the floats:
1) First, remove the air filter housing from the carburetor. (You will find more details on how to remove the housing in the article: “Replacing the air filter housing”, in the “Removal” section)
2) Next, using two wrenches, slightly loosen the fastening of the rod to the damper control lever.
3) Now unscrew the screw securing the rod with a screwdriver.
4) And then remove the bracket for fastening the rod shell, together with the drive rod itself.
5) Then loosen the screws securing the inlet and outlet hoses, and then disconnect them from the fittings located on the carburetor.
Note! There should be a small amount of fuel left in the hoses; if possible, it is recommended to drain it into any container!
6) Next, disconnect the tip of the wires from the solenoid valve terminal.
7) Next, using a screwdriver, unscrew the five screws that secure the carburetor cover.
 And then remove the cover.
Note! Try to remove the cover carefully, without damaging its floats and gasket!
9) Then, over any flat surface, turn the carburetor cover over with the floats up so that all the fastening screws fall out of it, and then put it down.
Note! Never place the lid with the floats facing up, otherwise the float brackets may be damaged!
10) Then check the relative position of the floats, their longitudinal installation, and also check the gaps between the floats and the surface of the metal gasket.
Checking the relative position of the floats and their longitudinal installation:
1) Checking both floats, which are indicated by the “Blue arrows”, is carried out from above, and it is done according to the prints that are on the surface of the metal gasket “Red arrow”.
Note! If one of any floats is moved to the side, then align it exactly with the edge and relative position. The floats should be aligned using your hands!
2) But not in all cases there are fingerprints on the metal gasket, but all because they form over time due to the fact that the parts are worn in, if your gasket has just been replaced with a new one, or it is simply damaged, according to the fingerprints there won’t be any on it, in this case apply them yourself using a marker or felt-tip pen.
Note! Make marks on the metal gasket while leaning on the carburetor body!
3) After setting the floats, pay special attention to their location, namely, check whether the tongue of the float bracket is installed perpendicular to the axis of the needle valve.
Note! If this is necessary, then using pliers or a screwdriver, align the tongue of the floats perpendicular to the axis of the needle valve!
4) Then, when bending the tongue is finished, pay attention to its surface, if it has burrs or is deformed, then in this case you will have to remove the floats, and then clean the surface of this tongue “letter A” using a needle file or pliers.
Note! If the tongue is severely damaged, it is recommended to replace the floats together with the bracket with new ones!
Checking the gaps between the floats and the metal gasket:
1) While the cover is lying with its floats up, at this time, using the tail of a drill or a piece of wire 1 mm thick, check the gaps of each float between the metal gasket.
Note! When checking the gaps, the damper ball must be recessed, that is, the floats must be in a lowered state, and the gaps between both floats between the gasket must be the same and range from “0.25” to “1 mm”!
More precise adjustment of the fuel level by adjusting the floats:
To do this you will need a depth gauge and a pencil.
1) First, using a caliper, in exactly the same place as indicated in the photo, measure “5.7 mm” from the edge of the gasket, and then use a pencil to make a mark on the gasket itself.
2) Then set the value “70.6 mm” on the caliper scale, and then install one caliper jaw in the place where you set the mark. Next, in this regard, install both floats, in connection with the gap of the caliper.
Note! There should be a gap of no more than “1 mm” between the jaws of the caliper and the floats!
3) Next, set the value “34 mm” on the depth gauge ruler located on the caliper, and then place it on the edge of each float.
Note! Immediately after inserting the caliper, adjust the holder of each float by hand so that both edges of the float are level with the caliper!
4) Next, lift both floats by hand by the central bracket, and check their stroke, which at the very bottom of the float should be “15 mm”.
5) If the stroke of the floats is more or less than “15 mm”, then in this case, adjust it for this:
• Using a screwdriver, bend the limiting protrusion of the bracket, and do this until the stroke of the floats becomes “15 mm”.
6) Finally, turn the carburetor cap vertically. Next, wait until both floats move completely upward due to the release of the damper ball. And then make sure that the mold line of both floats is installed parallel to the metal gasket.
Note! A slight deviation from parallelism when adjusted correctly indicates that the float mechanism is faulty. Most often this occurs due to the retraction of the damper ball, which in this situation must be replaced!
7) Upon completion of the operation, install all the parts that you removed earlier in their places in the reverse order of removal.
Video material on setting the floats: If you want to learn in more detail what’s what and how to adjust the fuel level in the carburetor, in this case we advise you to watch the video below:
Causes of failure - we make a diagnosis
Very often, owners of 99 VAZ are faced with the problem of poor engine performance, which can occur in both warm and cold seasons. One of the main reasons for this problem is malfunctions of the carburetor. The symptoms that arise during malfunctions are very easy to notice - the car does not start well, the speed on the tachometer fluctuates, unusual sounds in the form of pops can be heard from the exhaust pipe.
While driving, the VAZ 21099 may stall when changing gears. During acceleration or releasing the gas pedal, jerking and failures in operation are possible. Fuel consumption increases noticeably.
If you find problems with the operation of the VAZ 21099 carburetor, then in case of minor damage it can be repaired or replaced with a new one, if the problems are more serious. Repairing a carburetor is a delicate matter and requires experience in the work. For self-repair, you will need a standard set of tools and, preferably, a book on the maintenance and repair of this type of device.
Reassembling the Solex in reverse order
Installation of the carburetor mechanism on the intake manifold is possible after washing and repair, as well as some adjustment steps. It is important to connect all fuel and other hoses correctly so that there are no problems with engine operation. The DAAZ 2108–1107–10 carburetor is assembled in the following order:
- A gasket is applied to the installation site. It serves to reliably connect two units - the carburetor and the intake manifold.
- After this, the carburetor itself is threaded onto the studs and secured with four nuts.
- After the assembly has been carefully attached, hoses can be connected. The first step is to connect the vacuum and ventilation hoses.
- Next, the heating block is screwed to the carburetor.
- On one side, the fuel supply pipe is connected, on the other, the return hose for supplying excess fuel.
- The EPHH drive wire is connected to the corresponding screw.
- To complete the work, you can screw two wires (air and throttle valves) to the screws.
The strict connection sequence is due to the design features of the carburetor
After installing the carburetor, it is recommended to turn on the ignition and check the performance of the engine unit. If oil or fuel leaks occur at the hose connections, turn off the ignition and carefully check all connections.
All work that a car owner performs to maintain his car must be conscious. There is no need to disassemble the carburetor and replace its parts unless there are obvious signs of malfunction. In addition, when self-adjusting, it is necessary to adhere to clear rules of action. Both poor-quality repairs and incorrect adjustments can seriously affect the performance of the carburetor.
Operation “K” - we repair the carburetor
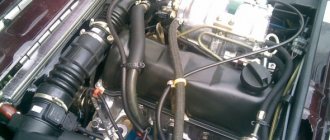
The VAZ 21099 carburetor is located under the car's air filter cover. If you buy a new carburetor, then you should not try to disassemble or adjust it, since it is already set to the required function from the factory. Every time after you remove or replace the carburetor, it is worth washing it, as dirt can get into the internal channels of the carburetor.
To get the carburetor, you need to use a 10mm wrench to unscrew the air filter cover and slide the four latches that hold it in place. Next, you should loosen the clamps that are attached to the air filter and unscrew the four studs that hold the filter housing and carburetor. After this, you need to loosen the carburetor fuel system clamps and carefully remove them. Next, disconnect the contact wire of the solenoid valve and unscrew the carburetor cover. It must be removed in such a way as not to catch the walls of the float chamber.
Place all unscrewed screws in a separate box - searching for lost fasteners will take a lot of time, and not every store has them freely available. After disassembling the carburetor, you need to check the positions of the floats in the chamber and, if possible, adjust them. The chamber floats should be parallel to the imprint of the chamber walls; this parallelism is clearly visible on the cardboard gasket of the lid. If it is not there, then you need to dilute or reduce the floats to the desired result.
After performing this procedure, the floats should move freely in the chamber and not touch its walls. The distance between the protrusions on the floats and the cardboard spacer should be on average 1 mm; it is best to measure this distance with a caliper.
If there are significant deviations, then the fuel level in the chamber is incorrect. The fuel level should correspond to the red stripes that are in the chamber; it is best to look at them immediately after removal, so that the gasoline does not have time to evaporate. You can also navigate along the ribs in the fuel chamber; to do this, you need to bend or bend the float tongue and pump fuel into the chamber manually. This method is also very good and has proven itself in practice.
Jets and valves - cleaning the carburetor
Devices such as jets control the necessary supply of fuel from the carburetor to the engine. In some cases, the repair consists of replacing them. The working jet must have three identical round holes; with prolonged operation they wear out and can be elongated. The hole in the middle of the nozzle head must be clean; various debris from low-quality fuel or from wear of the fuel hoses can get into it. Carefully inspect the rubber seal on the nozzle - if any breaks are found, replace it.
Carry out these steps for each jet. After completing these works, screw them back into the camera - this should be done by hand, and only in some cases with a screwdriver. A very common problem in carburetor operation is caused by poor contact in the solenoid valve. This happens due to oxidation of the terminal to which the wire is attached, so it needs to be cleaned and processed. In some cases, there is a breakdown in the switch, it may fail, so you will have to replace it with a new one.
One of the main devices in the carburetor is the fuel accelerator, which distributes fuel in the chambers. In practice, there are very few cases where this is the problem, but you shouldn’t rule it out. The accelerator needs to be washed or, if possible, replaced. It is best to clean your carburetor every six months. The cleaning product is available at any auto store. This procedure will significantly extend the life of your carburetor. If you are the owner of a VAZ 21099 with an injector, then on our website there is an article about this model.
Home →
Device →
Fuel and exhaust systems →
Carburetor →