How to check the ignition module of a VAZ 2114 with a multimeter
Diagnostics of a vehicle engine, checking the serviceability of its systems and characteristics can be carried out manually by the car owner, and quite little equipment will be required.
However, to determine the health of this part of the engine, some equipment is required, such as a special stand or an oscilloscope. However, many vehicle drivers cannot own such equipment. That is why you can use what you have at hand. An important factor in determining whether a motor is faulty is the power supply to the module itself. Initially, the VAZ 2114 ignition module is checked with a multimeter. One of the main signs that may indicate problems in this technical unit is difficulty starting the engine, interruptions in operation or failure. It is worth noting that this part of the engine contains several components, so self-diagnosis can cause difficulties and difficulties, but this still does not stop car enthusiasts. After all, it is not possible to check each of its parts, since they are all located under a solid body. This certainly cannot be done without the help of the necessary devices.
Multimeter
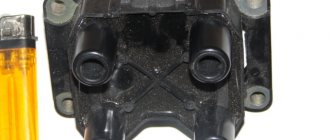
Some old-school motorists call the modules double-spark coils, which makes sense. After all, the coil is the predecessor of the ignition module in the technical evolutionary chain. The module is a paired design consisting of two pairs of windings (primary and secondary) and a switch that alternately switches low-voltage current from one coil to another. In some models of double-spark coils, the commutator is structurally located outside the block.
The operation of the module is controlled from an electronic unit that collects and analyzes information from various working components of the engine. The block, unlike the classic coil, has 4 sockets for connecting high voltage wires going to the spark plugs. The pulse occurs in pairs, first at terminals 1 and 4, then 2 and 3. That is, each of the built-in coils is responsible for the operation of two cylinders. A spark occurs simultaneously, as a pair.
At the input, the ignition module has a connector with four terminals. Usually most models have markings opposite them. Pulses from the Hall sensor alternately arrive at contacts A and B, serving as a signal to switch the commutator from one primary winding to another. C and D – ground and power supply (12 V), respectively.
Possible causes of failure
The weak point of the ignition coils and modules is the secondary winding, which generates a high voltage pulse. A coil break or breakdown may occur in it. The following factors lead to this phenomenon:
- use of low-quality or unsuitable candles;
- operation with non-functioning high voltage wires;
- frequent attempts to check the spark.
The high-voltage pulse arising in the secondary winding must be realized (spent). If this does not happen (if the integrity of a high voltage wire is broken, for example), a high-energy electrical pulse seeks an outlet. He will find it, with a high degree of probability, in the thin secondary winding.
Often, a module malfunction occurs when the integrity of poor-quality factory soldering of wires going to the switch elements is violated. This happens from vibration. Also, the cause of non-working coils can be a banal contact failure in the incoming connector. Another factor leading to a malfunction of the ignition unit is often moisture that gets on the device during washing or driving in unusual conditions.
Symptoms of a problem
It is extremely rare for two built-in coils to fail at once, so it is more likely to be possible to start the engine with a faulty unit. However, even an inexperienced driver will immediately suspect something is wrong. The malfunction will appear as follows:
- unstable (floating) idle speed;
- the engine has difficulty picking up speed;
- characteristic sound of the engine (triple);
- jerking when accelerating (while moving).
Operating a car with such a breakdown is possible (you can drive to a garage or car service station), but it is not advisable unless absolutely necessary.
Similar signs of unstable engine operation are possible with a number of other ignition or fuel supply faults. To differentiate possible breakdowns, the performance of the ignition unit should be determined. It would be useful to check the contacts of the wires coming to the device, as well as their integrity.
Checking module power
Before testing the performance of the coils, you should make sure that a possible breakdown is not caused by a loss of power to the device. First, you need to try to simply restore contact by moving it several times or disconnecting/connecting the block of wires included in the connector. If such manipulation does not lead to improved engine performance, a tester (multimeter) is used to determine the quality of incoming pulses.
Ignition module repair
Due to the fact that the design of the module consists of a pair of coils, its maintainability is extremely low. So, if there is a breakdown, breakage, fusion of the turns, as well as other damage inside the coils, then nothing can be done here - all that remains is to replace the failed module with a new, similar one. The only case when you can try to solve the problem without purchasing a new device is if the solder is damaged.
This can be found out by testing (using the methods described above). If the serviceability of the secondary windings has been established, you can try to open the module cover and visually determine the damage to the soldering.
If such damage cannot be determined, then you can simply try to thoroughly solder all the contacts inside, then install the module in place and start the engine - if this was the cause of the breakdown, then the car will start working properly again.
Frequent malfunctions of the VAZ-2114 ignition module
The following malfunctions occur in the VAZ-2114 ignition module:
- intermittency is formed at idle;
- power indicators leave much to be desired;
- the engine is not working correctly;
- in the paired operating mechanism, the cylinders are acting up (that is, the functioning of only one pair of cylinders can be heard);
- if the Check Engine light comes on.
If you suspect a faulty factory module in your car, then it's time to check the ignition module. It doesn’t hurt to make sure with your own hands that the wires are connected correctly and firmly; check that the spark plugs remain intact and are not damaged. Before you begin diagnostics and repair work, you need to stock up on protective equipment that will protect you from dangerous situations - the tool must be treated with insulating material, and gloves are required.
Signs of coil malfunction
Before starting an instrument test, you can try to determine whether the ignition coil of the VAZ 2114 8-valve injector is working by indirect signs (in some cases they are enough to verify a breakdown).
These include:
- instability (intermittency) of idle speed;
- the engine gains speed with great difficulty;
- “triple” when the engine is running;
- The speed gain while driving occurs in strong jerks.
If these signs are present (especially if there are several of them), you can either immediately replace the faulty module, or finally establish the fact of its malfunction using instrumental analysis.
Checking the condition of the ignition module with a multitester
In a VAZ-2114 injector with 8 valves, you can check the operation module using a multitester. All that remains is to arm yourself with a cunning device and determine the serviceability of the winding. During the procedure, follow the step-by-step instructions:
- Determine the operating format of the multitester in ohmmeter mode; it measures the resistance that occurs between the terminals of the secondary winding.
- Mount the probes by connecting the 1st and 4th cylinders to the terminals. Then fix to the 2nd and 3rd cylinders. An adequate result, indicating the absence of a breakdown in the winding, is approximately 5.4 kOhm; fluctuations in values of plus or minus 0.1 kOhm are acceptable. What you should pay attention to? The resistance between the terminals in a pair must correspond in terms of indicators to each other - be the same.
- If the difference is more than 100 Ohms, then we can say with confidence that the fault lies in the secondary winding.
Checking the ignition coil with a multimeter
Typically, a multimeter is found in the garage of most car enthusiasts.
How to make a call: general principles of operation + video
Using a multimeter, check for a short in the ignition coil windings. When working with the device, you need to know the technical characteristics of the ignition coil, because mechanisms from different manufacturers have different technical indicators.
- The first is checking the primary circuit for the presence of a short circuit in the interturn space. We connect the multimeter, having previously set it to measure resistance, to the ends of the primary winding, that is, to the terminals of the ignition coil. Compare the obtained result with the indicators specified in the technical specifications. If the device shows zero, it means that a short circuit has definitely occurred in the primary winding. If the device readings tend to infinity, it means that the circuit has broken. If the results are positive, check the secondary winding.
- To do this, connect the multimeter to the positive terminal of the coil, and connect the other end to the outlet of the high-voltage wire. Compare the results obtained with the characteristics of the ignition coil.
Determining the serviceability of an individual coil (with video guide)
The principle of checking ignition coils installed above the spark plugs is similar to the general one, with the exception of the multimeter connection points. When connecting a device to test the primary circuit, connect to pins of connectors 1 and 3. Polarity does not matter. Further technology completely coincides with testing on a two-spark coil.
To check the secondary winding, connect the device, observing the polarity. The red probe should be in contact with the spring inside the head of the rubber cap, and the black probe should be connected to the second contact of the connector, that is, the middle one. If there is no reading, you must ensure that the spring is in good condition, not dirty, not oxidized, and has normal contact with the coil. If necessary, you can remove the rubber cap and attach the probe directly to the ignition coil contact. Next, check the technical characteristics of the part.
Diagnostics of ignition coils with a multimeter should only be carried out on a cold car. As the coil heats up, the resistance readings change.
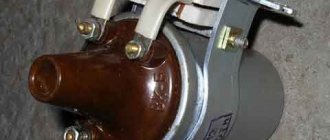
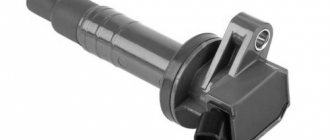
Ignition module: main types
The ignition module is quite small in size, but structurally complex electrical mechanism. The module is powered from the on-board power supply; the negative terminal is attached to the housing.
From the variety of such modules presented on the market today, several modified models for the VAZ of the following type can be distinguished:
- block (modules can have several coils designed to work with all cylinders simultaneously);
- separate (modules have one coil designed to ignite one candle).
Please note that the coils of block modules installed on the VAZ 2114 model can operate one per pair of spark plugs.
PURPOSE OF THE IGNITION MODULE VAZ 2114
The ignition module is a complex electronic device that performs the function of converting electricity coming from the generator into high voltage current (30 kW) and distributing it between the spark plugs.
Ignition module connection diagram
The unit produces a spark to two spark plugs, which are connected to the cylinders of the power unit, to spark plugs 1 and 4 of cylinders - an idle spark, to spark plugs 2 and 3 - a working one. The period of spark supply is calculated by the electronic on-board control of the fourteenth; it occurs when the engine stroke requires ignition of the fuel in the cylinder.
The device itself is connected to the BES (on-board electrical network) of the VAZ 2114; for normal operation, the module requires a constant power supply of 12 Volts.
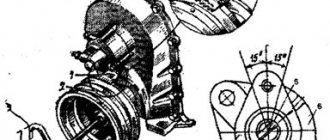
The unit consists of 2 high-voltage transformers, each of which is connected to electronic control units and VP (high-voltage wires). The dimensions of the device are quite compact - 11 * 11.7 * 7 centimeters, it weighs 1.32 kilograms.
The cost of the device varies from 1500 to 3000 rubles. In the lowest price category, there are products from Chinese OEM manufacturers whose service life is unpredictable - they can either work for several hundred thousand kilometers without any breakdowns, or begin to act up just a few months after purchase.
Reviews from the owners of the fourteenth show that the most reliable and durable devices are from Bosch. A good option is BoschM7.9.7, which is also suitable for the VAZ 2115.
IGNITION MODULE CHECKING TECHNOLOGY
In service centers and service stations, the ignition module is checked using a special device - an oscilloscope, but we offer you a simpler technology that gives similar results.
You can check the ignition module using a regular tester (12-volt light bulb) and a multimeter - a device for checking ignition coils, which can be bought at any auto store for 300-500 rubles.
Before proceeding with the device itself, it is necessary to check the fuse and the wiring by which the unit is connected to the spark plugs and the generator.
The fuse is checked as follows:
- Disconnect the power wire block;
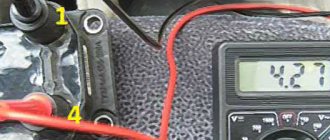
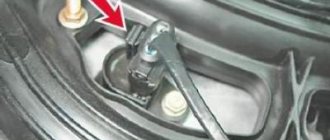
- We install one terminal of the multimeter on contact “A”, the second - on engine ground.
If the fuse is working properly, the tester will show a voltage of 12 V. If the voltage is too high or low, the fuse must be replaced.
The easiest way to check the power supply of the unit is with a control unit - we connect its wiring to contacts “A” and “B” and start the fourteenth. When the starter is turned on, the light should light up, otherwise it is necessary to look for problems in the circuit of contacts “A”, there is probably a break in it.
Checking the ignition module with a multimeter requires a device that can perform the functions of an ohmmeter. We put the tester in this operating mode and connect the terminals to the high-voltage wires going to the first and fourth cylinders, then we check the second and third in the same way. If the module is working properly, the tester will show a resistance of 5.2-5.5 ohms.
It is worth noting that only the first VAZ 2114 1.5L is equipped with the module, while modern fourteenth ones are produced with an ignition coil. Essentially, this is the same module, in the body of which there is no switch (it has been moved to the ECU), so checking the VAZ 2114 ignition coil is performed using a similar technology.
How to check the ignition coil: diagnostics and symptoms of failure
The easiest way to do this, of course, is not with your own hands, but with someone else’s hands at the service. But we still need to get there. If the car completely refuses to start, then, among other reasons, the ignition coil may be to blame. If the driver has an error scanner or a diagnostic adapter for diagnostics with data transmission using Bluetooth technology, great.
To do this, you need to have a special application installed on your smartphone and then you can establish with a high degree of accuracy that the reason lies precisely in the coil.
Here are the main error codes that indicate malfunctions in the ignition system of the injection eight-valve VAZ-2114:
- P3000-3004 - no spark in the cylinder (extreme number), these codes will not say anything specific, but will hint where to look for the cause;
- P0351 is a typical error indicating a break in the module on the windings of the first and fourth cylinders;
- P0352 - the same break, but on the windings of the other two cylinders, the second and third.
This is all that a scanner, module or special application can say. Not every one of these codes indicates that it is time to throw away the coil; sometimes the reason may not be so much in the coil as in high-voltage wires or spark plugs.
Breakdown on the spark plug insulator
That is why, before checking the ignition coil on a VAZ-2114, you should go from simple to more complex.
Price of the VAZ-2114 ignition coil and its replacement
The simplest thing is to replace the coil. Even a schoolboy can handle this. For the second Samara you need to buy a new ignition module 43 3705 . The same coil is used on dozens, on Priors and on 1118 with injection eight-valve engines.
Main signs and symptoms of failure
The main signs that suggest that the problem lies in the ignition system, and specifically in the coil:
- the engine does not start, although the battery is charged, the starter operates;
- Unstable engine operation, “troits”. This is reflected especially clearly on the tachometer;
- when you sharply press the gas pedal, the engine begins to choke, and significant failures in operation are felt;
- with increased air humidity or rain, uneven engine operation becomes more noticeable and “troits” are much stronger;
- during cold weather, until the engine warms up, failures in engine operation and unstable operation are observed; after heating, the symptoms do not disappear, but become less noticeable;
- during unstable engine operation, the check engine warning light lights up on the dashboard, which during diagnostics will indicate problems in the operation of the ignition coil;
- after acceleration, when switching to higher gears, dips are felt;
- while driving, when you press the accelerator pedal, noticeable jerks are felt;
- When driving, you get the feeling that someone is holding the car from behind, preventing you from accelerating and developing the required speed.
How to check input wires for serviceability
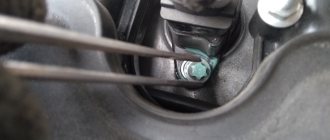
Often problems arise due to a lack of power to the module. To test the wiring, you need to use a multimeter, which must be set to the voltmeter position before starting work. No preliminary preparation is required in this case. It is better to park the car in a well-lit place, open and secure the hood. Follow simple instructions:
- The car must be turned off and the ignition turned off. First of all, disconnect the wire block by pressing the fastener with a screwdriver or other suitable object. It tightens with moderate effort.
- One probe of the device must be pressed to the contact marked “A”, the second should be applied to ground (any exposed metal on the car body). The main thing is that the contact is good, otherwise it will not be possible to take readings.
- Next, you need to ask an assistant to start the starter for a few seconds; the car will not start with the block removed, but the indicators can be taken. When the starter rotates, the voltage should be 12 V, there may be deviations, but small.
- Check other contacts in the same way, alternately changing the position of the probe from the voltmeter. The mass may be in one place.
If there is no voltage or it is much less than normal, you need to check several basic elements. The work is not difficult and takes literally a few minutes, since malfunctions are usually typical and occur in the same places:
- Replace the fuse. You can find it according to the diagram under the compartment cover or according to the instructions for the car. An element with a rating of 7.5 A is responsible for the ignition module; you need to install the same one. Even if the appearance of the fuse is normal, it is better to change it, since the contacts may be oxidized or the damage may be subtle, but significantly affect the operation.
- Check all wiring connections: vibrations can cause contacts to loosen or move away, and they often oxidize due to moisture. In the first case, you need to put the chips on more tightly or tighten the nuts, in the second, remove the limit switches and clean them of oxides, then apply a special compound for the contacts and put everything in place.
- If everything is in order there, then most likely the culprit is damage or a broken wire. You need to test each core in order to find the problem area. When troubleshooting a problem on the road, you can twist it and wrap it with electrical tape, but it is better to change the wires so that they are solid from start to finish.
It is easy to check the ignition module in the VAZ 2114 and other similar models using a simple multimeter. This takes little time and allows you to accurately determine the fault. The unit is conveniently located and has good access, so if replacement is necessary, the work is easy to carry out. The main thing is to remember to remove the battery terminal before starting to eliminate any problems.