Print this article Font size 16
In our material today we will talk about how the ignition module on a VAZ 2114 is checked, how it works and why so much in the car depends on its functional state.
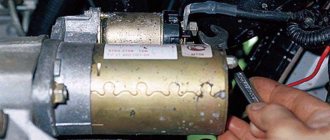
Ignition module
Checking the ignition coil and its circuits
With the ignition off, disconnect the engine control system wiring harness block from the ignition coil. To check the coil power circuit, connect the tester probes to the middle terminal of the harness block and the engine ground. With the ignition on..
. The device should record a voltage approximately equal to the battery voltage. If there is no voltage at the middle terminal of the wiring harness block, then the wire connecting the block to the ignition switch or the lock contact group is probably faulty. To test the control circuits of the coil, you can use a probe with a 1-2 W lamp. We relieve the pressure in the engine power supply system and do not replace the fuel pump fuse. We connect the probe probes to the middle and one of the outer terminals of the wiring harness block. If the control circuit (and power supply) is working properly when cranking the crankshaft with the starter...
. The probe light should blink rapidly. Otherwise, we check for a break and a short to ground in the wire connecting the outer terminal of the block to the controller terminal. Similarly, by connecting the probe probes to the middle and other extreme terminals of the block, we check the other control circuit of the ignition coil. You can check the serviceability of the ignition coil itself on the engine by disconnecting the wiring harness block and high-voltage wires from it. For clarity, we show the test on a dismantled coil. To check one of the primary windings of the coil, connect the tester probes to the middle and one of the outer terminals of the ignition coil.
Using the ohmmeter mode, we check the circuit for an open circuit. If the tester shows infinity, it means there is an open circuit in the circuit. Similarly, by connecting the tester probes to the middle and other extreme terminals of the coil, we check the other primary winding of the coil for an open circuit. To check for breakdown (short to ground) of the primary windings, connect the tester probes to the middle terminal of the coil and to the metal part of the coil body
If the circuit of the primary windings is working properly, the tester should record the value “infinity”. To check for a break in the secondary winding of the ignition coil, connect the tester probes to the paired high-voltage terminals of the coil (terminals 1-4 or 2-3 cylinders).
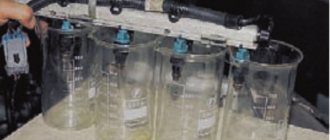
For a working ignition coil, the tester should record a resistance of about 4.0 kOhm. If the secondary winding breaks, the tester will show “infinity”. Similarly, we check the other secondary winding of the ignition coil. We check the secondary windings of the ignition coil for breakdown on the engine. We relieve the pressure in the engine power supply system and do not replace the fuel pump fuse. To test, you will need two known good spark plugs.
We tie the candle bodies together with a piece of uninsulated wire (“massage”). We connect the paired terminals of the ignition coil with the spark plugs using serviceable high-voltage wires and place the spark plugs on the cylinder head cover. Turn the crankshaft with the starter
To avoid electric shock, do not touch spark plugs or high-voltage wire tips. If the ignition coil is working properly, sparks should regularly jump between the electrodes of the spark plugs. Similarly, by connecting the high-voltage wires to the other two paired terminals of the coil, we check the other secondary winding for breakdown
Functions of the VAZ-2114 ignition module
The ignition module in the VAZ-2114 solves important problems in the functioning of the car:
- first creates pulses passing through high voltage;
- then transfers them to the spark plugs.
The power supply of the unit involves operation starting from the on-board system of the vehicle, the minus wire is controlled by the body of the car. The subtlety of the module’s operation is that it simultaneously produces 2 sparks, one of which occurs at the moment of maximum compression of the air-fuel mass, and the other depends on the release, which is why it is called idle.
As for the connection method, the spark plugs are connected to the 1st and 4th cylinder, and the idle sparks fit to the 2nd and 3rd cylinder structure.
Purpose and principle of operation
The ignition module of a VAZ-2114 car with an injection 8-valve power unit is located directly opposite the engine block on the spark plug side. This arrangement is most effective for supplying high-voltage wires to the spark plugs. The device is mounted on the wall of the engine compartment. This position was not chosen by chance. This way the MH interacts less with vibrating parts of the car.
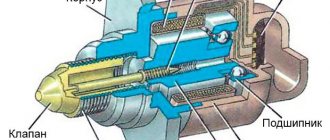
The device that comes with the described car model is of the block type. One housing contains 2 inductors and 2 discharge voltage regulators. The device operates according to the following principle:
- A pulse signal passes from the crankshaft position controller to the on-board computer.
- The signal is confirmed by a pulse signal from the Hall sensor of the ignition system.
- Both signals are calculated in the on-board computer and transmitted as current to the module.
- The module converts 12 volt voltage into high current.
- From the coil, the voltage is supplied to the spark gap, which forms a pulse voltage.
- The voltage passes through the high voltage wire of cylinders 1 and 4 to the spark plug.
- The spark plug is discharged by a spark, igniting the fuel in the cylinder.
- During the discharge, spark plugs 2–3 also receive voltage, but its power is adjusted by the spark gap.
All components are made of high-strength plastic with an aluminum plate for mounting to the engine. Additionally, both coils are filled with insulating solution. On the body of the device there are only 4 contact sockets for high-voltage wires and an electrical power socket.
Subject to all operating rules, the ignition module is a very reliable electronic device, but it is quite fragile. If the electrical circuit has a number of damages and is often subject to short circuits, then the coils or arresters fail.
Any malfunction of the MH leads to interruptions in engine operation. The following will describe the main symptoms of a malfunction of this device.
What does the ignition module consist of?
The ignition module built into the VAZ-2114 consists of 2 high-power transformers and the same 2 electronic-based control units. One side of the product has 4 outputs at once; they are responsible for connecting the candles. To keep the structural components in their original form and protect them, the manufacturer provides a plastic coating. The weight of the entire structure slightly exceeds 1 kg.
The spark plugs suitable for the engine are fixed together with the ignition module by running high-voltage wiring. A device called a “controller” controls the process. First, he takes the performance indicators of the structure, then analyzes them and, finally, decides what should be changed to achieve optimal performance - the crankshaft rotation speed, the temperature reached by the coolant in the VAZ-2114, or the engine load.
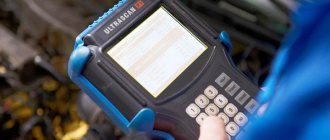
How to determine malfunctions in the ignition module at a service station
At a service station, diagnosing a VAZ-2114 factory module looks very simple - professional diagnostic equipment eliminates errors. Service station workers use an error code scanner and an application suitable for a computer diagnostic adapter. What errors are displayed on the display if the VAZ-2114 ignition module requires adjustment and repair?
- P3000-3004 – the car will not start;
- P0351 - indicates damage to the integrity of the windings of a pair of cylinders from 1 to 4;
- P0352 - determines the break in the section in the winding of 2-3 cylinders.
Computer diagnostics
If you carry out scanning diagnostics using the appropriate equipment, you can understand from the detected errors that the ignition module is faulty.
- P3000
(and also 3001-3004) – the ignition in the cylinders does not work; - P0351
– winding break in a pair of 1/4 cylinders; - P0352
– winding breakage in a pair of 2/3 cylinders.
If you discover any of these errors using a smart machine, do not rush to get too upset, since they do not necessarily indicate the death of this node. For example, high-voltage wires with breakdown or spark plugs can also create a problem. Therefore, professional diagnosticians advise going from small to great: that is, at the beginning, exclude more correctable and minor symptoms, taking on large and global ones last.
And only after checking other elements of the ignition system for malfunctions: unscrewing and inspecting the spark plugs, for example, ringing and replacing the wires, then start diagnosing the problems of the corresponding module.
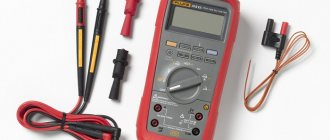
Checking the condition of the ignition module with a multitester
In a VAZ-2114 injector with 8 valves, you can check the operation module using a multitester. All that remains is to arm yourself with a cunning device and determine the serviceability of the winding. During the procedure, follow the step-by-step instructions:
- Determine the operating format of the multitester in ohmmeter mode; it measures the resistance that occurs between the terminals of the secondary winding.
- Mount the probes by connecting the 1st and 4th cylinders to the terminals. Then fix to the 2nd and 3rd cylinders. An adequate result, indicating the absence of a breakdown in the winding, is approximately 5.4 kOhm; fluctuations in values of plus or minus 0.1 kOhm are acceptable. What you should pay attention to? The resistance between the terminals in a pair must correspond in terms of indicators to each other - be the same.
- If the difference is more than 100 Ohms, then we can say with confidence that the fault lies in the secondary winding.
How can I solve this problem? Only by replacing the ignition module.
Engine doubles
Not to be confused with tripling! That is, not one cylinder is not working, but a pair: either 1/4 or 2/3. Well, this sign is quite easy to determine by listening to the operation of the car’s engine. This is also clearly felt by the vibrations and sounds of the running engine.
Dips in traction may also be felt when trying to accelerate or when moving up a hill, albeit a small one. Another indirect sign indicating a malfunction of the ignition module is the Check Engine light. True, the light bulb can light up for various reasons (and even without them).
How to check input wires for serviceability
Following the recommendations of specialists, to check the condition of the wires at the input, they need to be “ringed”. What does it mean?
- Determine the operating format of the multitester in the voltmeter position, and then disconnect the wiring block from the VAZ-2114 ignition module.
- Focusing on contact A, mount the first dipstick, and fix the second one to the engine ground.
- Ask an assistant to start the car or, alternatively, crank the starter. At this time, your task is to observe the measurements on the display. Normal voltage is 12 volts.
- Carry out exactly the same actions with the remaining contact.
What to do if there is practically no voltage? Then evaluate the serviceability of the fuse - it is likely that it has blown. Find 3 safety mechanisms on the VAZ-2114 electronic control panel. So, the third 7.5 A is a device suitable for the car module.
Even if the fuse is intact and intact, there is a possibility of oxidation and wire breakage, as well as loose contacts.
What to do if there is no multitester available? A control light designed for 12 V will help solve the problem. One wiring of the lighting device is placed to the contact of the block, and the other is closed to the motor housing. After turning on the ignition, the light should flicker.
How to check the VAZ-2114 ignition module with your own hands is shown in the video instructions:
Self-check of the ignition module Lada Kalina
There can be several reasons for misfires in a working engine; often the problem lies not so much in faulty high-voltage wires, but in a damaged ignition module.
You can identify and fix the malfunction of the ignition coil on a Lada Kalina car yourself; all you need is a multimeter. With this device you can measure the resistance on the contacts. Measurements are made in several steps, this allows us to identify all possible problems at a particular section of the circuit.
In this article I will try to talk in detail about how to check the ignition module with your own hands.
Now let's talk about everything in order.
Checking the winding for a short to ground
- Set the device to resistance measurement mode.
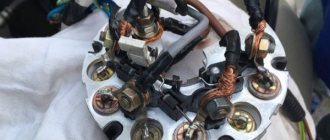
- Next, connect one end of the device to the central contact, which is located on the coil, and connect the other to ground. In the photo, everything described above can be seen more clearly.
- If you see infinity on the multimeter display, you can safely say that the winding does not short to ground, that is, everything is normal at this interval of the circuit.
An important nuance. Infinity, in this case, can also mean no response from connecting the ohmmeter. In other words, if there was a number 1 on the device and it did not change when ringing, this is infinity.
Let's sum it up
As you can see, the VAZ 2110 ignition module is a fairly simple device consisting of contacts, coils, boards and wires. However, only contact connections can be repaired. Other elements are beyond repair and need to be replaced.
At the same time, before starting repair work, it is necessary to properly test the module. To do this, you should adhere to the general rules, and also take into account the subtleties and nuances discussed above. As a result, diagnostics of the VAZ 2110 ignition module allows you to quickly identify certain problems and eliminate problems.
Checking the ignition module
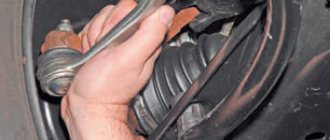
Next, turn off the ignition and remove the ignition module along with the bracket (by unscrewing two bolts of the upper and a bolt of the lower fastenings). Disconnect the high-voltage wires from the ignition module.
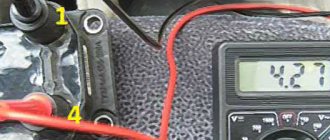
- Using a multimeter in ohmmeter mode, measure the resistance between central pin 15 and the housing (bracket) or ring. The device should show the absence of a short circuit (the device will show a high resistance, one) of the primary winding of the coil to ground.
- We sequentially measure the resistance between pin 15 and the outermost pins 1a and 2b. The resistance of each of the primary windings of the coil should be about 0.5 ohms.
- We measure the resistance between the high-voltage terminals of the coil 1 and 4, and then 2 and 3. The resistance of the windings should be about 5.4 kOhm.
When checking the ignition module, do not forget to take into account the internal resistance of the device, which can be determined by shorting the ohmmeter probes.
If the ignition module is faulty, try repairing it yourself. If the MZ turns out to be in good working order, the cause of the engine malfunction may be in the high-voltage wires (check) or spark plugs (check). Let us remind you that we previously told you how you can improve the ignition spark.
Different engines were installed on cars of this brand over the years. Some car owners have carburetor engines, while others have injection engines. Engines have different numbers of valves and types of power systems. There can be eight or sixteen valves. The motors for them were assembled on the basis of old engines 21083 and 21093.
The best of them is considered to be the sixteen-valve VAZ 21124, with a volume of 1.6 liters and a power of eighty-nine horsepower.
What to do if there is no working module?
If it is not possible to install a test element or borrow it for a while, for example, from a neighbor in the garage, then you will have to be patient and pick up a test lamp and a multitester.
We measure the resistance between the winding terminals (paired). The probes must be installed according to the scheme: 1/4, 2/3. The measurement results should be almost identical (approximately 5.5 kOhm is shown by the device). If the errors between them are 100 Ohms or more, the module needs to be replaced, since the secondary winding has failed. Next, in order to identify signs of a malfunction in the ignition module of the VAZ 2110 and 2114, we call the wire block and check the serviceability of the ECU. If you don’t have a multitester at hand, some testing steps can be carried out using a test light.
Checking the ignition module of the injection VAZ 2110 8/16 valves
The top ten may have an eight-valve engine 2111, with a volume of one and a half liters, or an engine 21114, with a volume of 1.6 liters. The difference between them is in the ignition modules.
The module for a one and a half liter engine has the article number 2112-3705010, and the module with a volume of one thousand six hundred cubic meters has the article number 2111-3705010. They also differ in price. If the cost of the first ranges from one and a half thousand rubles to 2100, then the cost of the second is cheaper by about five hundred rubles.
Which one should you choose? The most reliable ones are produced in the city of Stary Oskol.
Module structure
It consists of two ignition coils and two high-voltage switch switches. The coils are designed to create high-voltage pulses.
In essence, it is a simple transformer that has two windings: a primary winding, with an induction voltage of approximately five hundred Volts, and a secondary winding, with an inductive voltage of at least twenty kiloVolts. Everything is placed in one housing with one connector for signal wires and four for high-voltage.
Schematic diagram of the VAZ 2110 module
The operation of the ignition module is based on the “idle spark principle”. The module is capable of distributing a spark in pairs: to the first and fourth, second and third cylinders when transmitting pulses from the electronic control unit.
Possible faults
You can ring the VAZ-2110 ignition module yourself.
The main task of the module is to supply current to the spark plugs. A high-quality spark is enough to ignite the working mixture. If there is no spark, then problems with the engine are inevitable in the form of a decrease in power, an increase in fuel consumption, dips during acceleration, the speed fluctuates, and the engine refuses to work during startup.
Symptoms and check
If one coil fails, two cylinders stop functioning. This is easy to notice, since the engine becomes heated at idle, starting is difficult, gasoline consumption increases sharply, and dynamics are lost.
We remove the connector from the VAZ 2110 module by slightly moving the latch and pulling the wire.
We check the voltage between pin 15 and the block ground.
Circuit for checking the primary windings
Secondary winding test circuit
Scheme for checking the module for short circuit
You need to make sure the spark plugs are working. They are unscrewed and the spark is checked separately on each of the spark plugs. A high-voltage wire is placed on the spark plug head. The spark plug is placed in such a way that the threaded part of the spark plug and the engine mass are in contact. If, when cranking the engine with the starter, the spark is very weak or absent altogether, then it needs to be replaced. If there is no result, you need to check the high-voltage wires. This excludes spark plugs, caps and high-voltage wires from the list of faults. This means it’s time to move on to checking the ignition module. How to do this?