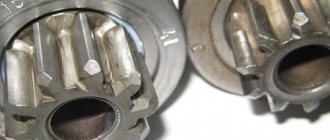
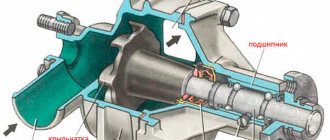
CV joint stands for constant velocity joint. This mechanism is a ball bearing. It differs from the usual one in that it rotates transversely. The CV joint is responsible for transmitting torque from the transmission to the drive wheels. This hinge is designed quite simply. But despite this, the element is important in the design of the car and must be constantly monitored. Car enthusiasts call the CV joint a “grenade” for the shape of this bearing. Over time, as well as due to wear and tear, the “grenades” fail. Let's look at how to replace a CV joint on a VAZ-2114. The same instructions are suitable for other cars from AvtoVAZ.
Malfunctions of CV joints
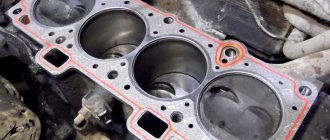
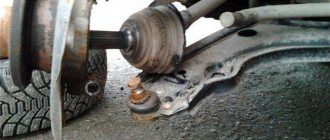
The main problem due to which angular velocity joints wear out and become unusable is dust and dirt that gets inside the bearing. The element is equipped with a boot. But often these protections are destroyed - be sure to monitor the condition of the anther. You can see it by looking under the car. In this case, the wheels are turned all the way to one side. If grease, tears or cracks are found on the rubber boot, the inner CV joint boot must be replaced.
If you rock the drive shaft by hand several times, you can find out if there is any play in the mechanism. Another reason why it may be necessary to replace the CV joint on a VAZ-2114. This is the service life. Modern spare parts for Lada are mostly manufactured in China and most often are not of high quality. Domestic spare parts are of a higher standard, but sometimes defects occur. Destruction of the retaining ring is somewhat less common. Then the axle shaft comes out of the hinge during sharp turns. This leads to damage, and after some time to complete failure of the part. Symptoms of external joint malfunctions are characteristic sounds, most often knocking and crackling sounds when turning. This is true for the outer CV joint. Signs of malfunction of the internal CV joint are clicks and vibrations. When they gain speed, they move to the car body. The outer CV joint fails most quickly. It works in more difficult conditions. The internal CV joint (including the VAZ-2115) fails and requires replacement much less frequently. The malfunction lies in the development of the separator at the points of contact of the balls. They are installed in the cage with significant gaps. Therefore, if the wear of the separator is uniform, then this is not dangerous.
Replacing the inner and outer CV joints on a VAZ 2114
Knocks in the chassis are a frequent companion in life for VAZ 2114 owners. Many elements that can cause knocking, bad roads, and low-quality parts can cause extraneous noise in the suspension.
A common source of the problem is the angular velocity distributor, or CV joint (grenade). The process of replacing a part is simple, so you can change it yourself. The question is often asked which CV joint for the VAZ 2114 is better: regular or tripoid. Among the most common arguments: tripoid is more reliable, but it hums and vibrates at high speeds. The regular one is less reliable, but the car handles better at high speed. However, you can find opposing opinions and arguments on this matter.
There is no clear answer which type is better. Operation in harsh conditions showed that there is no fundamental difference in driving sensations and reliability. The main thing is to buy a high-quality grenade made of well-hardened metal, install it correctly and monitor the safety of the anthers.
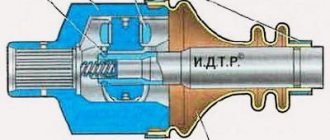
Scheme for disassembling the VAZ 2114 CV joint
Causes of malfunction
Among the main causes of CV joint failure:
- low quality metal and lubricant;
- insufficient amount of lubricant;
- rupture of the boot, entry of dirt.
The CV joint is a moving element, so it heats up when moving. A lack of lubricant or its lack of the necessary properties leads to wear of the hinges and the appearance of extraneous sounds. Due to the rupture of the boot, dirt gets into the grenade, solid particles harm the moving elements.
Fault diagnosis
The VAZ 2114 has 2 external and 2 internal CV joints. First you need to determine which one is knocking. The optimal test would be on a suspension diagnostic stand. If this is not possible, diagnosis by ear is possible.
Two signs indicate a grenade malfunction in a VAZ 2114:
- the sound resembles a crunch;
- It usually appears when turning.
The simplest and most accurate way to do a garage check is as follows:
- Place the car on a flat surface;
- Turn the wheels to one side (to the middle position or a little further);
- Drive off with medium speed. It is worth remembering that starting too smoothly may not reveal a crunch due to insufficient load on the CV joint, and starting too abruptly may lead to the drive flying out of the wheel.
- Repeat the operation by turning the steering wheel in the other direction. The appearance of a crunch indicates a malfunction of the outer CV joint on the side in which the steering wheel is turned.
Visual detection of ruptured anthers will also be a sign of a CV joint failure. If you discover a damaged protection for any grenade, it must be immediately removed, disassembled and cleaned. If there is enough grease and there is no significant wear on the hinges yet, it is enough to replace the boot and fill it with new grease. If the wear of the balls is obvious, it is better to change the grenade.
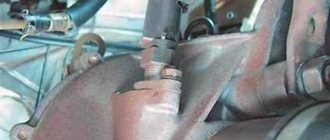
CV joint boot VAZ 2114 with a defect
It is more difficult to diagnose a malfunction of the internal grenade on a VAZ 2114. If it malfunctions, it crunches when starting off in a straight direction, and not when turning. But the same symptoms, for example, include play in the steering rack or wear on the engine mounts.
Sometimes the problem can be diagnosed from the pit by tugging on the drive from the gearbox side: strong play or the appearance of extraneous sounds indicate that the internal CV joint should be replaced.
Replacement
It is better to change a grenade yourself with an assistant.
Algorithm:
- remove the wheel, remove the wheel bolts and the hub nut washer;
- unscrew the ball from the steering knuckle;
- pull out the splined end of the outer CV joint;
- pull out the drive with the internal CV joint from the gearbox;
- if you plan to remove both drives, remove the internal grenade from the drive and insert it into the gearbox so that the differential does not move after removing the second drive;
- remove or cut off the anthers, thoroughly clean all hinges with a special liquid or just gasoline;
- when filling the CV joint, use a special lubricant suitable for these purposes; ordinary lithol does not have the required temperature characteristics;
- the retaining rings of each CV joint and the hub nut must be replaced;
- The inner CV joints are inserted into the gearbox until they are completely fixed; when adjusting, you can use a hammer with a wooden spacer.
It is quite possible to diagnose and replace a CV joint with your own hands. This does not require sophisticated car mechanic skills and engineering knowledge, but it allows you to get in touch with the car, see and feel how it works. Whatever the reason for the crunching sound, you need to check the condition of the grenade as quickly as possible. Delaying this will almost certainly mean bringing the part to the point of complete wear, and timely repairs will allow you to get by with “little loss.”
Methods for repairing CV joints
There are three methods for restoring a hinge. The first is a complete replacement of the CV joint on the VAZ-2114 with the same new one. This is how they work at service stations - even if a part can be restored, it is still replaced with a new one. The second method is to replace the cage along with the bearings from the repair kits. And it is also possible to rearrange the joints of equal angular velocities. Repair kits for the second generation Samara are on sale.
But if the store does not have the required kit, this makes CV joint repair impossible. And the part will have to be changed. Also note that the repair kit does not include cups. You cannot purchase them separately. And the third way. If the cup and clip are worn out on only one side, then the original move can be made. In this case, repairing the CV joint involves changing the “grenade” from the left axle shaft to the right one or vice versa. What does this give? The direction of rotation of the balls in the bearing changes, and they begin to work in unworn areas. The disadvantage of such a restoration is that the “grenades” will crunch during operation if the car is moving in reverse gear. The hinge on which the boot has ruptured can be repaired only if water, dust and dirt from the road have not managed to get into it.
The bearing must be disassembled, the destroyed boot removed and the insides washed with gasoline or kerosene. Next, replace the lubricant and install a new protective cover. This completes the repair.
Why change CV joints?
If damaged anthers are found during the inspection, they must be replaced. Otherwise, water and sand will get inside the part through cracks in the rubber. Very soon this abrasive mixture will disable the “grenade”. When the car moves around corners, the constant velocity joint can simply fall apart into two parts. After this, the car can no longer be used. There is a significant risk that all the oil in there will leak out of the gearbox. In order to avoid such a nuisance, it is necessary to change the anthers in a timely manner. How much does it cost to replace a CV joint on a VAZ-2114? The price of the service at the service station is 1000 rubles. As for the cost of spare parts, an outer CV joint for a VAZ-2114 costs about 1,500 rubles. depending on the manufacturer. The internal one costs a little more - around 2200 rubles.
Tools required for replacement, preparatory work
Replacing a CV joint on a VAZ-2114 with your own hands will take about one hour. But you should prepare the necessary tools. To work, you will need keys 17 and 19. You should also prepare a set of heads. Additionally, you will need a wheel wrench, mounting blades, a wrench, and a jack. They also prepare CV joint-4 lubricant, rags, and pliers. For greater convenience, the car should be driven onto an overpass or into a pit.
The car is put on the parking brake or put into gear. To make replacing a CV joint on a VAZ-2114 even safer, special clamps are placed under the wheels. The car has internal and external angular velocity joints. Both “grenades” are located on the drive shaft. The process of replacing both internal and external is no different.
Replacing CV joints VAZ 2113, 2114, 2115
If you do not regularly check and change the boot, then frequent replacement of the VAZ 2114, 2115 or 2113 CV joint is inevitable. Therefore, it is necessary to constantly clean this element from dirt, dust, reagents, sand and moisture. Other reasons for the failure of the hinge are: exhaustion of the unit's service life, damage to the retaining ring, and others. But, no matter what the problem, if you hear a characteristic crunching sound when turning when you take turns at speed, you need to urgently carry out restoration work. Otherwise, there is a high risk of the grenade breaking into two halves while the vehicle is moving. In case of this malfunction, repairing it yourself is quite possible. This article will tell you how to fix the problem. But first you need to understand how the CV joint works.
Required spare parts
Depending on the volume of work - failure of one grenade or simultaneous replacement of the internal and external CV joints of a VAZ 2114, 2113 or 2115, you may need the following spare parts:
- external grenade (items 2108-2215012-86, 21080221501286, 2110-2215012, CV-P 1001 K, 302040);
- internal hinge (items 2108-2215056-86, 21080221505686, 2108-2215056, FJ228, 302315);
- for replacing CV joint boots on VAZ 2114 and other models (article 2108-2215030, 2110-2215068, 21100221506800, 2108-2215068).
The price of the unit varies over a wide range - from 1 thousand to 2.7 thousand rubles.
Tools required for repairs
To replace the boot of the outer or inner CV joint of a VAZ 2114, 2113 or 2115 or the entire assembly, you need to prepare the following tool:
- jack;
- keys for 17 and 19;
- wheel wrench;
- pliers;
- mount;
- set of heads;
- knob;
- lubricant;
- rags.
The time and effort spent on independent work is fully justified, since the price of replacing a VAZ 2114, 2113 or 2115 CV joint at a car service ranges from 1,200 to 1,800 rubles. These amounts are comparable to the cost of the node itself. The cost of replacing the inner and outer CV joint boot of a VAZ 2114 and other models is similar to the cost of installing a new spare part (tariffs are current as of May 9, 2019).
Order of Operations
Replacing the outer CV joint of a VAZ 2114, 2113 or 2115 is similar to working with an internal grenade. They are located on the shaft drive, which must be reached by performing many operations:
- To replace the outer CV joint of a VAZ 2114, if there is no inspection hole or overpass, you need to jack up the car and unscrew the bearing nut. IMG3
You need to remove the wheel; it can be used together with a jack for support.
Now you need to unscrew the 2 brake caliper bolts. One is located at the top, the other at the bottom.
The next operation is to separate the brake pads. This can be done using a flat-head screwdriver.
You need to remove the brake caliper along with the caliper and pads. The entire knot needs to be tied so that it does not hang.
Now unscrew the steering end nut and press it out using a puller.
Unscrew the two ball joint bolts, remove the wheel bearing nut, and remove the washer.
Now you need to unscrew the ball joint fastening in the direction of the steering knuckle, remove the grenade from the bearing hole, and pull out the shaft. If jerking doesn’t work, we help with a screwdriver. If the oil is not drained before work, the hole can be plugged with a rag.
The shaft needs to be carefully cleaned of the old grease, remove the old ring, put on a new boot, a new retaining ring.
Take a new grenade, squeeze new lubricant into its cavity, spread it over the surface, and install the hinge on the shaft.
Now you need to hammer the grenade onto the shaft. This is done using a punch. You need to pull the boot onto the CV joint, fix the clamp against the direction of movement of the car, and compress it using pliers.
The small clamp is fixed identically. Now you need to install a new retaining ring on the hinge. The unit is ready for installation. The CV joint together with the shaft is inserted into the box. If you used a rag, you must first remove it.
Let's summarize
From the above, it is obvious that replacing a VAZ 2114 CV joint with your own hands is quite affordable. The activities take little time, provided you know how to handle the tool and have common sense. To ensure that repairs do not have to be performed frequently, you need to not only regularly check the condition of the boot. But also change the lubricant. Experts recommend doing this at least every 100 thousand kilometers.
Further steps are performed in reverse order. Also see the sequence of replacing the CV joint on a VAZ 2114, 2113 or 2115 in this video:
Algorithm for removing the outer CV joint
The first step is to remove the engine and gearbox protection. This can be done by unscrewing the bolts at the front and the nuts at the back. The transmission then drains oil. It is enough to drain 1/3 of the total volume of lubricant. Next, use a wheel wrench to remove the bolts holding the wheel.
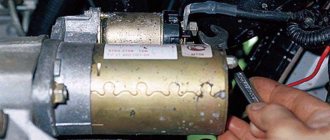
Then, using a 30mm head, unscrew the nut that secures the outer CV joint. The car is raised on a jack and the two bolts on the hub that hold the ball joint are unscrewed with a wrench. Using mounting blades or a mount, the hub is moved away from the jet thrust. Then, if you pull on the strut, you can pull out the pin and the angular velocity joint.
How to remove a vaz shruz
Having determined that it is the external grenade that is broken, we begin to remove it.
How to unscrew the hub nut on a VAZ?
First of all, unscrew the hub nut. To do this, take a 30mm head and a lever, the larger the better. We put bricks under the wheels to prevent the car from rolling (simply putting it in gear is not an option, the wheel will spin) and begin to unscrew the hub nut.
In this matter, the more you weigh, the better, since I very often lacked my weight and leverage of about one and a half meters. I got out of the situation in the following way: I stood completely on the lever, as close to the edge as possible, thereby giving maximum tension to the nut, and hit the lever with a hammer. Usually this method helped me unscrew even the most soured wheel nuts.
One more nuance: if the outer walls of the head come into contact with the walls of the hub, it is better to lubricate the head with mining or lithol, or, in extreme cases, with silicone grease. Thanks to this trick, the head will not bite in the hub.
How to remove a grenade?
The hub nut is unscrewed, now we remove the wheel, unscrew the two bolts that hold the ball joint, disconnect the suspension arm and the hub, move it to the side of the car while lightly tapping the grenade, remove it from the hub. At this point there are two options:
- The grenade is already broken.
- Replacing the grenade due to its crunching sound.
In the first case, you simply remove the outer part of the CV joint from the shaft, then the retaining ring from the drive shaft and knock off the cage with a hammer.
In the second case, removing the CV joint becomes more difficult. You need to deflect the grenade relative to the shaft at the maximum angle so that the bearing balls and their cage are visible.
Now use a hammer to break the jumpers of the cage between the bearing balls and take out the balls one by one. When you take out the last ball, you can remove the body of the grenade, and then its inner part sitting on the shaft, after first removing the locking ring from the shaft.
Of course, you can simply try to knock the grenade off the shaft, but due to the locking ring this will be problematic.
That's it, the CV joint is completely removed. Now let's start installing the new part.
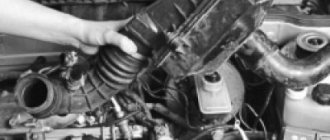
Removing the drive shaft
Next they move to the wheel arch and from there they take out the drive shaft, which already has an internal and external hinge. Using pliers, remove the clamps holding the boot from the parts. If the latter is destroyed, then it is torn apart.
Otherwise, you can just move it to the center. If the boot is torn, the inner CV joint boot will need to be replaced. These parts are sold separately and are included with the spare part. To remove the joint from the drive shaft, you need to hit the inside with a hammer. After a few blows, the part will fly off the shaft. The same operation must be done on the other side.
Replacement process
Replacing the internal CV joint on a VAZ-2114 is performed as follows. First, the ring from the old hinge will be removed from the drive shaft. Instead, a part from the new kit and a new boot are installed. The “grenade” is driven onto the shaft with a hammer. Then the hinge is generously lubricated.
The boot is securely fixed using clamps on the drive shaft and on the CV joint itself. The outer hinge changes in a similar way. Then screw a nut onto the outer CV joint and hammer the shaft back into the gearbox. The replacement was completed successfully. Now all that remains is to put everything back together in reverse order.
Replacing the internal grenade of a VAZ
The grenade has to be changed because clicks appear in it when moving; if you drive with such clicks in the grenade, then at one point you will be left on the road, with a broken grenade, a headache, and the problem of getting home. For those who are stingy with new spare parts, I’ll tell you a way to extend the life of a grenade; if a grenade clicks, then swap it with another grenade, swap the left one with the right one, and the grenade will go on for a long time without clicking. Clicks in the grenade appear due to the fact that a hole is formed in the metal and the ball constantly bounces along this hole. But when you swap the grenade, the filled hole in the metal remains on the other side, so the car will go forward without clicks in the grenade, and back with clicks.
There are two ways to replace the internal grenade of a VAZ. The first way to replace the internal grenade of a VAZ is to completely remove the drive from the car. The second method of replacing the internal grenade of a VAZ, the drive remains on the hub, only the internal grenade is pulled out from the box, this method is not very convenient, but it happens that the nut does not come off the external grenade, you don’t want to spoil it, then you can use the second method of replacing the internal grenade.
These methods differ only in that the first is more convenient, and the second is inconvenient, since everything has to be done under the car.
I will explain the replacement of the internal grenade using the first method, starting from this, you yourself will understand how you can replace the internal grenade using the second method.