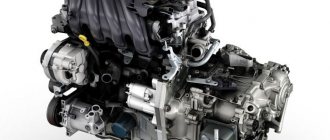
In order to correctly carry out the work of replacing the timing belt on a Chery Tiggo, you need to know what engine model is installed on it.
In short, depending on the year of manufacture and modification, the car is equipped with engines ranging from 1.5 to 2.4 liters. But this information is not enough to understand the essence of the issue.
Therefore, below we will consider not only the procedure for performing work on replacing the timing belt, but we will separately dwell on the models of power units that were equipped with the model we are considering.
Easy timing belt replacement on Vortex Estina with 2.0 Acteco engine
So, finally, the brainchild of the Russian-Chinese automobile industry came to us.
We meet Vortex Estina with a 2.0 Acteco engine, timing belt replacement at 120,000 kilometers. In general, the car is interesting not only for its origin, since it is a Chery Fora, also known as Chery A5, produced at TAGAZ, but also for its engine. Although it has the Chery logo on it and is called Acteco SQR484F, this is a long-known engine from the Mitsubishi concern of the 4G6 series. There is an official procedure for replacing the timing belt on this engine, in which it is necessary to remove the valve cover, then changing its gasket accordingly, set TDC, block the camshafts, and so on, if you are interested, you can read the article about Tingo. We will follow a simple, long-proven path. Let's apply a few marks and use a little trick that you will learn about later.
The tool for replacing the timing belt is standard here, a set of keys and hexagons, and we also need a bison, a cup of coffee and an hour of free time.
We remove the decorative plastic along with the throttle valve pipe.
Remove the front timing belt protective cover by unscrewing the five hexagons by five.
For clarity, we will show it with the cover removed.
Using a 16mm wrench, turn the service belt tension roller counterclockwise until it is completely loosened. Then remove the generator belt.
We unscrew the six bolts by thirteen and remove the crankshaft pulley. We do not unscrew the central bolt.
We see a mark on the crankshaft. We turn the crankshaft by the bolt, clockwise, so that the mark faces down.
Using a plank, we jack up the engine and unscrew the engine mount from the cushion and cylinder block.
We dismantle the idler roller of the service belt.
We unscrew the six ten bolts of the lower timing belt protective cover and remove it last.
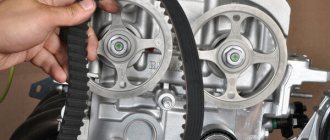
Mark the location of the camshafts.
As well as the position of the crankshaft, for reliability we will put two marks.
After this, we use a little trick: we lock the camshafts by their sprockets using a bison. Just be careful not to damage the sprockets; we adjust the bison in such a way that it snaps into place with one hand and place it in the place where both camshaft sprockets are closest.
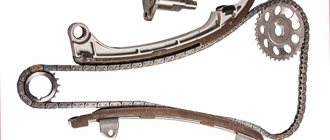
We unscrew the tension roller and two bypass rollers or, as they are called in everyday life, parasitic rollers. Remove the old timing belt.
Do-it-yourself timing belt replacement for Cherie Tigo
The Chery Tiggo car manufacturer recommends changing the drive belt every 40 thousand mileage. Next, we will look at how you can change the timing belt on a car with an Acteco 1.8 engine yourself, without resorting to the services of a car service.
Replacement Tools
Preparatory stage
Before replacing the timing belt, the car must be raised using a jack. It is necessary to remove the front wheel on the passenger side, as well as the expansion tank, after first removing the tube from it and freeing it from the mount. Don't forget to put the car on the handbrake and engage fifth gear before climbing.
Replacing the timing belt
In order to change the belt, you need to get to it. To do this you need:
It's time to install a new timing belt.
First, we put two deflection rollers in place. Then the tension roller so that the stopper on it fits into the groove on the cylinder block, do not tighten the bolt.
We check that all our marks match and put on a new timing belt. First, we put two camshaft sprockets, a left roller and a tensioner on the pump on the right idler roller. We make sure that the descending branch of the belt is tensioned so that our marks do not subsequently run away.
There are two important elements on the tension roller: an arrow indicating the direction of tension and a dial indicator for the optimal timing belt tension.
We use a hexagon to tighten the roller so that the arrow on the indicator is opposite the groove, and tighten the bolt.
We remove the bison, the tension may come off a little, in this case we repeat the tensioning procedure. We check that all marks match. We turn the crankshaft two turns and once again check all the marks and tension of the timing belt, and if everything is in order, we begin to assemble.
We install all parts in the reverse order of removal. We start the car. Well, that's all, guys. It's simple, there's nowhere else to go.
When to change the belt
The main purpose of the timing drive is to synchronize the actions of the shafts that take part in the operation of the propulsion system - the crankshaft and camshaft. The belt transmits torque from the crankshaft to the camshafts. This way the exhaust gas is removed and the cylinders are supplied with air. The belt ensures that the valves and pistons operate synchronously, so they do not collide during movement.
If the belt is not given due attention, it will definitely break, and this will happen before the time regulated by the manufacturer. It is believed that the belt on a Cheri Fora must be replaced after 60,000 km. But this can happen much earlier if diagnostics are not carried out.
The timing belt drives the water pump, causing it to receive additional stress. It is recommended to carry out diagnostic procedures on the belt every 25,000 km. Here are some signs that indicate that it’s time to replace the consumable with a new one:
- the car began to consume more fuel than before;
- malfunctions in the operation of the engine began to be often noticed;
- the car's power began to decrease;
- the engine began to overheat quickly.
If you notice one of these signs, you should think about it and look under the hood to check the condition of the belt drive. During a visual inspection of the timing belt assembly, you can independently detect defects indicating that it is time to replace the drive. Here is a list of these defects:
- the surface of the belt looks worn;
- chips and gouges are visible on the teeth;
- the surface is covered with cracks;
- the ends are torn and individual threads are visible;
- the structure began to delaminate;
- the surface is covered with oil stains.
Do-it-yourself timing belt replacement
1. First of all, take a jack, use it to lift the car and remove the right wheel. After this, the car needs to be placed on a support, which should be prepared in advance. 2. For our safety, the car must be de-energized. To do this, be sure to disconnect the left terminal from the battery. 3. We remove the air filter housing and other equipment that may interfere with our work. 4. Unscrew the bolts securing the expansion barrel. It is not necessary to completely remove the barrel itself, just move it to the side.
5. After this, we have to dismantle the drive of the attachment. 6. Now you can remove the top cover of the casing covering the timing mechanism. 7. Now we remove the right support. To do this you will have to raise the engine a little. 8. Remove the crankshaft pulley. To do this, you need to fix the crankshaft so that it does not rotate and unscrew the fastening bolts. 9. Now you can remove the lower timing case cover. 10. Remove the valve cover. To do this you will have to unscrew 12 bolts. The cover should be removed with the gasket. Disconnect all wiring from the gas distribution mechanism. 11. Please note that the mark located on the crankshaft must be in a horizontal position.
12. Unscrew the plug near the fourth cylinder and screw a special bolt into the resulting hole. 13. We install all the shafts exactly according to the marks. We fix the camshafts. This can be done using a special plate, which... Pay special attention to the correct installation of the shafts according to the marks. 14. Loosen the tension roller. After this, remove the belt drive. 15. We also shoot videos. Be sure to inspect them for defects. If any are found, the rollers must also be replaced along with the belt. 16. We put on new videos. We check the marks again and tighten the new belt. 17. We combine the risks by turning the tension roller. Then tighten the fastening roller and bolt. 18. Remove the lock and turn the crankshaft to the right 2 turns. Let's check the marks again.
We carry out the rest of the assembly in reverse order. Be sure to check the vehicle's operation after completing the repair process. If unnatural noises are heard when the engine is turned on, the procedure will have to be repeated.
It is quite possible to replace the belt yourself. Be sure to check its condition from time to time. This will help prevent the belt from breaking.
Replacing the Chery Tiggo timing belt
The timing belt is an important part of the car that drives the camshafts and ensures the movement of the car. Replacing the timing belt in a car is carried out as planned. This is done in order to eliminate the possibility of its breakage, which, as is known, entails dire consequences in the form of bent valves and engine jamming.
The Chery Tiggo car manufacturer recommends changing the drive belt every 40 thousand mileage. Next, we will look at how you can change the timing belt on a car with an Acteco 1.8 engine yourself, without resorting to the services of a car service.
What will you need?
Before you begin any repairs, make sure you have the following tools, parts, and equipment available:
Well, of course, you need to buy a new belt. During the process, you may find that the timing rollers also need replacing, but this is not necessary. It happens that the rollers in the car make absolutely no noise and work perfectly, but only the belt is worn out.
Preparatory stage
Before starting the replacement, you need to raise the car slightly using a jack. It is necessary to remove the front wheel on the passenger side as well as the expansion tank, after first removing the tube from it and freeing it from the mount. Don't forget to put the car on the handbrake and engage fifth gear before climbing.
Replacing the timing belt
In order to change the belt, you need to get to it. To do this, we remove the engine mount, disconnecting it by unscrewing 4 bolts and 2 nuts that secure the mount. After this, remove the plastic engine protection as well as the fender liner on the desired side. Now we need a key for 16. This is used to remove the video. The belt tensioner mechanism also needs to be removed. Underneath we find the bolt that holds the plastic timing case and unscrew it, removing the protection.
Next will be the removal of the crankshaft. The crankshaft pulley needs to be removed, as well as the idler pulley, but it is better not to unscrew the central bolt that is located on it. We also remove the lower and upper casings by unscrewing the three bolts that hold them in place.
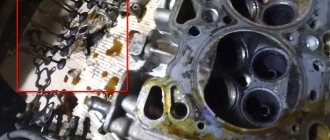
Disconnect the high voltage wires and the knock sensor, unscrew the spark plugs. The crankcase exhaust hose will interfere with removing the valve cover; it must also be disconnected from the engine. Having freed the valve cover, remove it too.
It is necessary to place marks on the camshafts, which must coincide when the shafts rotate. The teeth on the pulleys should move until the small marks match.
There is an alternative way to adjust the crankshaft position. To do this, you need to use four metal rods that are installed in the spark plug wells. With the correct position of the motor shaft, these rods will become strictly straight.
Now we need a plate that fixes the camshafts in a horizontal position.
After the shafts are securely fixed, loosen the tension roller. Using a hex wrench, slowly unscrew the bolt securing the roller to the bracket. We turn its inner part until the timing belt becomes loose. And only now can it be removed from the car.
You need to put on the new belt very carefully, carefully ensuring that the crankshaft is in the same position. In order to properly tension the belt and avoid sagging, you need to adjust the degree of tension by rotating the inside of the tension roller. We turn the roller until the arrow and the slots coincide. After this we fix the video.
We check the correct installation of the gas distribution mechanism as follows: the marks on the camshaft pulleys must coincide with the crankshaft. The bolts on the upper shaft pulleys need to be loosened. To prevent the fixing plate from bending, it is better to hold the crankshaft with a wrench. We unscrew the plug that is located in the front part of the engine and slowly turn the crankshaft using a key.
Now we need a pin. Use it to lock the lower shaft. When positioned correctly, the pin will rest, and only its tip will peek out. The shaft will thus stop.
We check the position of the pistons and draw a new mark. Everything must be reassembled in reverse order.
Did you like the article? Add to your page so you don’t forget:
Functions of the timing belt
The main function of the timing belt is to synchronize the operation of the engine shafts, which are involved in the operation of the gas distribution system: crankshaft and distribution. It transmits torque from the crankshaft to the camshafts. Thus, fuel and air enter the cylinders and exhaust gases are removed. The belt drive ensures that the valves and pistons move in sync so they don't bump into each other.
If the valve belt breaks, the valves hit the pistons and bend, leading to expensive repairs.
Timing belt drive
In addition, the timing belt is a drive belt for the water pump, which places additional stress on it. The operating efficiency of the timing belt and auxiliary equipment depends on the condition of the belt drive.
The need to replace the timing belt can be determined by the following signs:
- engine malfunction;
- increased fuel consumption;
- drop in vehicle power;
- engine overheating.
The efficiency of the gas distribution mechanism and auxiliary equipment depends on the condition of the belt drive. To avoid belt breakage and engine overhaul, it must be changed according to the regulations after 50 thousand kilometers.
In addition, it is necessary to regularly visually inspect the components of the gas distribution mechanism and change them if defects are detected.
The strap must be replaced if the following defects are detected:
- wear of both internal and external surfaces;
- defects, tearing of teeth;
- cracks on the outer surface;
- frayed ends;
- peeling of material from the base;
- traces of oil on surfaces.
The service life of the belt depends on the quality of the product, the conditions in which the car is operated, and the driver’s driving style.
How to change the timing belt?
To make the procedure more convenient, place the car on a lifting device or inspection groove.
Set of tools
To carry out replacement work, you need to stock up on the following tools:
- a set of spanners;
- a set of heads;
- torque wrench,
- screwdriver;
- jack;
- engine support.
It is advisable to buy original consumables, otherwise there is a possibility of purchasing a fake. Low-quality materials last less and can lead to various troubles along the way.
Repair kit for Cherie Fora
The process of replacing the timing belt on a Cherie Fora car consists of the following steps:
- First, lift the car using a jack, remove the front right wheel and place the car on the prepared support.
- Next, we de-energize the car by disconnecting the negative terminal from the battery.
- Then we remove the equipment that will interfere. You need to loosen the clamps and remove the air filter housing.
- After unscrewing the mounting bolts, you need to move the expansion tank to the side.
Loosen the air duct clamps
- We dismantle the belt drive of the attachment.
- Remove the upper timing belt cover.
- Raise the engine and remove the right mount.
- Having secured the crankshaft from turning, you need to unscrew the fastening bolts and remove the pulley.
- Then unscrew the fastening bolts and remove the lower protective timing cover.
- Disconnect all wires and hoses from the timing system. After unscrewing the 12 mounting bolts, remove the valve cover along with the gasket.
- Set the mark on the crankshaft to a horizontal position at 15:00.
Place a mark on the crankshaft - Near the fourth cylinder you need to unscrew the bolt that acts as a plug and screw in a special bolt.
- Next, you need to correctly align the crankshaft and camshafts according to the installation marks, then install a locking plate in the slots on the shafts to fix the camshafts.
- Now you need to loosen the bolts on the gears and the tension roller bolt, and then remove the strap.
- Then you need to remove all the rollers and check them for defects. Replace if necessary.
- After installing the rollers on the seats, check the alignment marks and tighten the new timing belt. You need to start with the crankshaft, then put it behind the idler rollers and put it on the camshaft gears.
- While turning the tension roller, you need to align the marks and then tighten the tensioner mounting bolt.
- Next, remove the plate, special bolt and turn the crankshaft two turns in a clockwise direction. Now you need to check the alignment marks again.
Aligning the marks on the shafts
If everything is in order, you can perform reassembly.
Replacing the timing belt of Chery Tiggo, step-by-step instructions
In order to correctly carry out the work of replacing the timing belt on a Chery Tiggo, you need to know what engine model is installed on it.
In short, depending on the year of manufacture and modification, the car is equipped with engines ranging from 1.5 to 2.4 liters. But this information is not enough to understand the essence of the issue.
Therefore, below we will consider not only the procedure for performing work on replacing the timing belt, but we will separately dwell on the models of power units that were equipped with the model we are considering.
About the car
The first mention of this car appeared in 2005 after the Shanghai Auto Show. It was given the index A21, and in 2006 the car went into production as Chery A5. For consumers in Russia it is known as Fora. This model is assembled in Kaliningrad, again using the Seat Toledo as a basis. The car received its original appearance, which looks organically on the road with other cars representing global automotive trends.
The power unit is a motor that the Austrian company AVL helped develop. It has four cylinders, 16 valves, variable valve timing. Gasoline with an octane number of at least 92 is used as fuel. The engine displacement is 2 thousand cm 3 with a power of 130 hp. Today, cars with a slightly reduced displacement to 1600 cm 3 have appeared on the roads. Power also dropped to 109 hp. The engine valve mechanism drove the timing belt.
Are the valves bending?
The timing mechanism drive and hydraulic valve lifters require special attention and maintenance. Neglecting this leads to significant damage to the power unit of this car. When a toothed belt breaks in the timing mechanism drive, the pistons meet the valves. Not only valves are damaged, but also pistons and connecting rods. Repairing the engine after such damage will require large financial investments. To avoid this, it is necessary to monitor the condition of this mechanism during each vehicle maintenance.
This operation can be carried out by any car owner. The vehicle manufacturer recommends replacing the belt at a mileage of no more than 60 thousand km. This figure may be different depending on the operating conditions of the machine, the quality of consumables used, and maintenance. There are known cases when the drive belt broke after a mileage of only about 20 thousand km, and this entailed additional costs for major engine repairs.
Engines on Chery Tiggo: all versions
Over the years of production, the manufacturer Chery Tiggo managed to change several types of engines. Let's briefly look at their features.
1.5 liter ACTECO
SQRE4T15 (with a turbocharger) and its version SQRE4T15B are a gasoline power unit. Starting from 2021, it was installed on the first generation Chery Tiggo 7.
Fuel type: gasoline. Volume - 1.5 l. Power - 152 hp. With. with a maximum torque of 210 N*m.
It has two camshafts, 16 valves, and a timing chain belt.
1.6-liter
1.6 liter engines are presented in the following types:
1.8 liter
In the 1.8 liter category, Cherry Tiggo is represented by the SQR481FC engine. This is an injection engine with a power of 132 “horses” at 5750 rpm. The highest torque is 170 N*m at 4500 rpm. Fuel - gasoline.
Installed on Tiggo T11 (restyling) from 08.2013 to 11.2016.
2.0 liter
The most popular are the 2-liter Chery Tiggo engines.
They are presented in the following options:
2.4 liter
This category features the 4G64S4M engine with a power of 95 kW or 165 “horses” at maximum torque. This is a 16 valve four-cylinder engine manufactured under license from Mitsubishi Motors Co.
Installed on the first generation Tiggo T11 from 10.2005 to 07.2013.
Replacement procedure
Carrying out such an operation does not require high qualifications from the driver, the presence of special equipment or tools. In addition to purchasing new spare parts, the driver should prepare:
- A set of wrenches, open-end wrenches, and spanners.
- Screwdrivers with slotted, cross-shaped blade.
- Car jack.
- Body stand.
- Anti-recoil shoes.
- Support for the power unit.
- Crankshaft and camshaft stoppers.
And it is also advisable to have a torque wrench to correctly tighten the bolts when assembling the engine, a support for installing the motor on it when replacing the belt. Replacing the timing belt of a Cherie Fora can be done something like this:
- The next step is to unscrew the bolts of the power unit cushion on the right side in the direction of travel of the car. The engine is jacked up through the gasket, three bolts are turned out with a 15mm head, and they are removed from the spar.
- Next, use a 22mm spanner to hold the crankshaft pulley from possible rotation, unscrew the 6 bolts securing it, and remove the pulley.
- Now you can dismantle the lower protective cover of the timing mechanism; just unscrew the six bolts with a 10mm wrench.
- The valve mechanism cover must be removed; before doing this, disconnect the connector from the camshaft sensor.
- To replace a worn belt, you need to set the alignment marks.
- You can remove the timing belt by loosening its tension. Unscrew the bolts securing the tension and idler rollers and remove them from the cylinder block.
The timing drive mechanism is assembled in the reverse order. Before this, the installation marks are checked, and a thread locking agent is first applied to the roller mounting bolts.
Alignment marks
Correctly setting the installation marks means ensuring efficient operation of the power unit, this is done in this way:
- On the crankshaft pulley, the threaded hole has a slot that should be installed so that it points towards 15 o'clock. To do this, turn the crankshaft with a key.
- Using a 22 key, unscrew the plug, which is located in the area of cylinder 4. In its place, screw the crankshaft stopper, turn the crankshaft until it stops against the stopper.
- The camshafts have cutouts, they should be directed horizontally. If they are in this position, they are secured with a locking bar.
If the belt has been broken, the camshafts are set to the desired position by turning the key to 32, after which they must be fixed.
Scratching my head, we proceed to the replacement.
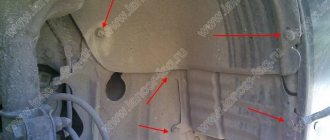
Remove the expansion tank. We drain the antifreeze if we change the pump. We remove the protection from below, if there is one, and give the engine a little boost. We also remove the front right wheel and the plastic mudguard. We unscrew the engine mount, four bolts and two nuts and dismantle it.
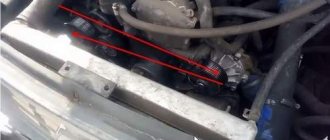
As usual, all sorts of pipes get in the way, so some bolts are not visible in the photo. But you will find them without problems. Without a cushion the engine looks like this.
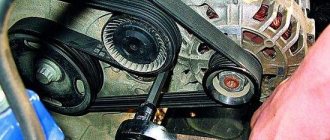
Using a sixteen key, turn the automatic belt tensioner until it loosens and remove the attachment belt. The spring there is serious, so you have to work hard. In the photo the belt has already been removed.
1 – bolt attaching the tension roller to the automatic tensioner.
2 – bolt for fastening the automatic tensioner.
We remove the tensioner; it prevents you from unscrewing one of the bolts of the protective casing. It is not necessary to unscrew the upper bypass roller if there is no play.
We unscrew the six small bolts of the crankshaft pulley and one large lower idler roller and remove them.
We turn the crankshaft so that the mark is approximately parallel to the floor and looks towards the front bumper. And we put our mark on the casing. It will be needed for subsequent verification.
Reviews about self-replacement
Victor from Novosibirsk.
I changed the timing belt myself after a mileage of 50 thousand km. I didn’t experience any particular difficulties, since I performed a similar operation several times on other engines. To make it easier to set the installation marks for subsequent belt replacements, marks were placed on the camshaft pulleys.
Nikolay from Tver.
I bought a used car, so I decided to replace all consumables and engine lubricants. I purchased spare parts from trusted suppliers and changed the timing belt in the garage. The work took about three hours, most of the effort was spent on installing marks in the timing drive. After that I drove 15 thousand km. There are no problems with the engine.
Changing the timing belt and rollers on Chery Elara A21 (Fora, Vortex)
The main purpose of the timing belt in the design of Chery Elara A21 is to transmit rotation from the crankshaft to the camshaft . In the design of other cars, it can also transmit rotation to other units, for example, a generator .
If we consider the situation in more detail, the timing belt is responsible for the synchronous opening and closing of the valves depending on the current position of the cylinders .
The belt itself is fixed on pulleys removed from the crankshaft and camshaft. of rollers can be provided , which ensure free rotation of the belt and maintain its tension level.
The timing belt has internal teeth. Their number depends on the car model. It is usually made of high-strength rubber on a cord base. Today, other material options are gradually appearing, but their distribution is still insignificant.
The presence of teeth on the Chery Elara A21 timing belt allows it not to fall off when performing its function, and also to reliably transmit rotation between the shafts.
There are several factors that indicate the need to replace a damaged part:
- The appearance of delamination.
- Formation of cracks on the surface.
- The appearance of an uncharacteristic sound.
It is important to replace a faulty belt in a timely manner. The rate of its wear depends on the loads and the quality of the material.
The service life is reduced if it comes into contact with dust, dirt, moisture, or technical liquids.
Typically, the timing belt of the Chery Elara A21 is replaced once every 45-50 thousand kilometers.
However, if there is damage to it, it should be replaced as soon as possible.